What's New on PropFlo
Date: 16 Feb 2024
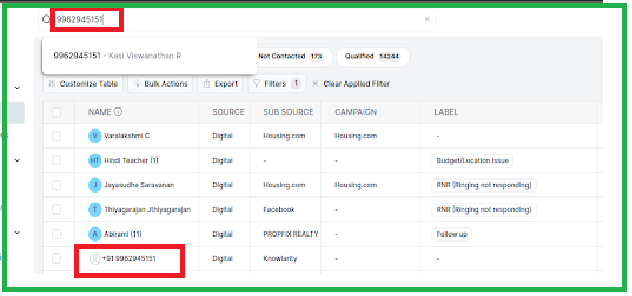
Seamless calling integration with Knowlarity!
⚡Say goodbye to the hassle of manual dialing! With Knowlarity integration, you can now make calls to your customers seamlessly, saving you time and effort.
📈 Boosted Productivity: Increase your team's productivity and efficiency by simplifying the calling process. Spend less time dialing numbers and more time engaging with your customers.
Get ready to elevate your customer communication to new heights with Knowlarity integration! Try it out today and experience the difference firsthand.

Click on the link below to know more about integration of Knowlarity with Propflo:
https://help.propflo.ai/books/integrations-knowlarity/page/knowlarity-integration-calling
Happy calling! 📞✨
Date: 15 Feb 2024
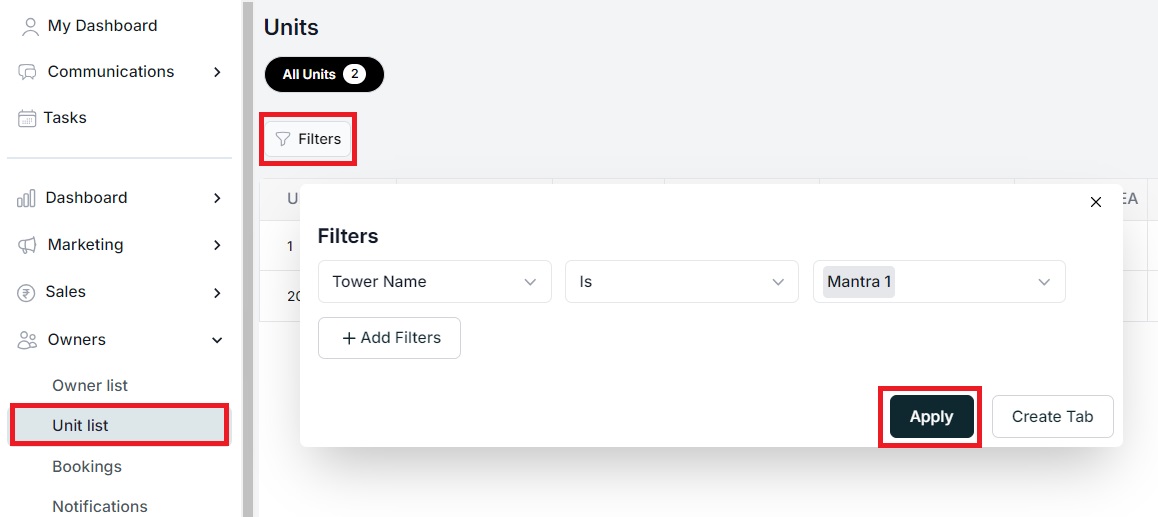
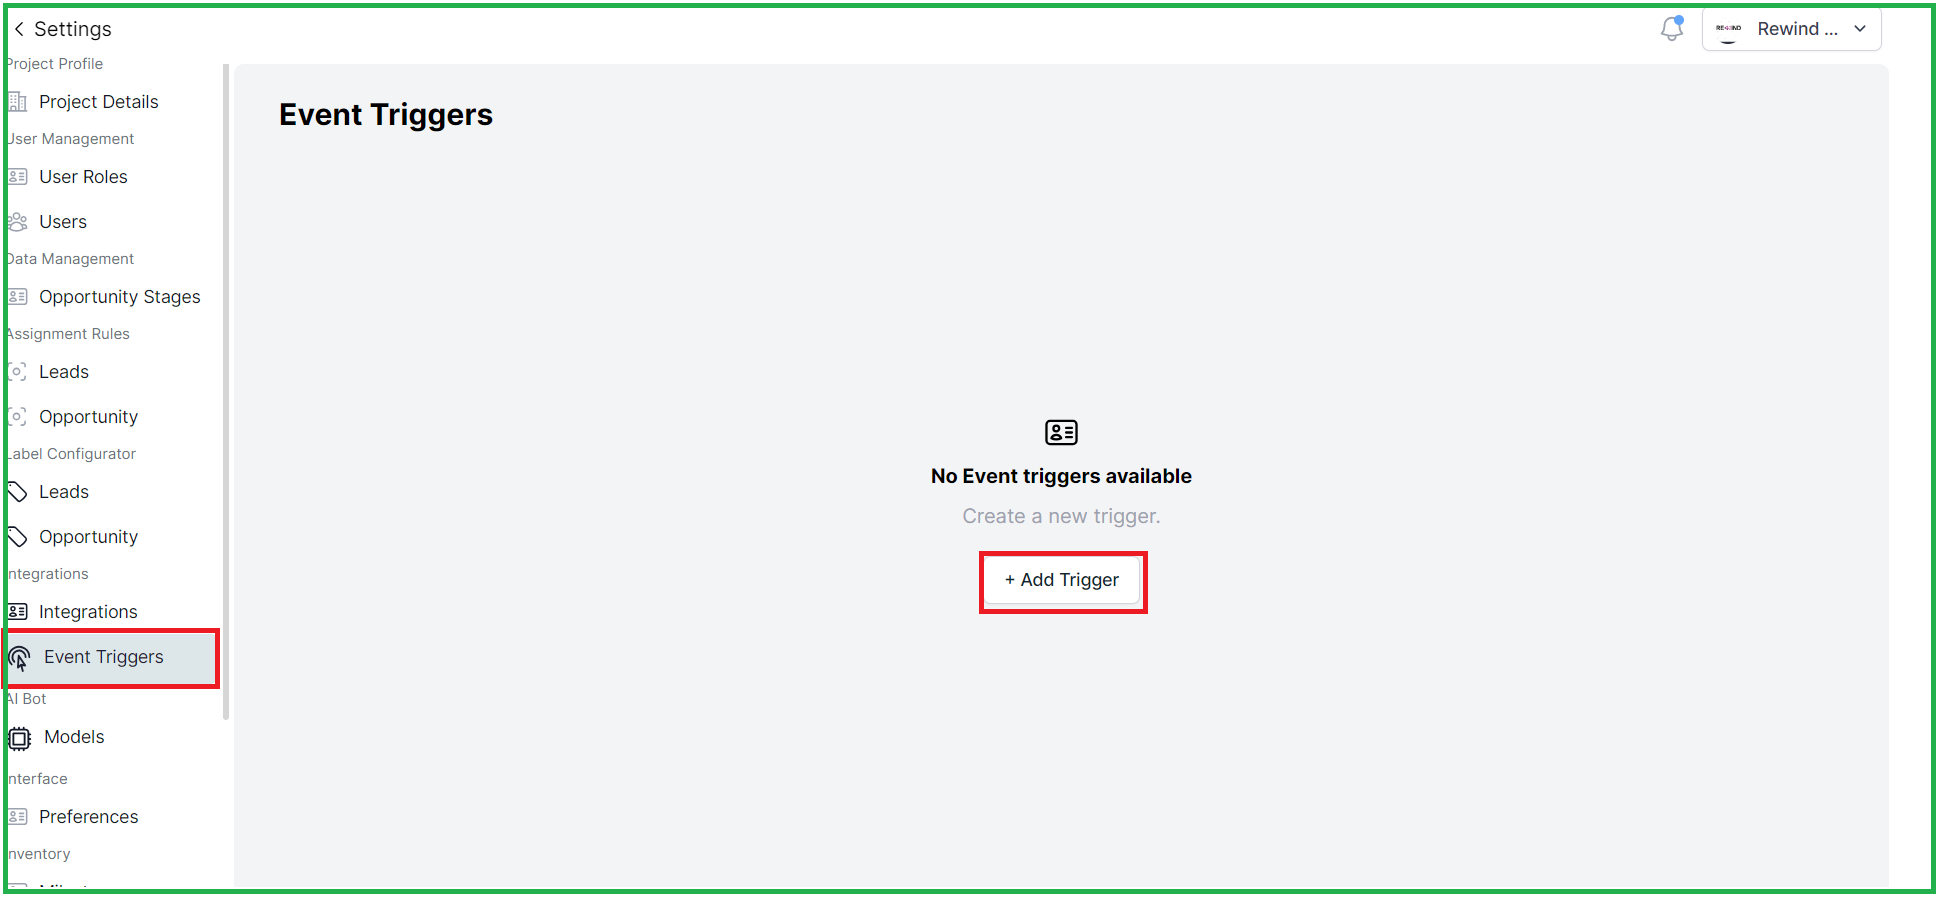
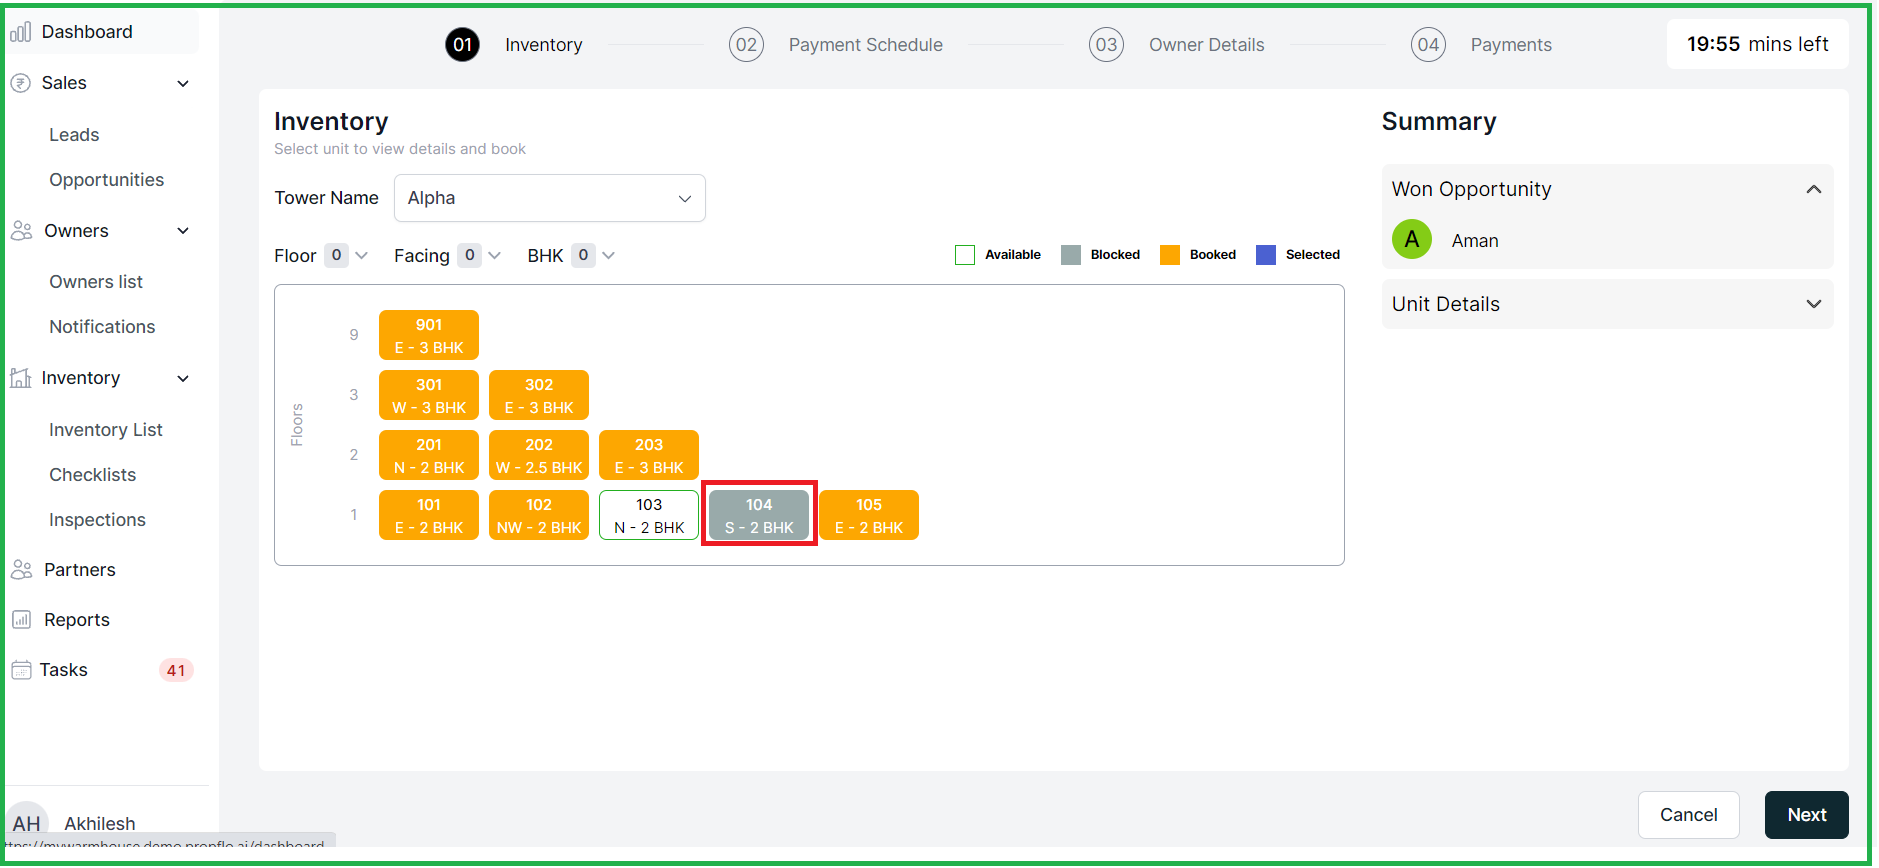
1. Introducing Filters in the Units Section:
Now, finding the perfect unit is easier than ever with our brand-new filter option in the Units section. Quickly refine your search based on your specific preferences and discover the ideal unit that meets your needs effortlessly.
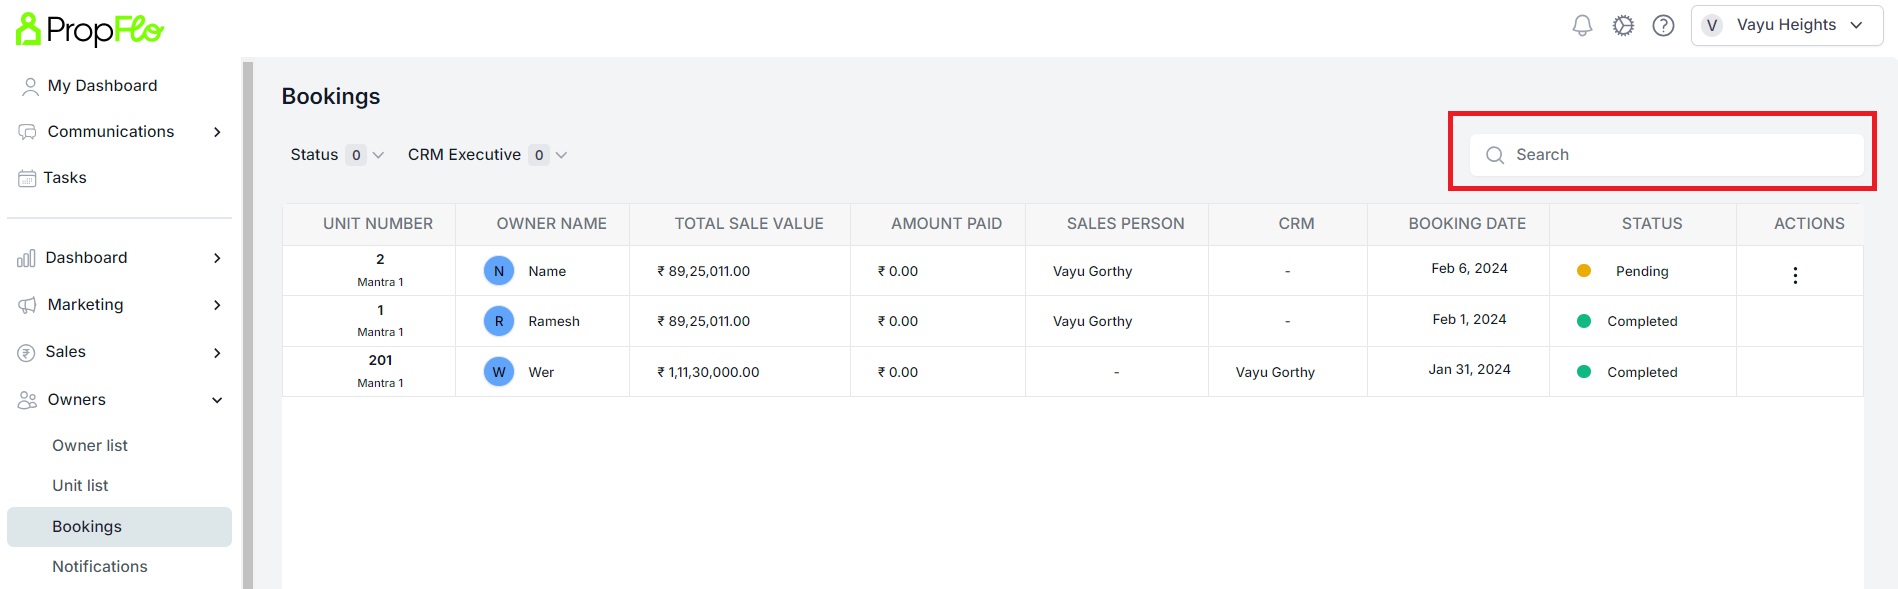
2. Enhanced Search Functionality in the Bookings Tab:
Searching for bookings just got a whole lot simpler! With our new search bar in the Bookings tab, locating bookings is quite simple. Whether you're looking for a specific date, or booking details, our powerful search functionality ensures you find what you need in no time.
Date: 13th JAN
Aboard App Enhancements & Bug Fixes
1. App freezing issue when the user clicks on the back button has been fixed.
2. Issue in cross icon button in conformation popup, this has been resolved
3. Country code which is missing for secondary owner mobile number has been added.
4. Done few changes to payment cards font size and alignments.
5. Maintained consistent font across all the screens.
6. Removed the excess space between total investment progress bar and action tab.
7. Inserted the back & close button into the PDF of the demand note and the payment receipt.
8. The problem in the properties tab, which was not functioning properly when transitioning from notifications to property details, has now been resolved
CRM module & Sales module
1. Validation for joint purchasers has been eliminated in the booking process. Both primary owner and secondary owner details, including email and mobile information, can now be identical.
2. Event triggers are not project specific.
Date : 10th JAN
Enhancements & Bug fixes
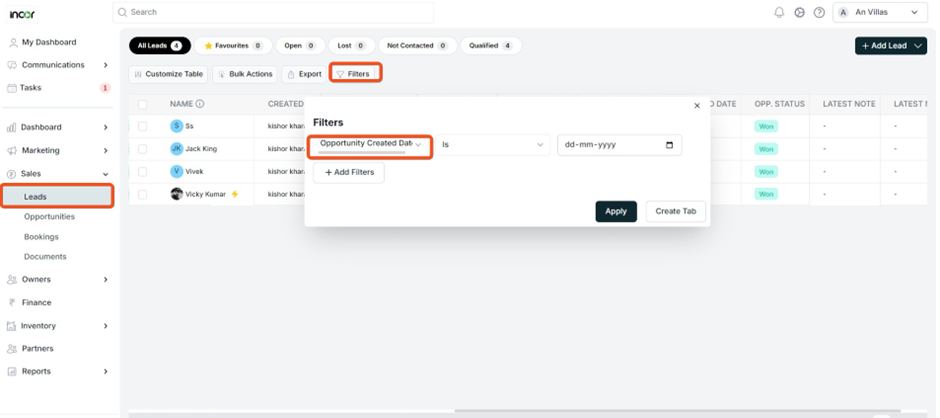
2. We can now organize leads by their opportunity creation date using filters
4. Lazy loading for activities and notifications has been resolved.
5. The email domain character limit is increased from 4 to 7.
6. Response message is updated in the Open API
Date : 6th & 8 th JAN
Hot Fixes
The cron jobs have undergone code optimization to address the previous issue of triggering weekly and daily reports at incorrect times.
Earlier, leads from various projects used to converge into a single project, but this has now been organized and sorted.
Date: 5th JAN
Enhancements, features and Bug fixes
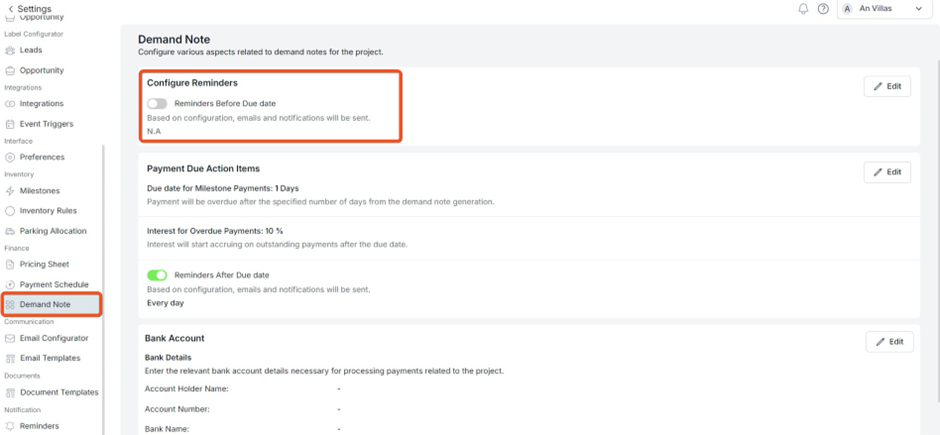
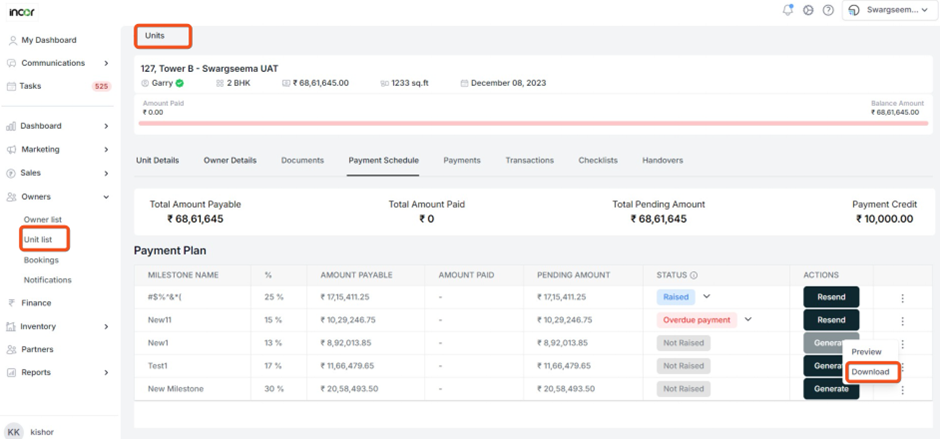
1. Interest calculation has been added to the demand notes
You can set the interest calculation for pending dues based on due dates and interest over due payments.
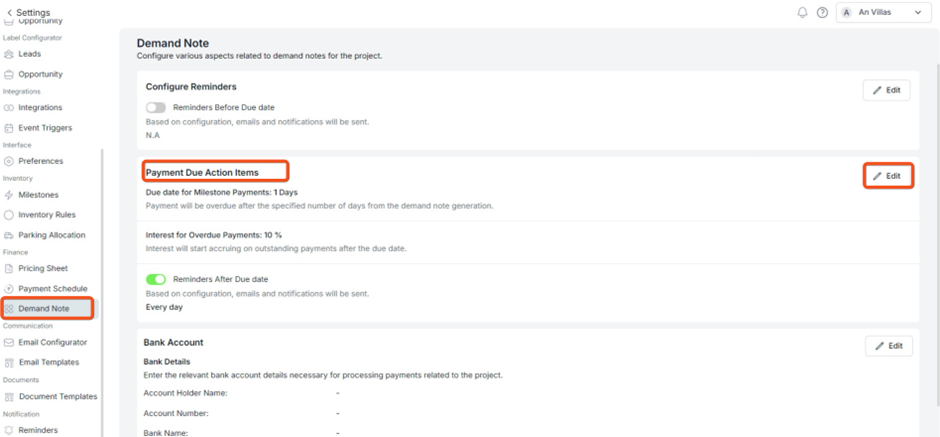
In the units à payment schedules you can able to see the interest for the over due payments.
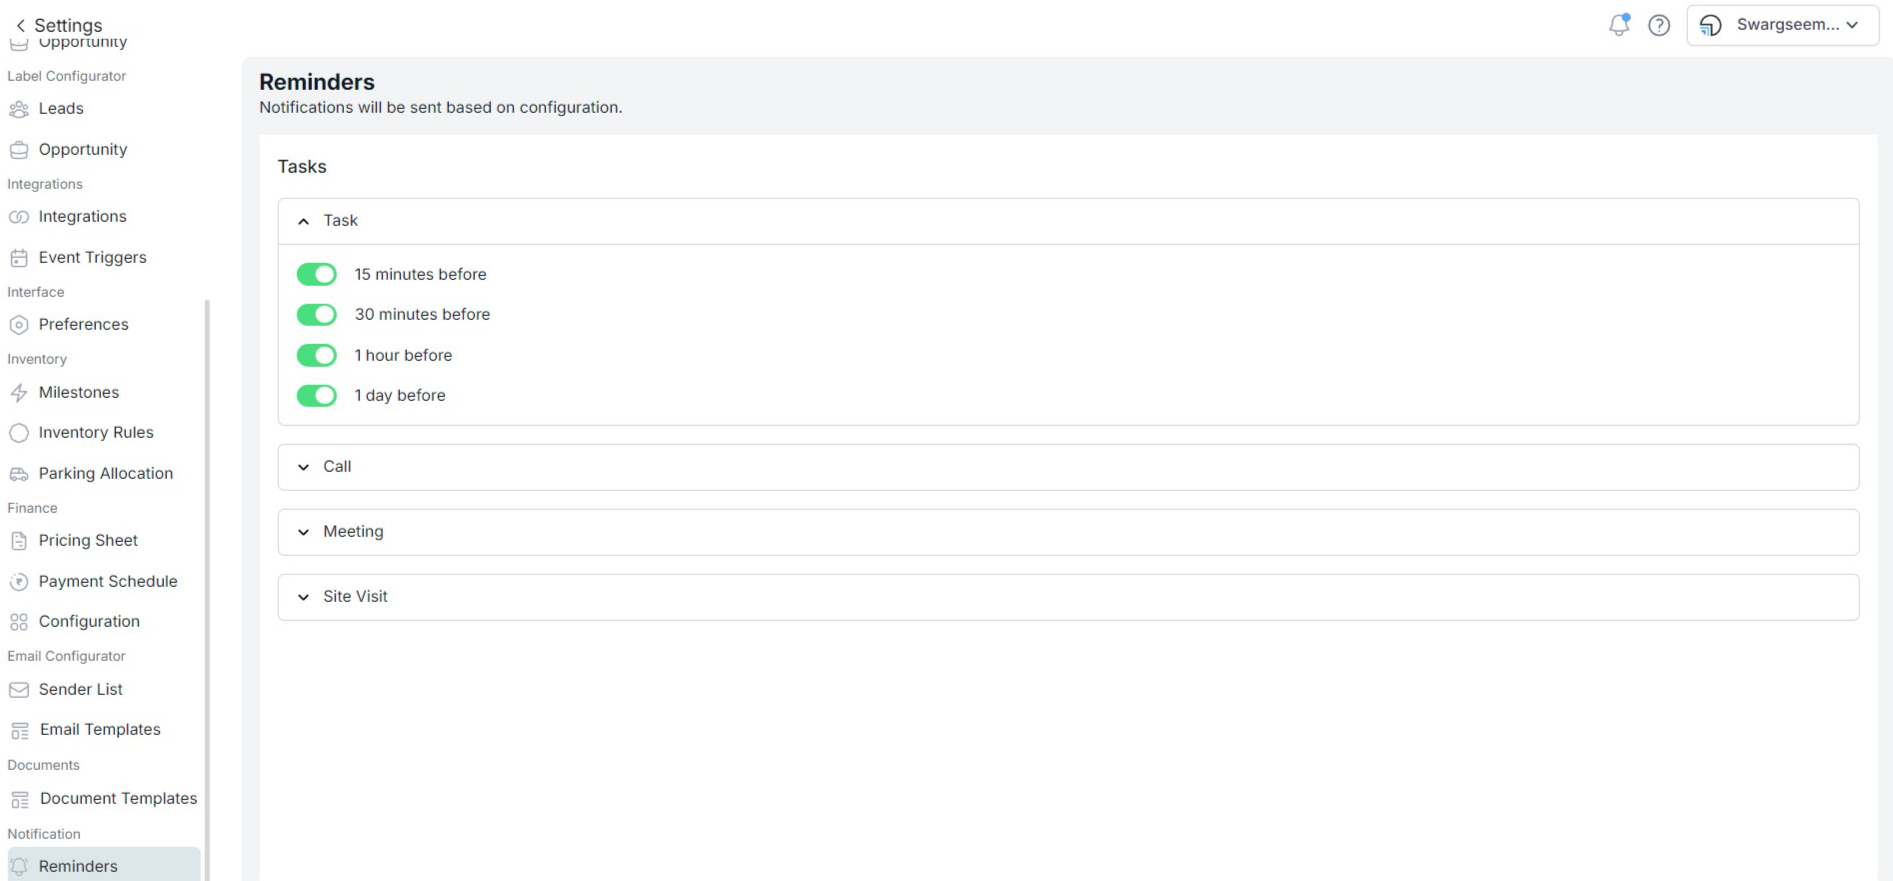
2. Payment Reminders is a new feature which is been added to the demand notes, here is the screenshot for reference.
CRM Customizations:
1. Demand note can be sent without the user details information as well in the units.
2. Providing users with the option to abstain from utilizing car parking facilities.
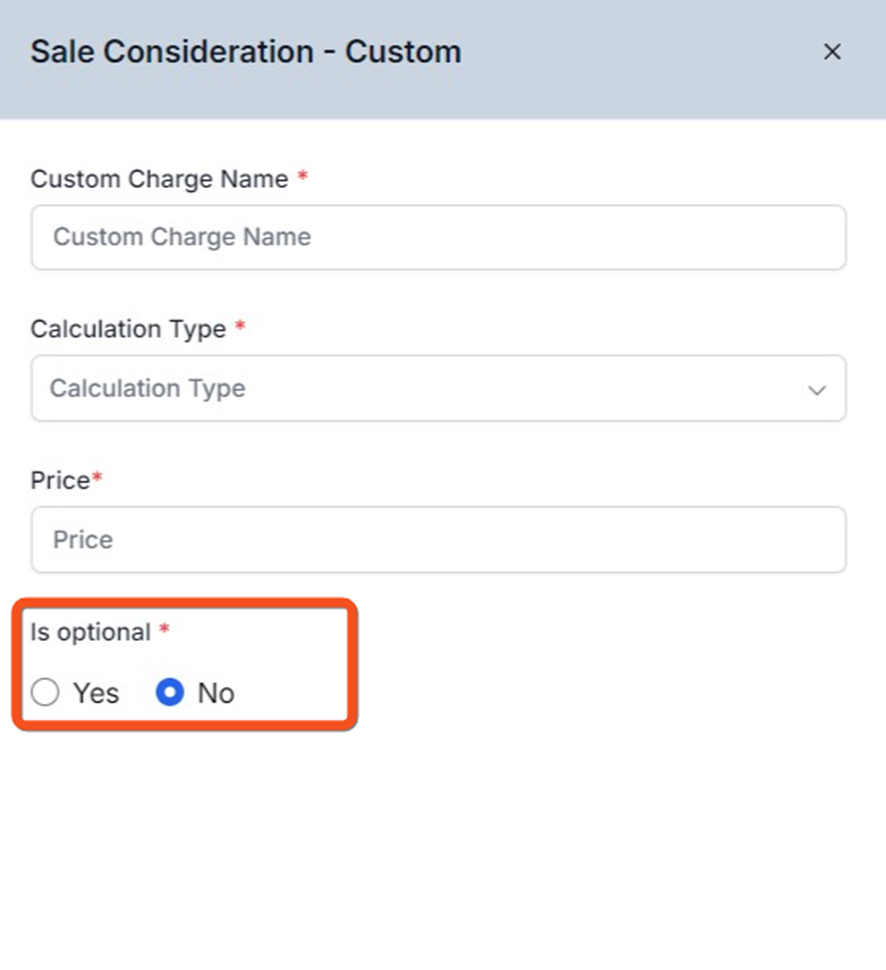
3. In a custom pricing sheet configuration, CRM users have the option to choose whether they want to opt-out of specific settings.
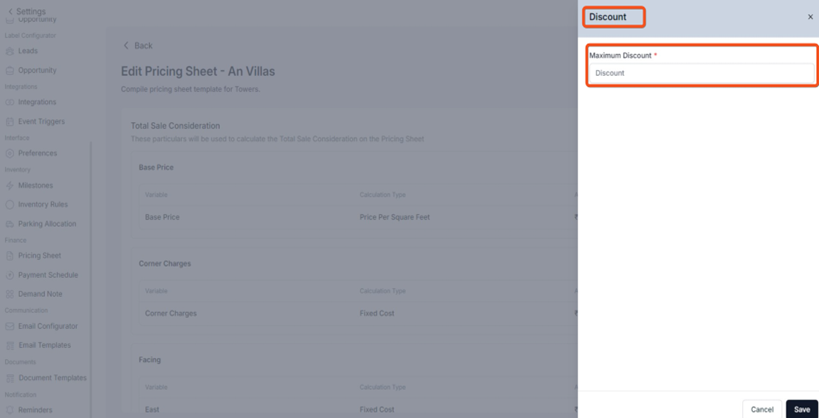
4. Discount: Restricting CRM users from giving more discounts than it configured in the settings
5. Displaying the combine mandatory field messages while booking the form or generating the cost sheet.
6. Cost sheet templates can be created based on the database configuration.
7. The problem of role changing from CRM to sales, despite exceeding the limit, has been resolved.
Open Issues
1. Remainder email is triggered when the status changed from partial to overdue.
2. The unit information appears blank when the property tab is accessed, and when cancelling a parking lot booking, the redirection leads to unit instead of the car parking details, displaying an empty result.
3. In customer portal, the document notification shows the document id instead of document name.
4. UI issue for overlapping the percentage field and milestone name is fixed.
Date: 26th & 27 thDEC
IOS & Android
1. Several performance issues and UI concerns have been addressed, with a particular focus on resolving UI issues in the AI content generator. Additionally, the problem of blank notifications pages has been successfully fixed.
2. Users have the ability to input information such as their name, phone number, and email. This data will be recorded and stored as a lead in the application.
3. Showing lead details upon navigating from a reminder notification was not supported previously, and there were also performance-related issues. Now, lead details will be displayed as part of the improved functionality.
Date: 20th DEC
Enhancements and Bug Fixes
Sales
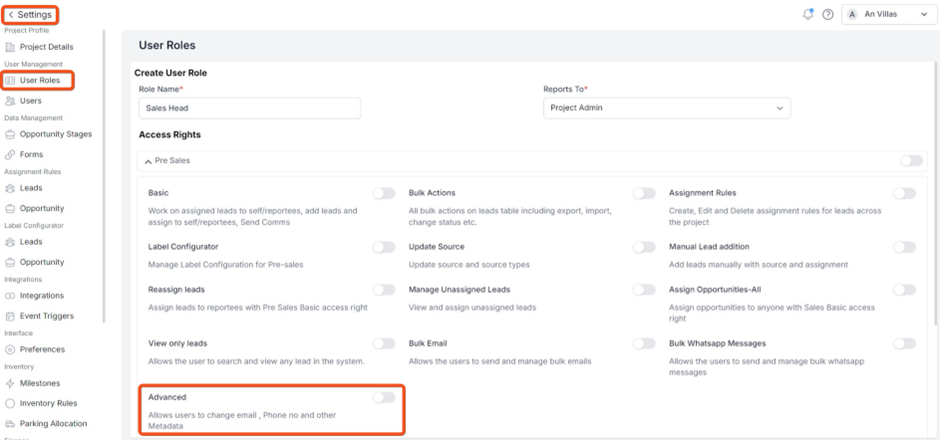
1. Modify the email and phone number of the lead in accordance with the granted access privileges.
To accomplish this, go to the settings, access User Roles, and choose the pre-sales mode. In this mode, you will find the advanced toggle button.
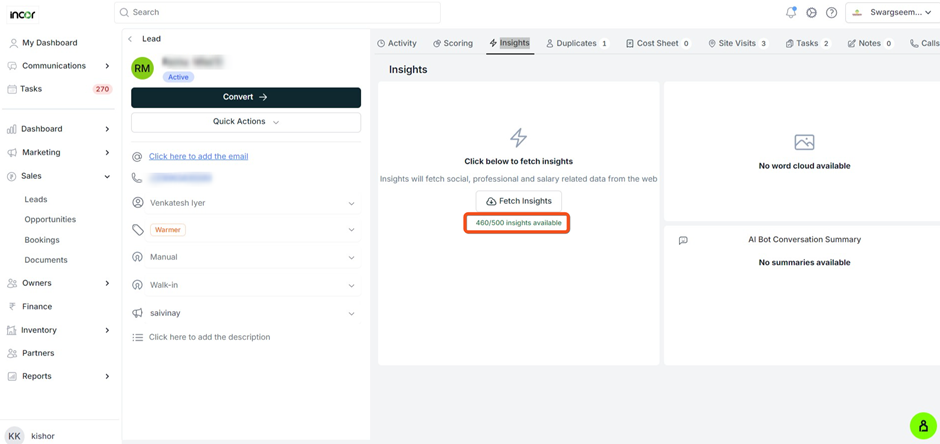
2. The entity-level insights threshold has been set to 500
3. The issue where the Kanban back button directed to the initial result rather than the chosen card has been resolved.
4. Notifications have now been configured for specific projects rather than for all projects.
5. Breaking the user interface occurs when viewing the leads list at the latest note, especially when the size is significant as been fixed.
6. The problem with the extended duration for exporting leads has been resolved.
7. The problem related to the exported Excel file through the "Export Leads" option has been
8. Enhance your lead creation experience with 'Open Forms.' When providing a description, ensure accuracy and clarity to streamline the process.
9. Limiting undesired API activations in communication.
10. The problem with redirections from a notification as been fixed.
11. Display problems with first and last names in bulk email triggers have been addressed and resolved.
12. The user interface (UI) and functional issues identified in the open-site-visit form have been successfully addressed and resolved.
CRM
1. Enable CRM users to reserve units marked as "management blocked."
2. Keeping user limit restriction only on Sales users and unlimited check on CRM user onboarding and updating user role.
Date: 13th DEC
Customer App – Enhancements
1) Demand notes and payment receipts can be viewed in the App- View.
2) Revised app to display accurate owner details.
Web Releases: CRM
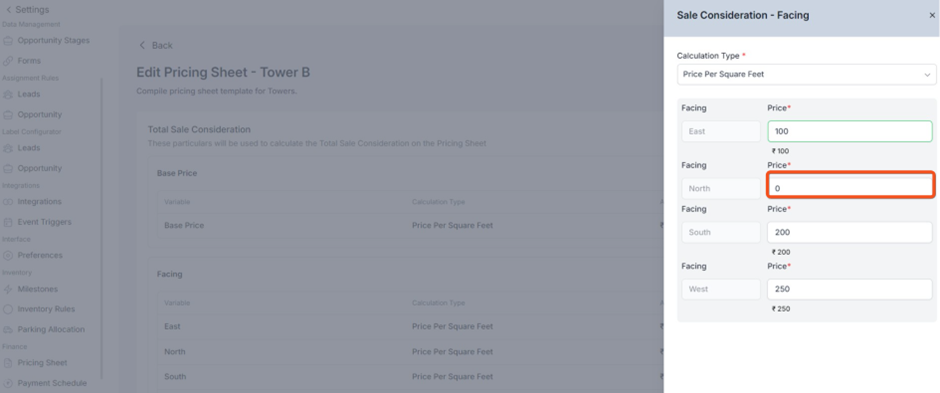
1.Pricing sheet now accommodates zero facing

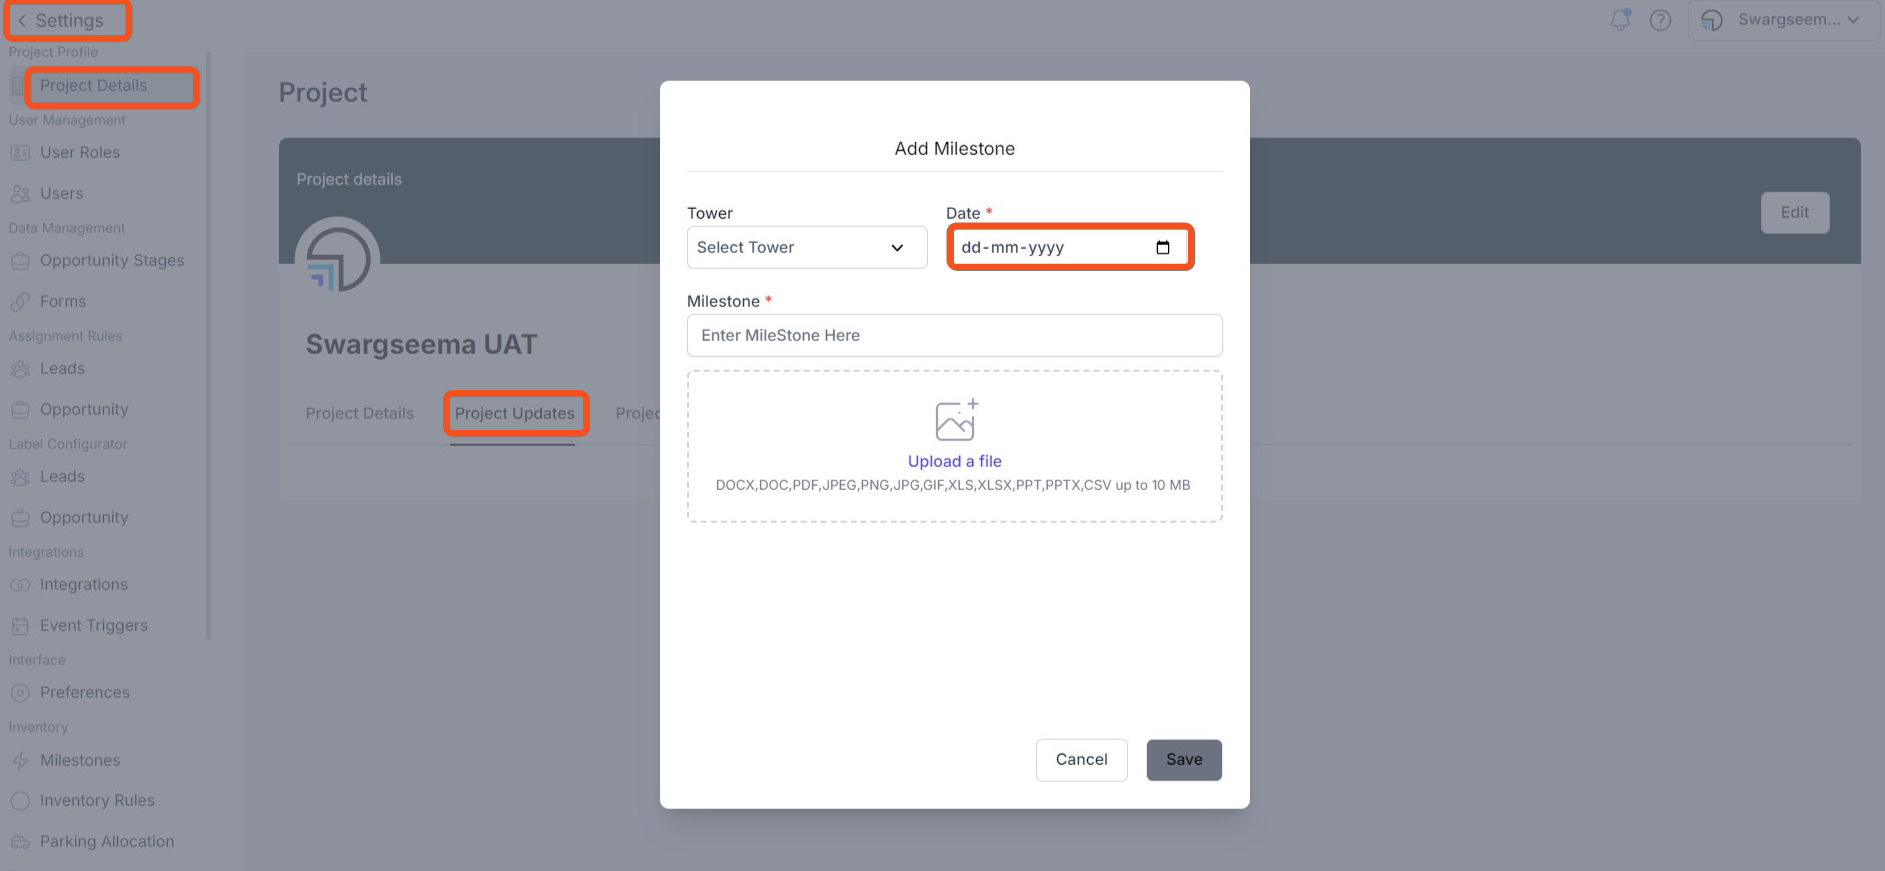
2. Introduced new feature, which has ability to seamlessly add milestone to the past dates.
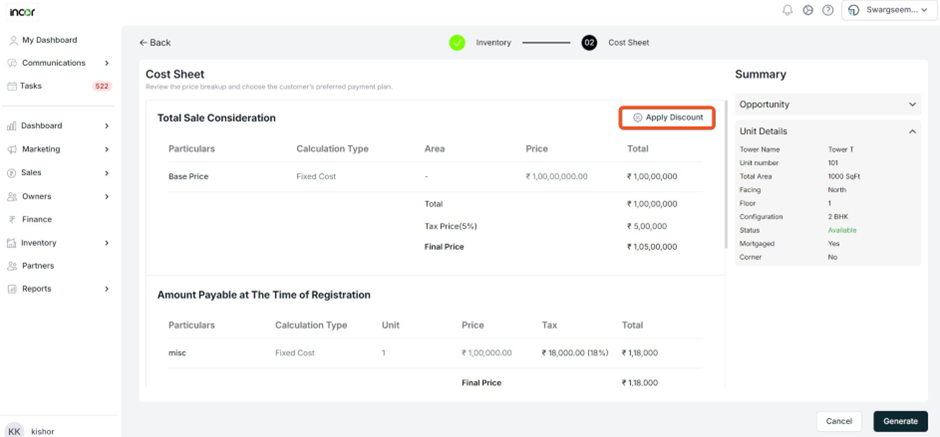
3. Option to set discount to the entire amount in the cost sheet.
4. Pricing sheet now accommodates zero values.

5. Distinguishing Between Corner and Non-corner Inventories (New 'Corner' Field Added in Inventories).
Date: 11th DEC
Enhancement & Bug Fixes
CRM: Providing the choice to bypass the creation of a user/owner account when completing the booking form.
Sales : Hot Fixes
The problem with exporting leads has been fixed.
Updated the toaster message for improved clarity during the export of leads and opportunities.
Date: 8th DEC
Hot Fix
Several performance-related issues, as well as the problem with inventory status and glue logic, have been resolved in the latest releases
Date: 6th DEC
Enhancements and Bug Fixes
Sales:
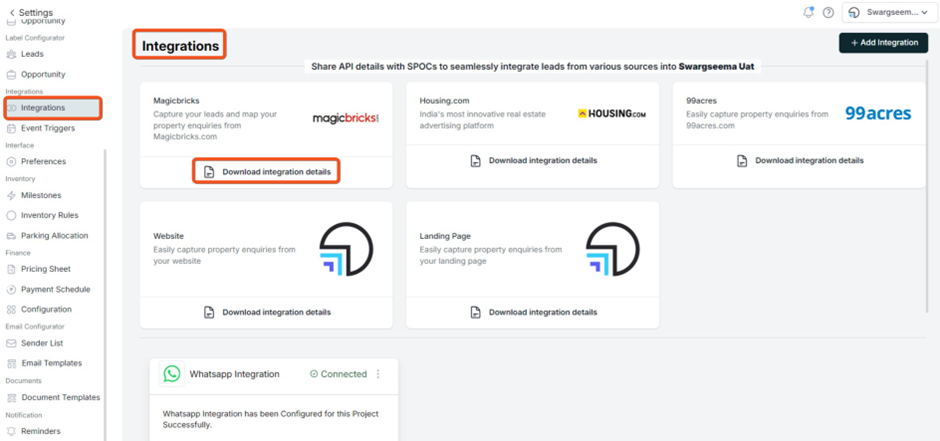
1. Integration documents are now conveniently housed within the integrations section in the settings. To access them, simply navigate to settings and click on integrations to explore the comprehensive list of integrations along with their associated supporting documents.
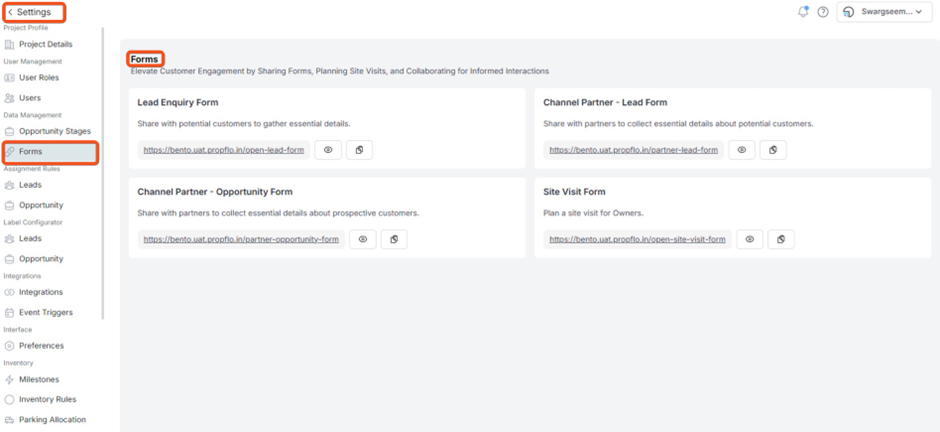
2. Few marketing forms has been added to the data management.
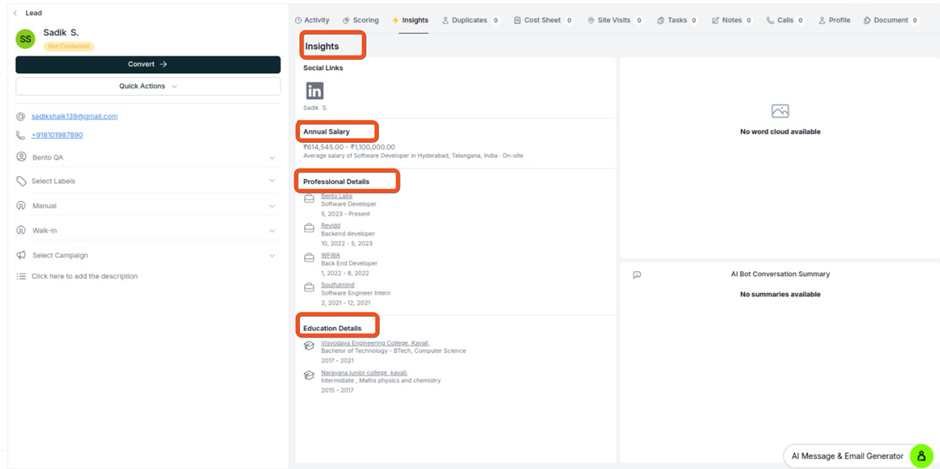
3. Insights have been integrated into the production system, enabling the retrieval of professional, social, and salary-related data from the web.
CRM:
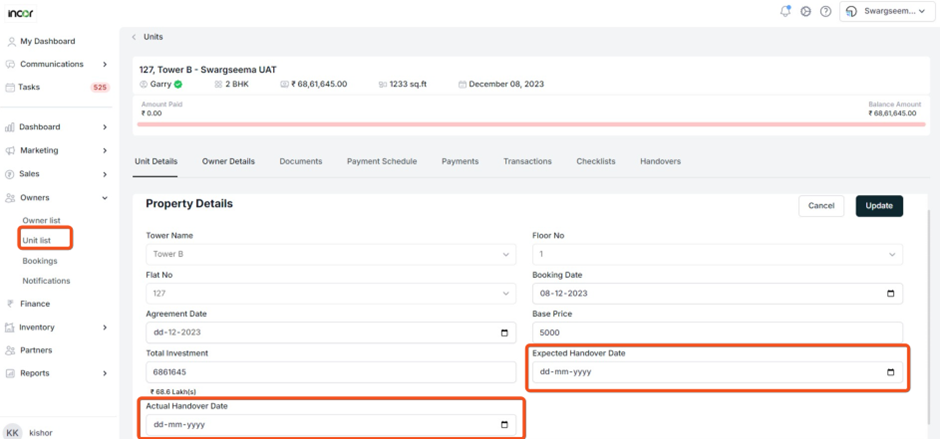
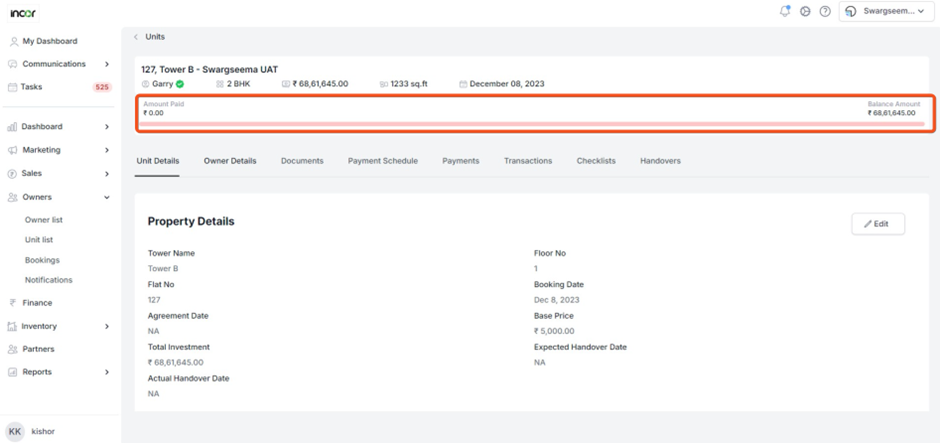
1. Users now have the capability to adjust both the actual and expected handover dates.
2. Payment statements are now accessible for download through both the units and customer portals.
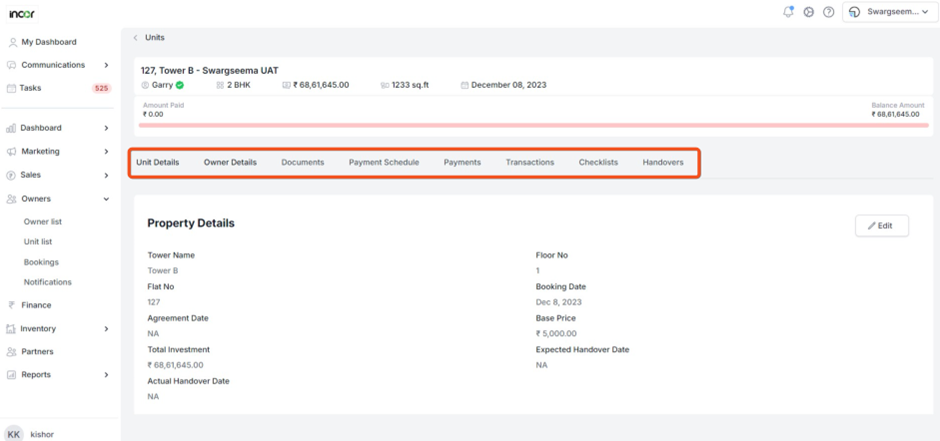
3. The unit details now include a newly added progress bar for the payment schedule.
4. Tabs in the unit details has been re-aligned.
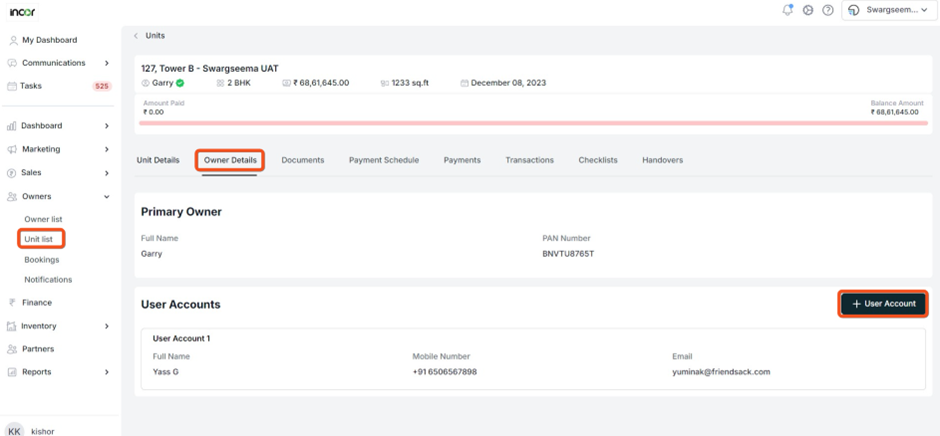
5. A new "Add User" button has been incorporated into the Owner Details tab.
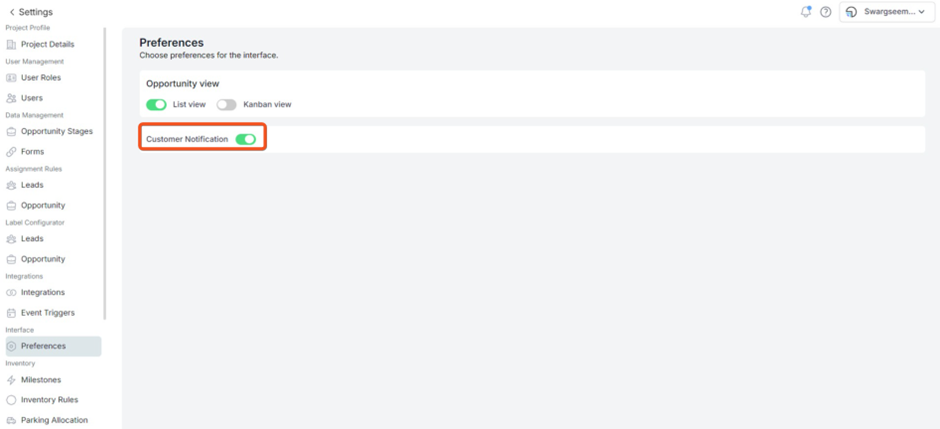
6. A new “customer notification” toggle has been added in the preferences.
7. Updated HTML templates for demand note and Receipts.
8. Statement of the account can be generated from the customer portal as well.
Date: 28th Nov
Web Application – Sales
Enhancements
Users have the option to select predefined time intervals, such as 15 minutes, 30 minutes, 1 hour, and 1 day before. Furthermore, users can customize their reminders by specifying multiple reminder times and choosing from various options.
Several performance-related updates have been implemented.
Web Application – CRM
Enhancements
1. Few changes and updates are made on the dashboard.
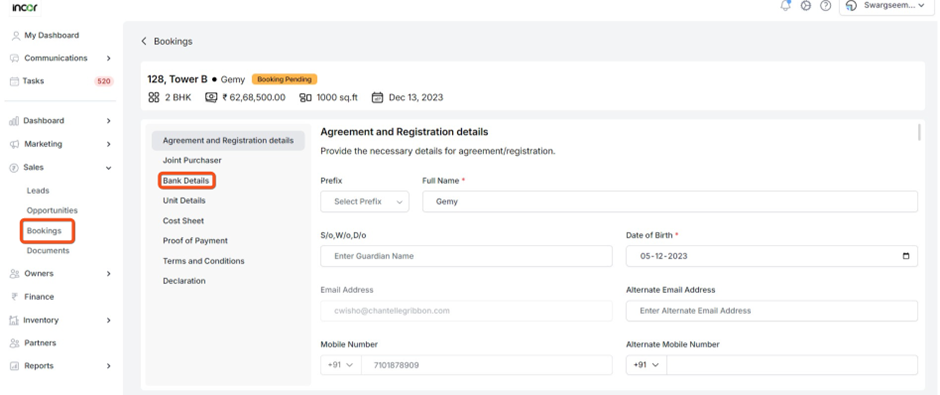
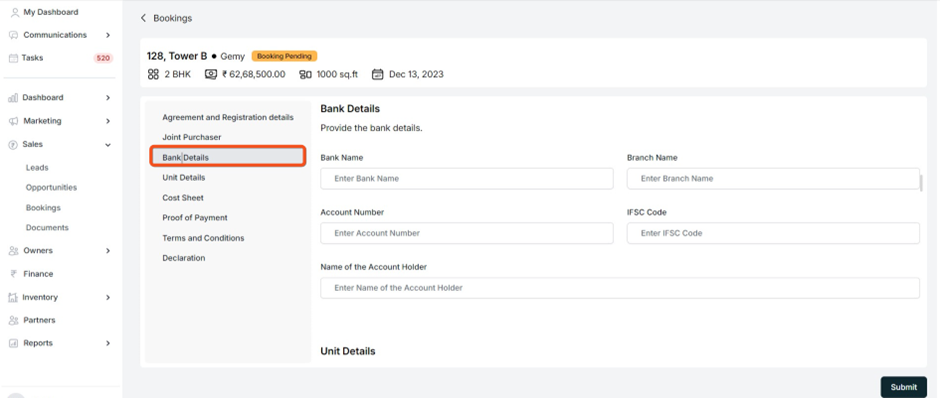
2. Bank details have been designated as non-mandatory in the booking form.
To update this information, proceed to the Sales module, click on a booking, select the desired booking, and navigate to the bank details section.
As indicated in the screenshot, this field is now optional, allowing the form to be saved without filling in this information
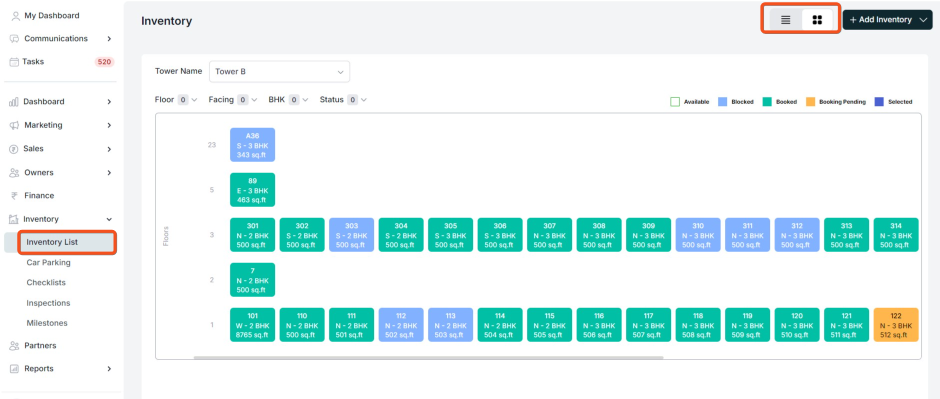
3. The unit sorting functionality has been included in the inventory grid view.
Head to the inventory list and transition to the grid view to observe the sorting based on units.
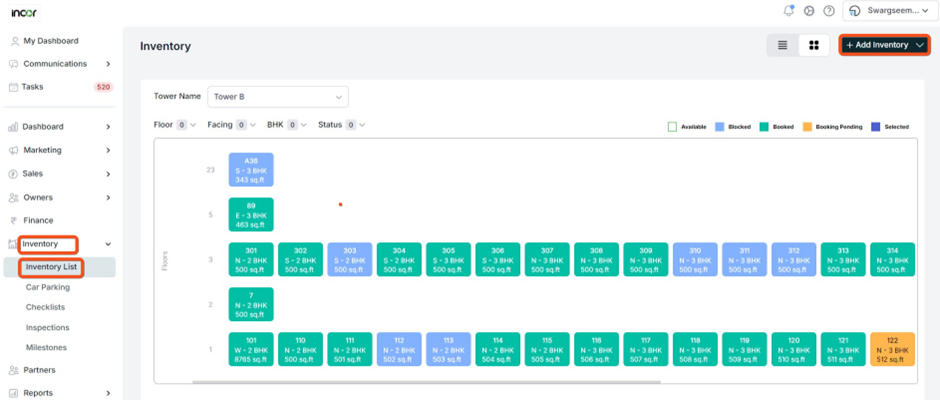
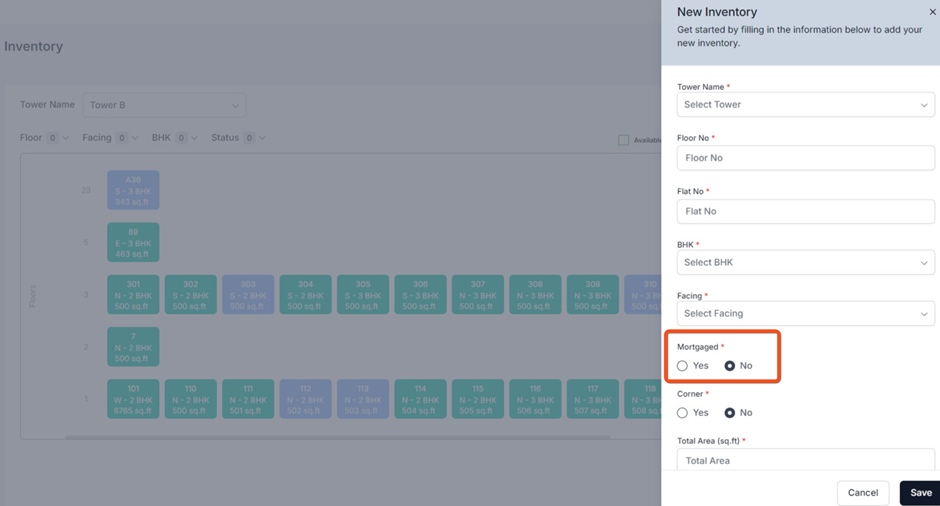
4. Added a new field, "Mortgaged," to the inventory addition form, providing options for "Yes" or "No."
Inventory can be added either manually or by importing through a CSV file.
To add inventory, navigate to the inventory section and click on the "Add Inventory" option, where you will find the mortgage selection.
Here are the screenshots for references.
Date: 24th Nov
Mobile Applications
Updates & Enhancements in Customer-PropFlo App
1. Users now have the capability to access a comprehensive list of acquired properties.
2. Users now have the option to retrieve and download payment and transaction details for their purchased properties.
3. Timely updates will be sent to users related to properties.
4. Documents related to properties can be accessed and downloaded.
5. Real time property notifications
Date: 22nd Nov
Web Application – CRM
Feature Update: Hot Fixes
1) Customer Portal: The "Area" field in the customer portal previously displayed the price, but it has been updated to now reflect the actual area of the property.
2) Discount Rounding: Discounts are now rounded off, as needed, for precision and accuracy.
3) Few enhancements and bug fixes in the payment schedule and payment screens.
Date: 16th Nov
Web Application – CRM
New Features:
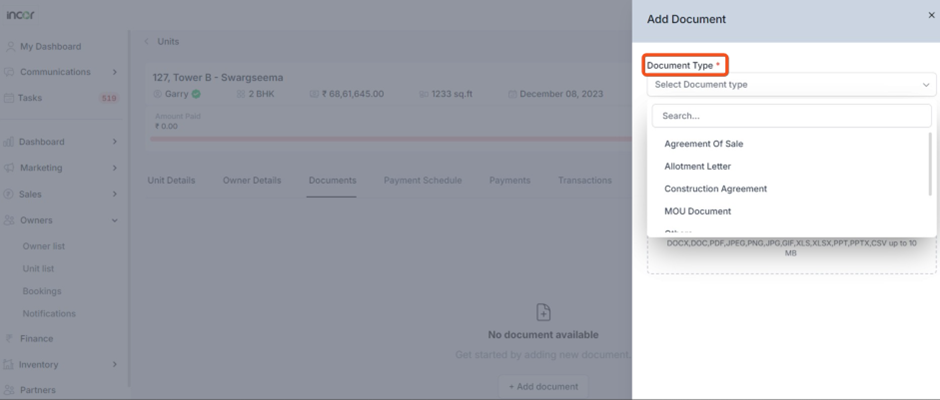
1) Creation of Documents:
We can create a custom document template tailored for your customers.
Go to the settings menu and select "Document Templates." Click on "Create Template" to effectively manage templates for various common documents like AOS, booking forms, MOUs, and more.
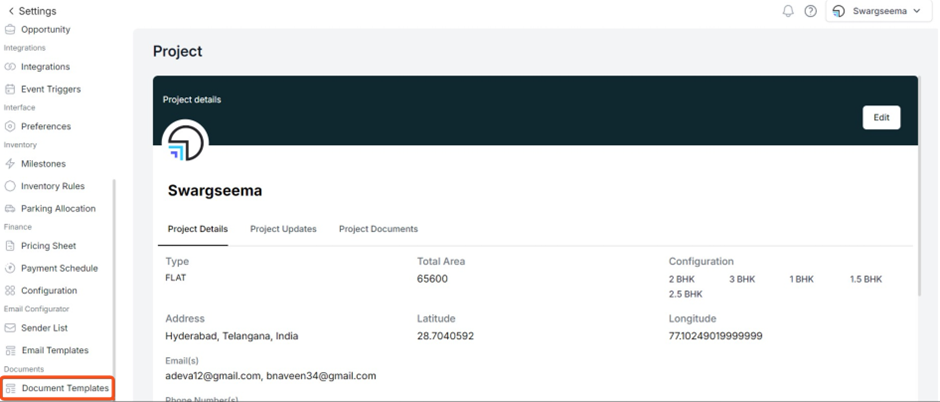
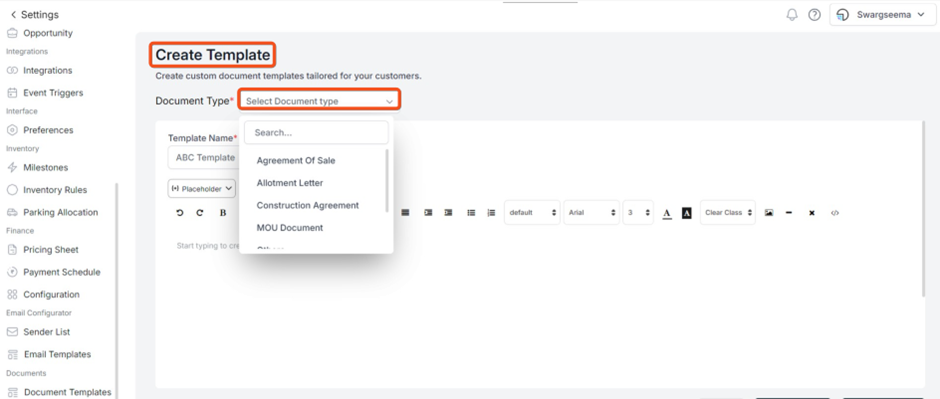
Save and publish can save your template in your documents.
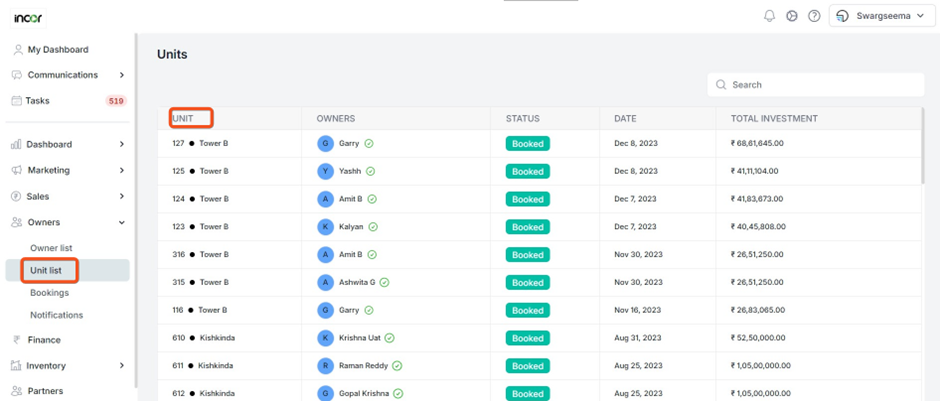
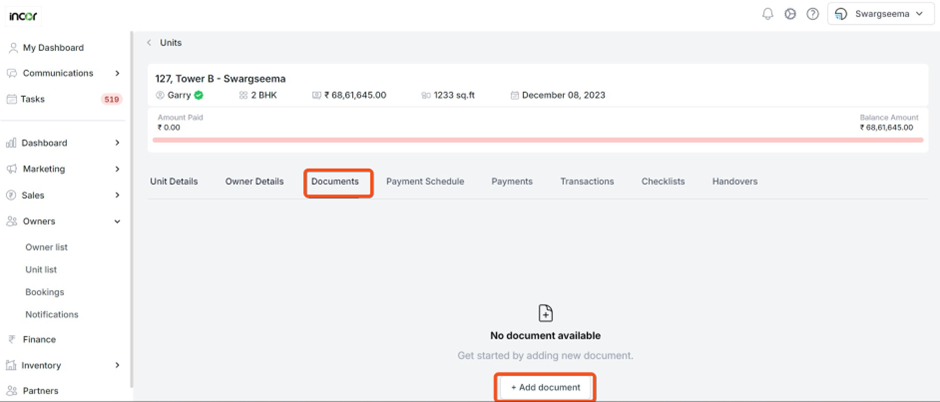
Once the template is created users can generate documents for specific unit.
Go to the Owners section, access the Unit List, and choose a specific unit. From there, you can generate a document by selecting the document type as needed.
2) Few bug fixes on pricing sheet and cost sheet.
Date: 14th Nov
Web Application
New Enhancements:
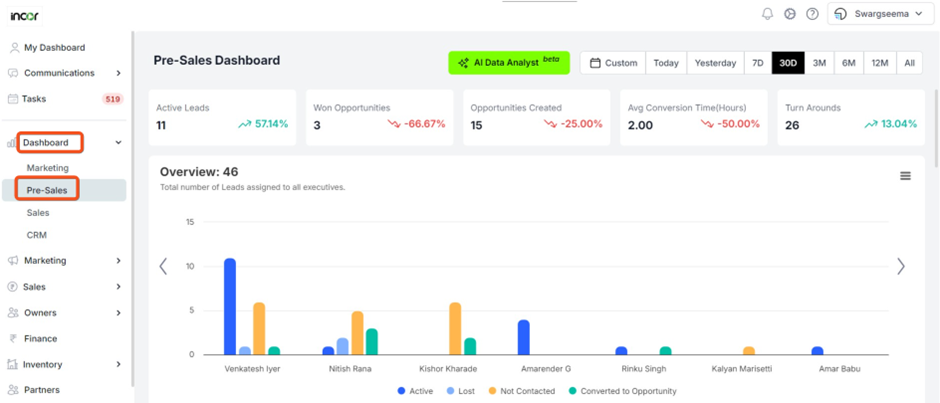
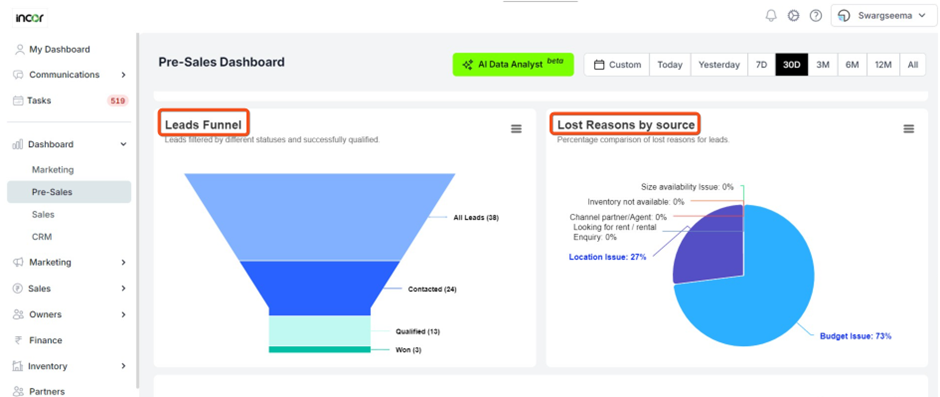
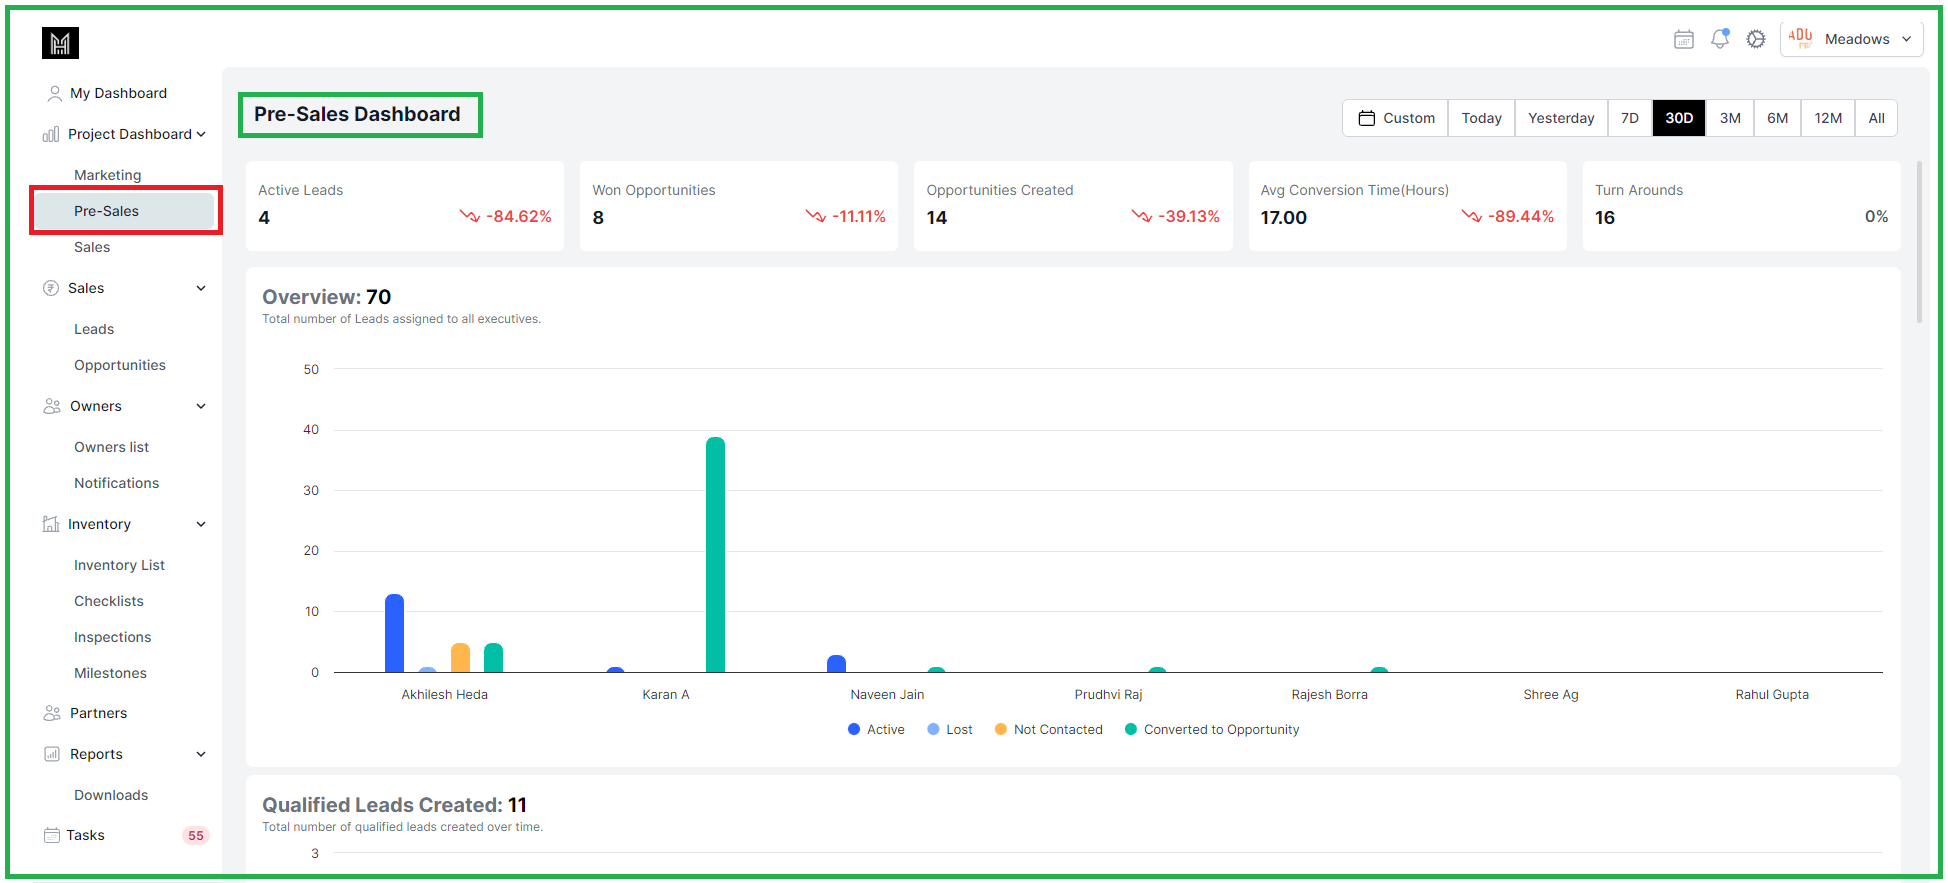
1. New graphs in pre-sales
Several graphs have been incorporated, including the "Leads Funnel," "Lost Reasons by Source," and "Labels."
Please access the dashboard and select the pre-sales section. Within this section, you will find a comprehensive dashboard displaying active leads, successfully won opportunities, newly created opportunities, average conversion rates, and turnaround times.
Here are the screenshots explaining the new graphs.
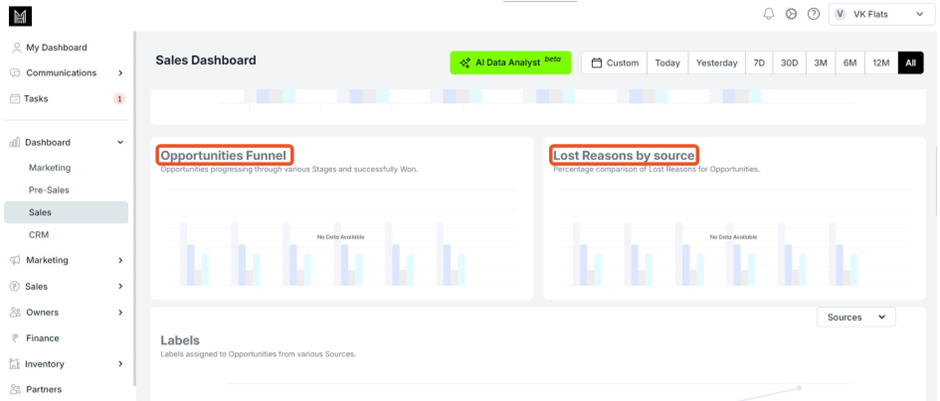
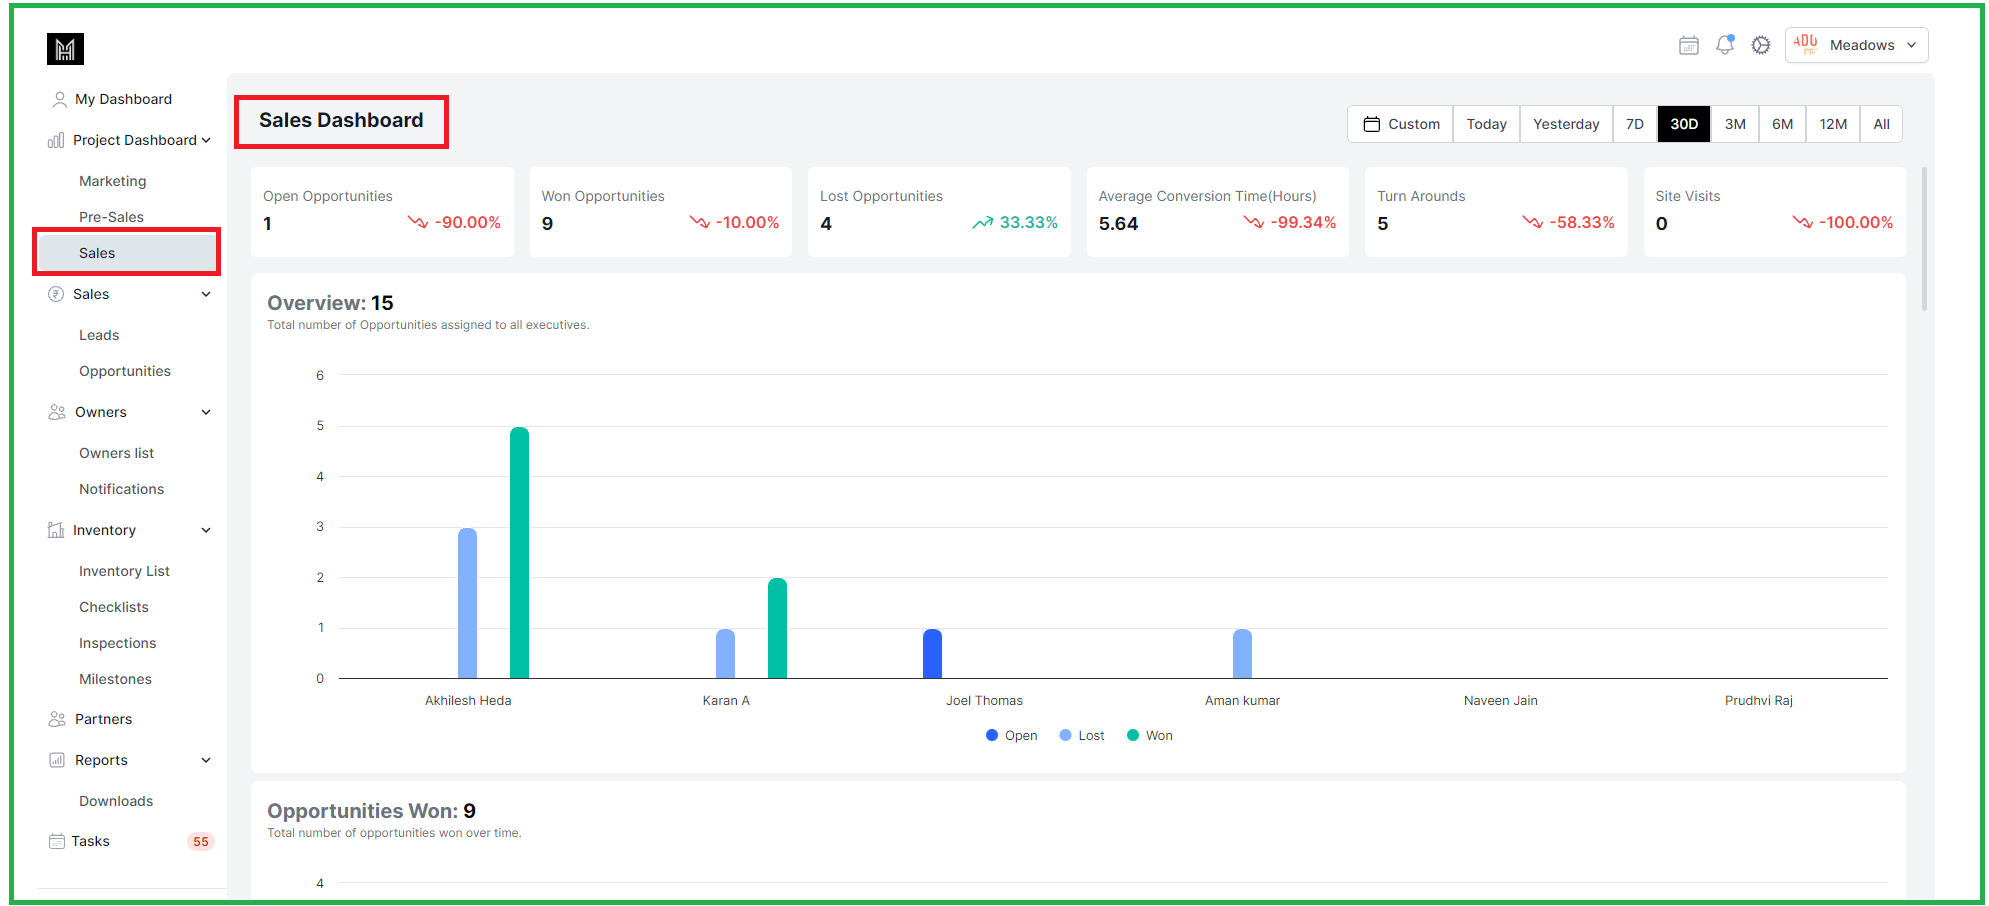
2. New graphs in Sales
Several graphs have been incorporated, including the “Opportunities Funnel” “Lost reasons by source” “Labels”.
Please access to Dashboard and select the sales section. Within the section you will able to see the comprehensive dashboard layout showing open, won, lost opportunities with average time and turn arounds.
Here are the screenshots explaining the same.
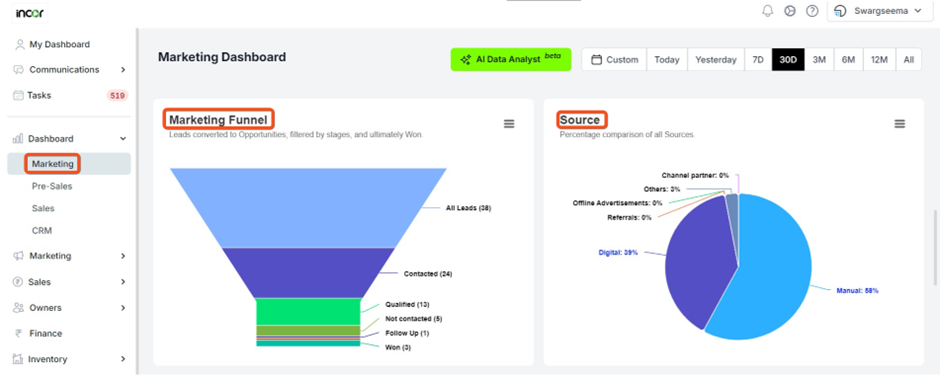
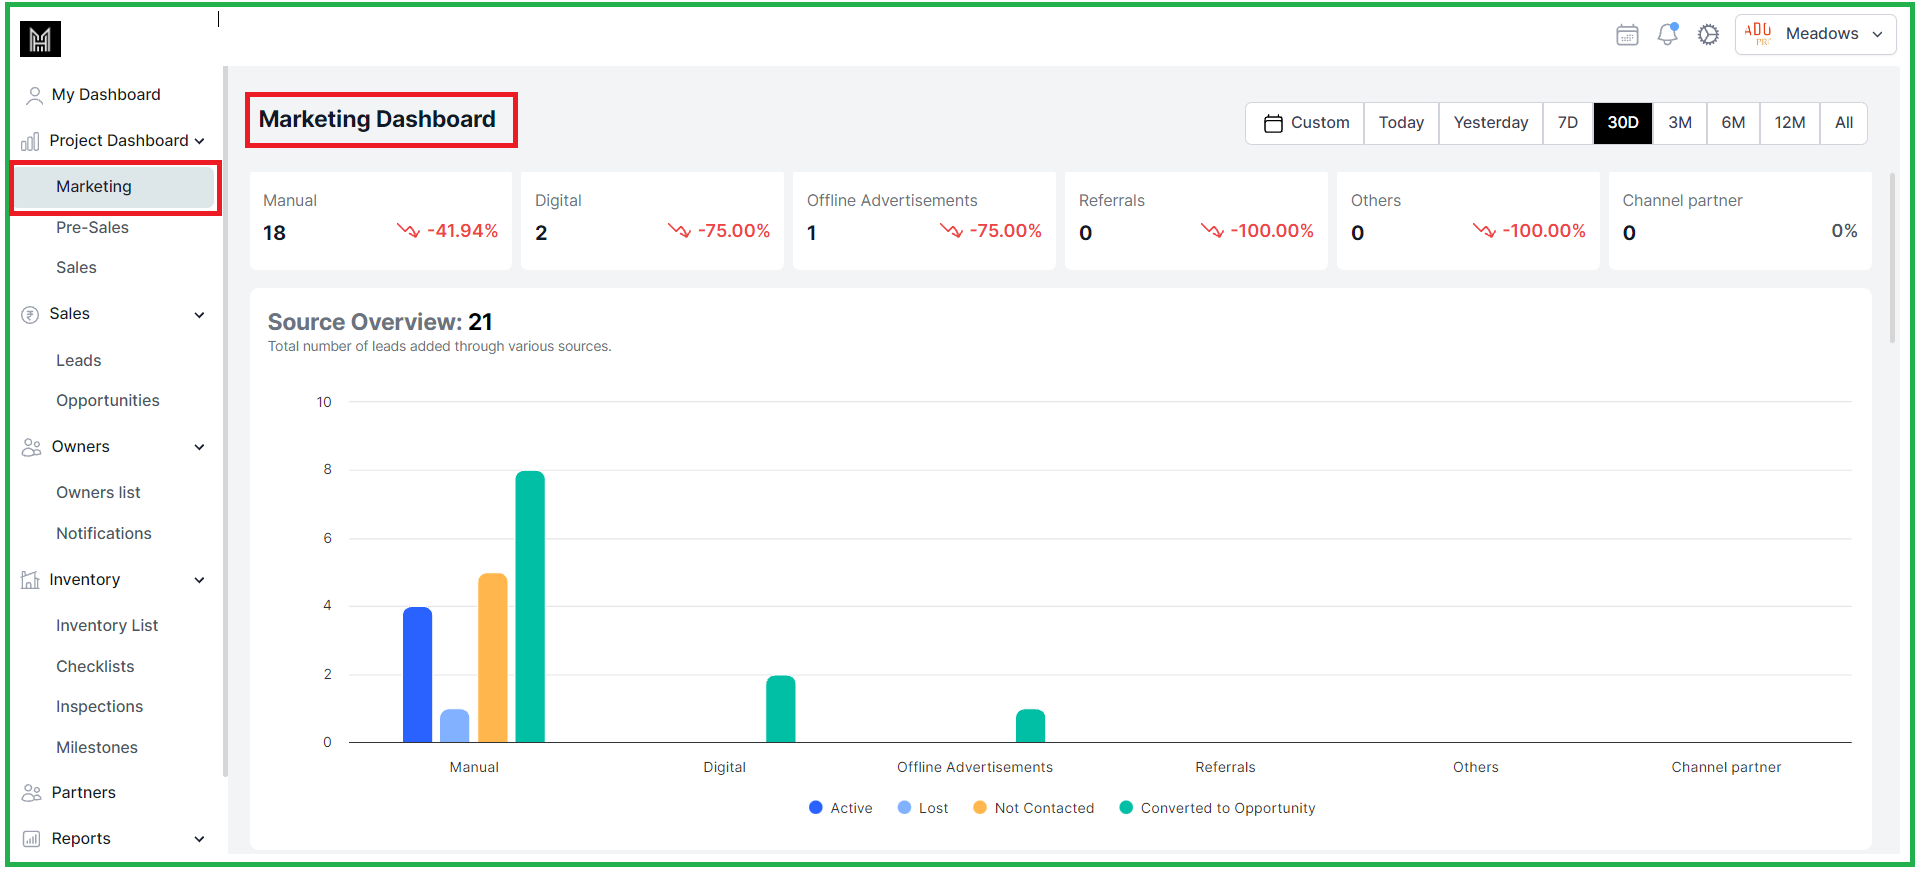
3) New graphs in the marketing
Several graphs have been incorporated, including the “Source Overview” “Marketing Funnel” “Source” “Campaigns”.
After accessing to the dashboard module please select marketing section and you will be able to see marketing dashboard with source overviews.
Here is the screenshot for the reference.

4) Email Preview
A user can preview the email before sending it to any leads or opportunities.
5) Open forms for site visit is linked to the units.
6) Code optimization has been done for performance related.
Date: 1st Nov
Web Application
Hot Fixes:
1. The AI Content Generator now displays the complete content for emails.
2. The bug encountered during OTP-based login has been resolved.
Date: 31st Oct
Web Application
New Feature:
1. The total sale consideration will now feature two tax configurations: 1% for amounts less than 45L and 5% for amounts exceeding 45L.
2. The Floor Rise amount field is now capable of accepting the value "0".
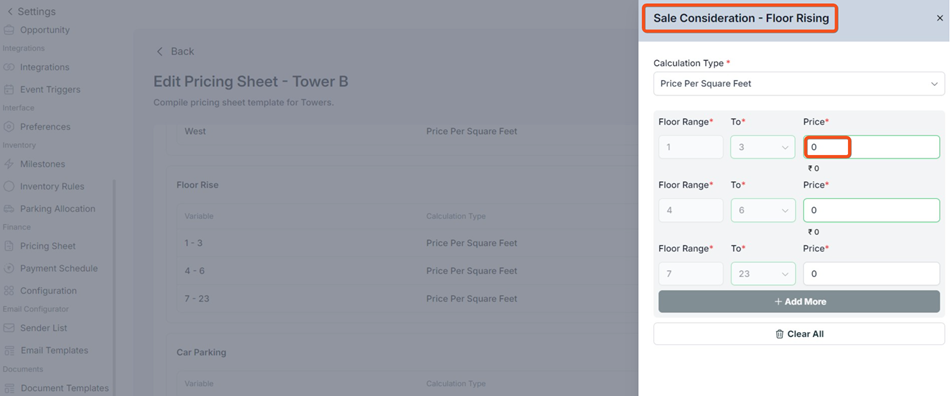
Kindly proceed to the settings, select the pricing sheet, and click on any tower to access the pricing sheet, where you can view the floor rise amount.
As illustrated in the above picture, price 0 is accepted.
Date: 27th Oct
Web Application - CRM
New Features
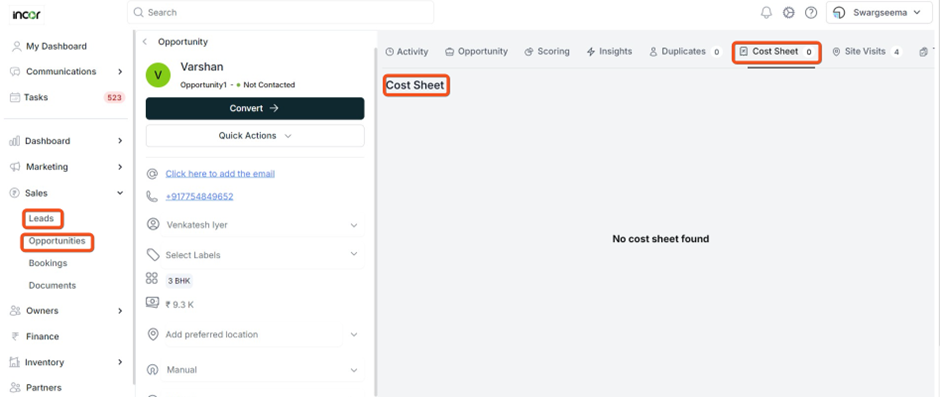
1. Generate cost sheets through the quick action feature within lead and opportunity profiles.

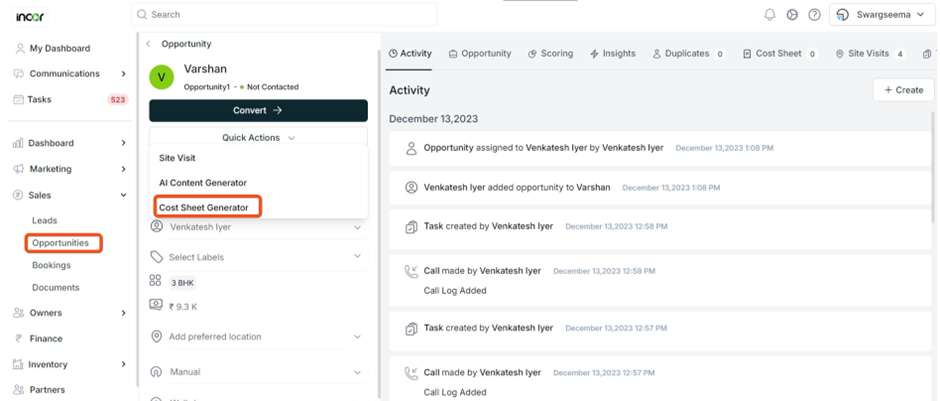
2. Included a "Cost Sheet" tab within lead and opportunity profiles.
3. Discount and TDS options have been incorporated into the cost sheet.
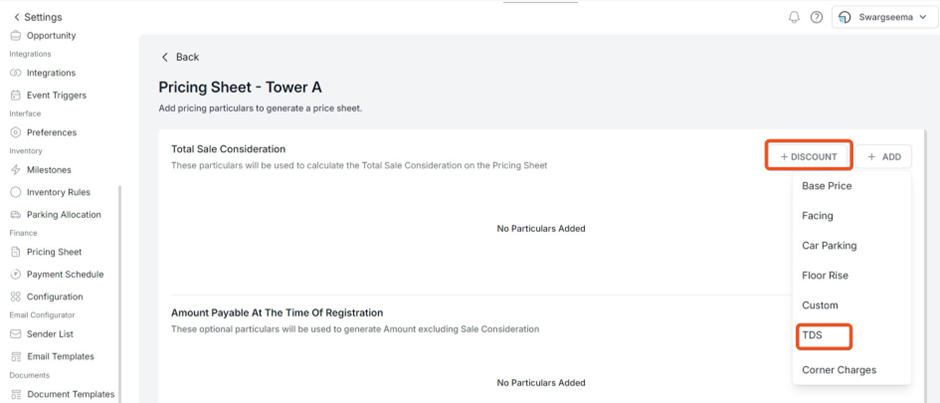
Access the settings and select the pricing sheet, where you can add both discount and TDS to both new and existing cost sheets.
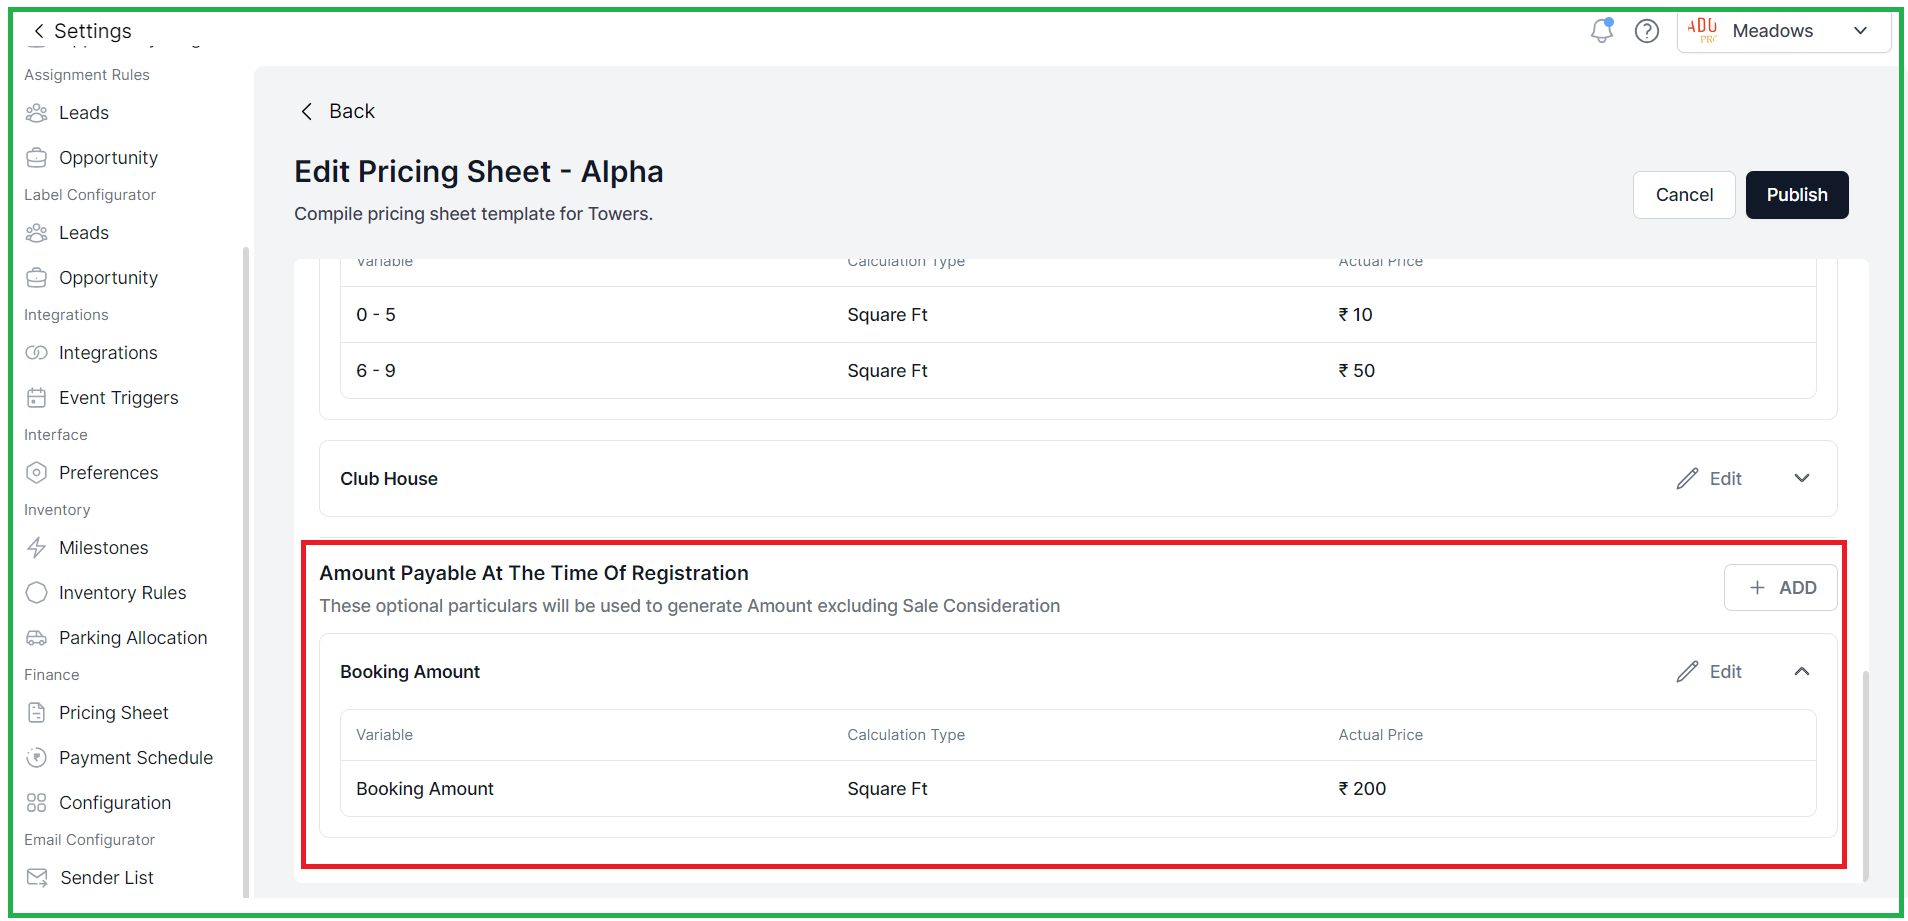
4. Include "% of sales consideration" as a calculation type within the "Amount payable at the time of Registration" section of the cost sheet.
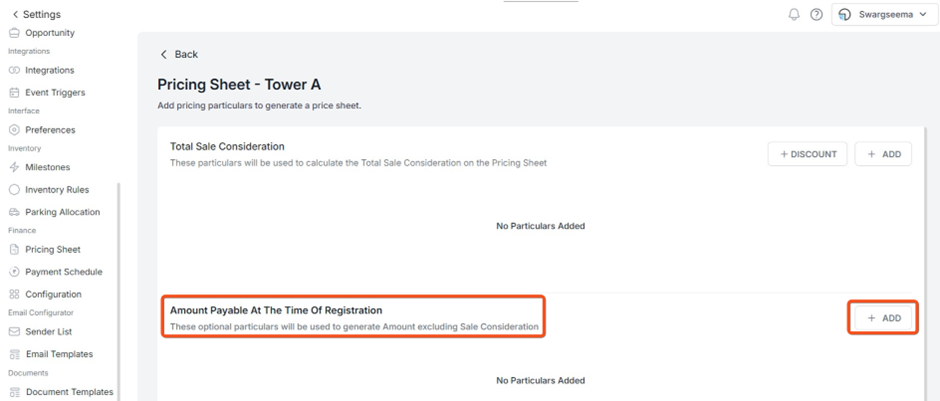
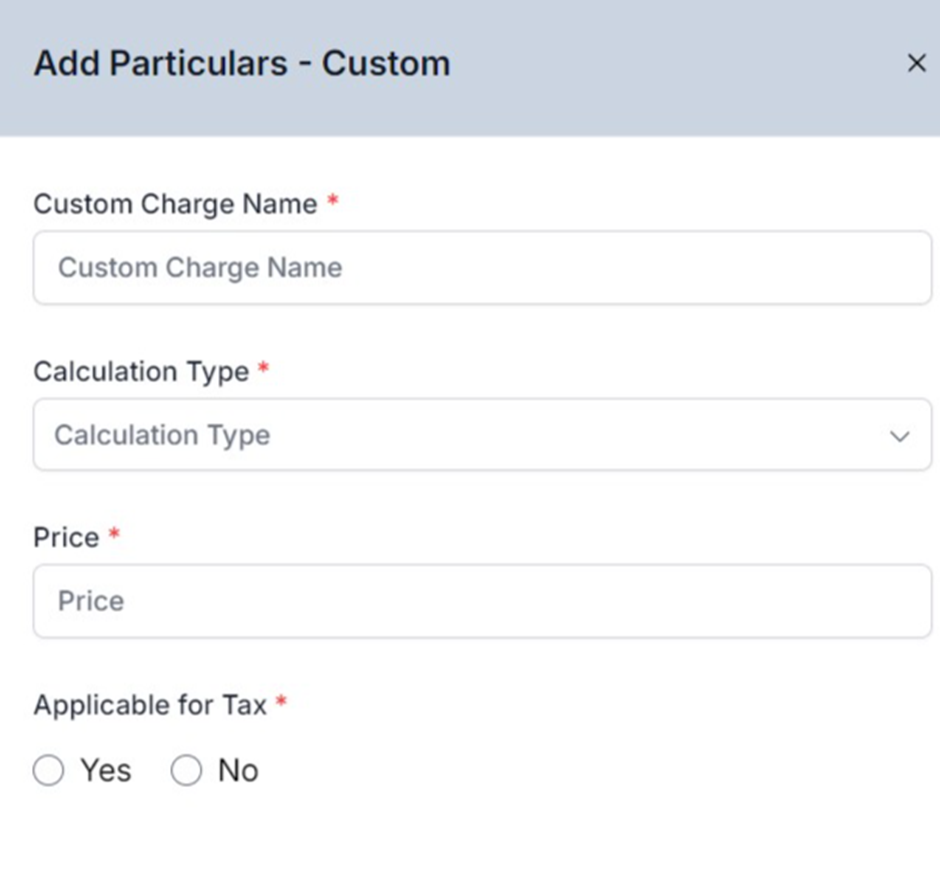
As illustrated in the above picture, please click on the add button to add the custom charges.
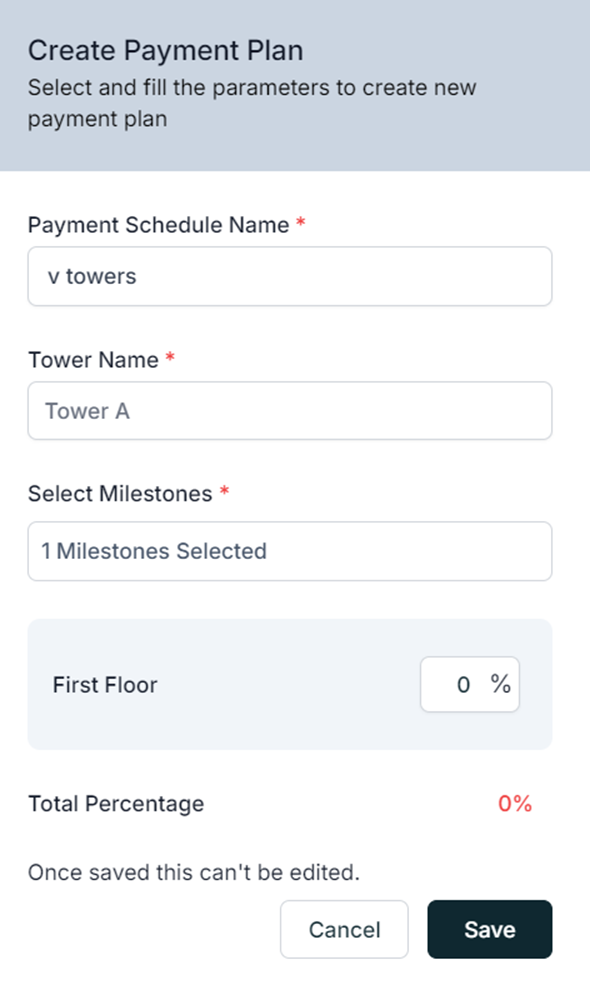
5. Zero is now acceptable for the milestone percentage in payment schedules.
Access the settings, go to payment schedules, and select "Add New Payment Plan." Here, you can include zero as milestone percentages, as demonstrated in the accompanying screenshot.
Date: 26th Oct
Web Application - Sales
New Features
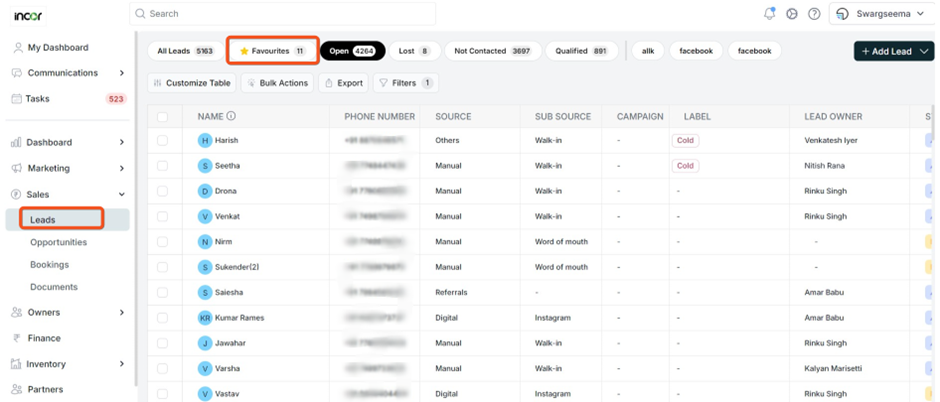
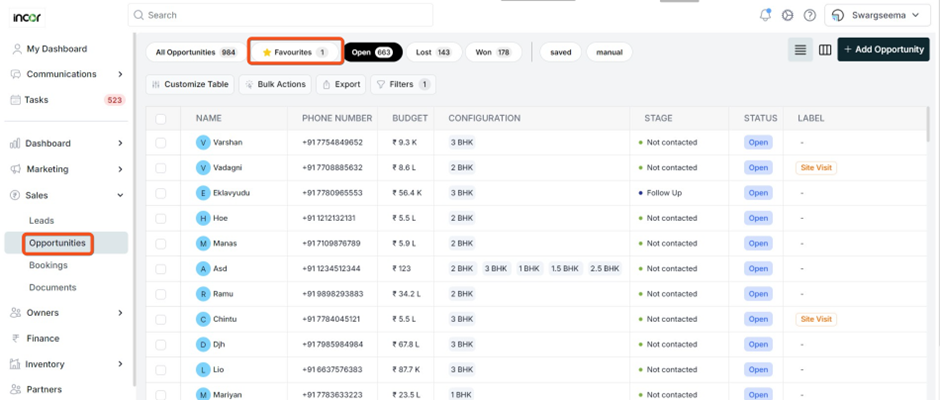
- 1. A new feature has been introduced in the leads and opportunities module, presenting the 'Favourites' button.
- 2. A redesigned layout has been introduced for leads and opportunity forms.
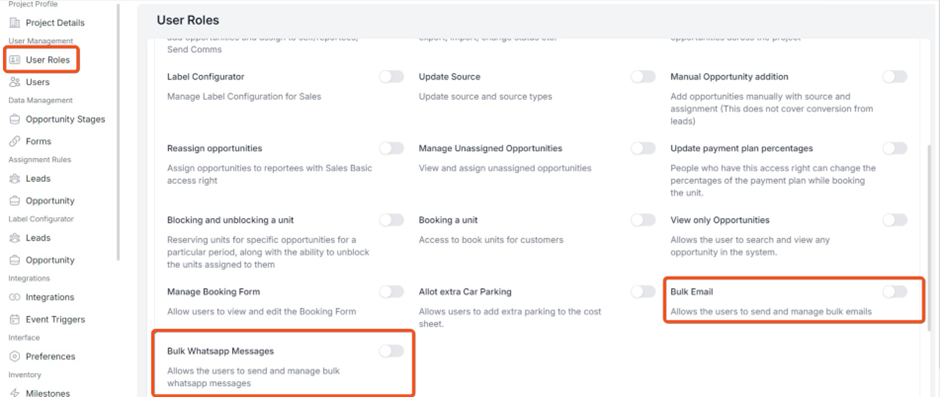
- Obtained several new features for controlling permissions related to Bulk email and Bulk WhatsApp messages.
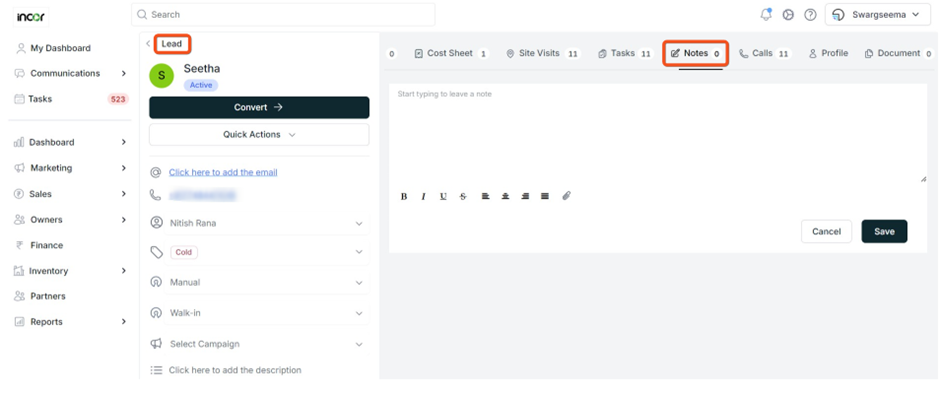
- Introduce the capability to create and save notes within the note’s column for the leads and opportunities sections.
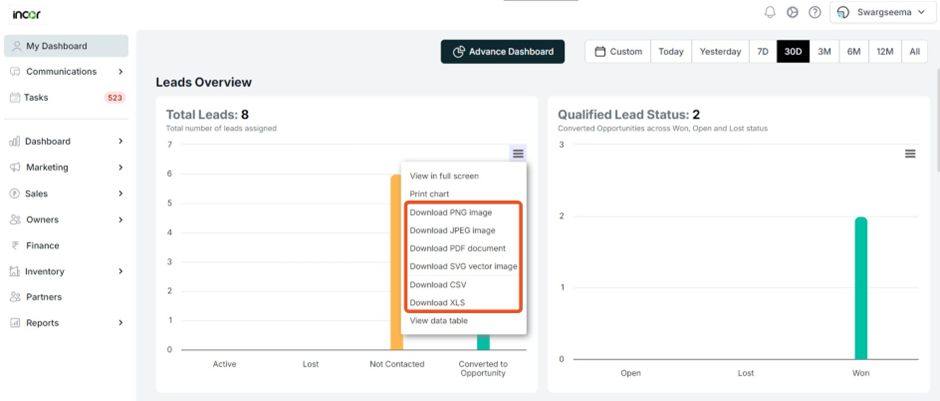
- The export feature is now available across all graphs, allowing users to save in PNG, JPEG, PDF, CSV, XLS, and SVG vector image formats.
Date: 24th Oct
IOS and Android
- The AI Content Generator is now operational within the lead and opportunity module, providing suggestions for email and WhatsApp content.
Date: 17th Oct
Web Application
1 Enhancements under the WhatsApp integration
1.1 WhatsApp integration has come up with new feature to send the messages in bulk.

As illustrated in the screenshot above, navigate to the settings button, then select "Integrations." Click on "Add Integration," choose the WhatsApp integration, input the required information, and click "Save" to successfully integrate.
1.2 Users can create and save WhatsApp message templates.
Note : WhatsApp templates can be created only from the Meta end
1.3 Users can select the recipients from the leads and opportunities and can send the messages in bulk
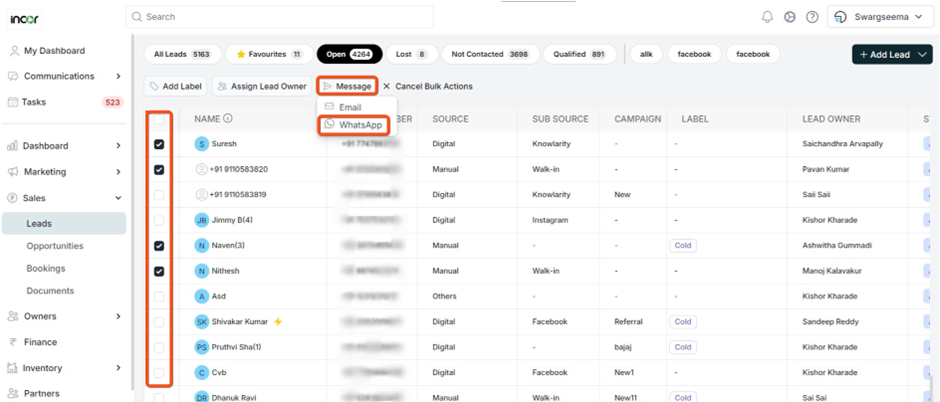
1.4 Users can preview the messages before sending them.
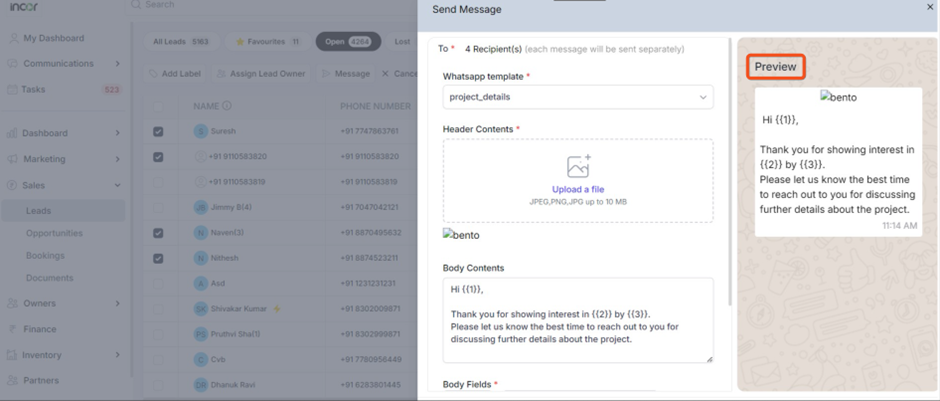
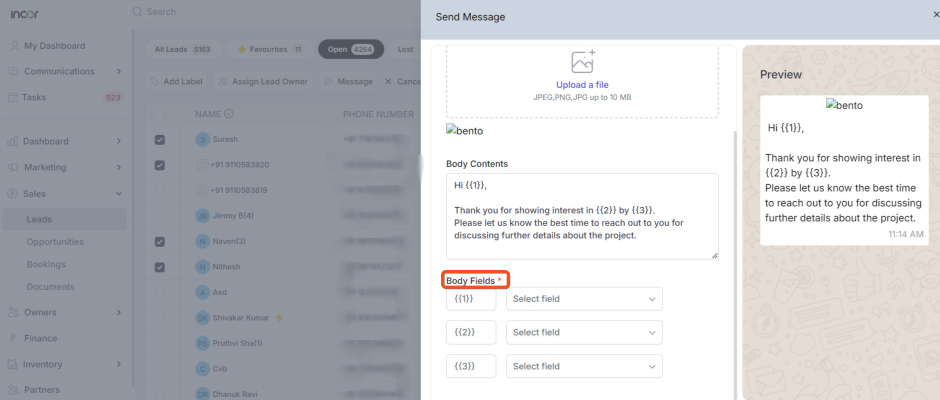
1.5 Users can send the bulk WhatsApp messages with the place holders so that they can personalize the messages for each recipient.
2. New options in Access Rights
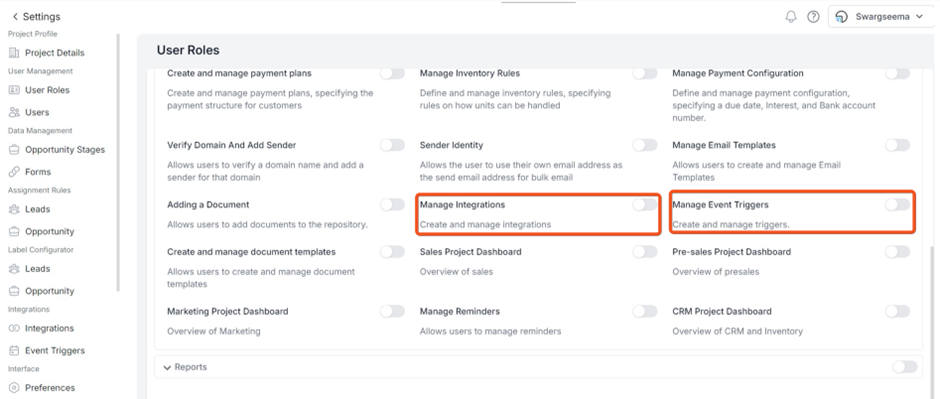
2.1 Obtained several new features for controlling permissions related to managing integrations and event triggers.
2.2 Removed Captcha from the forms
Date: 12th Oct
Web Application
New Feature:
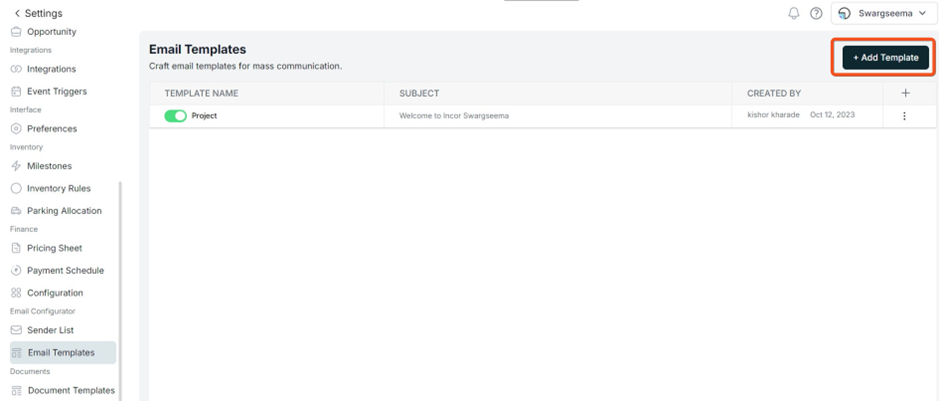
11. Email Templates
Here, user can create email templates which can be used in sending bulk emails. Few other new options like place holders, deleting the email, changing the format of the body of the email template.
Locate to the settings button and access the email templates section by clicking on it.

Click on the "Add Email Templates" button to initiate the template creation process, allowing you to craft and save drafts. Incorporate placeholders as you design templates for added customization.
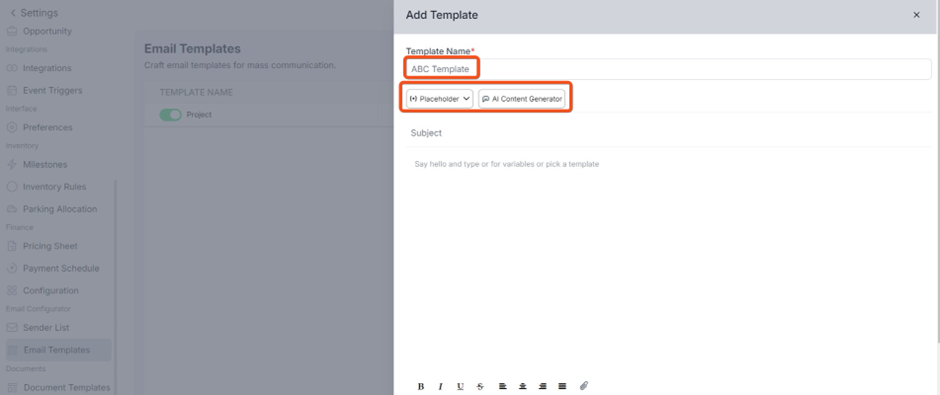
1.1 AI Content generator Introducing a cutting-edge AI content generator seamlessly integrated with email templates to enhance and optimize email communication by providing improved and personalized content.

As illustrated in the screenshot above, the AI content generator offers optimal content suggestions along with alternative options, all of which can be conveniently saved in drafts.
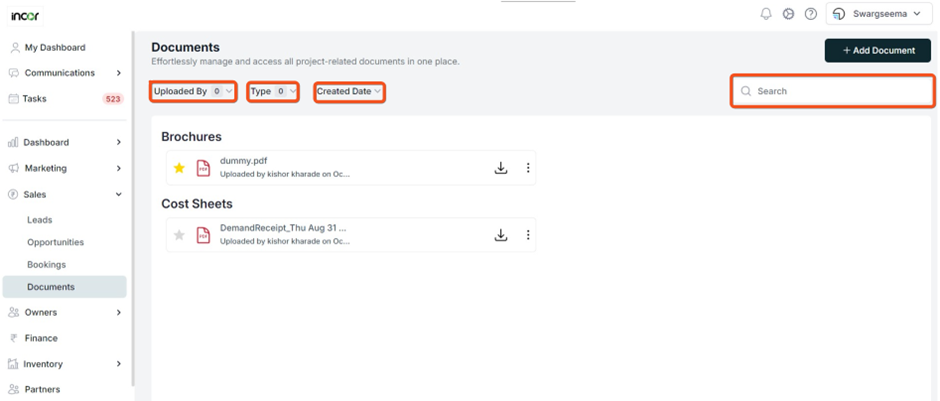
12. Document Repository
2..1 Users can upload documents to the repository and classify the documents as “Brouchers” , “Floor Plans”, “ Unit Plans”, “ Cost Sheets”, “ Project Plans”, “Municipal Agreements”, “Construction Agreements”, “RERA agreements” and lot more.
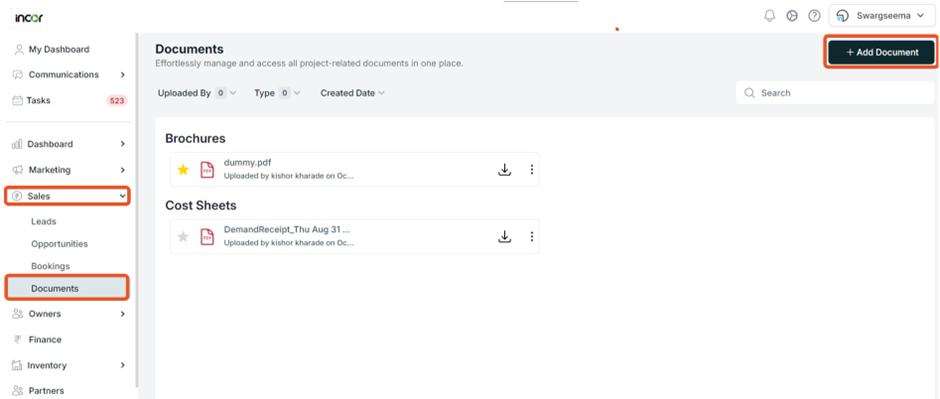
Head to the sales module and access the documents section, where you can conveniently view all documents in one centralized location. opt to add more documents by selecting the "Add Document" option.
2.2 Users have the ability to locate documents within the repository based on their names.
2.3 Users have the option to retrieve and download the documents.
2.4 Users can refine document searches by employing filters such as data, uploaded by, type, and sorting options
2.5 Users have the capability to delete and rename documents.
2.6 Users can designate documents as favorites.
Date: 9th Oct
Web Application
Enhancement:
1. Integrations
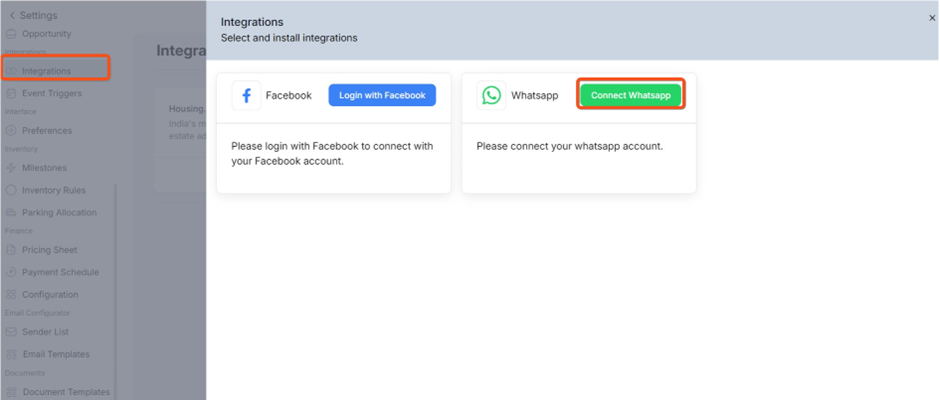
Enabled direct integration between Propflo and Facebook, streamlining the process of redirecting leads directly into your CRM.
Here are the steps to integrate Facebook

Locate the settings button and access the "Integrations" section by clicking on it.
Select the "Add Integration" button and proceed with the integration process.
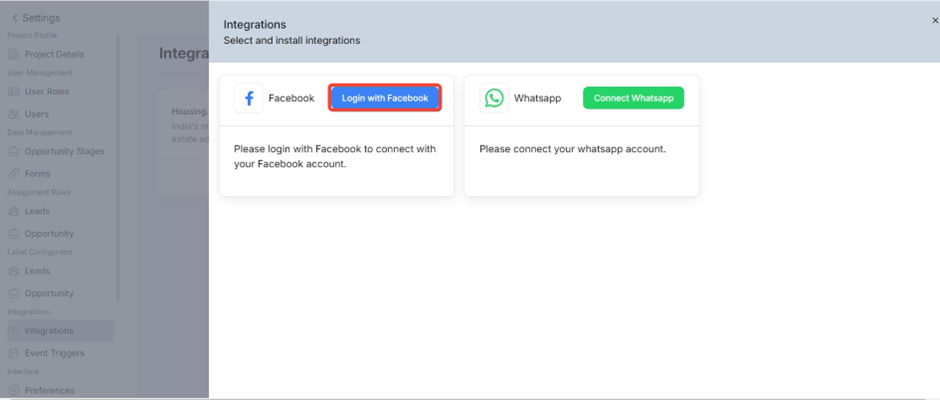
Opt for the "Login with Facebook" option to seamlessly integrate with Facebook, eliminating the need for Zapier dependency and proceed with the direct integration process.
Note: This integration is exclusively designed for Meta business accounts.
Date: 28th September
Web Application
NEW FEATURE:
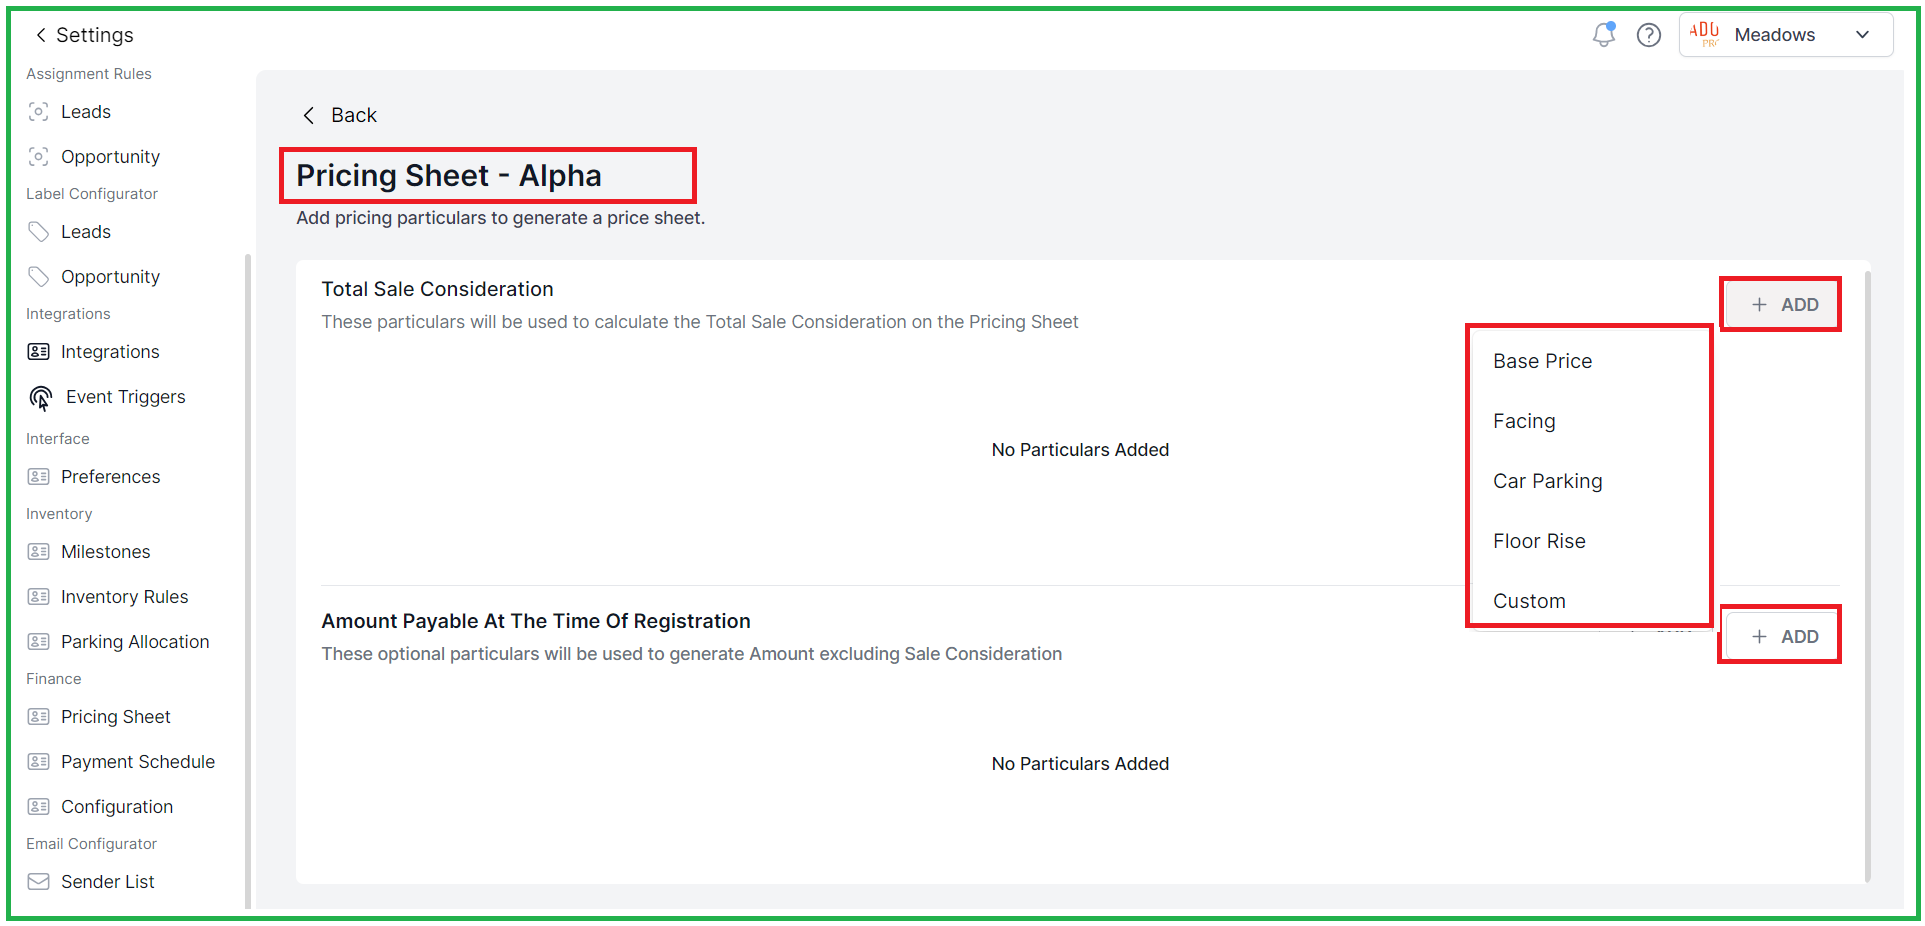
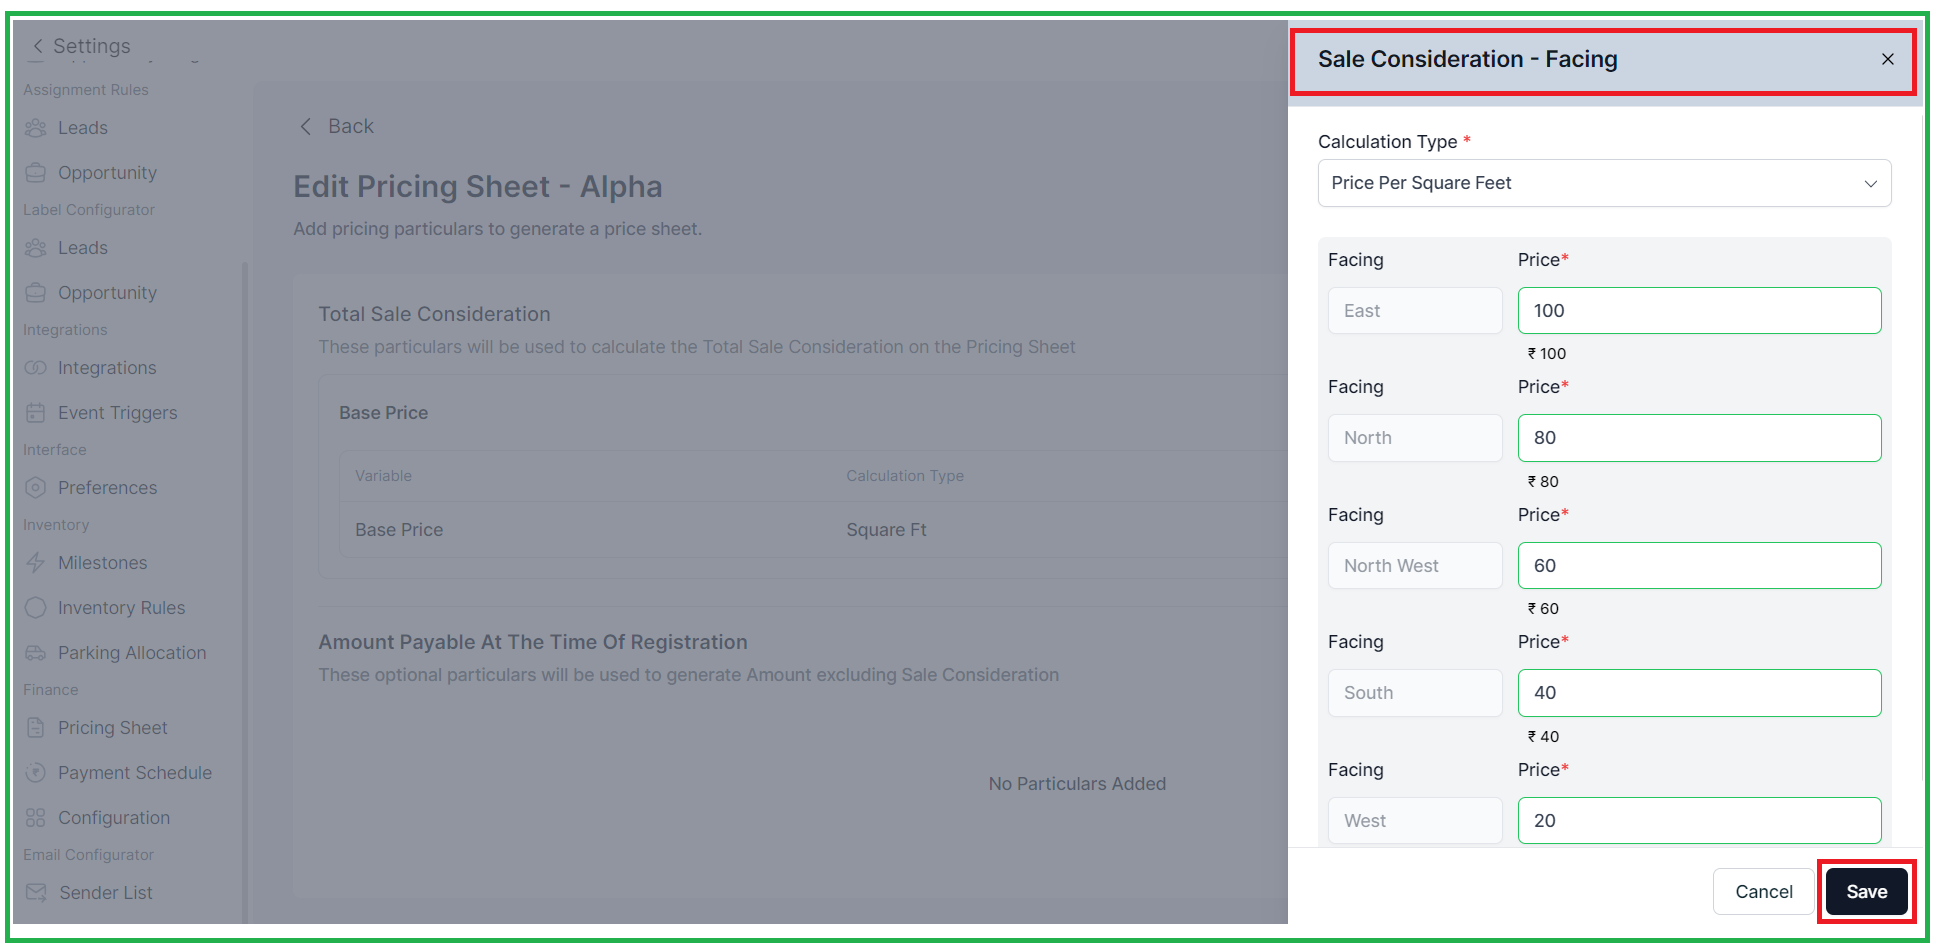
1. Pricing sheet in Finance Setting
Here, users can observe a list of towers and have the ability to add a pricing sheet specific to each tower. The pricing is adjustable and can be based on sqft or per unit.
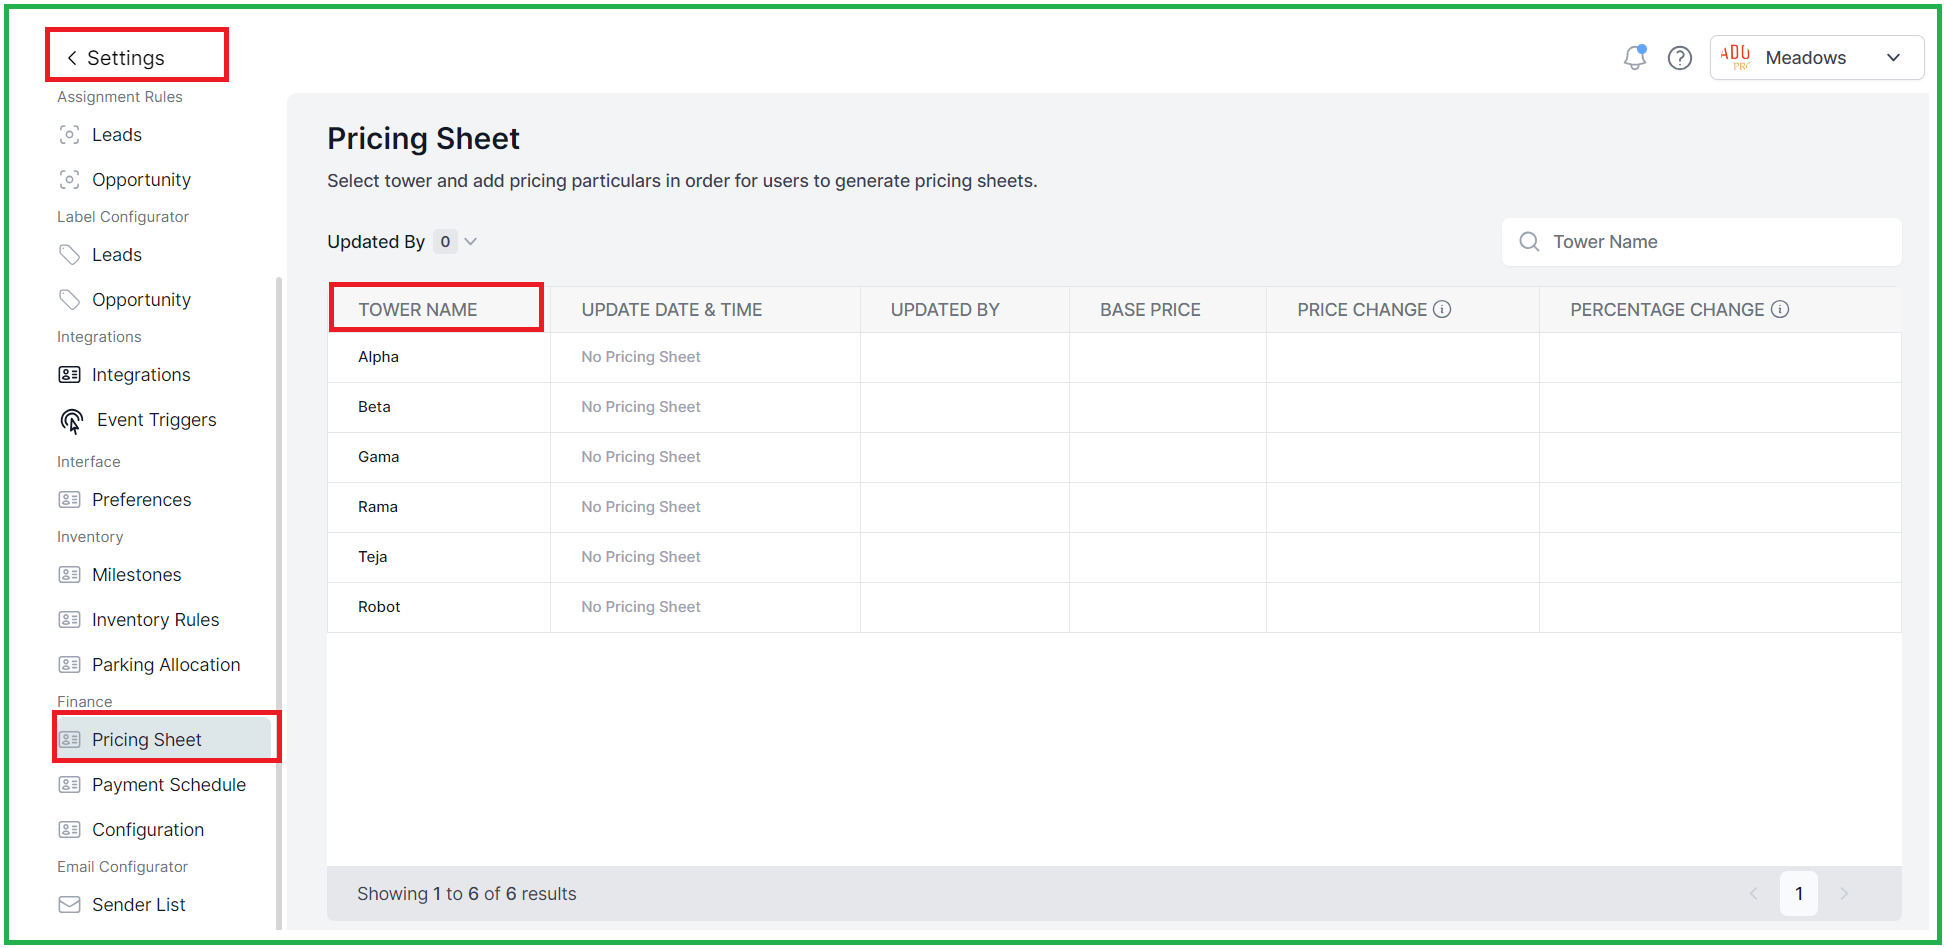
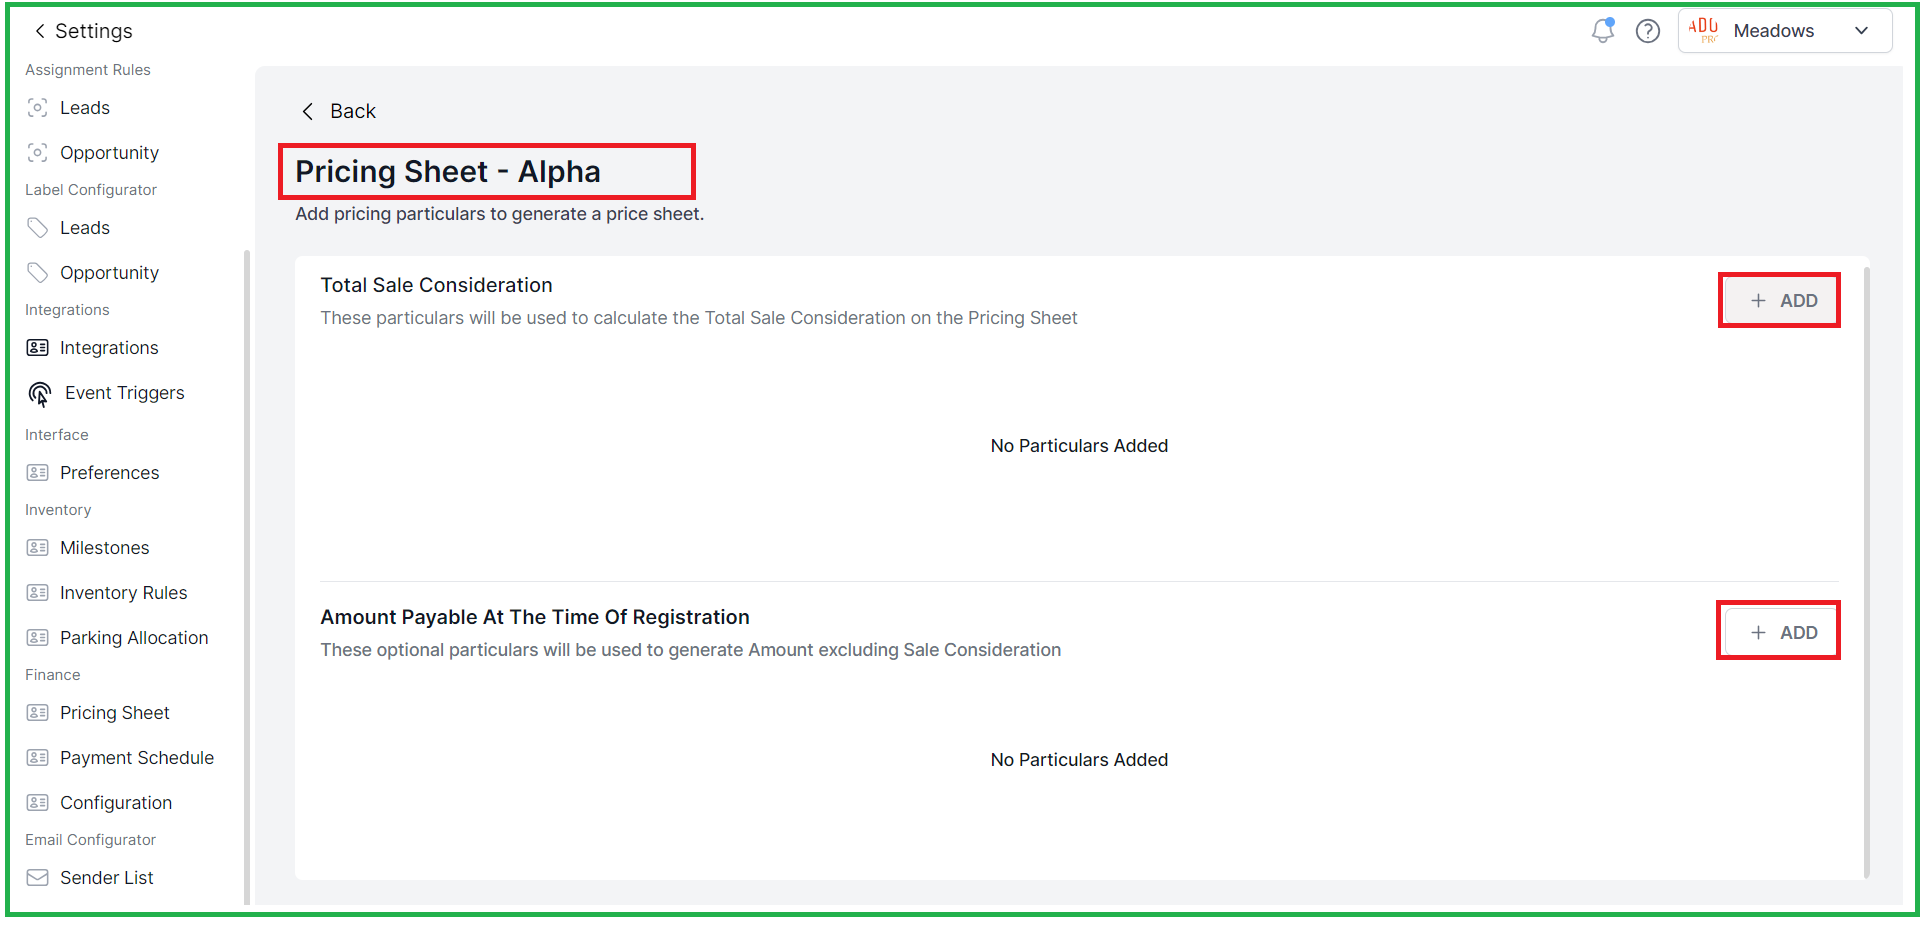
Sales consideration components of Pricing:
1. Base Price: The foundational cost for a unit.
2. Facing: The price variation based on the unit's orientation.
3. Car Parking: The cost associated with parking spaces.
4. Floor Rise: Additional charges based on the floor the unit is on.
5. Amount Payable at Registration: The amount due when the unit is registered.
1.1 Cost sheet in Inventory Booking
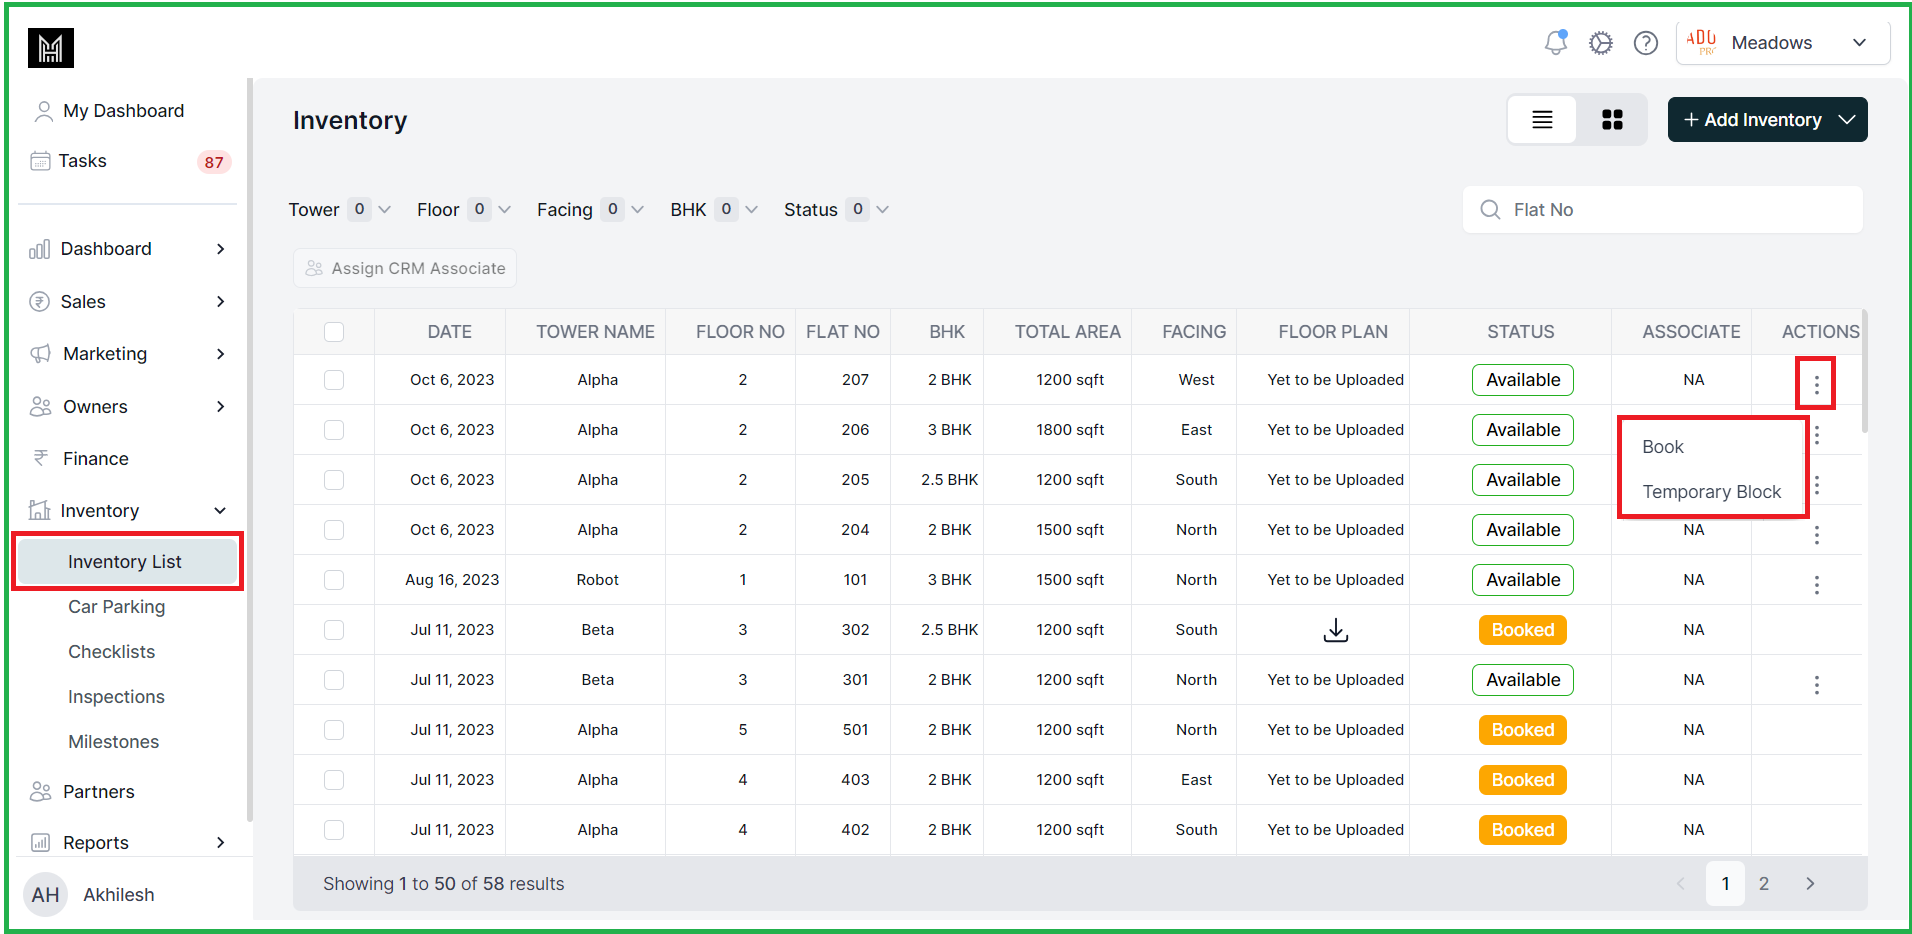
- When a CRM user books a unit for a customer through the Booking Inventory feature, the system populates the cost sheet details for the selected unit.
- This includes the tax slab for each section and the payment schedule based on the total sale consideration. The tax slabs for each section are automatically retrieved by the system.
- Additionally, CRM/Sales users can add extra car parking based on their access rights.
NOTE: Additionally, users have the option to create versions of the Pricing Sheet in case of any edits or updates. This feature is based on Access rights available to CRM users only.
2. Parking Allocation-
Inventory Settings, CRM users can define the rules for allocating parking slots, such as: 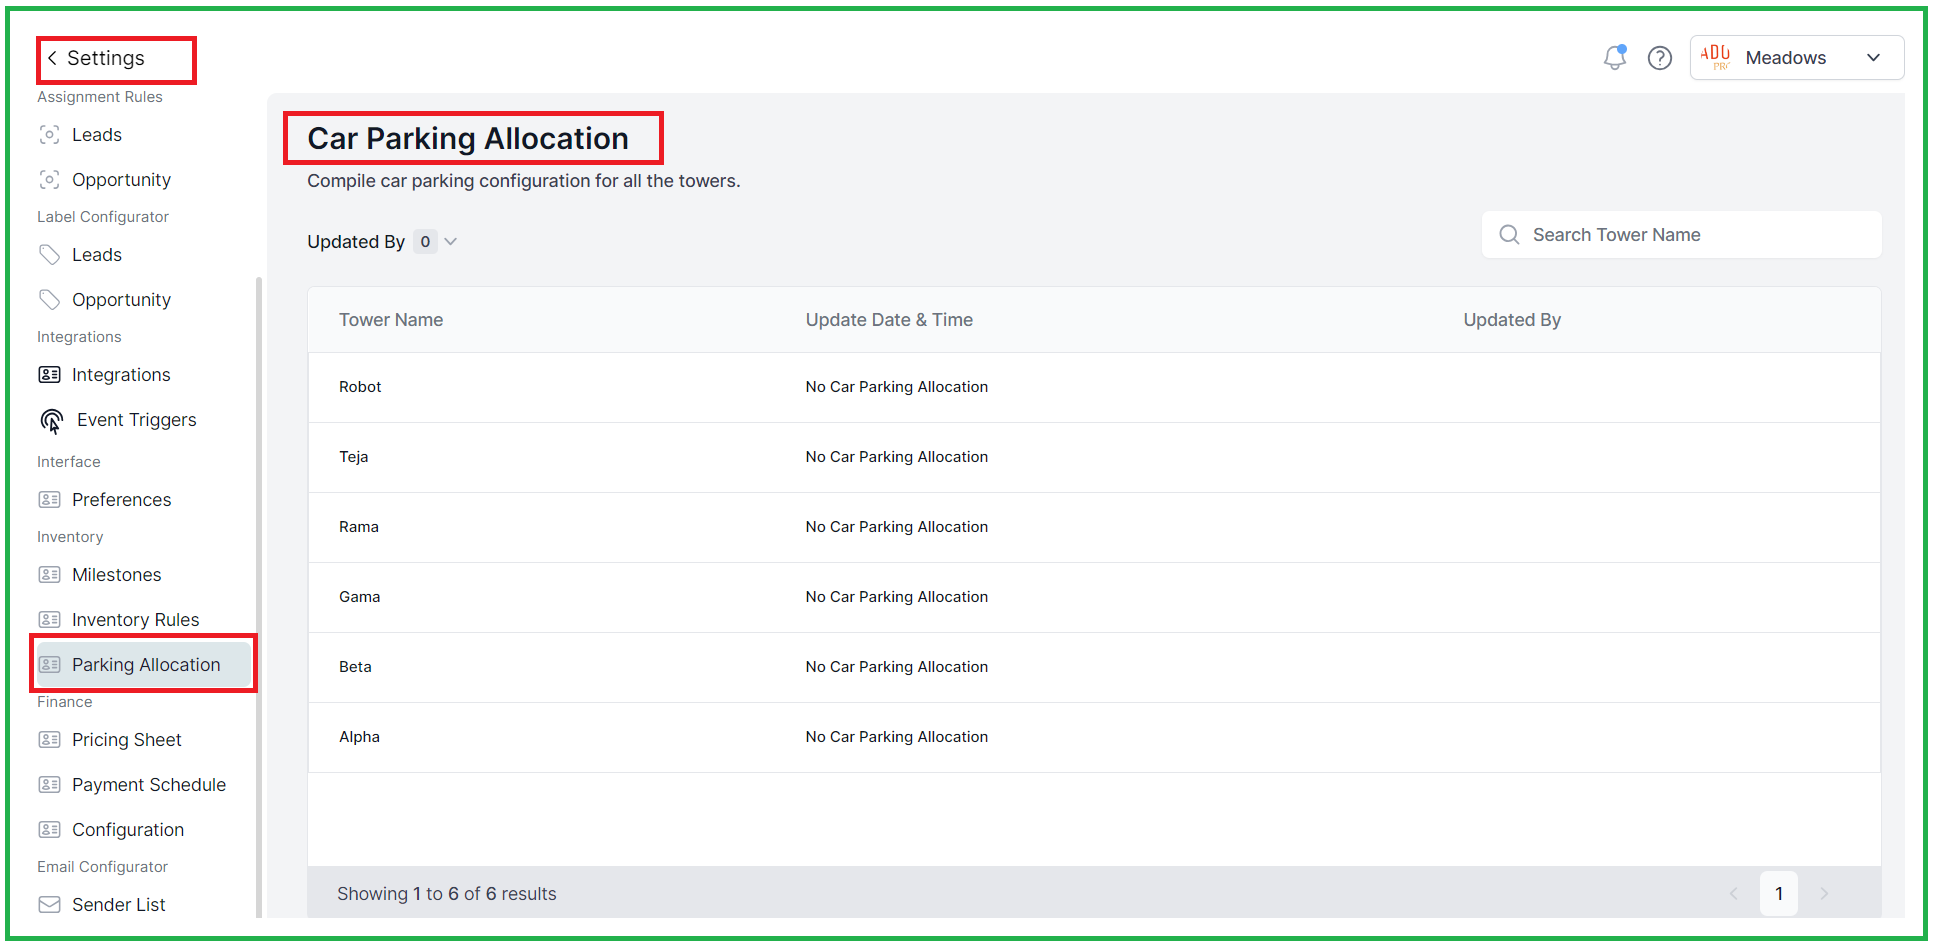
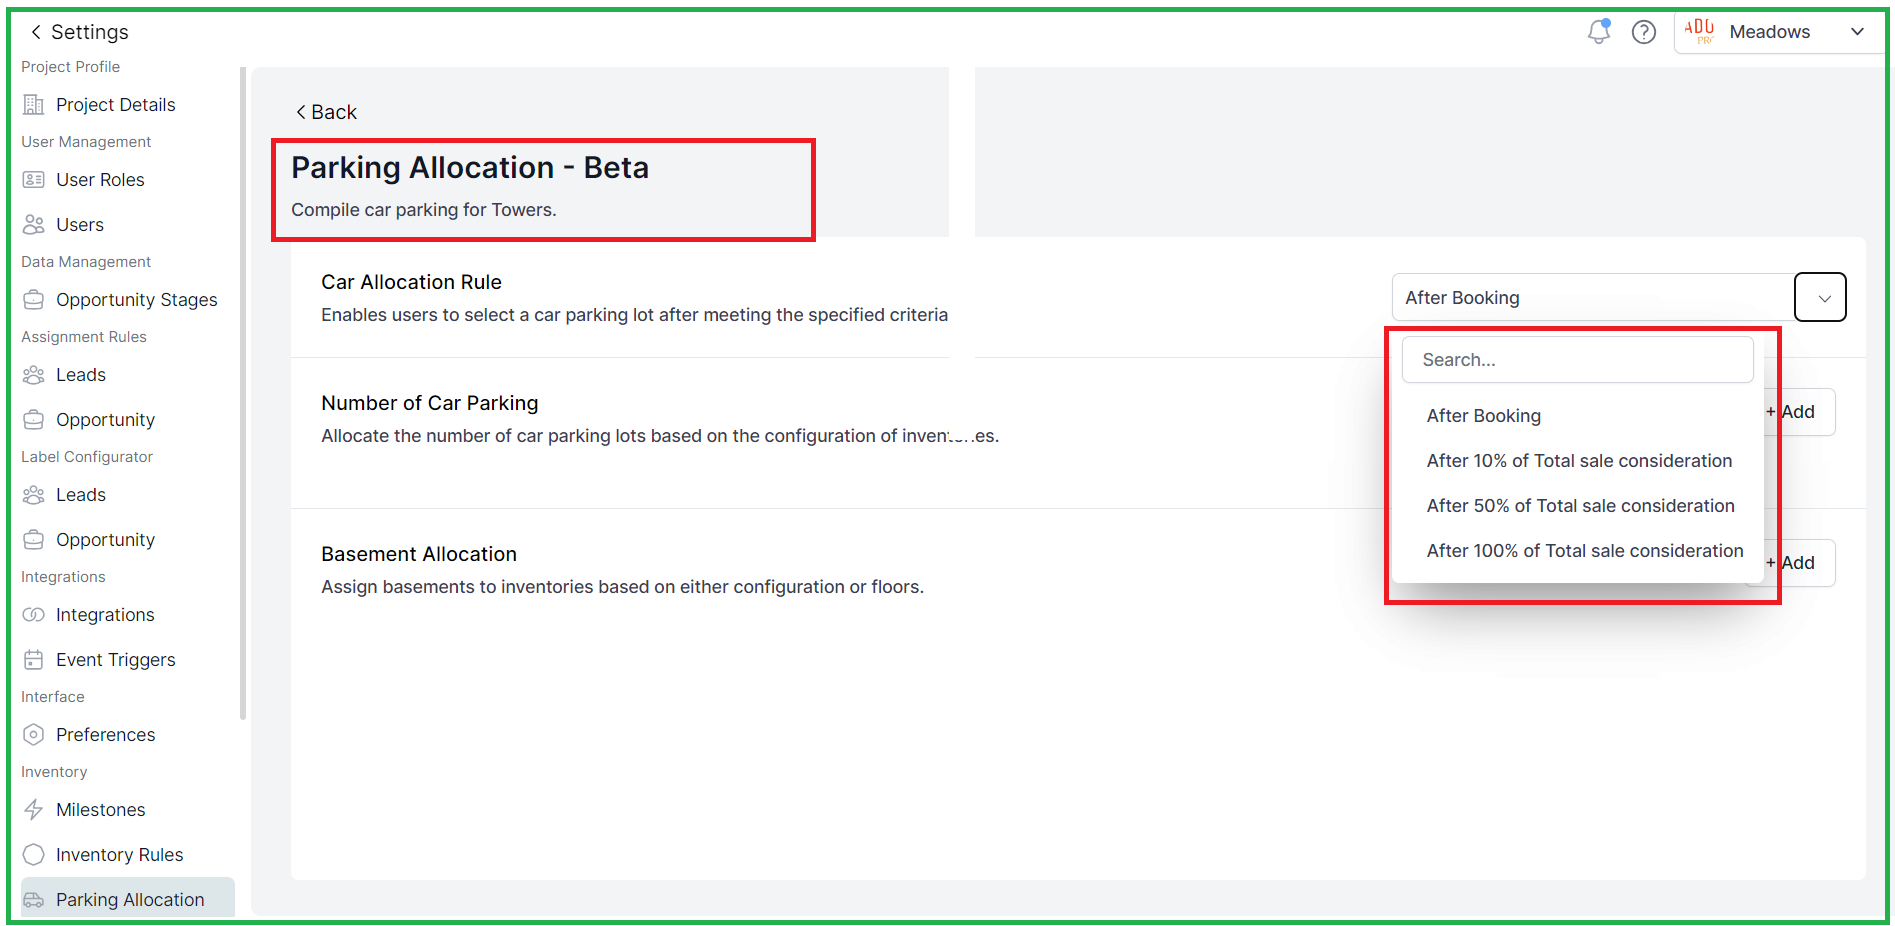
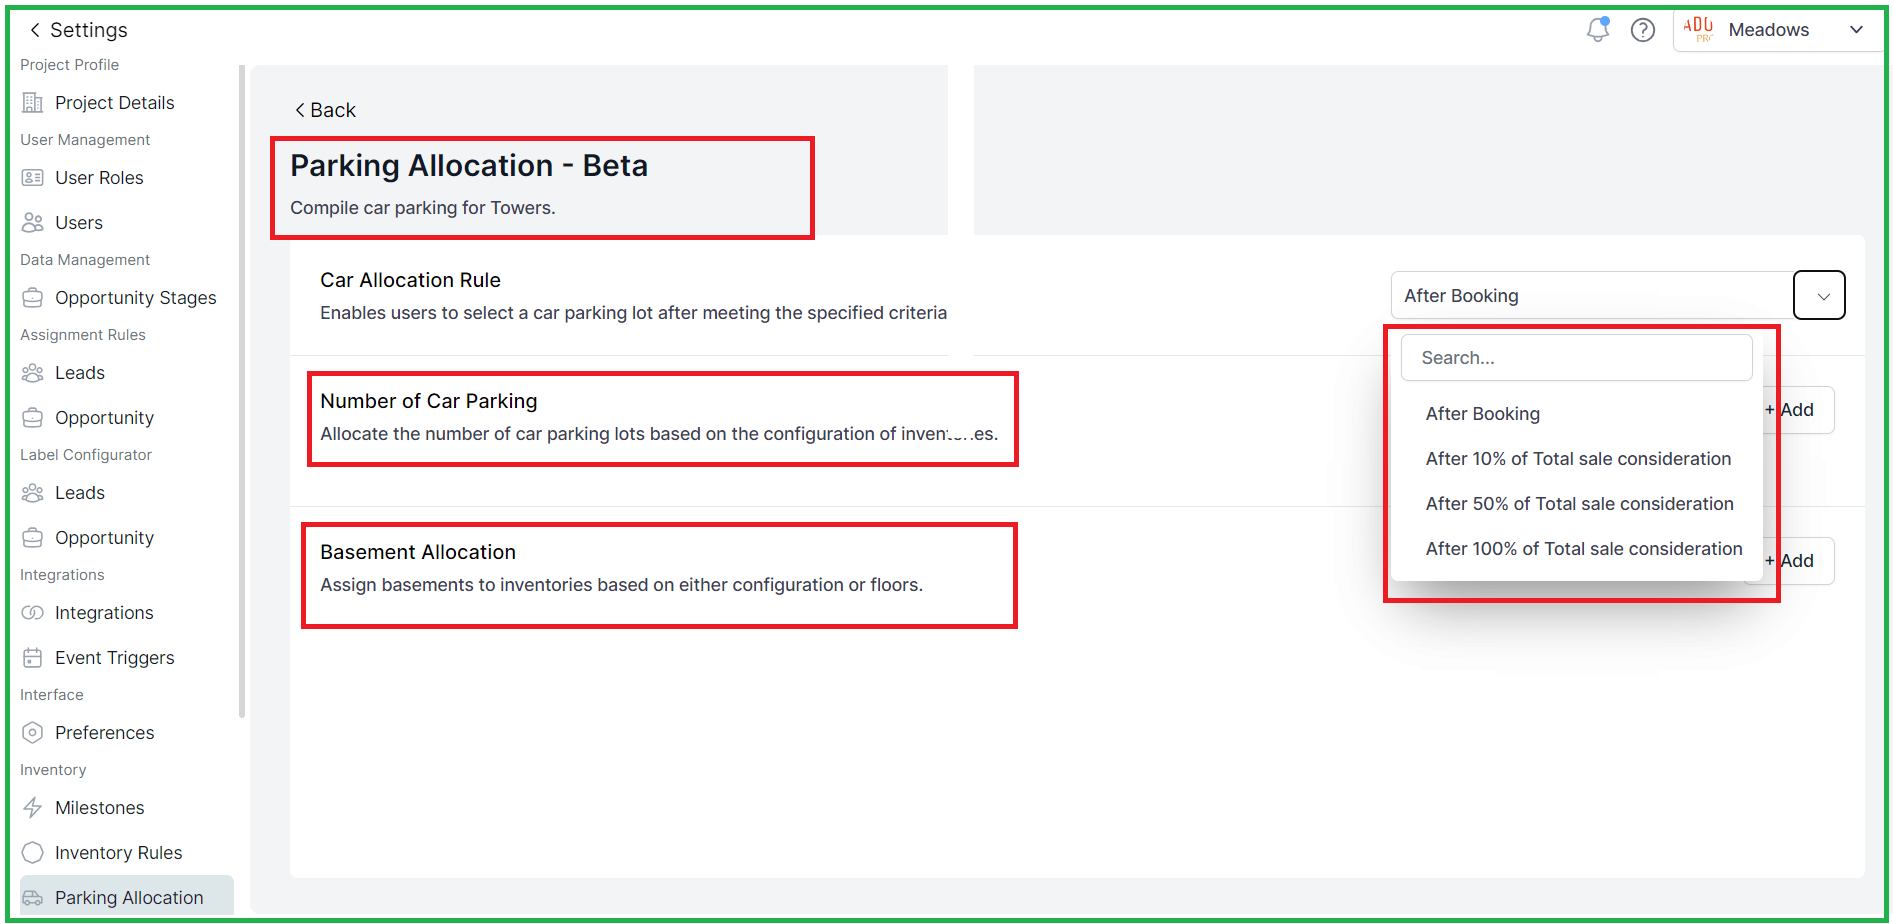
Furthermore, users can specify the type of parking allocation based on floors or configuration and determine the total number of parking slots for each configuration.
Note: This feature is also to the users with CRM access rights.
Date: 25th September
Web Application
1. Enhancement Under the Opportunities:
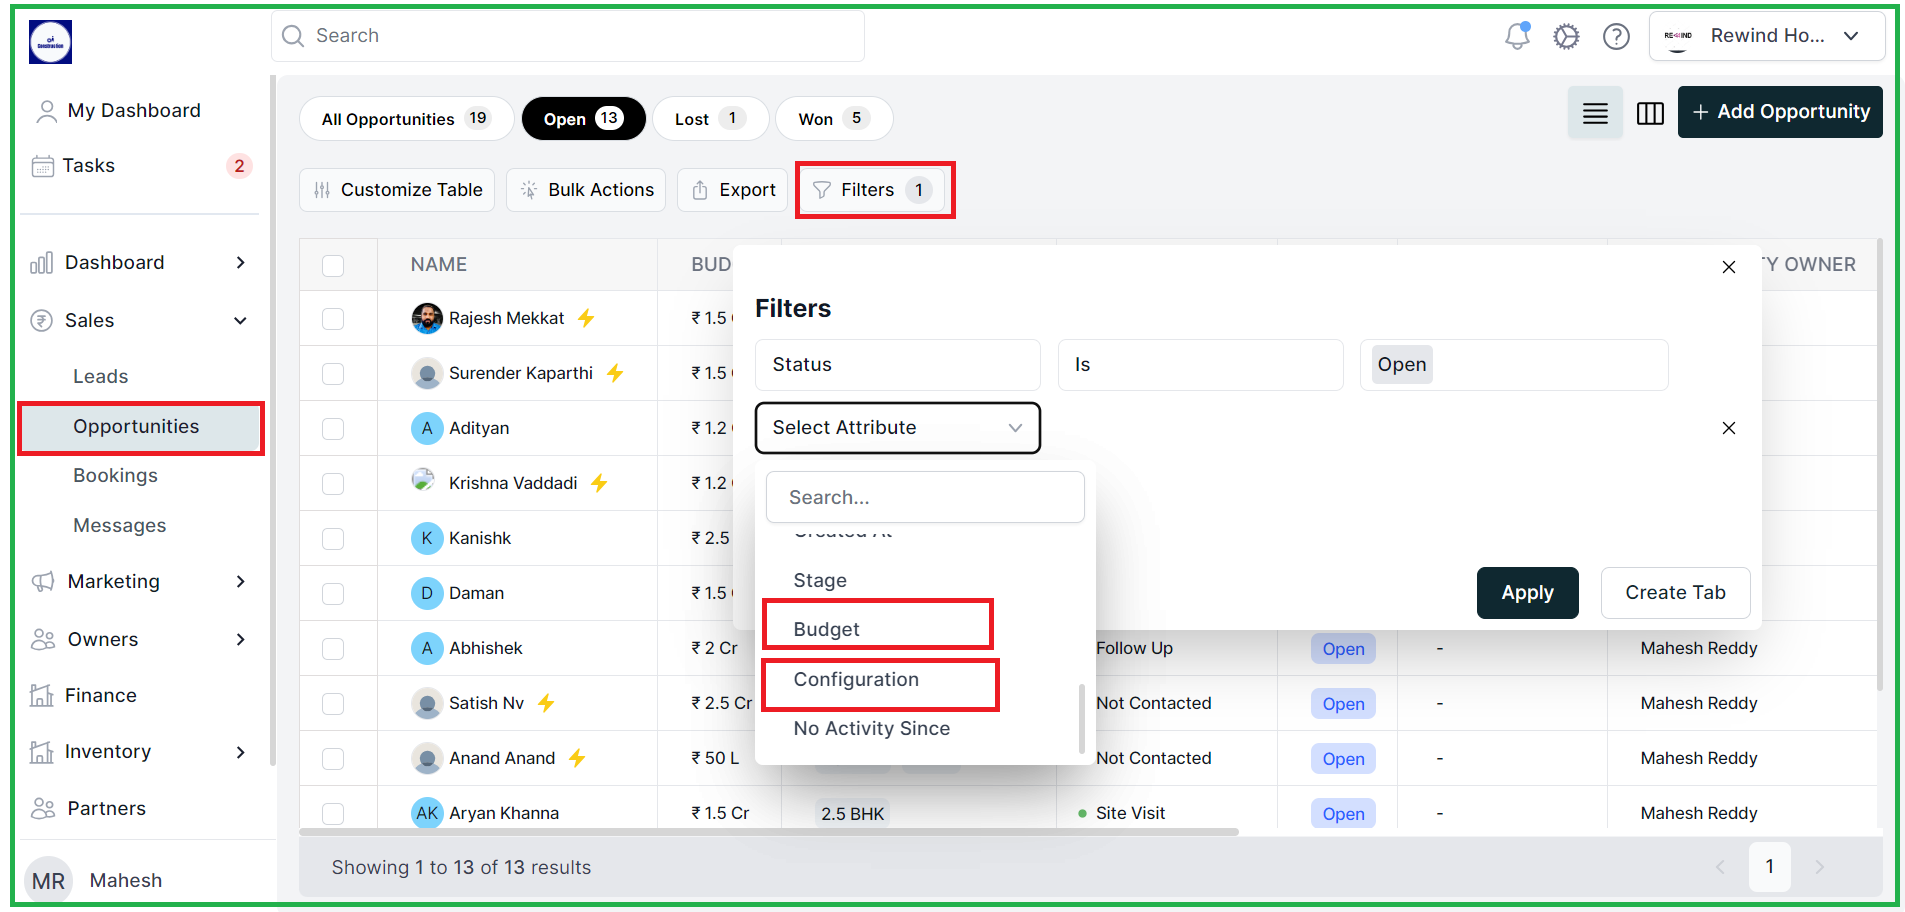
1.1 Filter with budget and configuration: You can easily filter opportunities based on budget and configuration, making it simpler to find the right options.
1.2. Now Added an edit icon to quickly modify opportunity stages to avoid issues with automation

1.3 To prevent problems with automation, you can't mark stages as "INACTIVE" or "DELETE" if automation is being used.
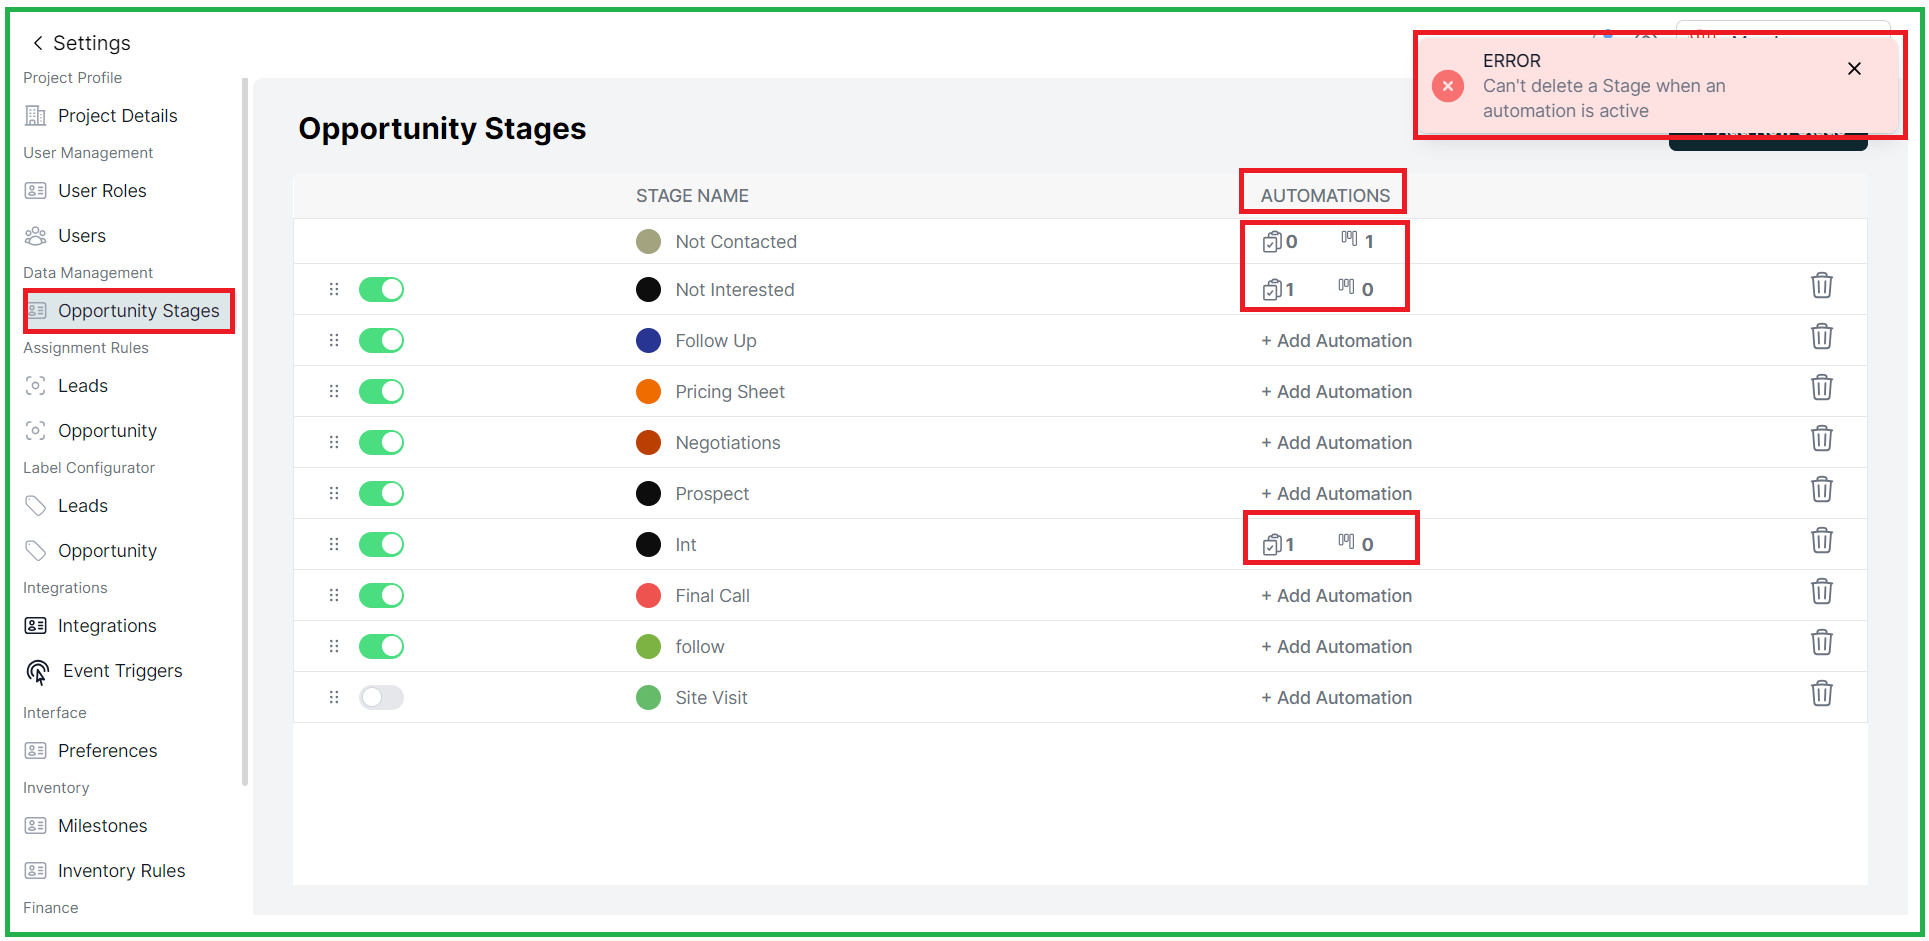
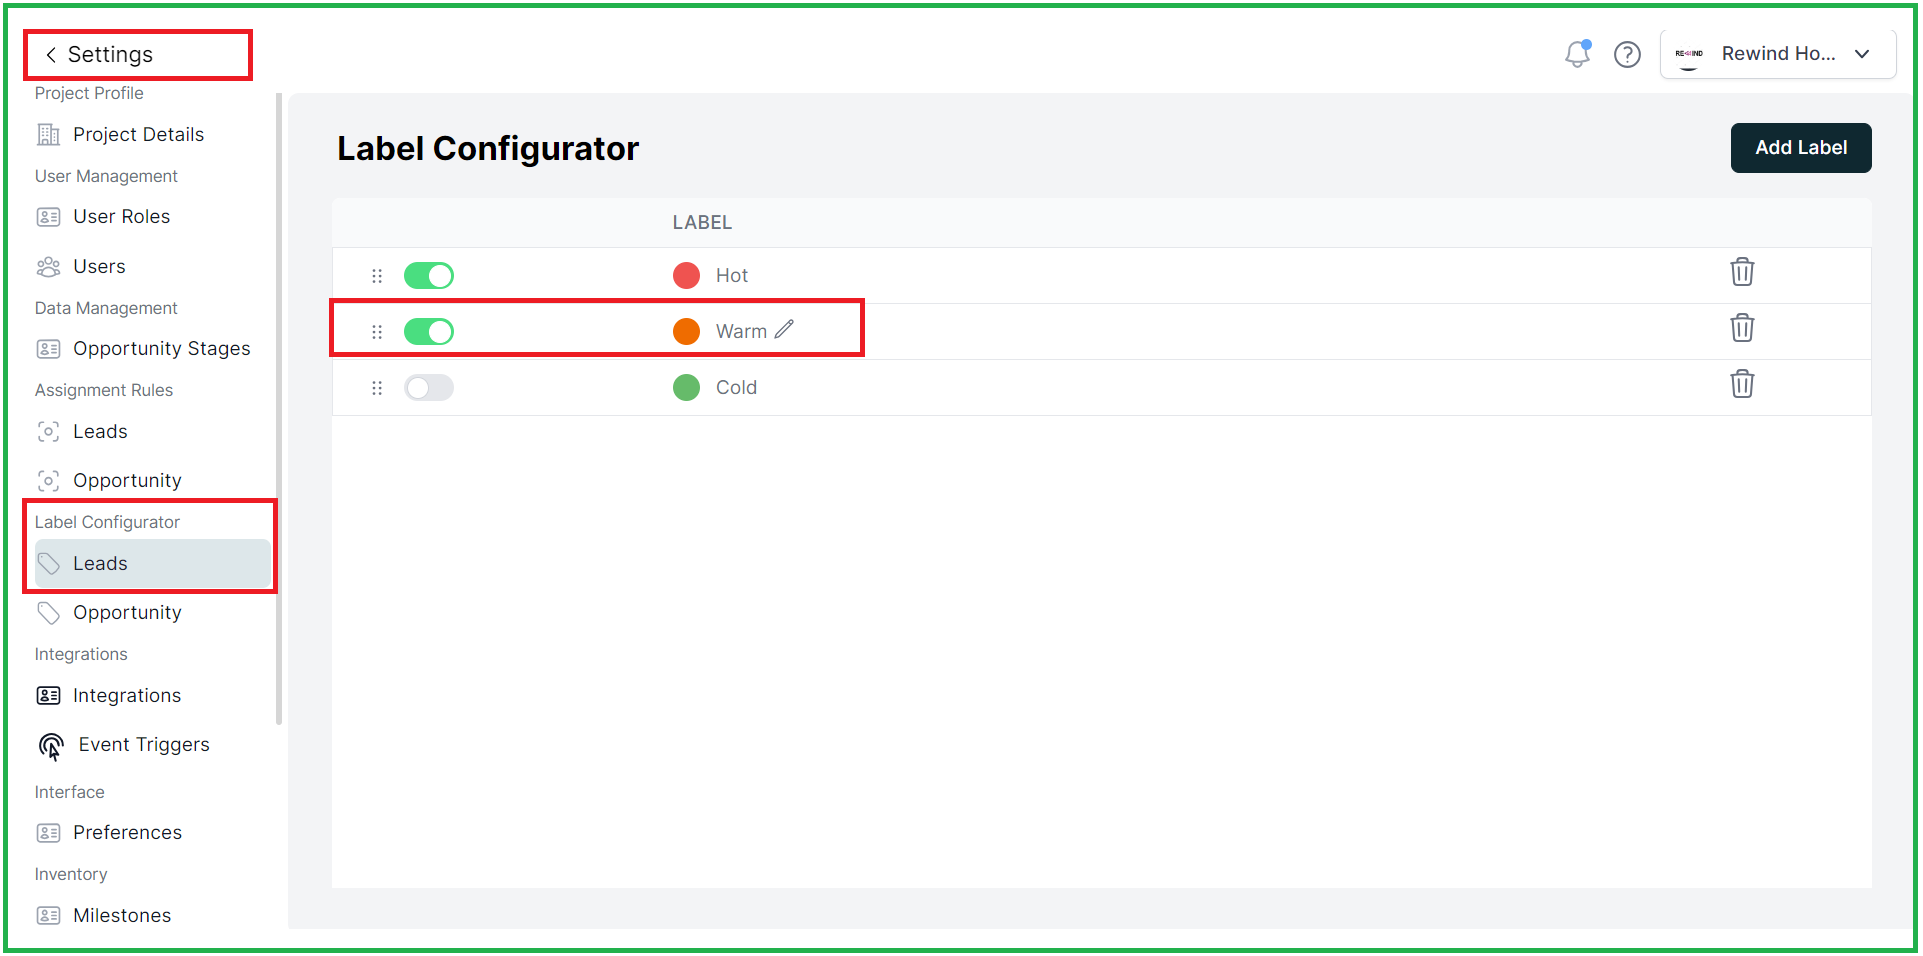
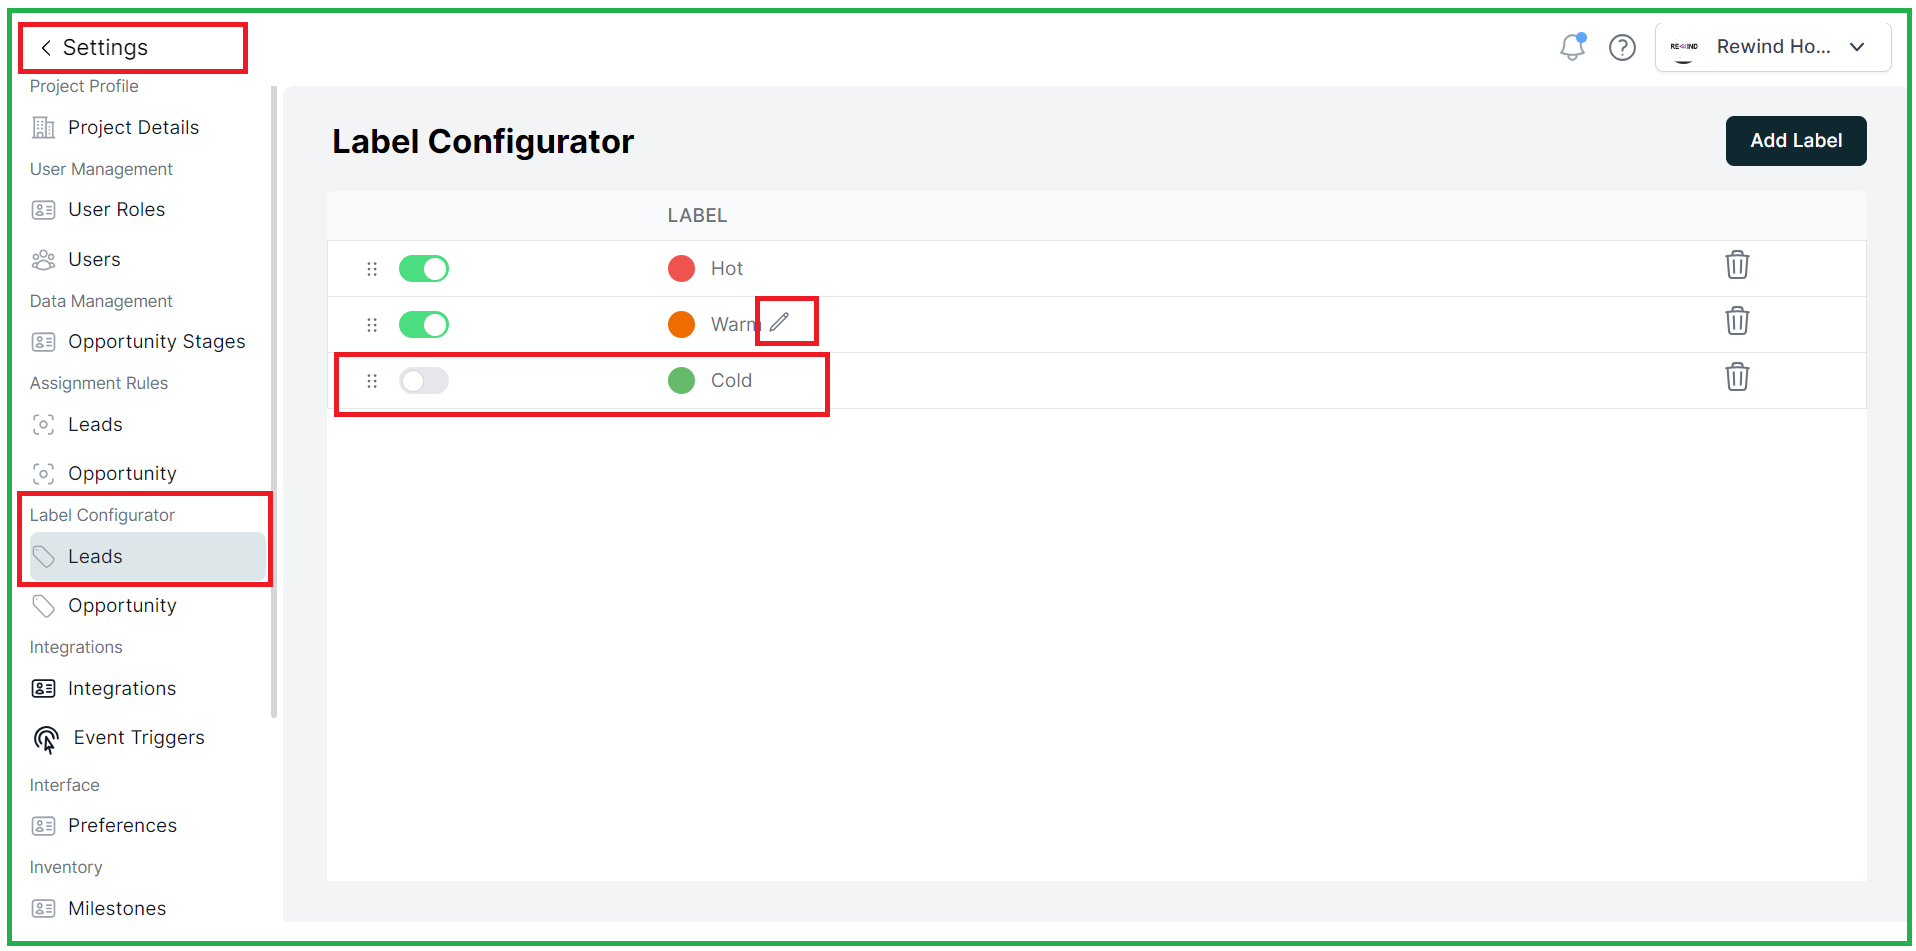
1.4 Disabled Edit for INACTIVE Stages: "INACTIVE" stages and labels can't be edited.
1.5 Partners Search: You can now search for partners more efficiently.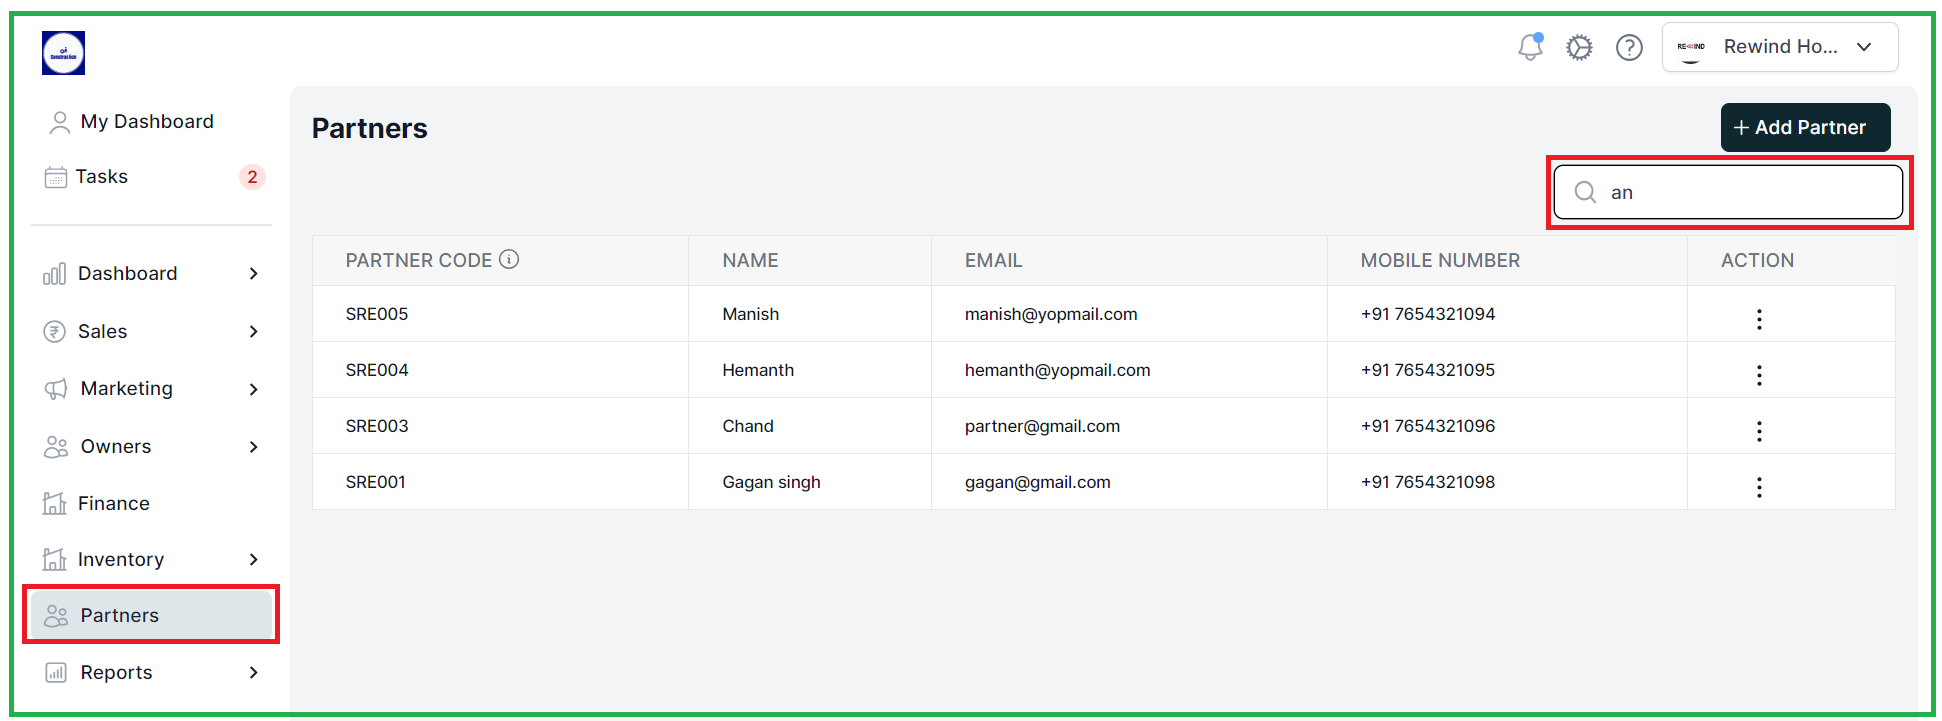
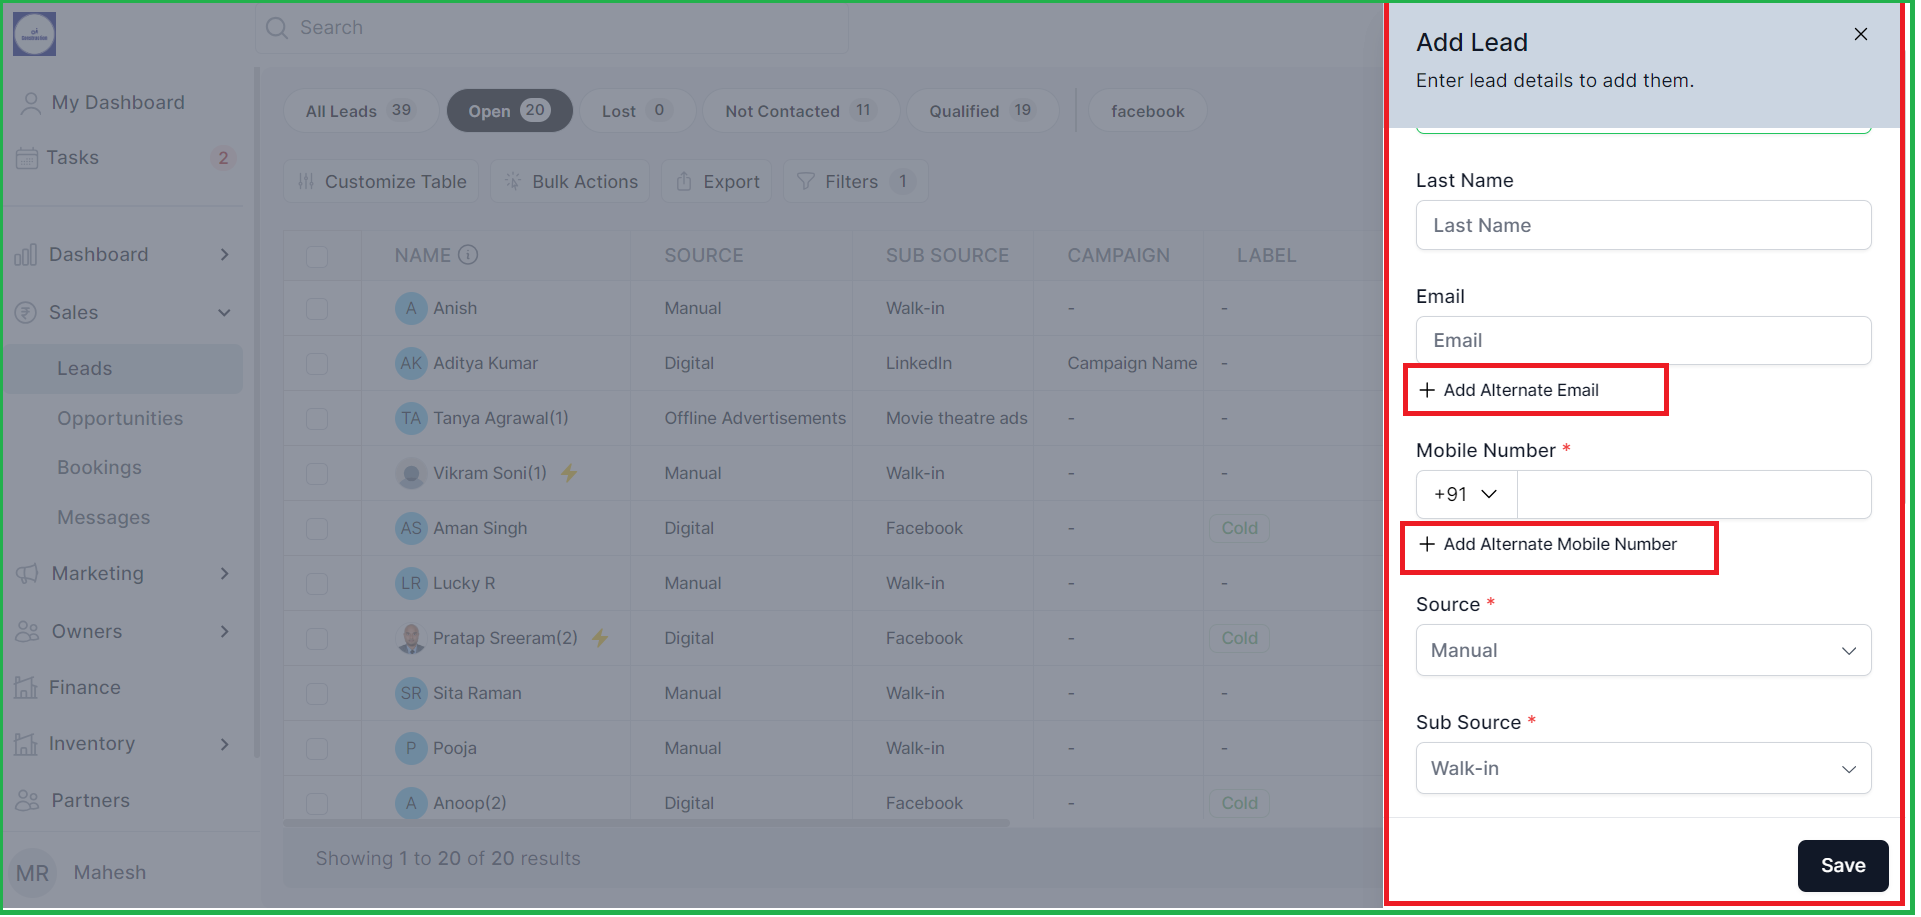
1.6 Lead Alternate Contact Info: When creating leads, there's now an option to input alternate "email" and "phone numbers".
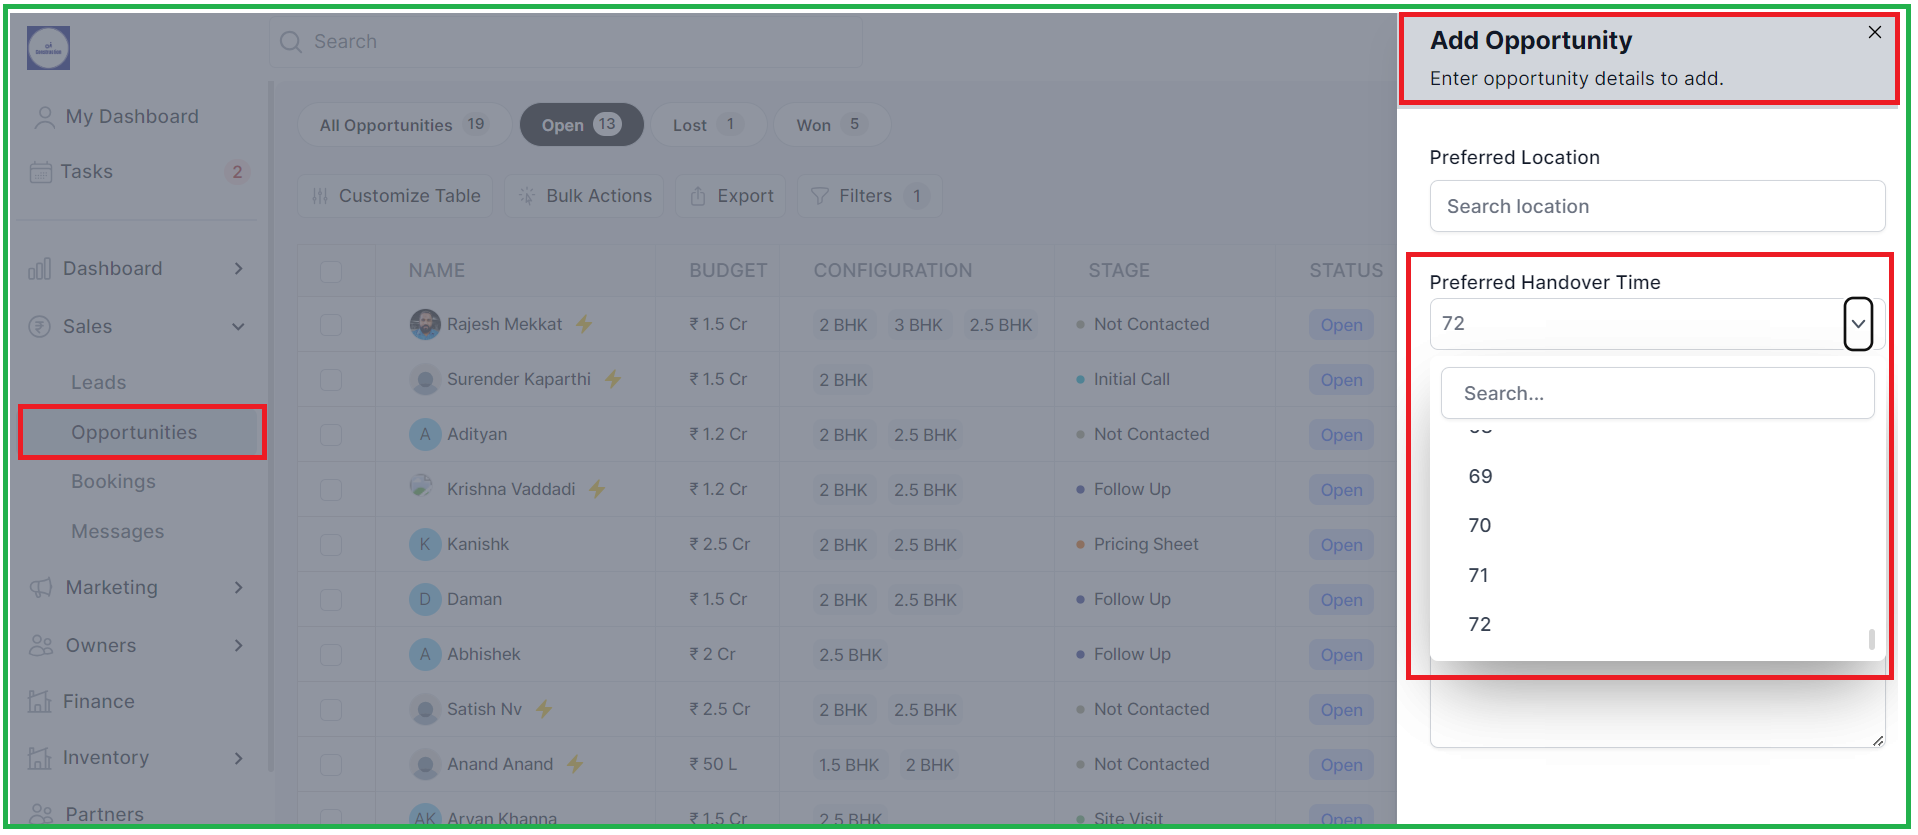
1.7 Extended Opportunity Handover Time: Opportunity handover time has been extended to 72 months.

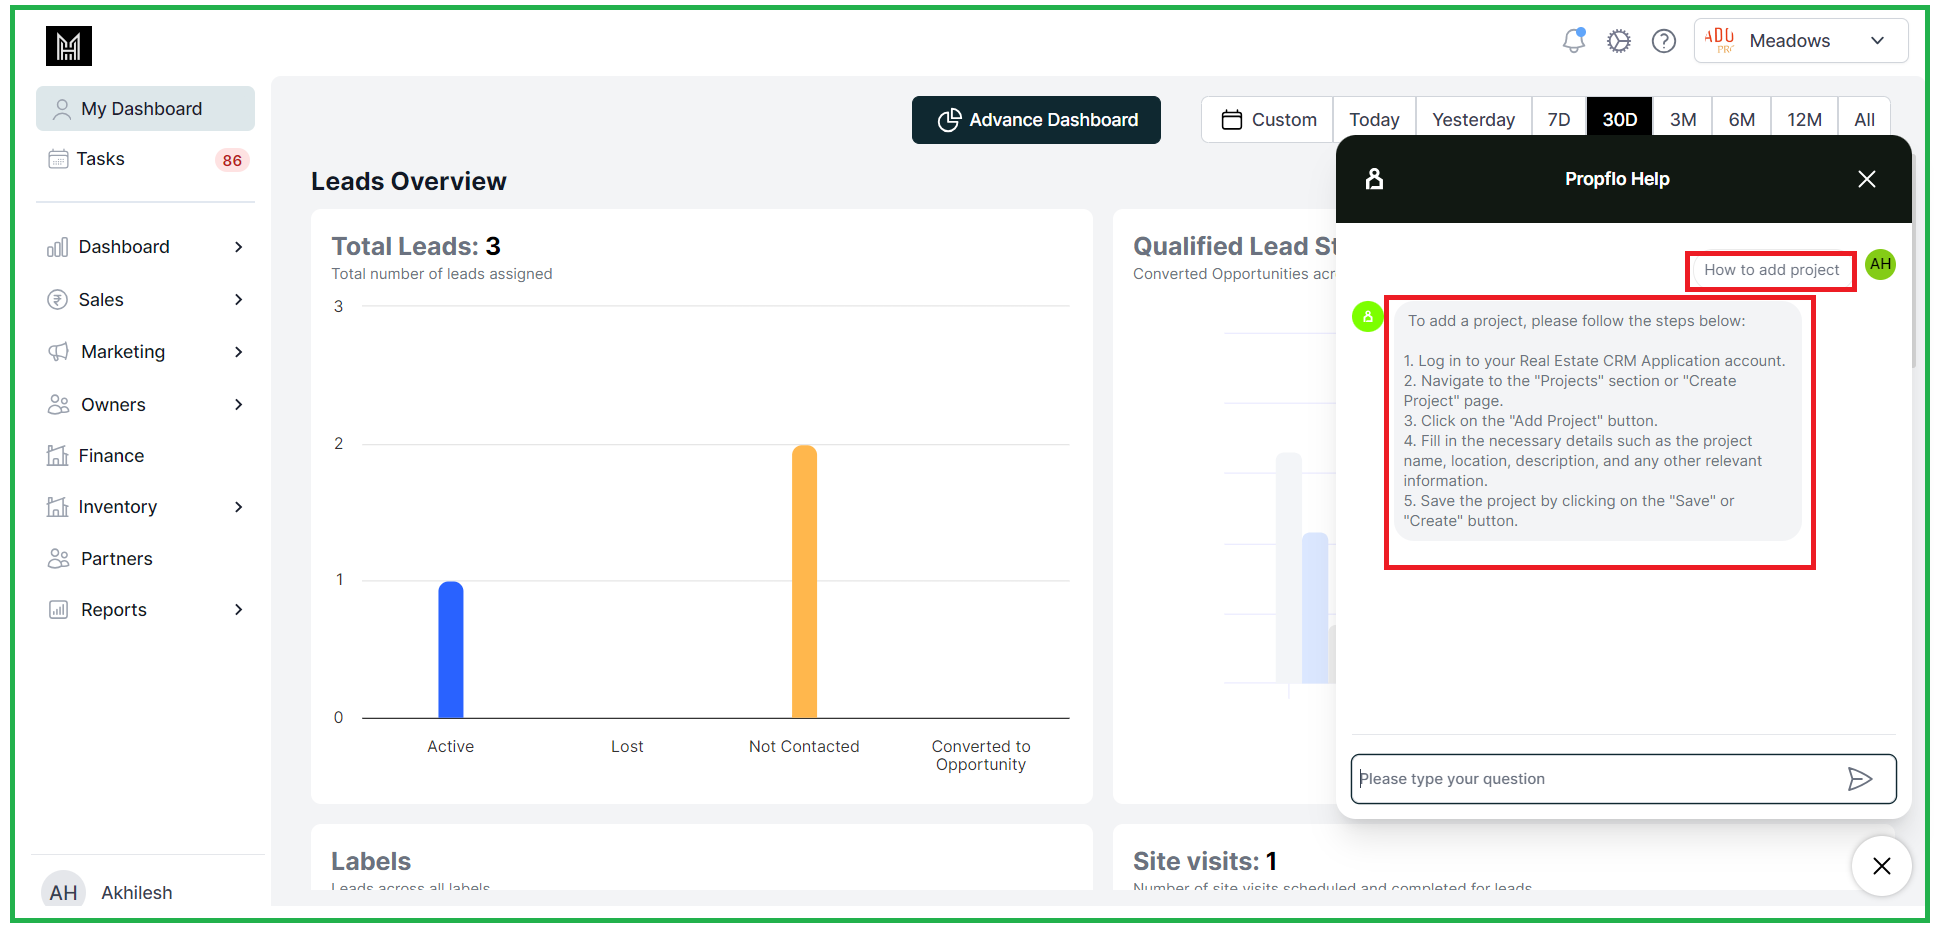
2. Knowledge Base AI:
Now we have an API that allows users to ask questions related to Propflo. The AI leverages content from help.propflo.ai to provide accurate and timely responses.

This is how you can get the responses to the question related to the Propflo updates and features when asked,
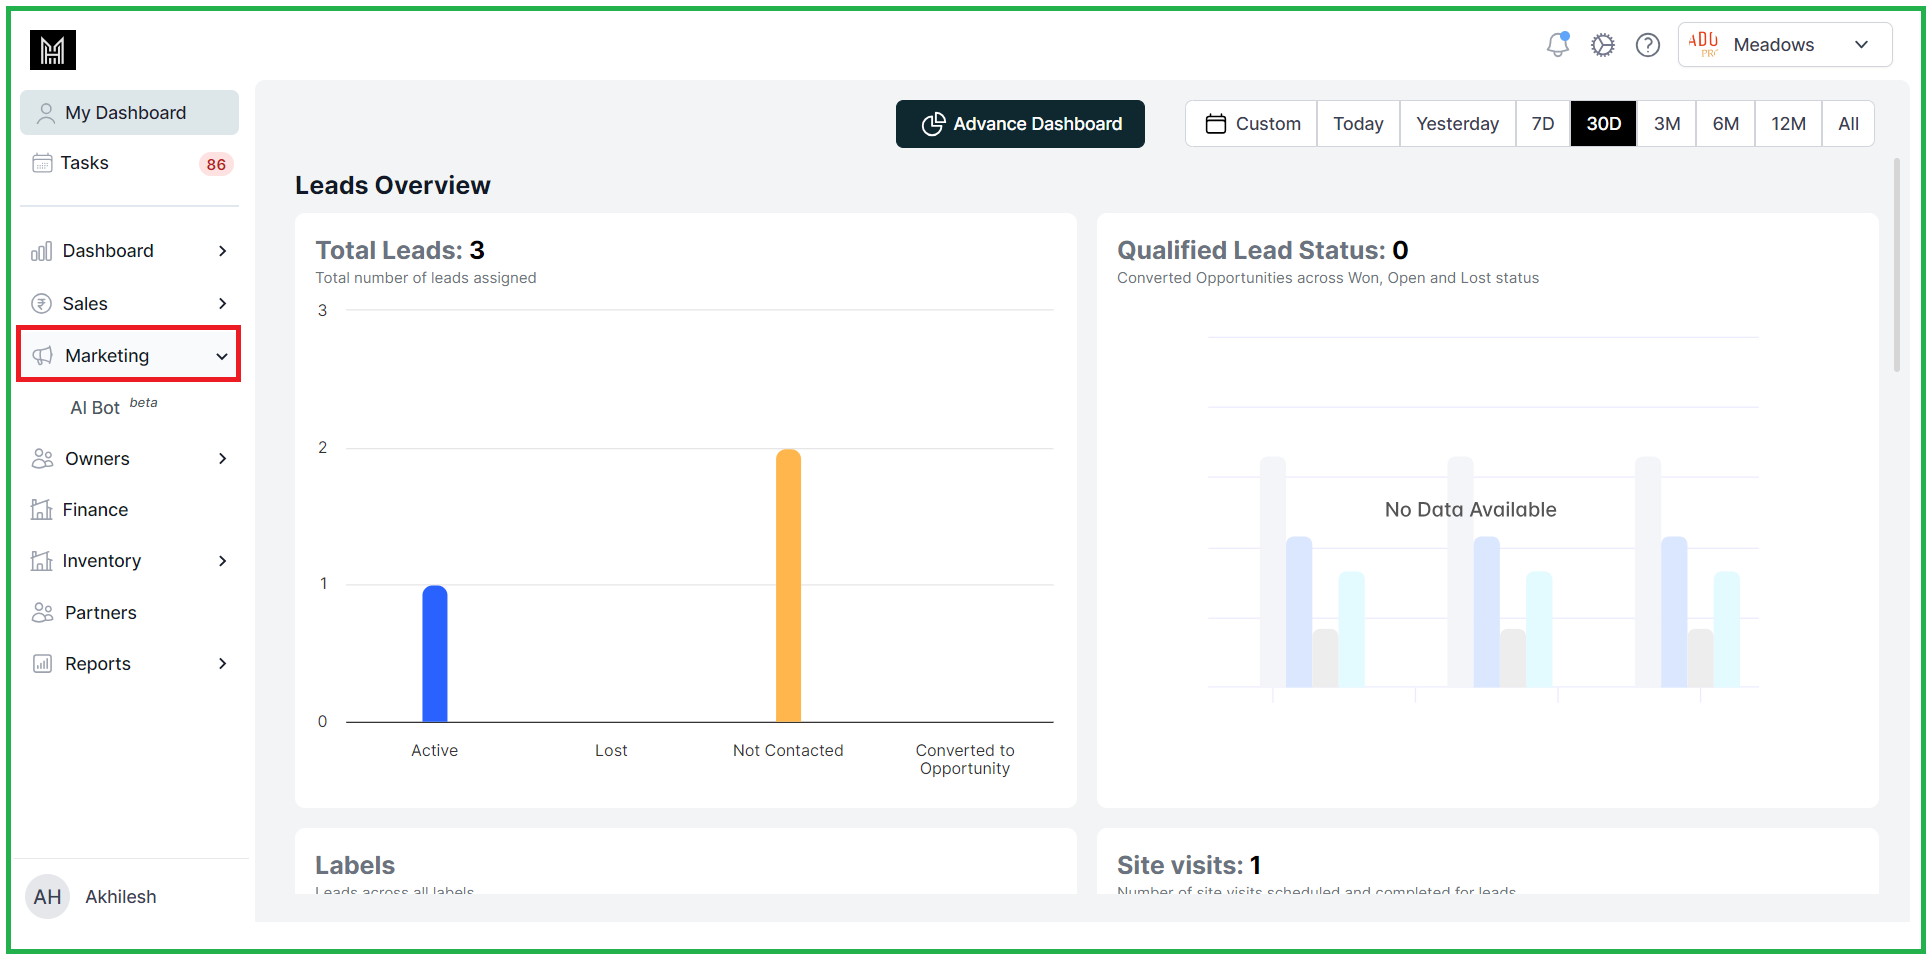
3. AI Bot Menu:

AI bot models are now under "Marketing" in the main menu, making them easier to access.
AI Bot Conversation Summaries: We now have an API that creates automatic conversation summaries for AI bot interactions regarding leads and opportunities. This simplifies tracking and understanding these interactions.
Added AI Bot summary also in lead insights when the "WhatsApp is integrated" and "Event Trigger" is added and WhatsApp chat is initiated by the any buyer its will be reflection on this screen.


4. Improved AI Data Analyst:
AI Data Analyst is now even better at providing accurate and insightful data analysis for leads and opportunities.
Date: 26th August
Web Application
NEW FEATURE:
1. AI Analytics Simplified:
You can find the "AI Data Analyst" tool in the Dashboard Menu under sections like Marketing, Presales, and Sales.
Using AI for Data Insights: For getting information from your data, try asking these questions,
Note: Its In Beta phase so you can test on with these questions,
Sample Questions (For Data): How many leads were created on August 22, 2023?
How many leads have been assigned to kishor?
How many leads come from Facebook?
How many leads are marked as "lost"?
How many opportunities are there?
1.1. For these AI Data Analyst go to the "dashboard"
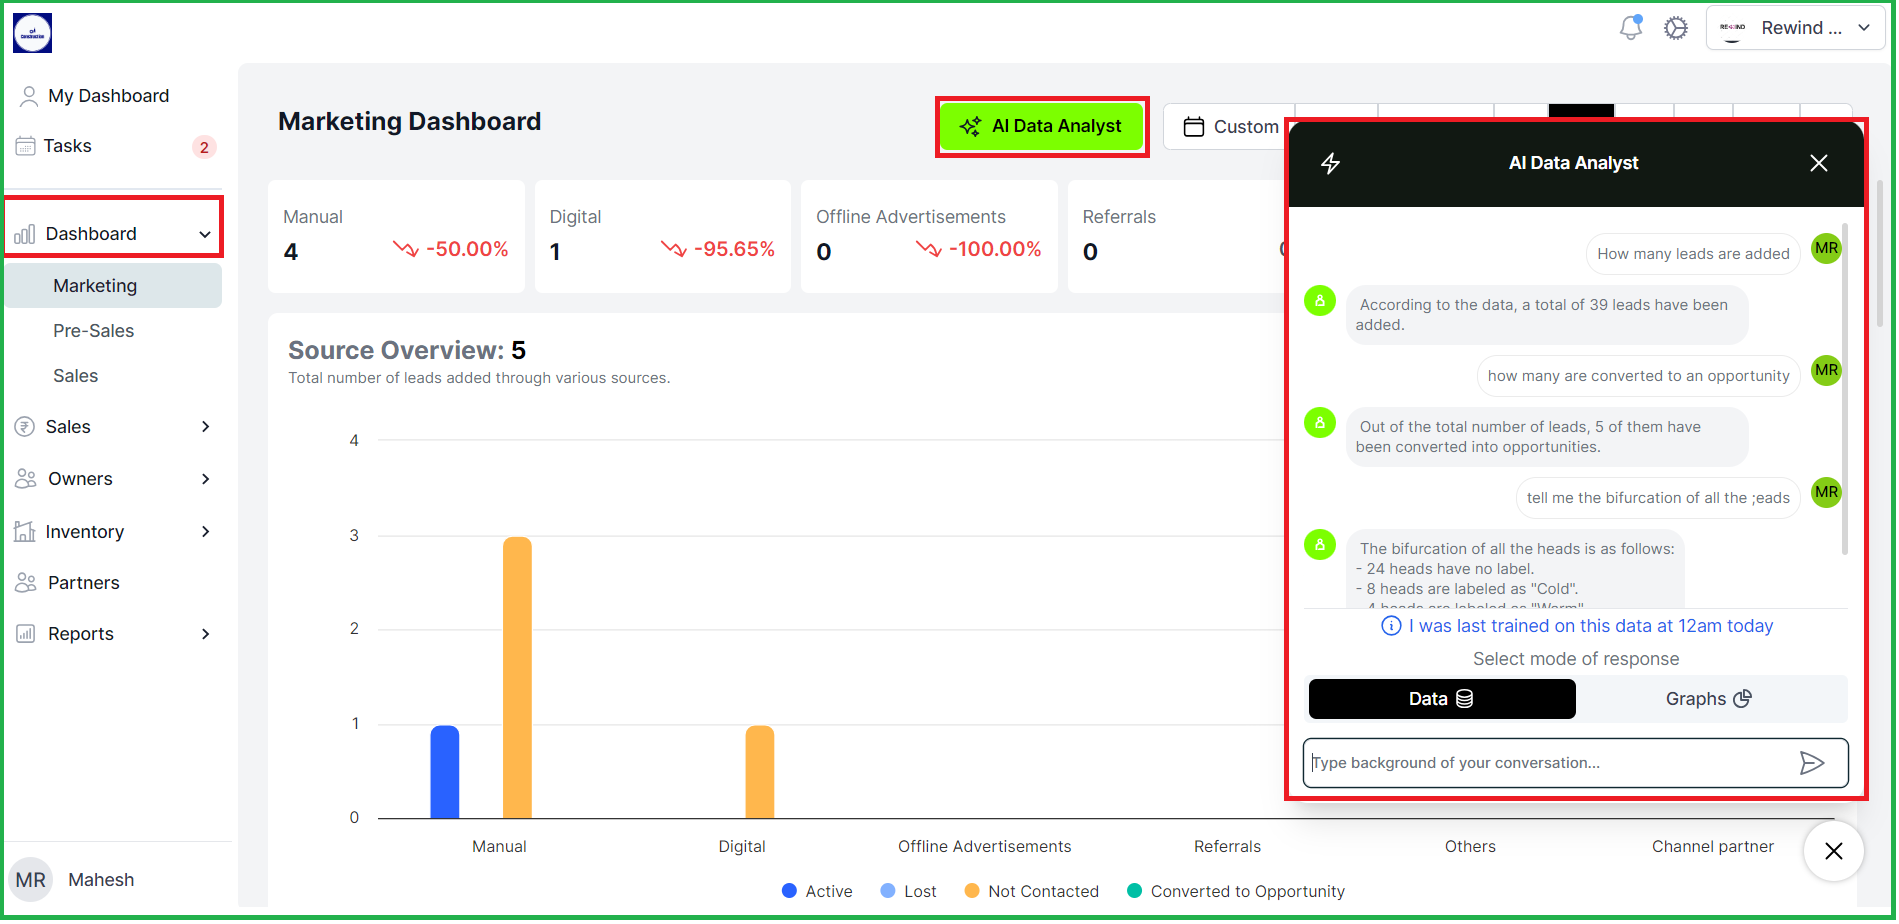
Sample Questions (For Graphs): Give a bar graph on lead assigned to
Give a stack column graph on lead assigned to
Give a bar graph on lead status

Date: 22th August
Web Application
NEW FEATURE: SALES
1. Expanded Sidebar Menu:
Now, whenever you hover over the sidebar menu, it will automatically expand, providing you with quick access to various sections of Various Modules,
2. Kanban Card Enhancements:
We've made the Kanban view even more informative, now you can see note and task counts displayed directly on the cards, along with labels to give you a better overview.
3. Better Preferred Location Search:
When working with preferred locations, we've added a "Google Search" feature at the Opportunity level. This means you can quickly search for location details without leaving the platform.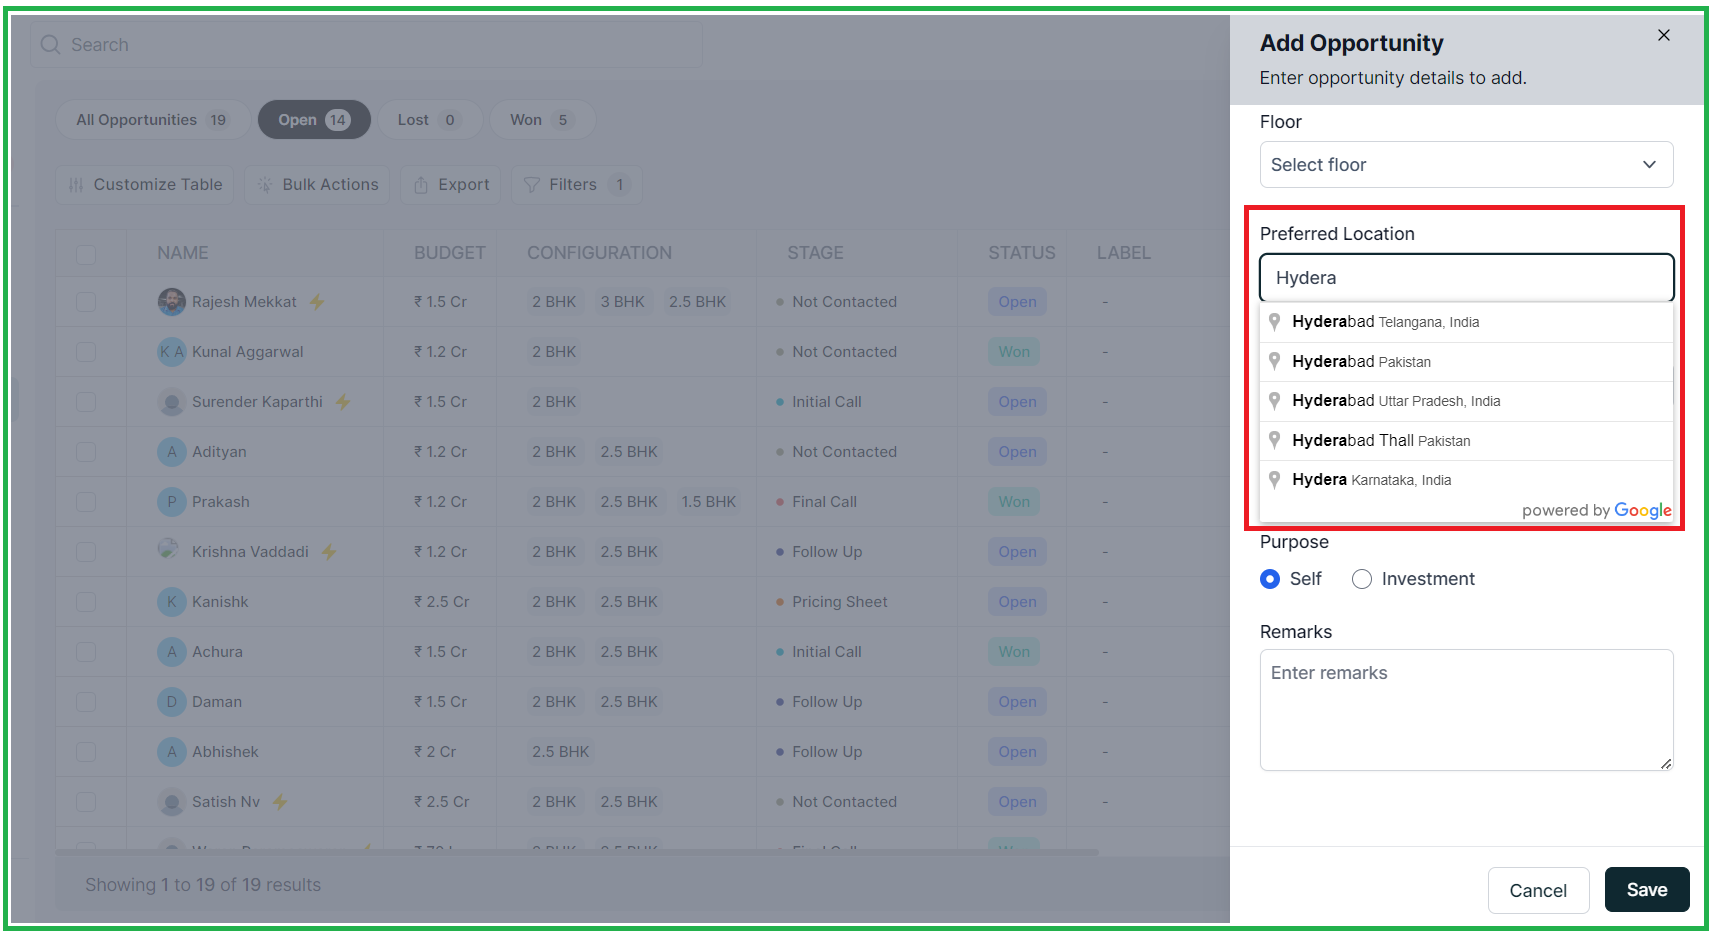
4. Easier Filtering:
The filter tab will now open by default when you're viewing Opportunities and Leads in list format.
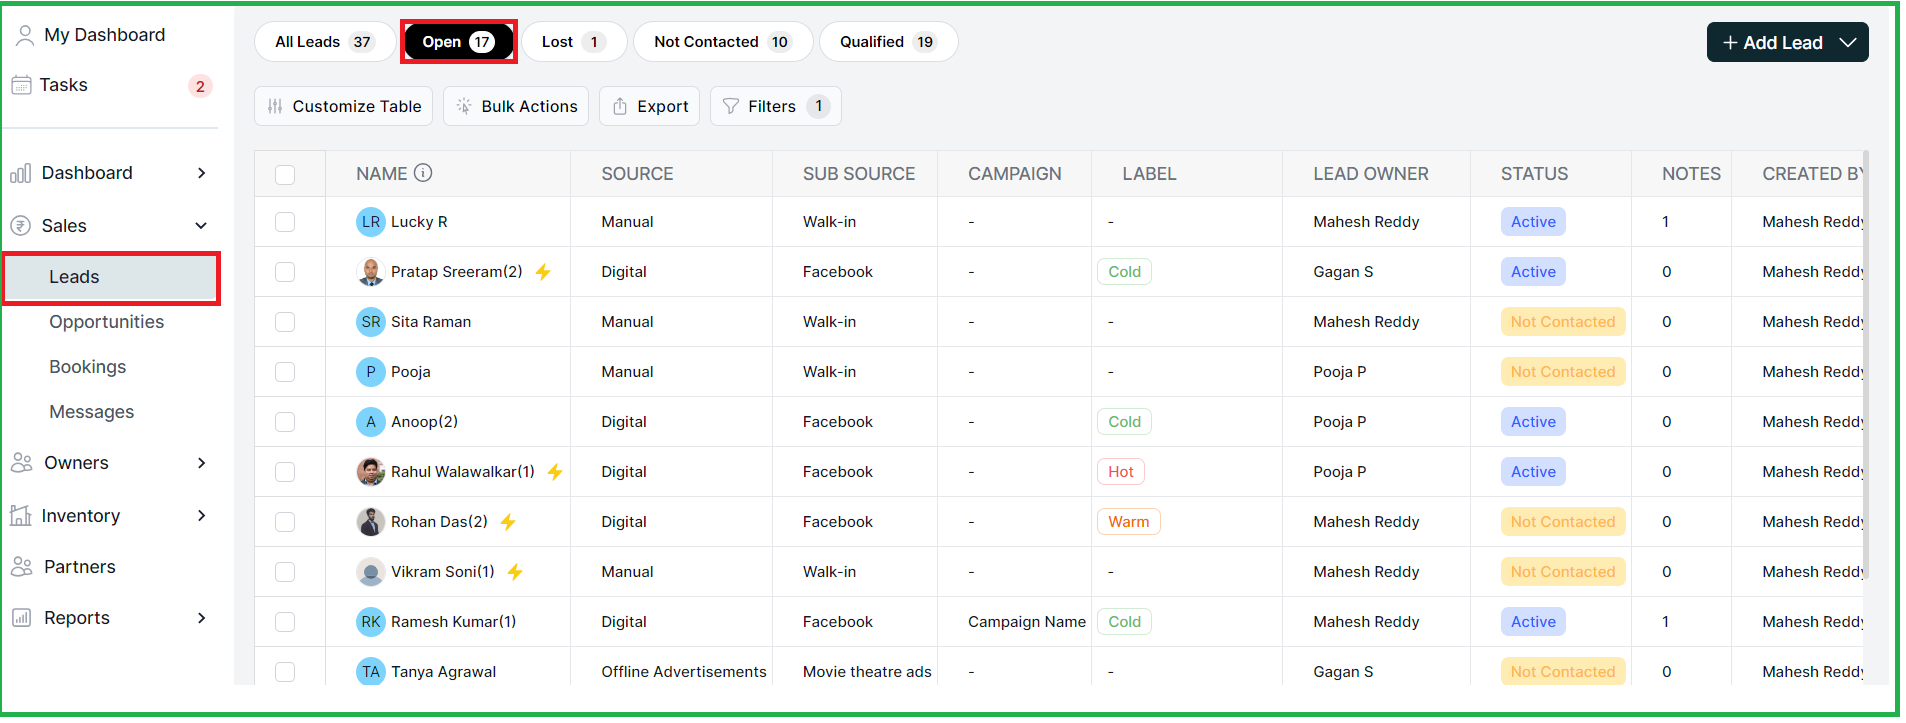
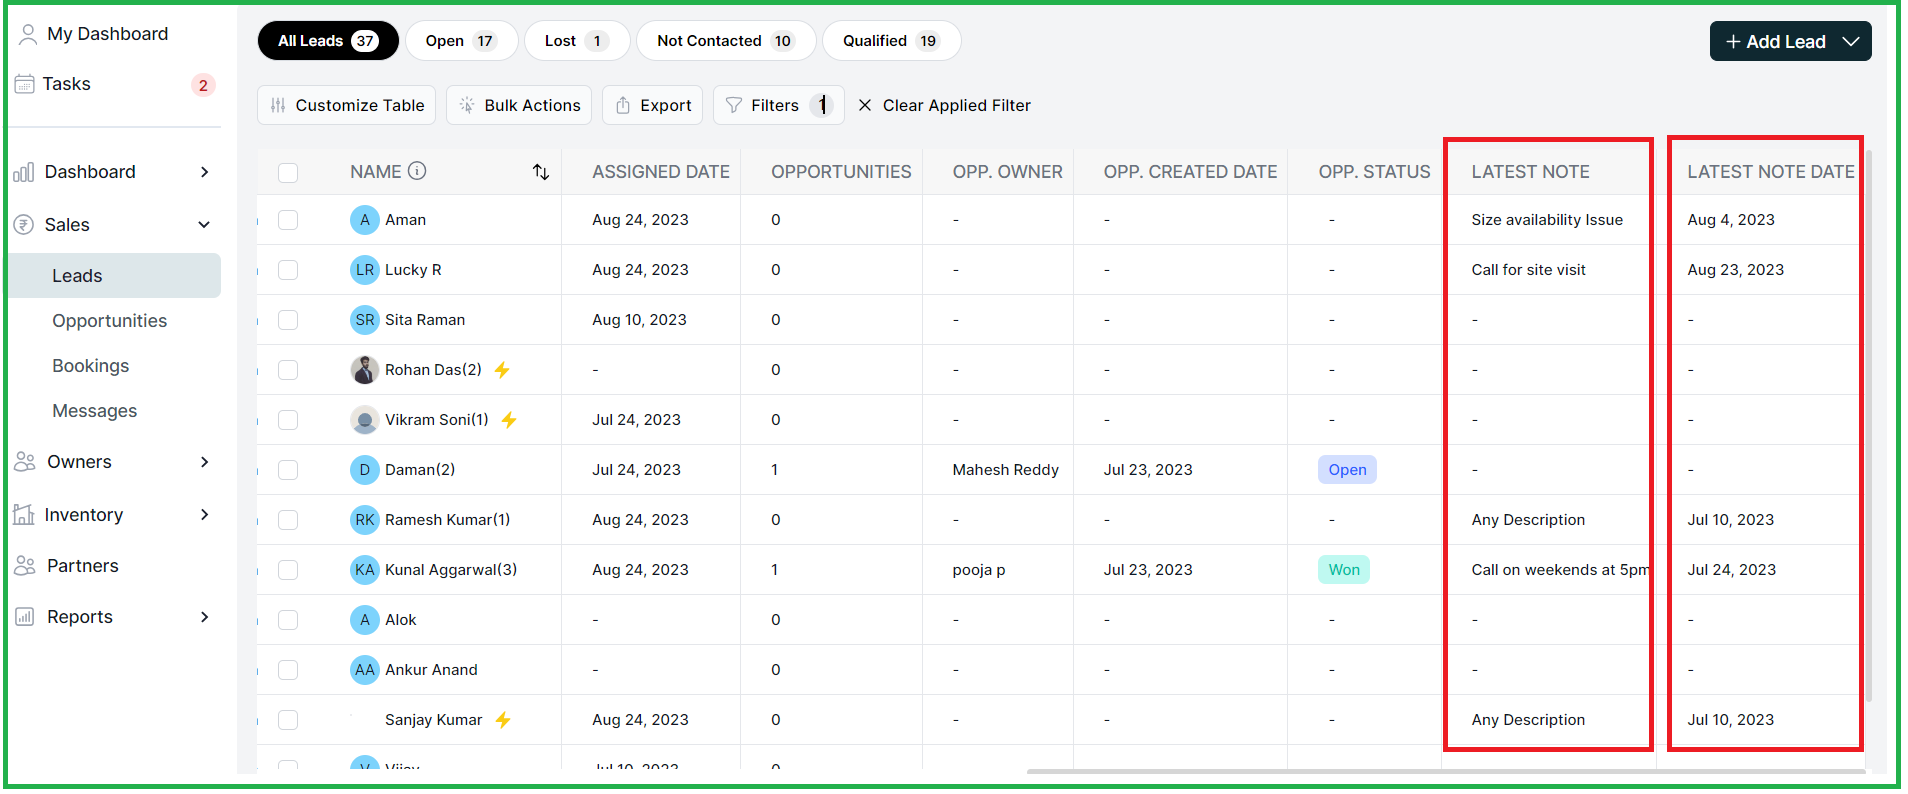
5. Stay Updated with Notes:
In the list view, you will now have the "LATEST NOTE DATE" & "LATEST NOTE" columns, you can easily see the most recent notes associated with each item.
6. WhatsApp Integration with Trigger:
Now you can even integrate facebook and WhatsApp with the Propflo with a simple steps,

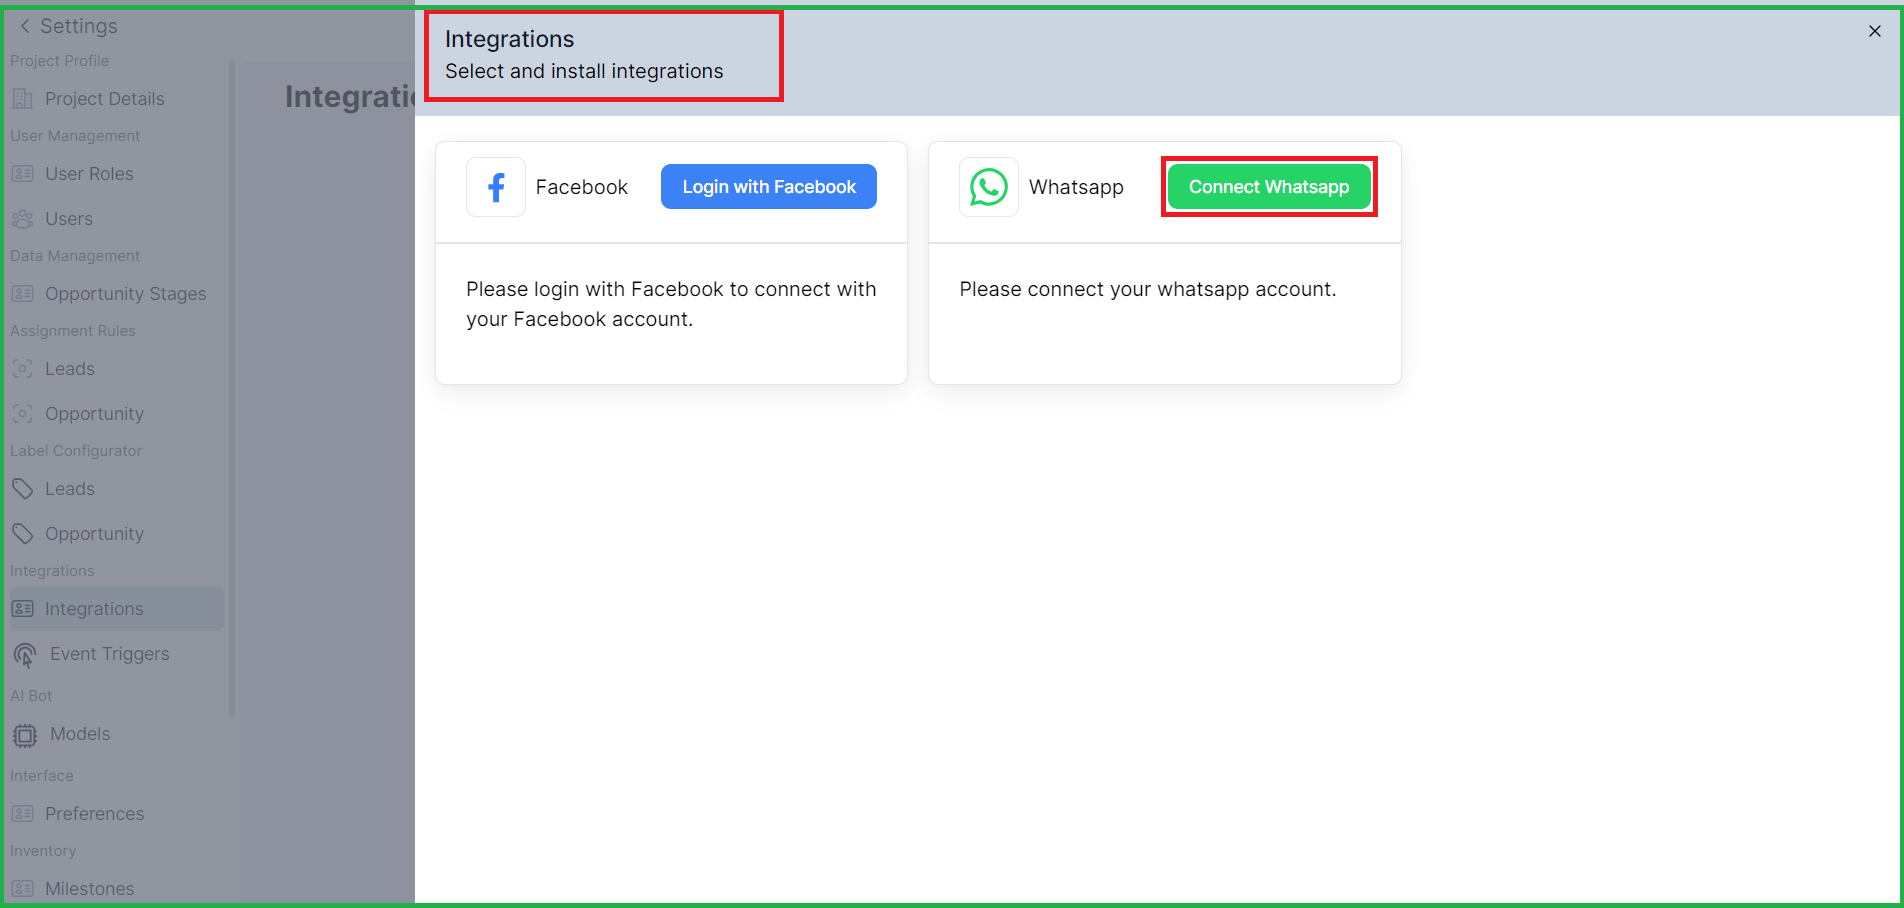
Here you have to add the details of your WhatsApp business account,
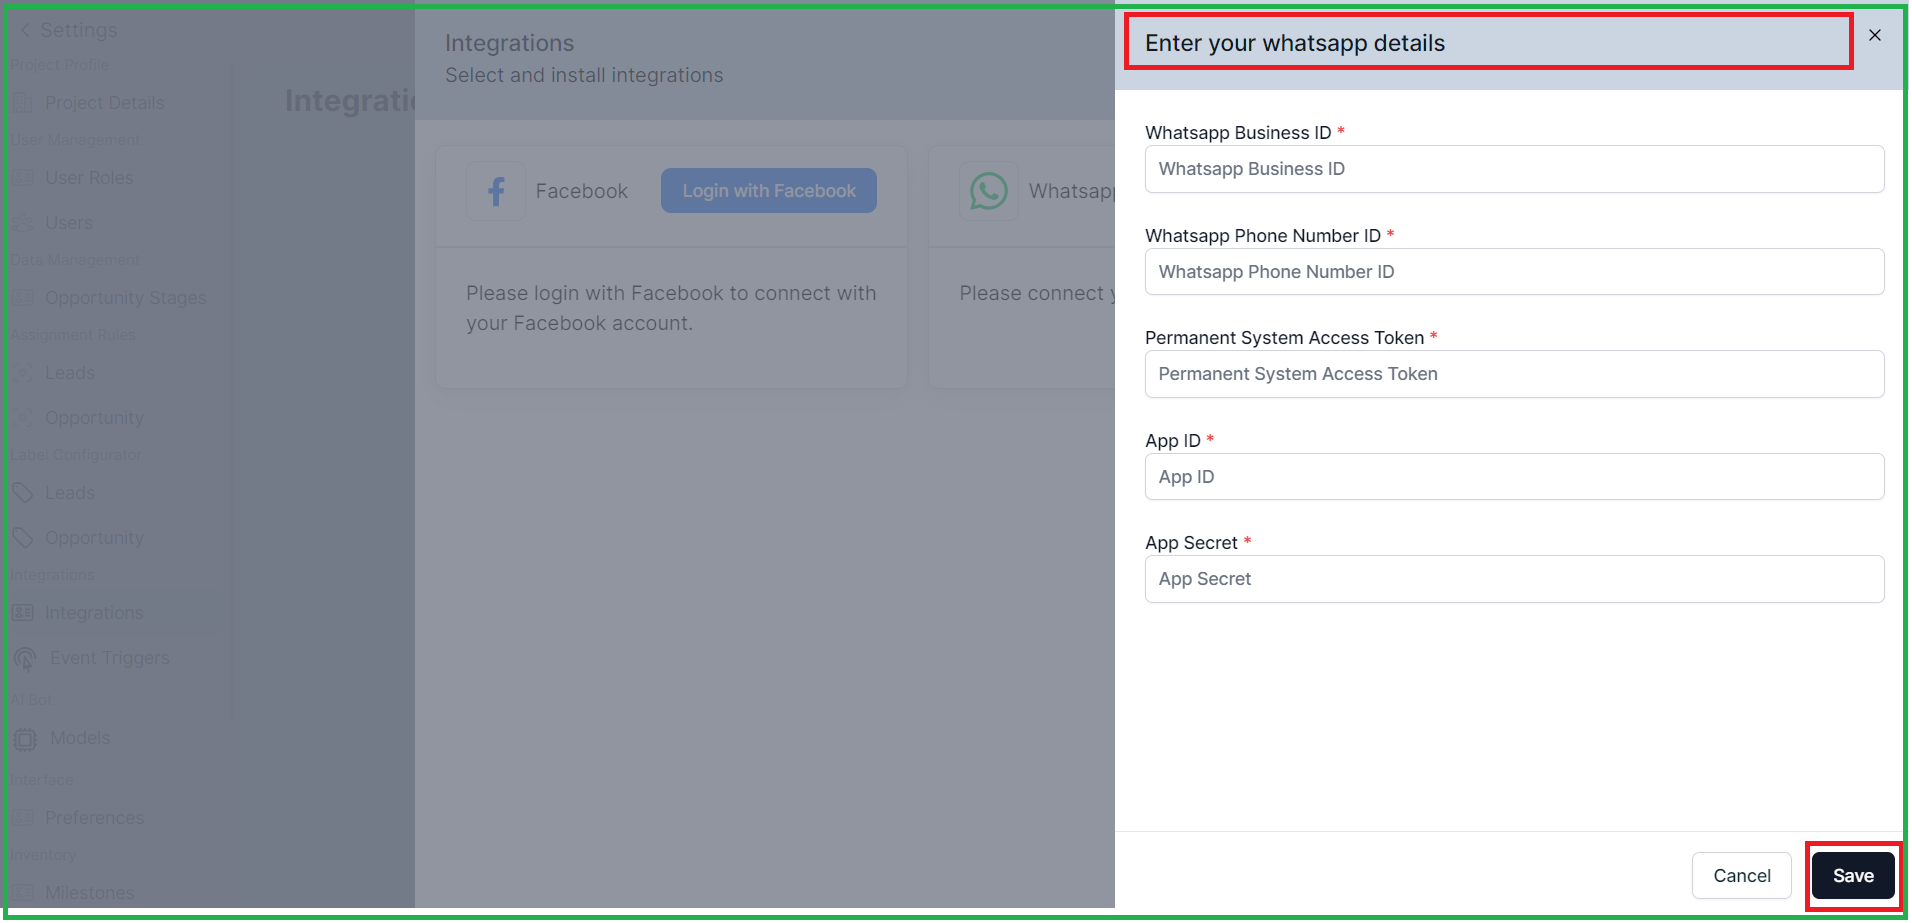
For adding the WhatsApp Business IDs details please check the below <https://drive.google.com/file/d/1O-ZyTpvrl-9zjRS9o_Id3uwoG6APjZ5W/view>
Once integration is completed, you can add event Trigger by selecting and filling the parameters given in Meta business account.
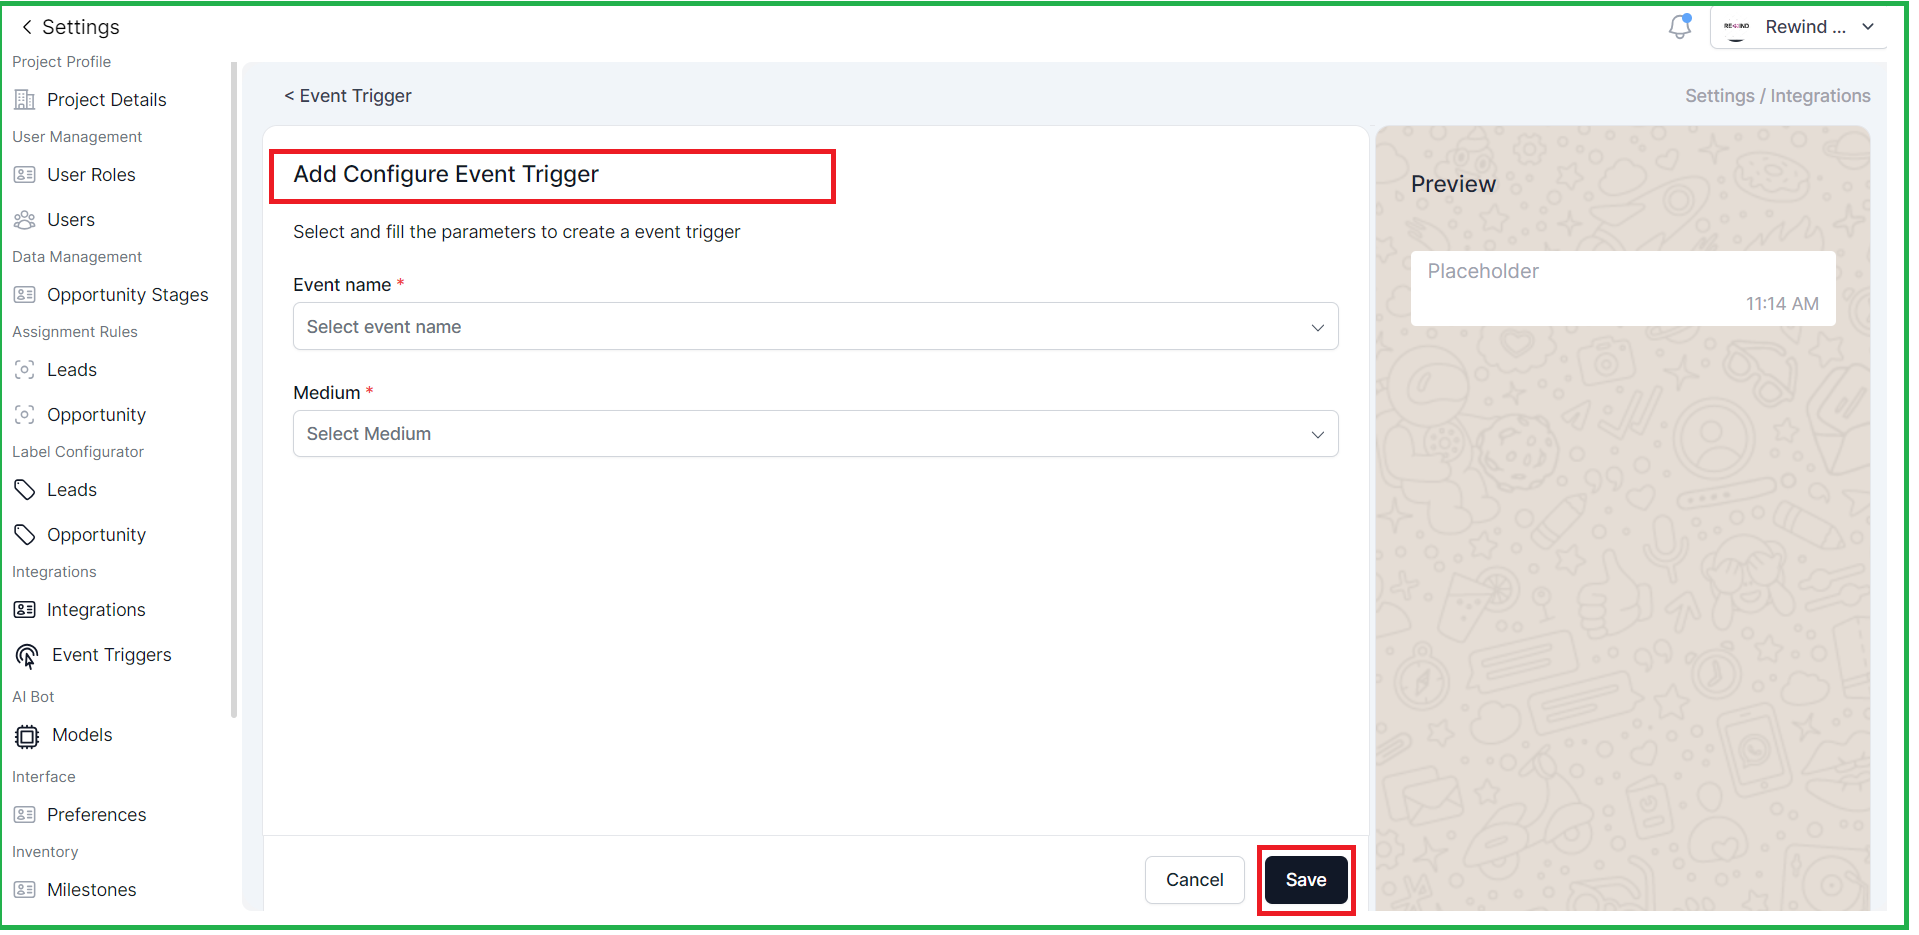
For more information regarding Integrations and Event triggers please refer:<https://drive.google.com/file/d/1O-ZyTpvrl-9zjRS9o_Id3uwoG6APjZ5W/view>
7. Interactive Bot:
Train the Bot with the URL of the project or you can also upload the file (Max 5)
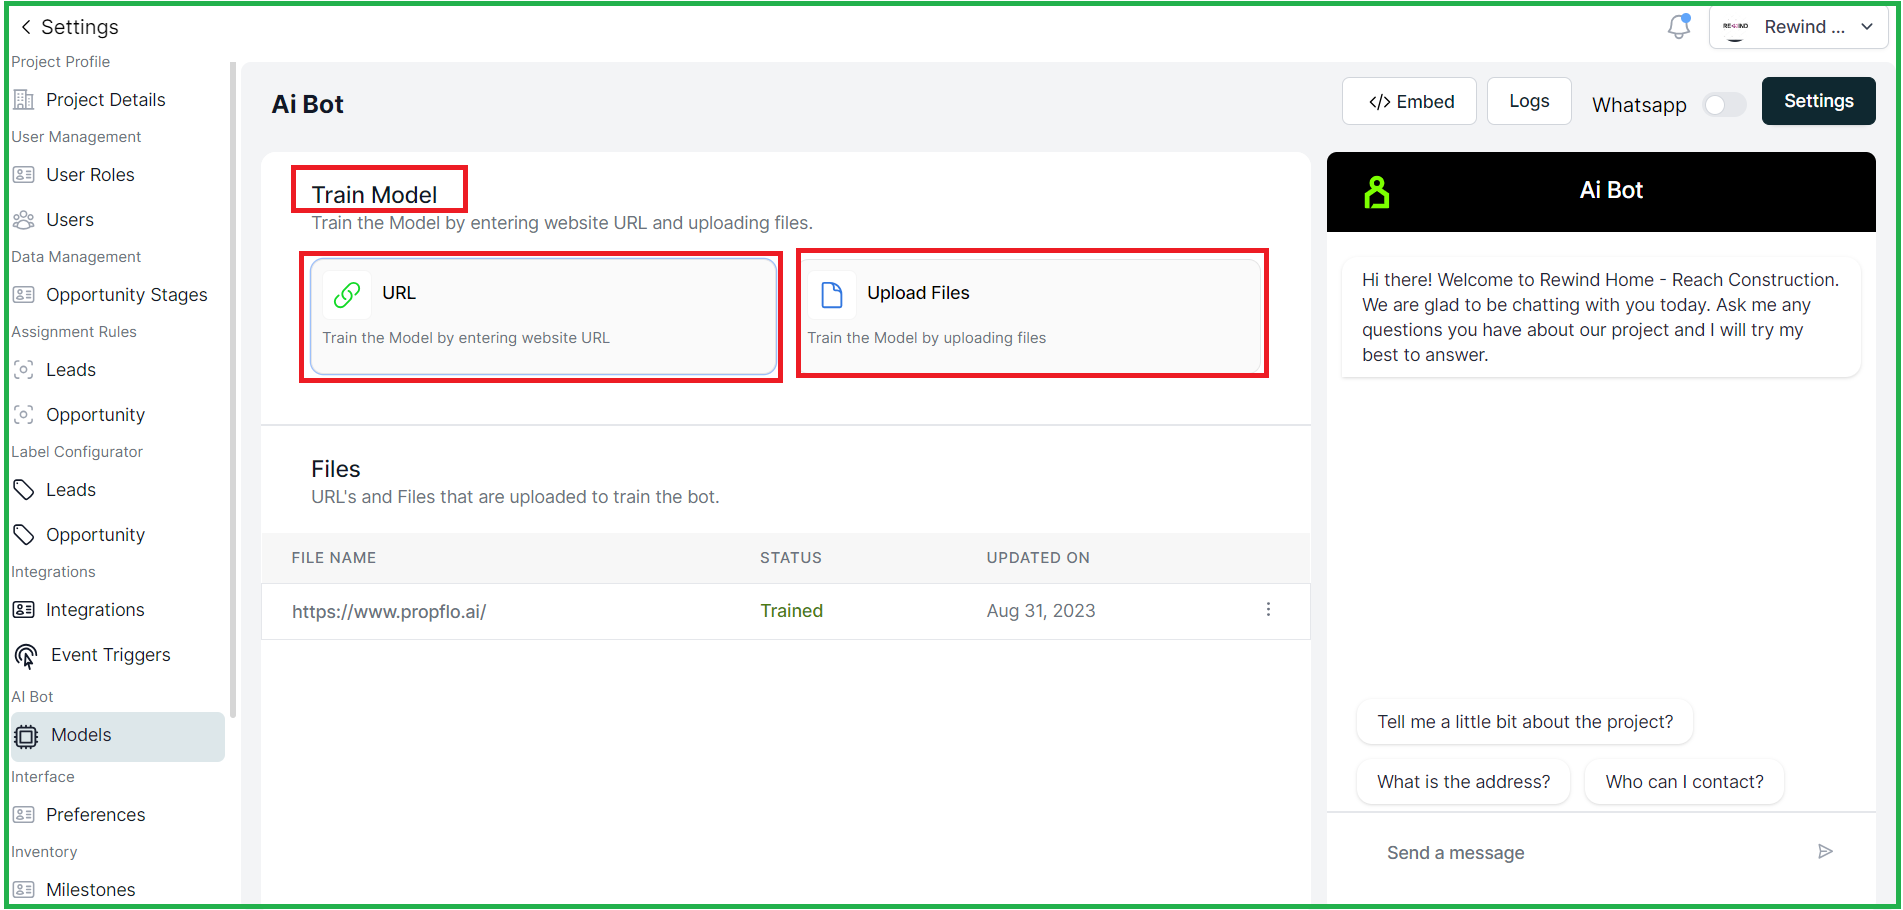
2. Go to the setting and Configure URL to embed on your landing page
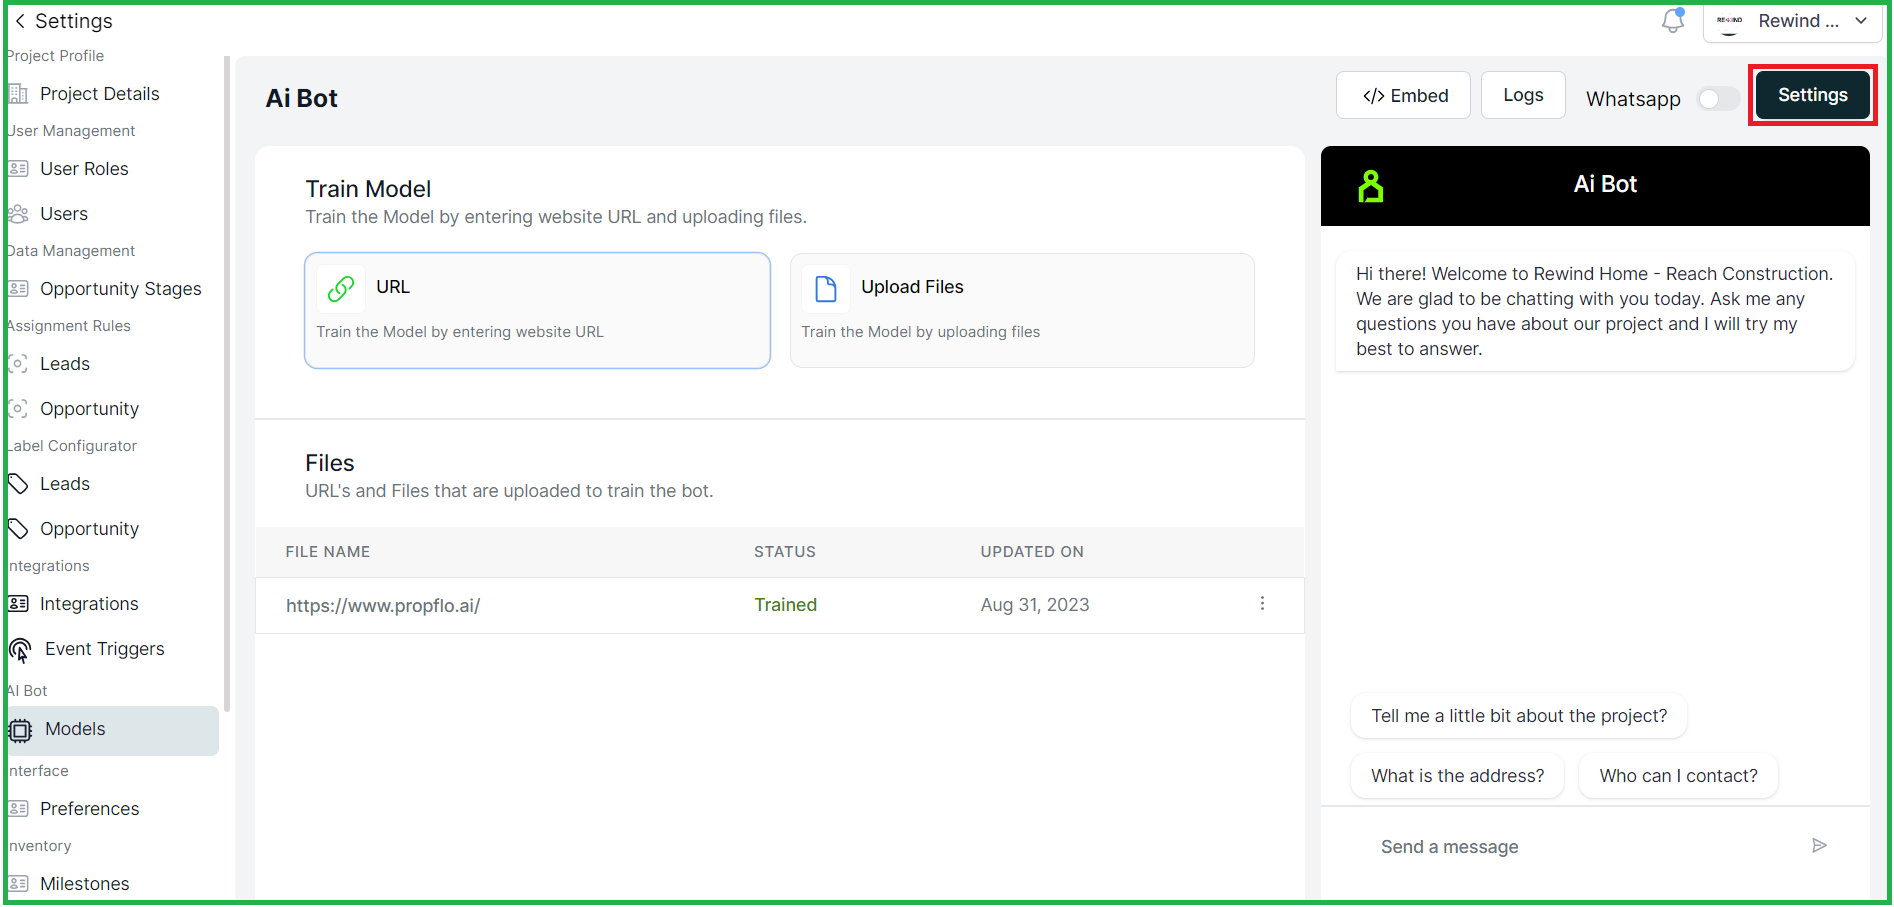

If the WhatsApp is integrated you can use this Bot in WhatsApp as well
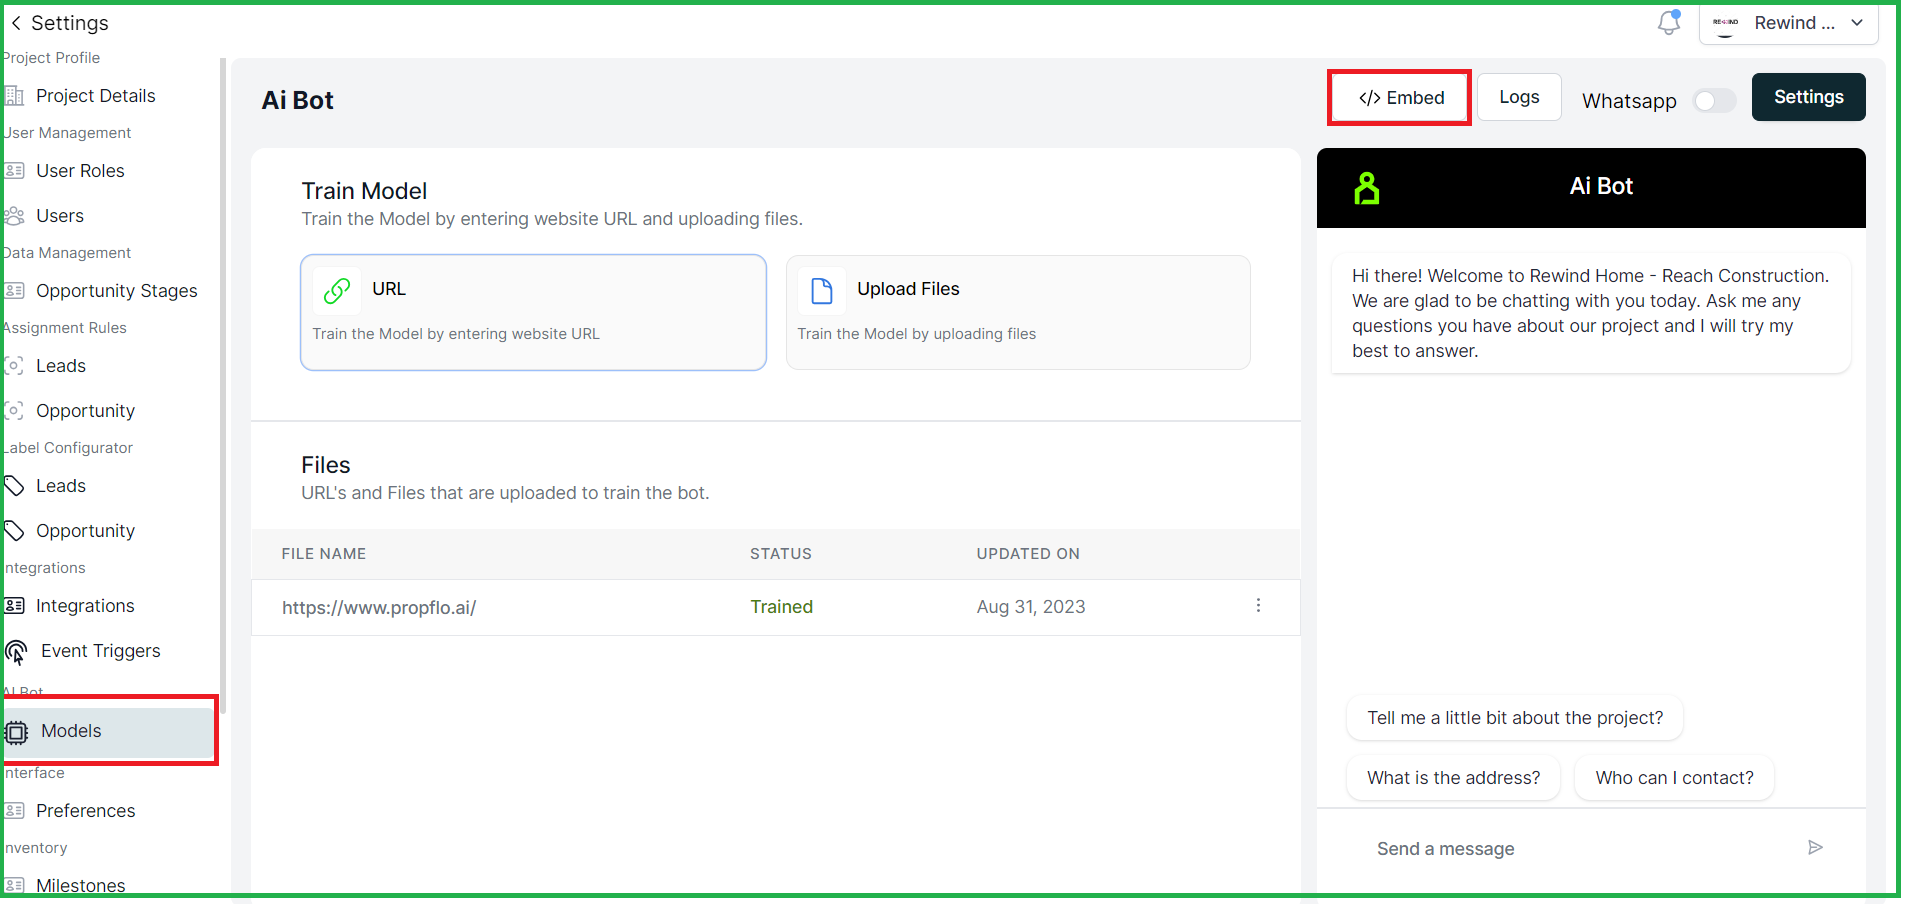
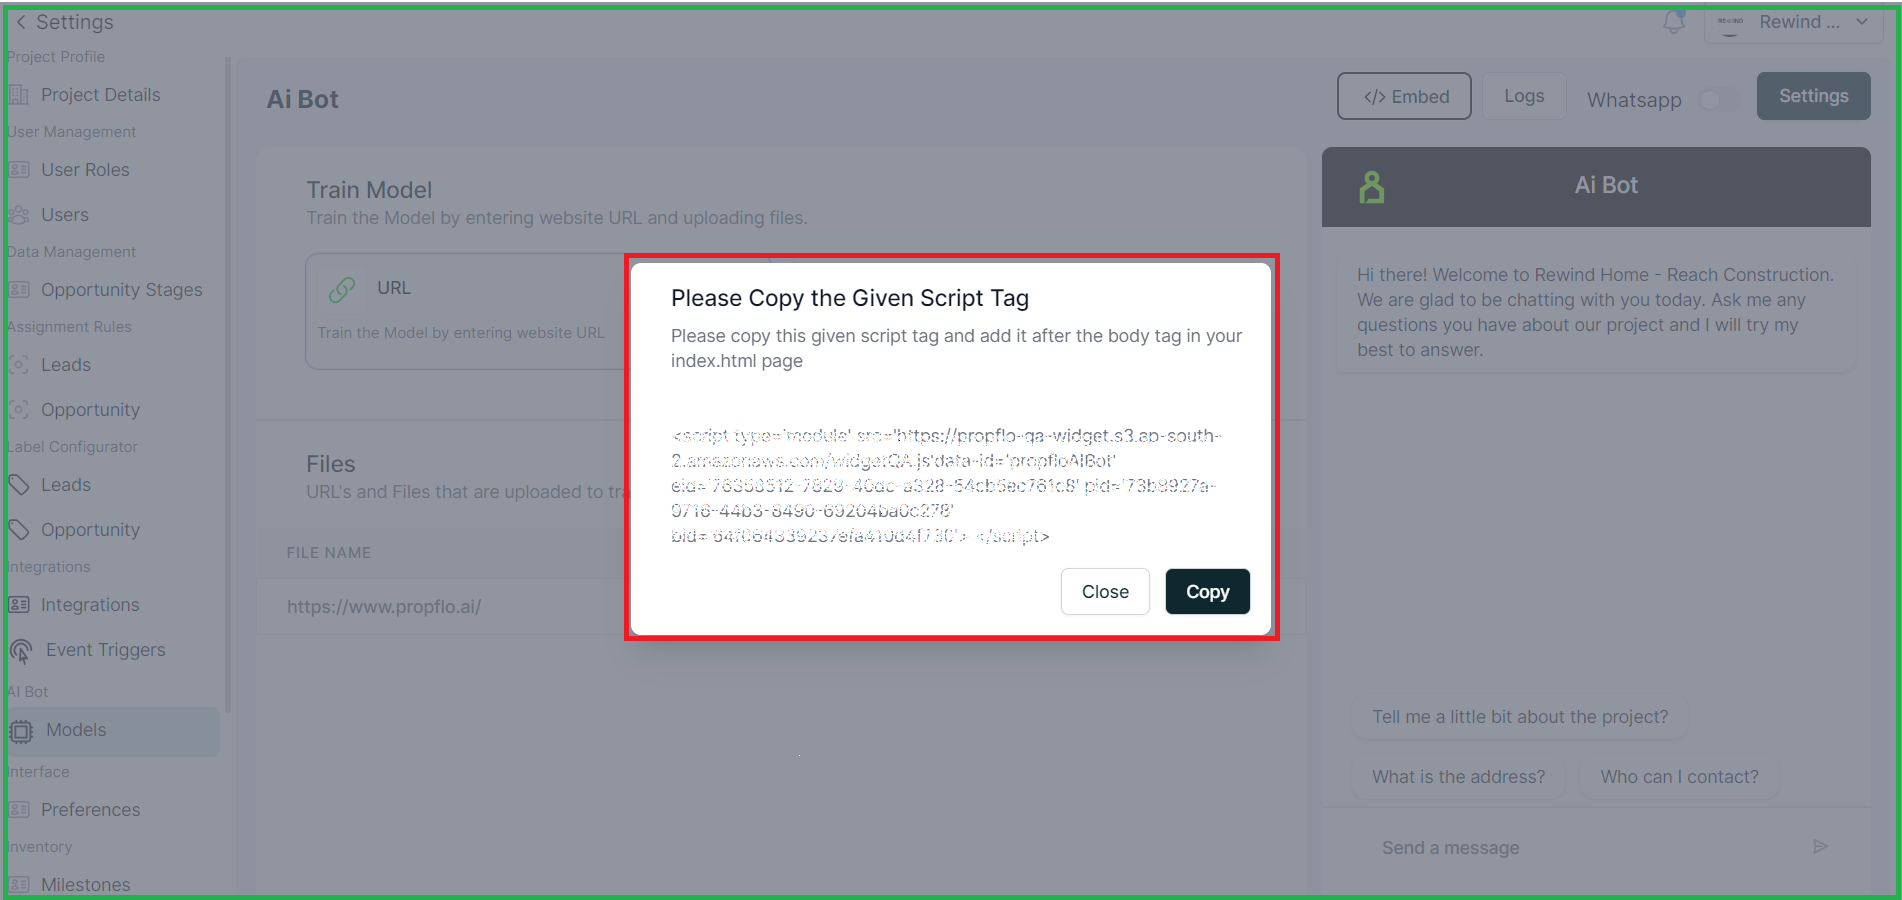
Whenever you want to Embed to your website please write to us at: support@propflo.ai
FEATURE UPDATE: CRM
1. Booking form:
The process of making a booking can begin in two ways:
1. By completing/ Filling the booking form on behalf of the customer.
2. By sending the customer a booking form link through email.
a. Screen to see how the a sales/CRM can fill the booking form on customer behalf,

In the first method, someone from the CRM team fills out the form on the customer's behalf.
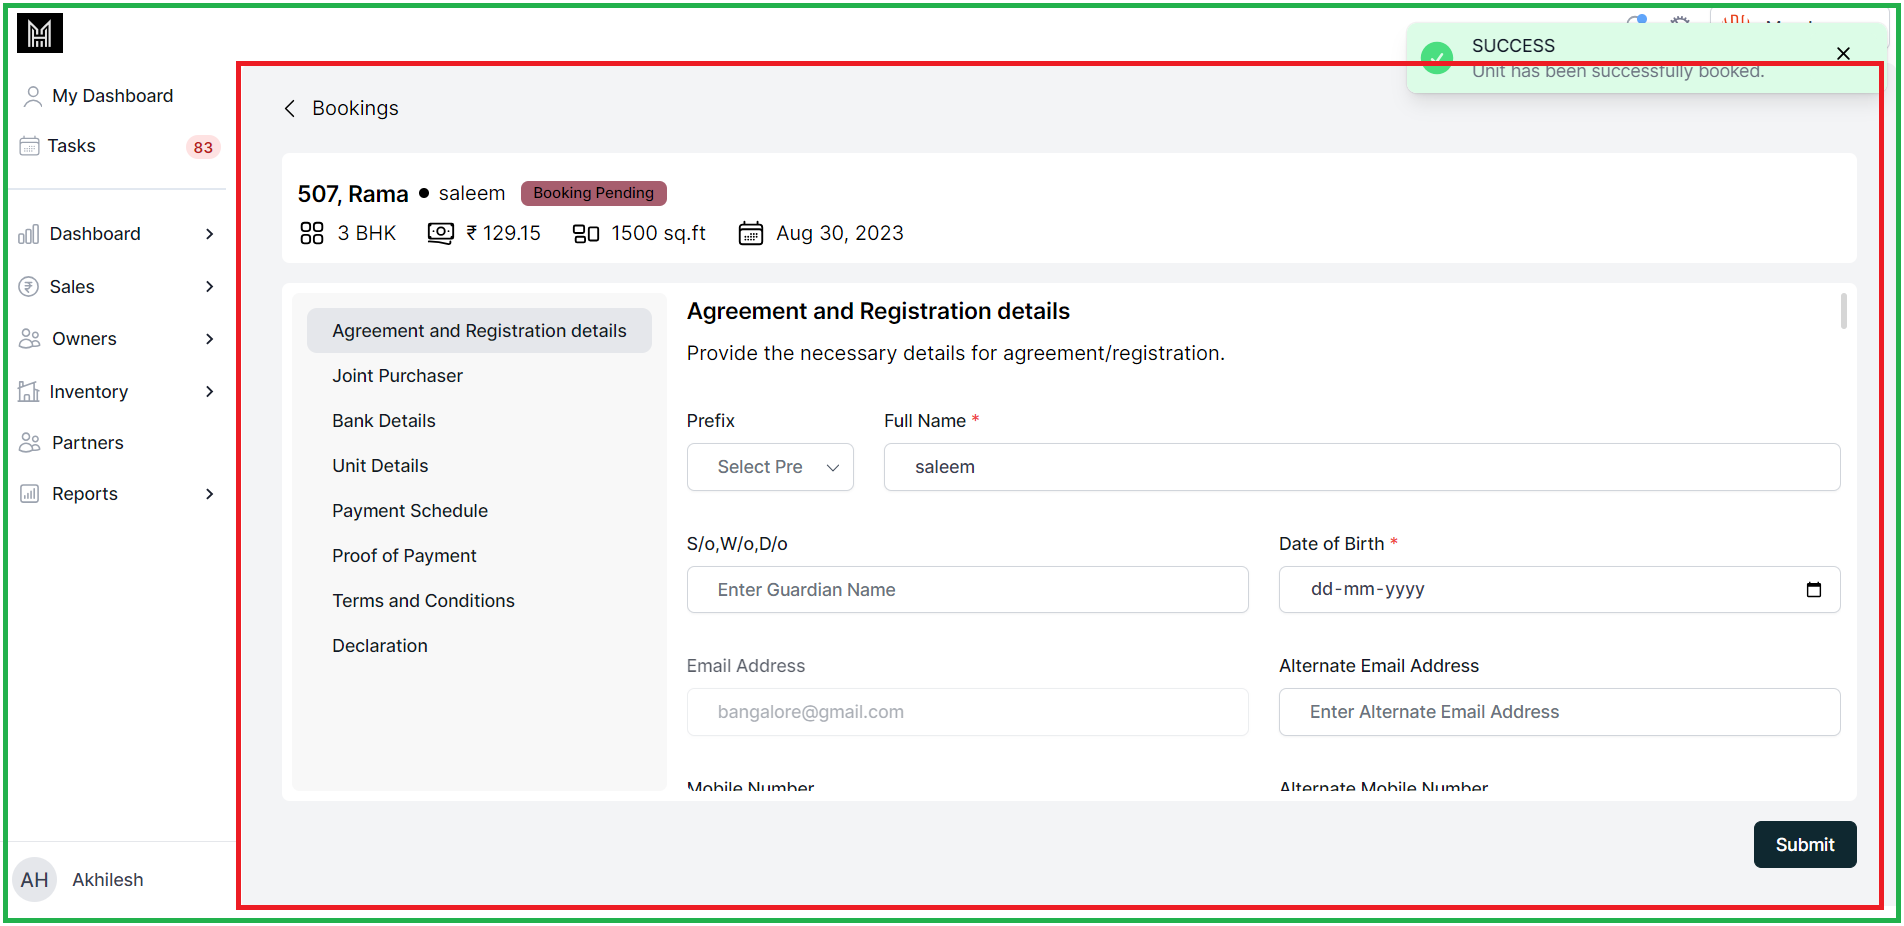
Once the booking form is filled you can confirm by clicking on "Submit"
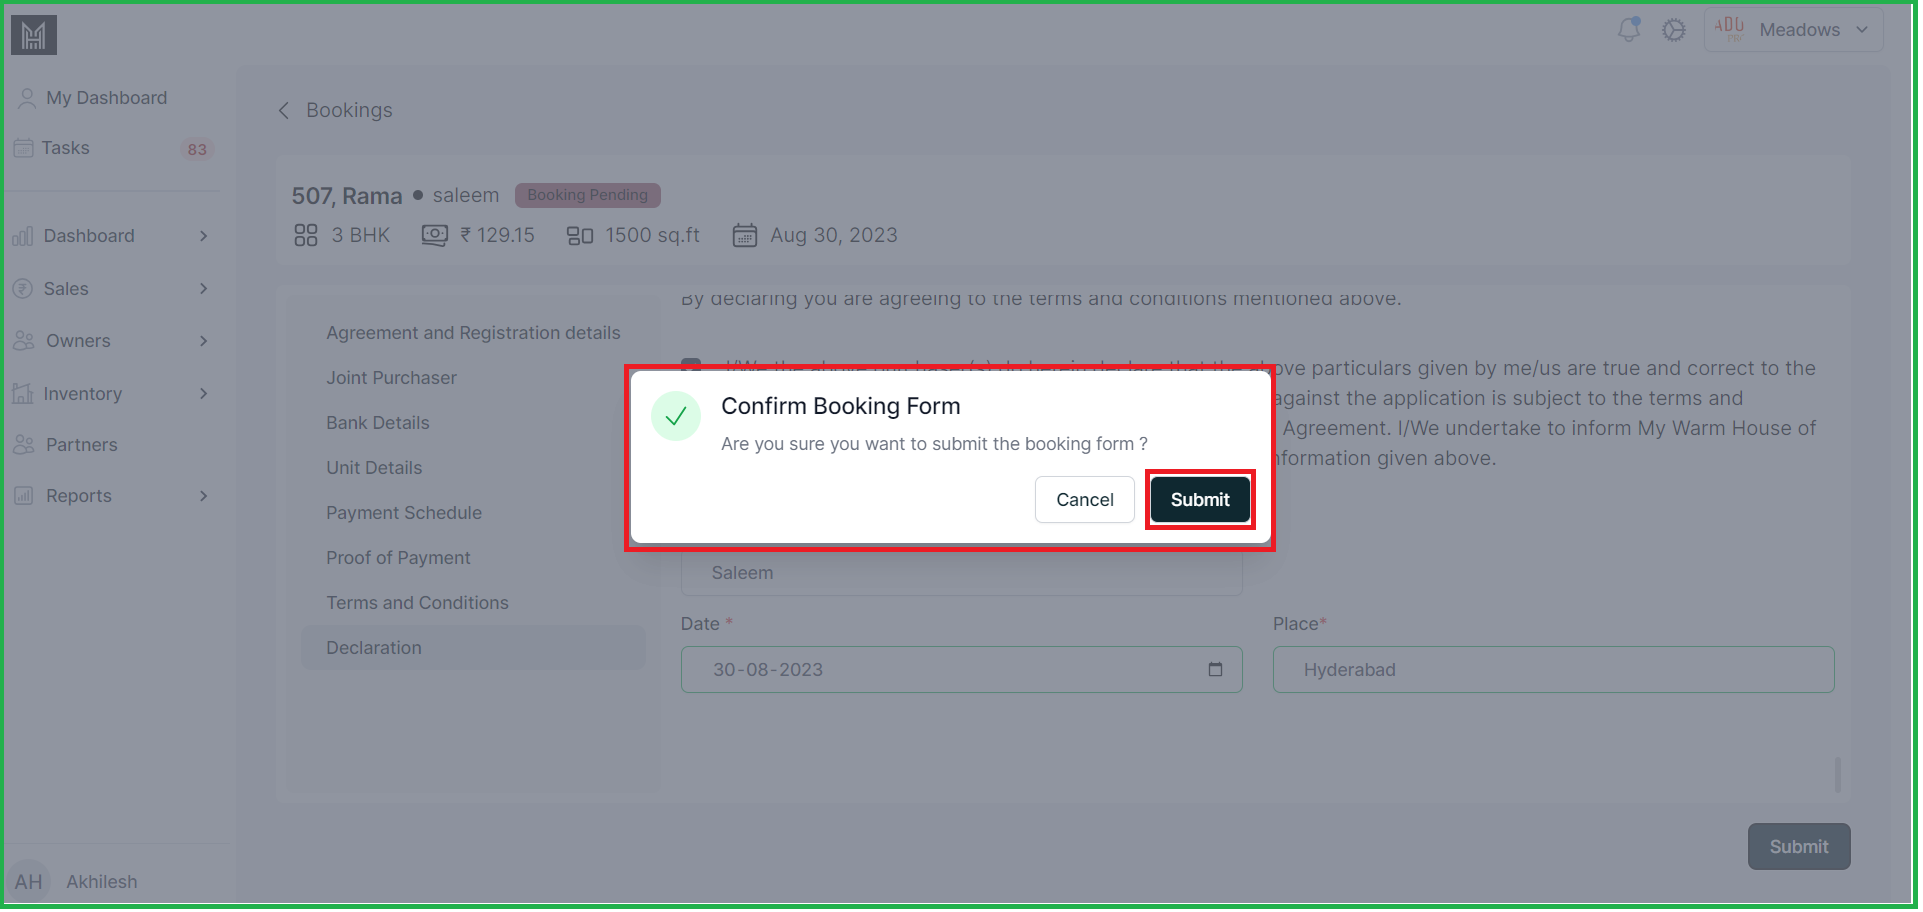
This will be next screen once the booking form is submitted,
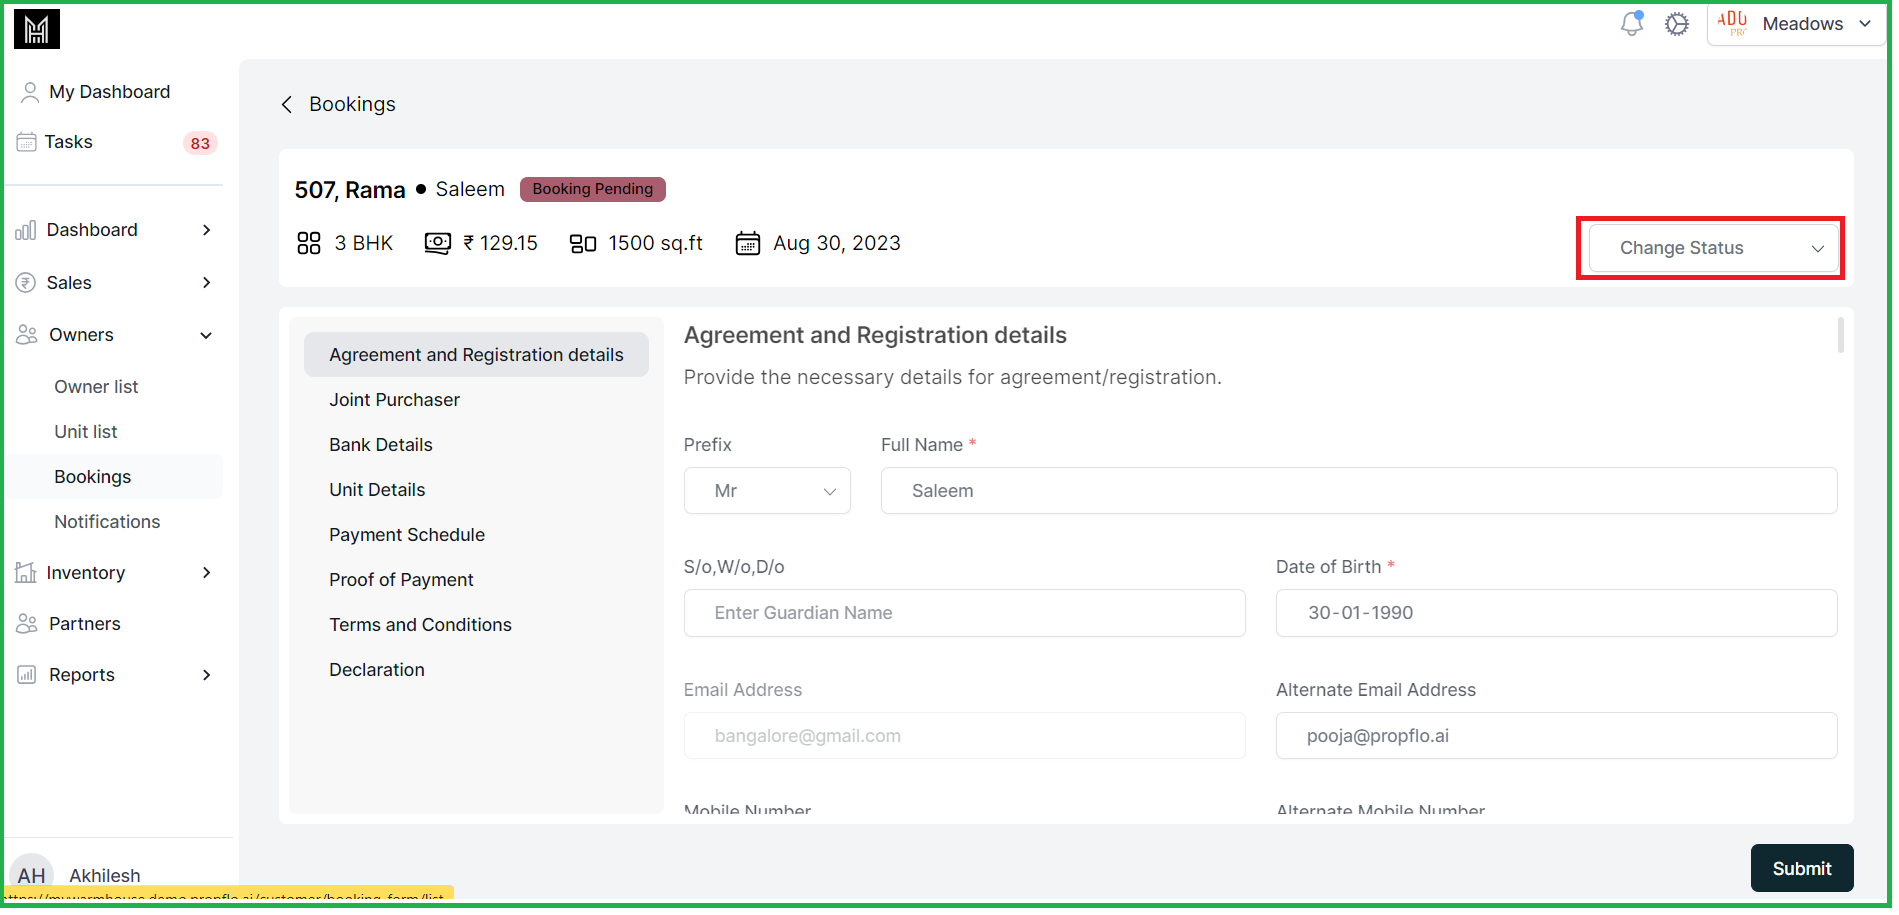
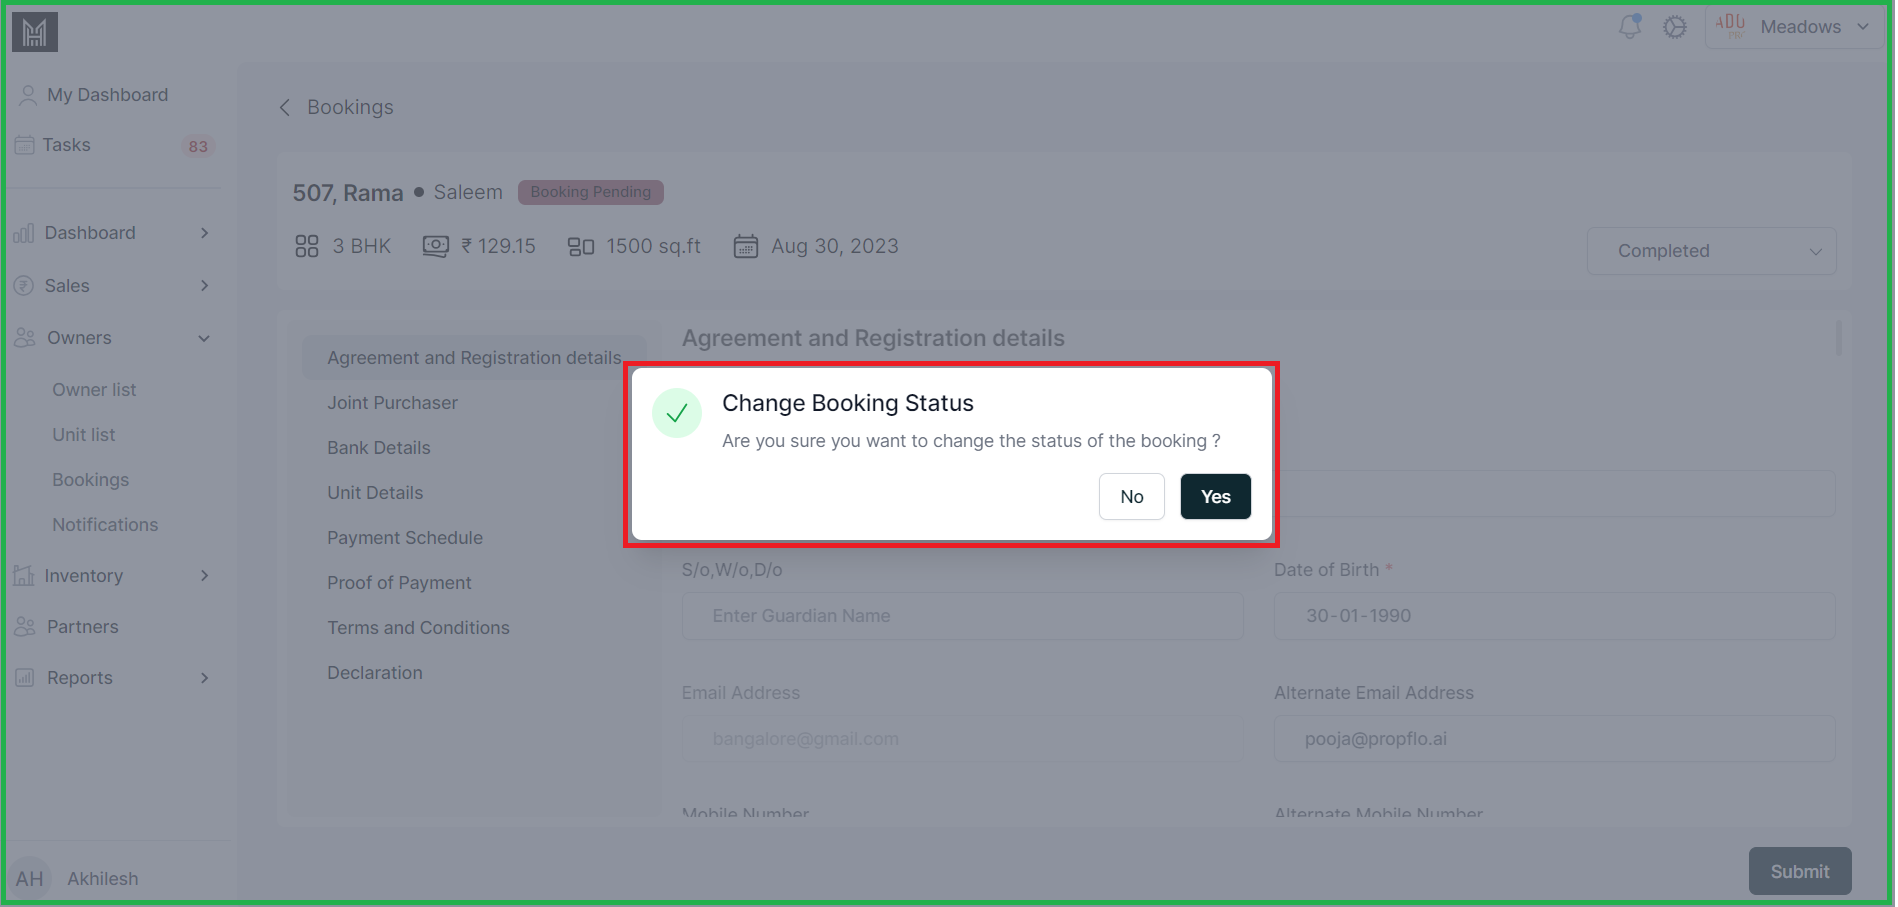
A CRM representative can review the details and update the status as either "Completed" or "Cancelled" based on verification.

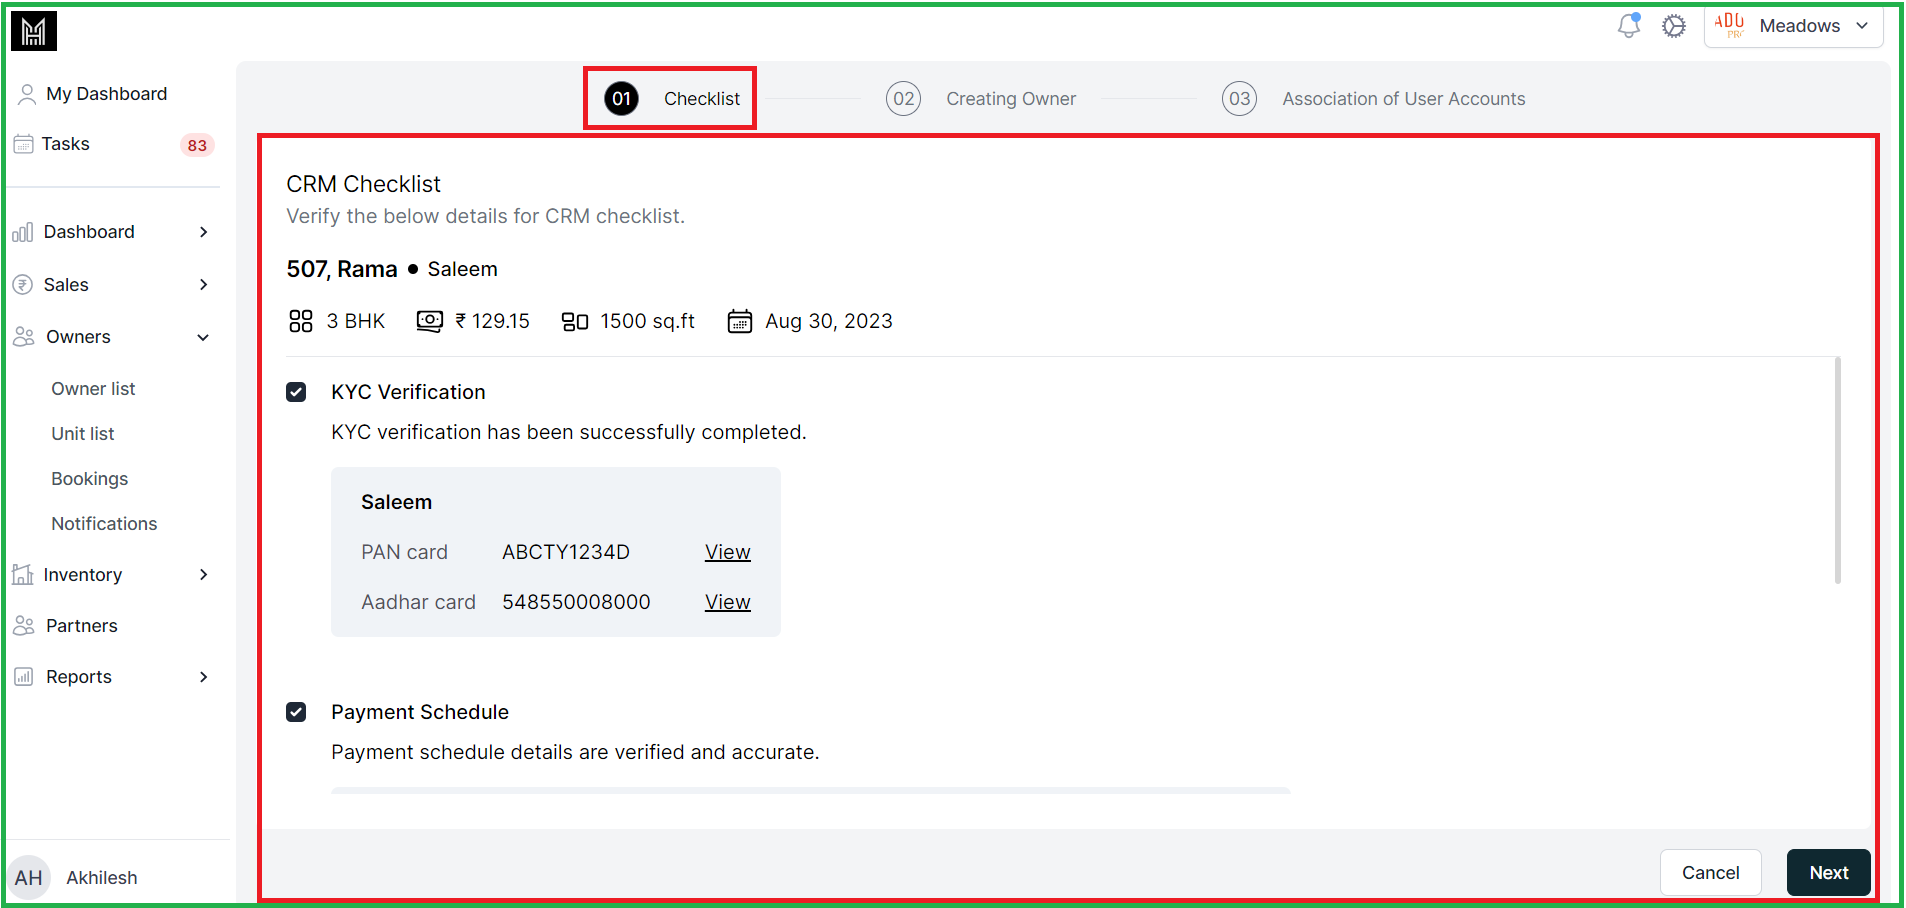
Once the booking form is filled by the sales person the CRM will validate the details and "Tick" the checkbox and "Next"
The CRM representative creates a user account, providing login credentials for the customer portal, and click on to "Next"

Here you can add the user account from which the owner want to login as the owners in the portal,
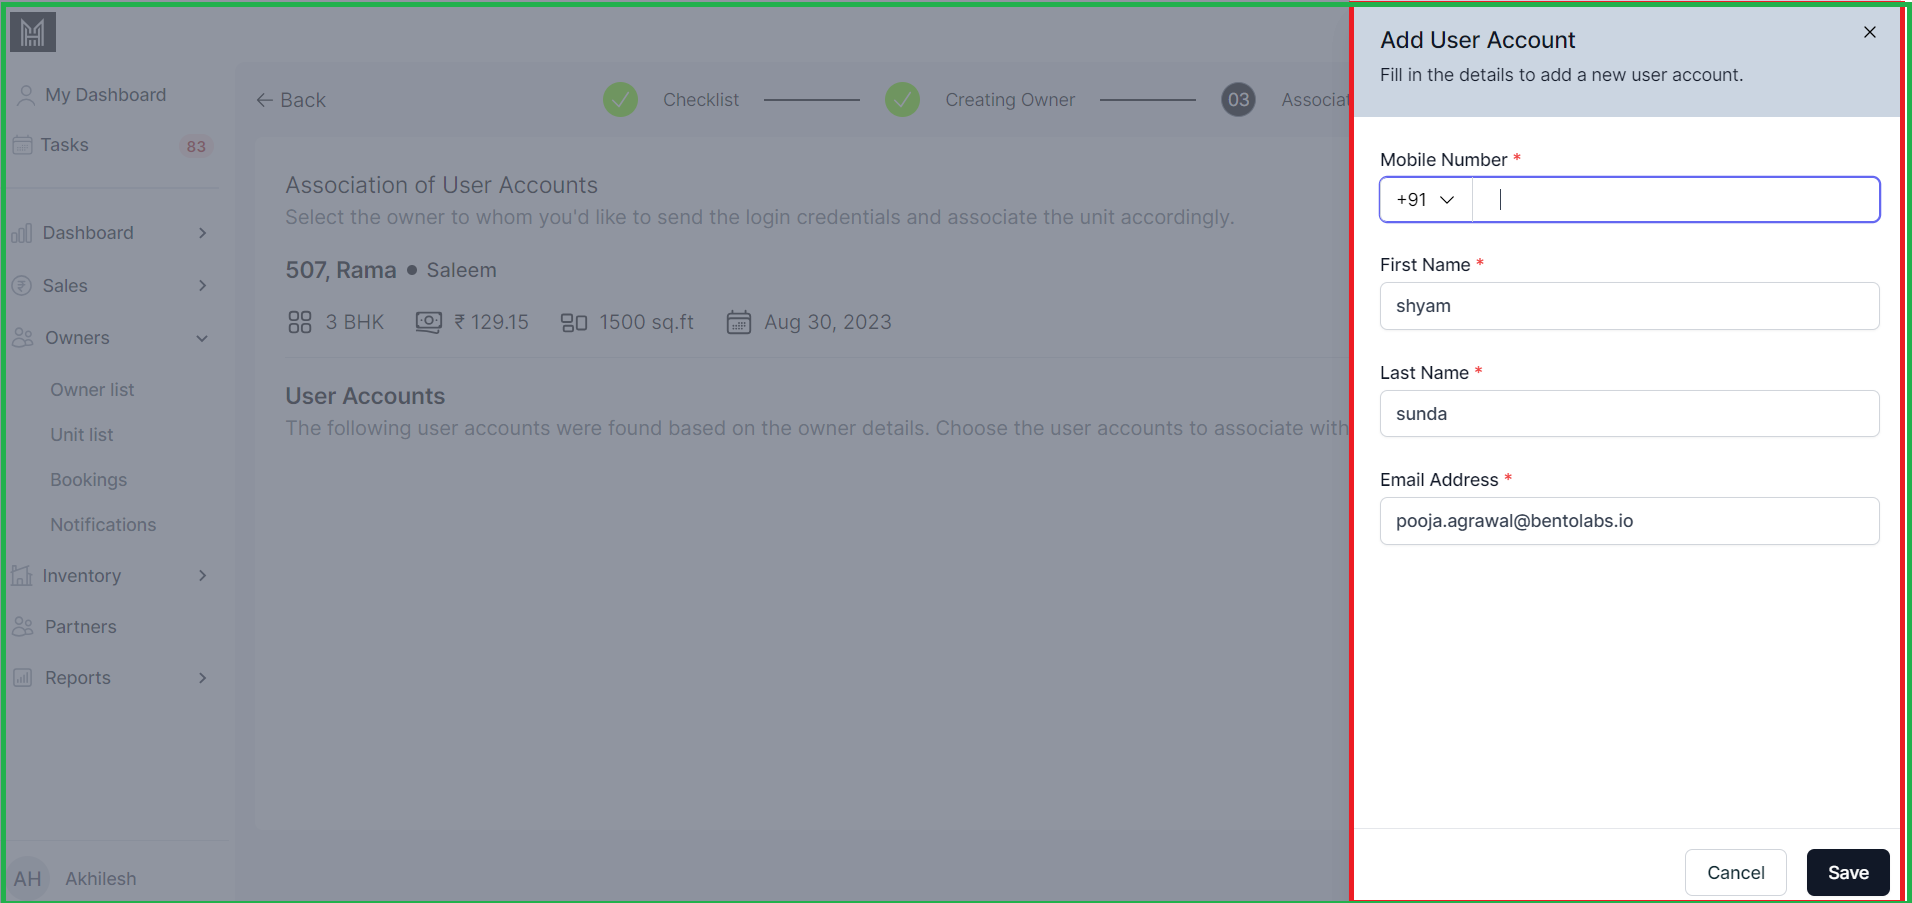
Once the user login is created you can choose the user account to associate with booked unit.
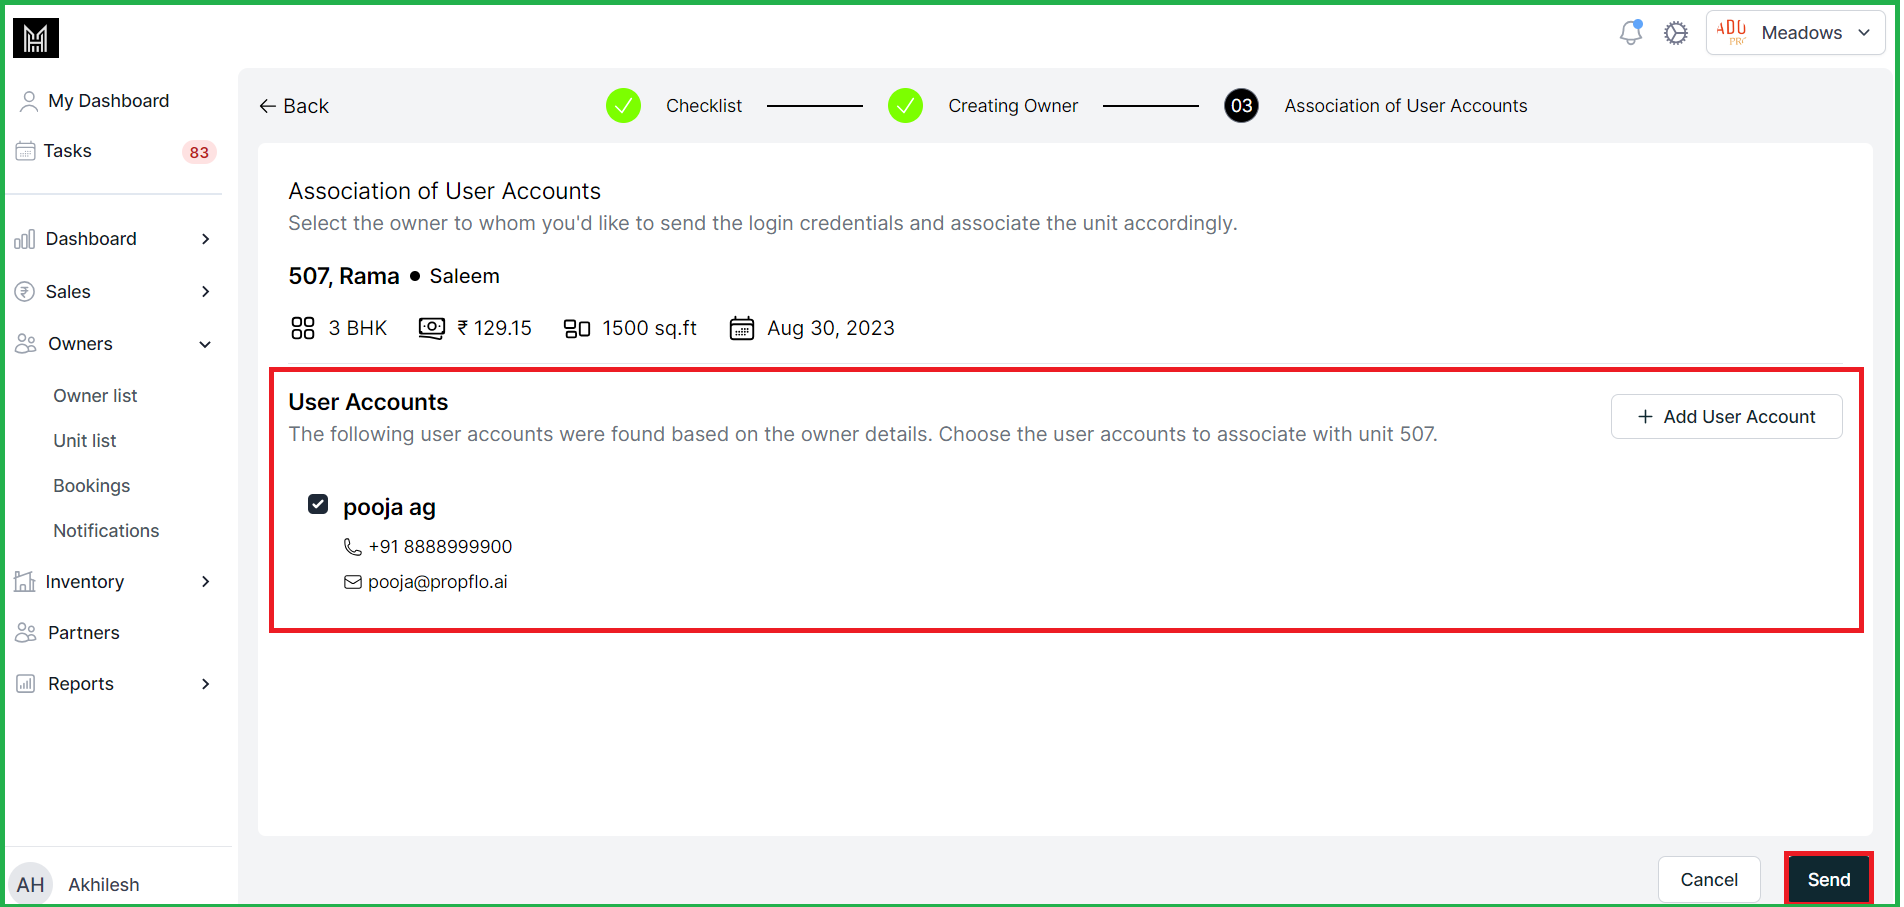
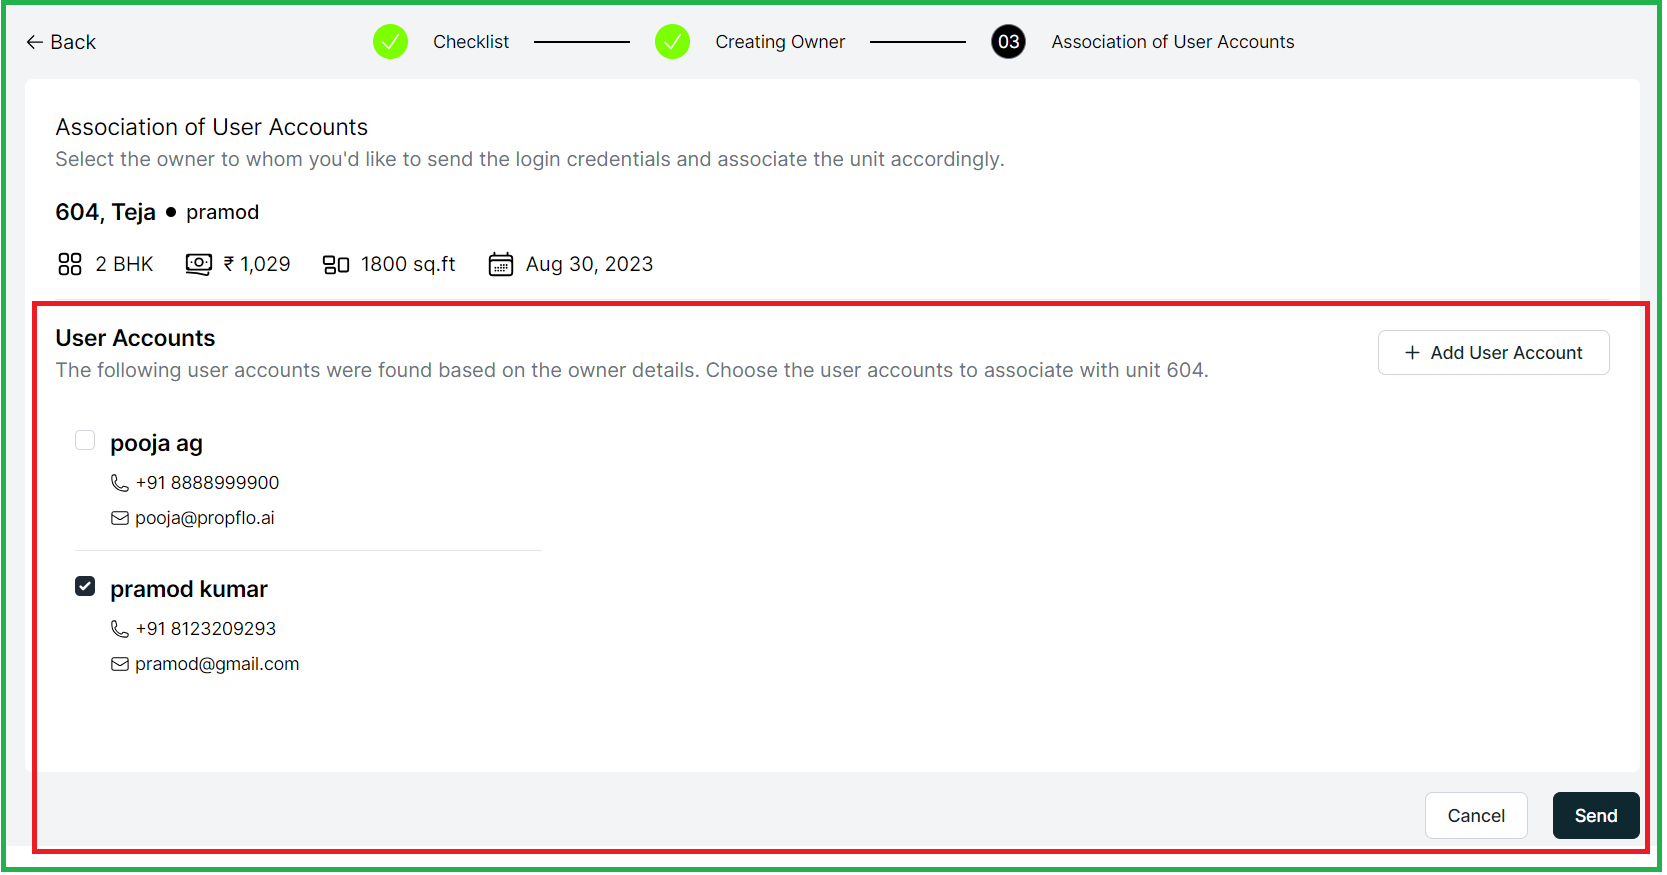
After clicking on to "send", based on the user selected will get login credentials for customer portal in the email,

2. Owner and Unit Management:
In the "Owners" sidebar navigation, you will find the following menus to effectively manage owners and units:
2.1 Owner List: This menu provides an organized display of "owners" along with their corresponding "PAN" details and "purchased units".

2.2 Unit List: Here, you'll find detailed information about "units", including the "owner" associated with each unit and its "current status".

MOBILE UPDATES [ Android & iOS]
Re-Designed
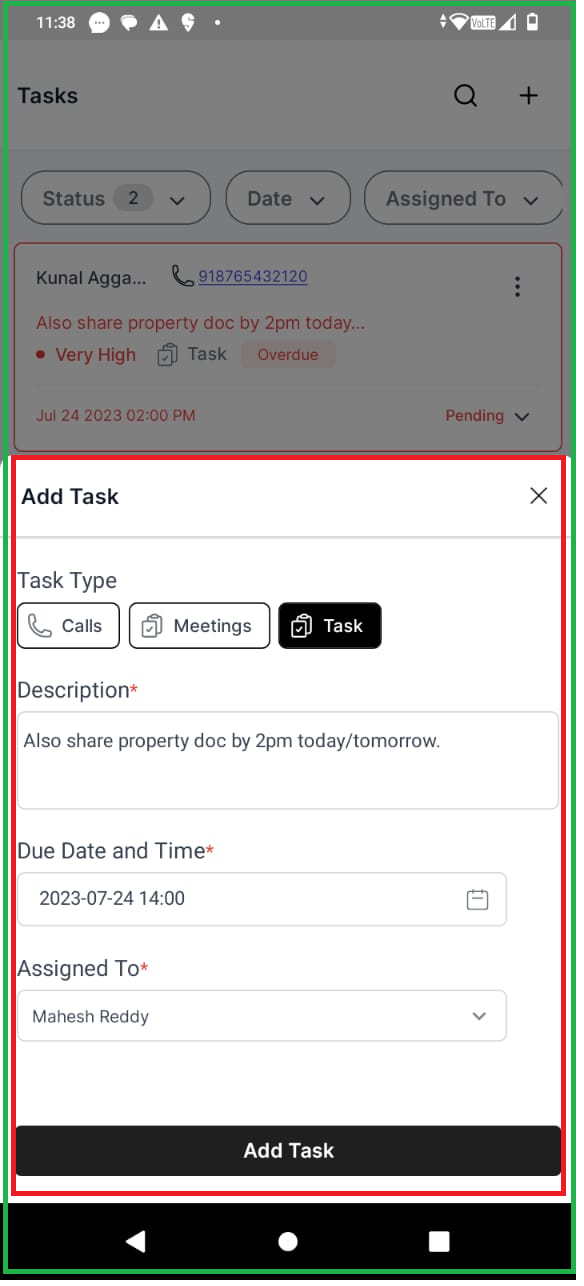
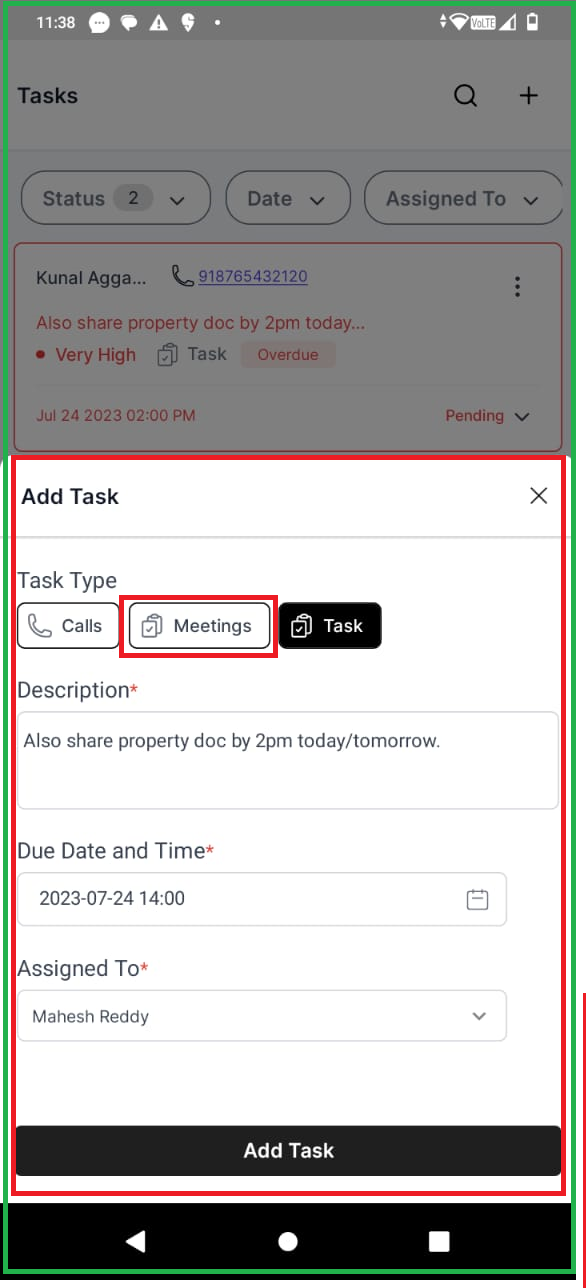
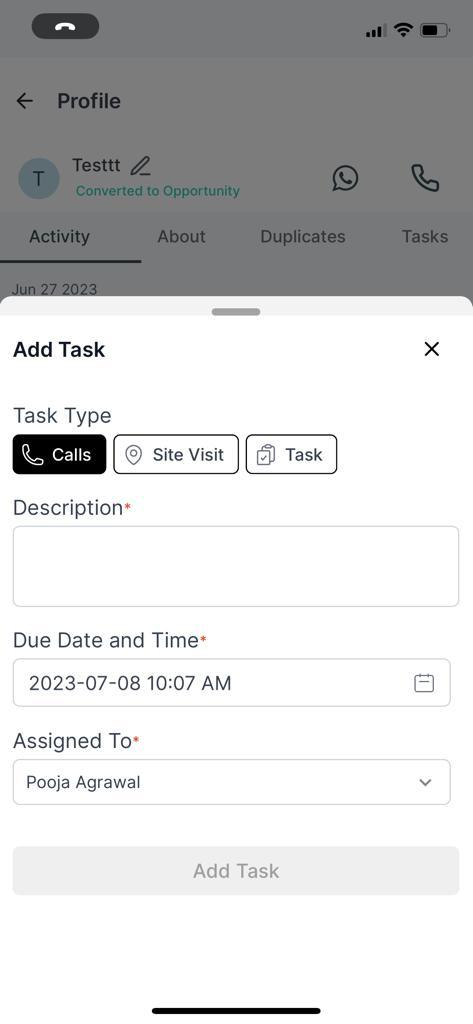
1. On the "Create Task" page, significant changes have been introduced.
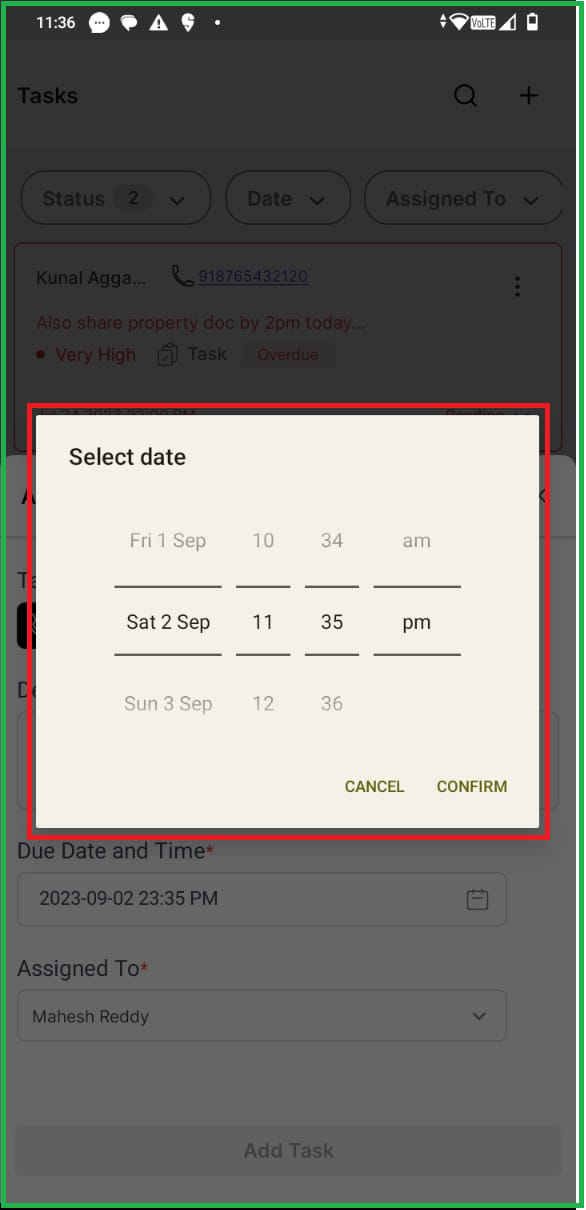
The page now employs a bottom sheet design, meaning that when the user clicks on the "Add Task" button, the interface emerges from the bottom of the screen. Moreover, the task type "site-visit" has been substituted with "meetings." Notably, this revamped version of the page also empowers users to conveniently adjust the date and time directly from the "Add Task" interface.
2. The process of adding a lead/Opportunity has been transformed into a bottom sheet layout.

4. In App call- The mandatory field requirement for adding notes during call follow-up has been removed.
3. Push Notifications: Clicking on any push notification now seamlessly takes the user to the sales app.
4. User interaction improvement: Radio button labels are now clickable throughout the application.
5. Now a measure has been implemented to restrict the creation of empty notes in call follow-up, as well as adding notes in Quick Actions.
Date: 4th August
Web Application
NEW FEATURE:
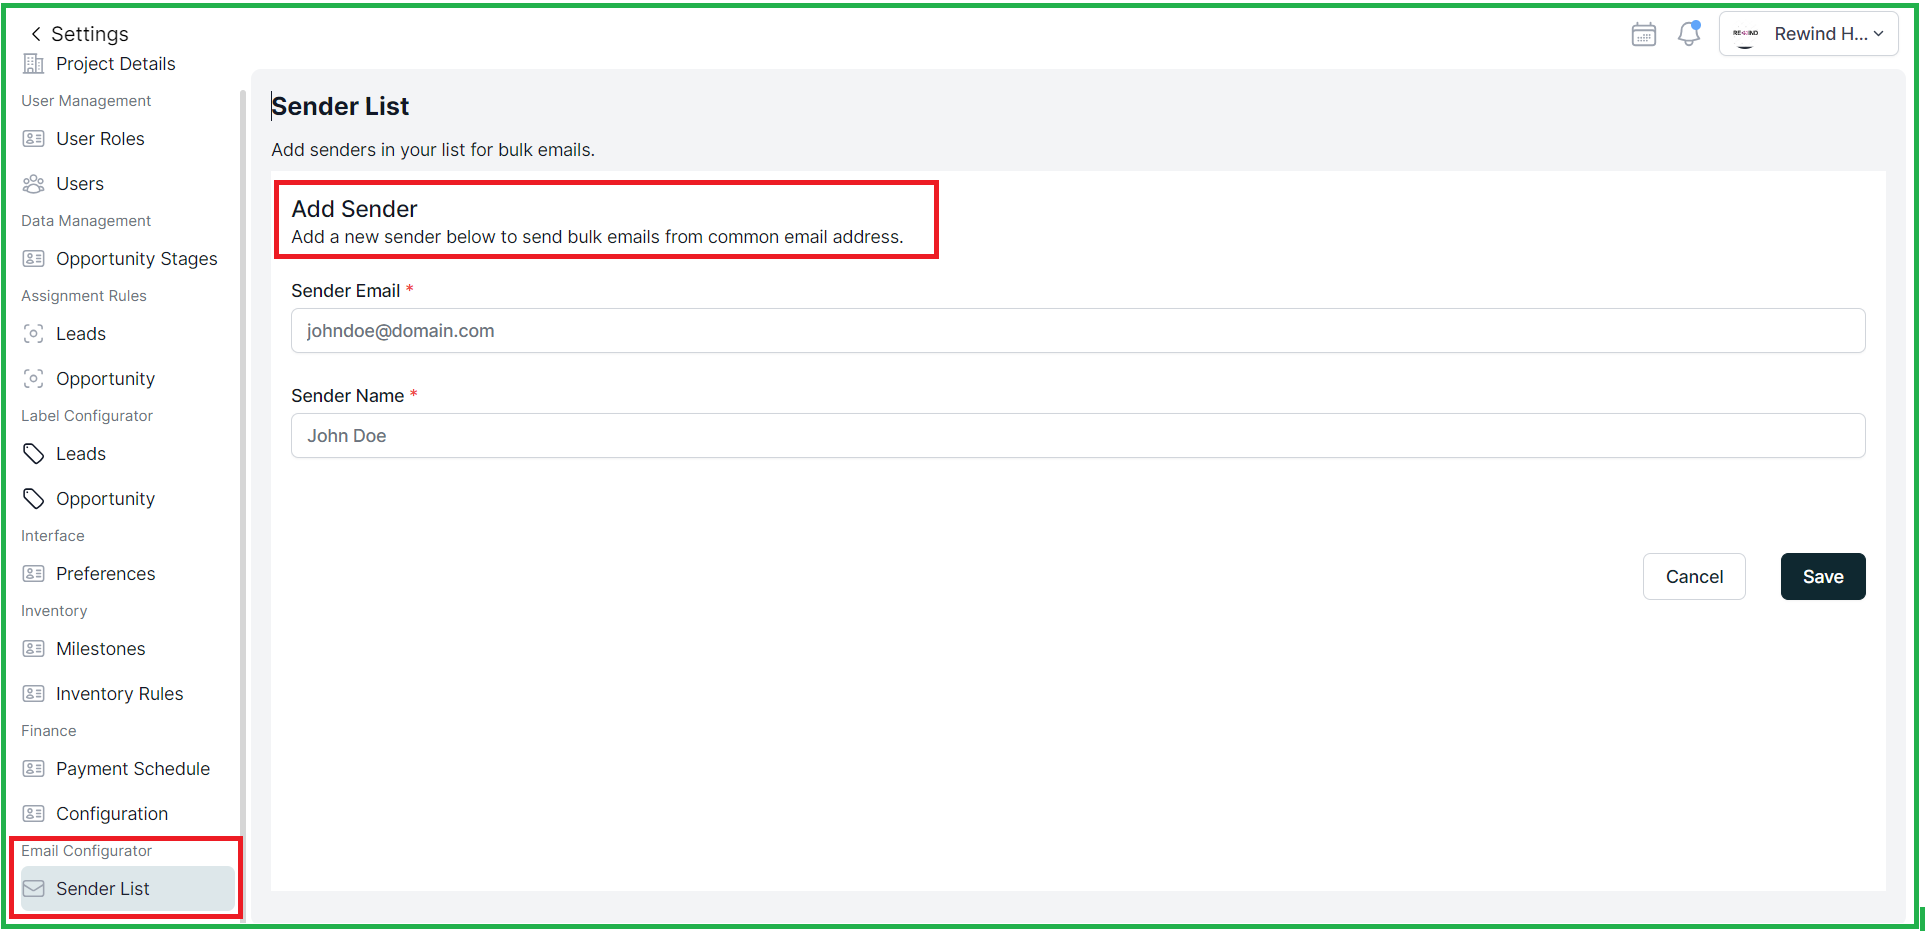
1. Streamlined Communication: Send Bulk Emails to Leads and Opportunities.
"Email Configurator," designed to simplify your tasks. Now, you can efficiently perform bulk email actions for both leads and opportunities.
To get started, you'll need to configure a few settings under "Email Configuration" in the settings menu. This includes setting up your sender list.
Before you start sending a message email Authentication is required:
- Authentication works only for domains owned by the company, personal addresses such as Gmail, Yahoo can’t be authenticated on Propflo.
Here are the steps how you can Authenticate a Domain in Propflo:
To add a domain, the user will need to enter the domain name
The domain name is the name of the website/ service that you want to use for email.
For example, if your website is www.abcbuilder.com, or your email is sales@abcbuilders.com then your domain name would be abcbuilders.com
Adding a Domain
Begin by adding the sender's email address you want to use in companies Propflo account.
This is the screen where you can add the sender email address
- In the setting you will find this tab under the Email configurator 'Sender list' add the details and save
- For instance, if you're using "sales@<mydomainname>.com," add this sender in your settings. You'll then be prompted to authenticate the domain "mydomainname.com."
- To set up your domain, you need to add the DNS records provided by Propflo to your DNS hosting provider. This provider could be AWS Route53, Wix, GoDaddy, CloudFlare, or similar.
Note: To proceed, kindly liaise with your organization's IT Administration Team.
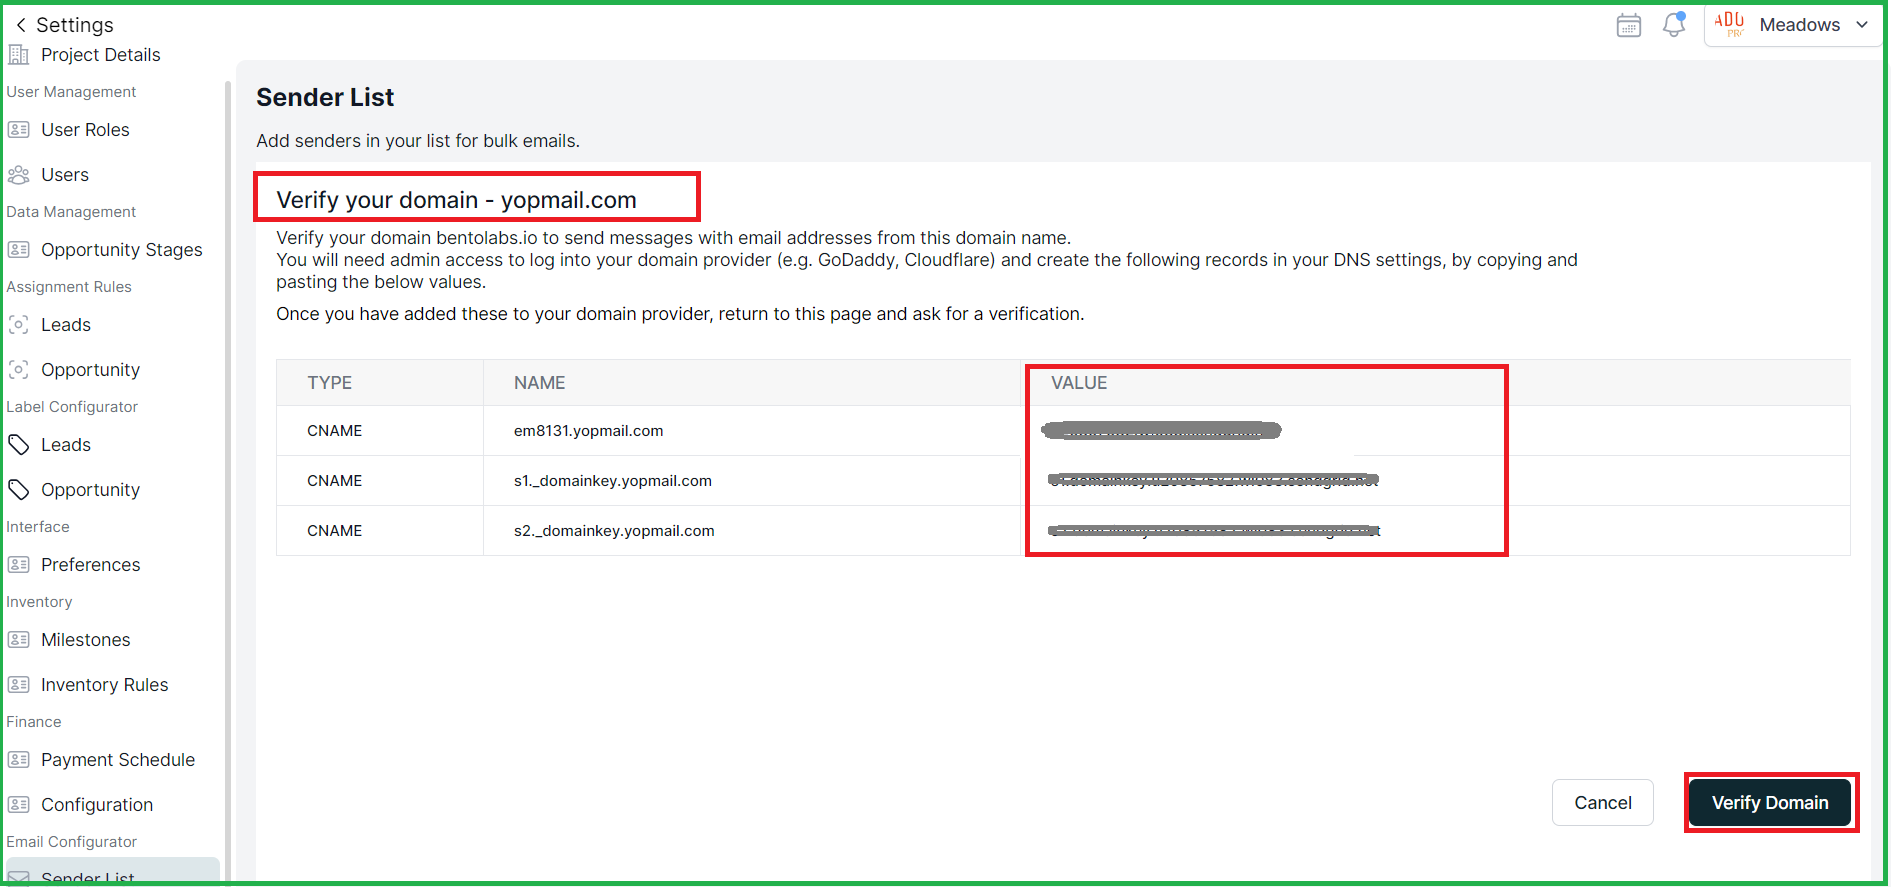
- Check if you have access to your DNS or hosting provider. If not, find out who in your company has this access before proceeding with domain authentication.

- Here the domain is verified and configured and is connected successfully by clicking to okay.
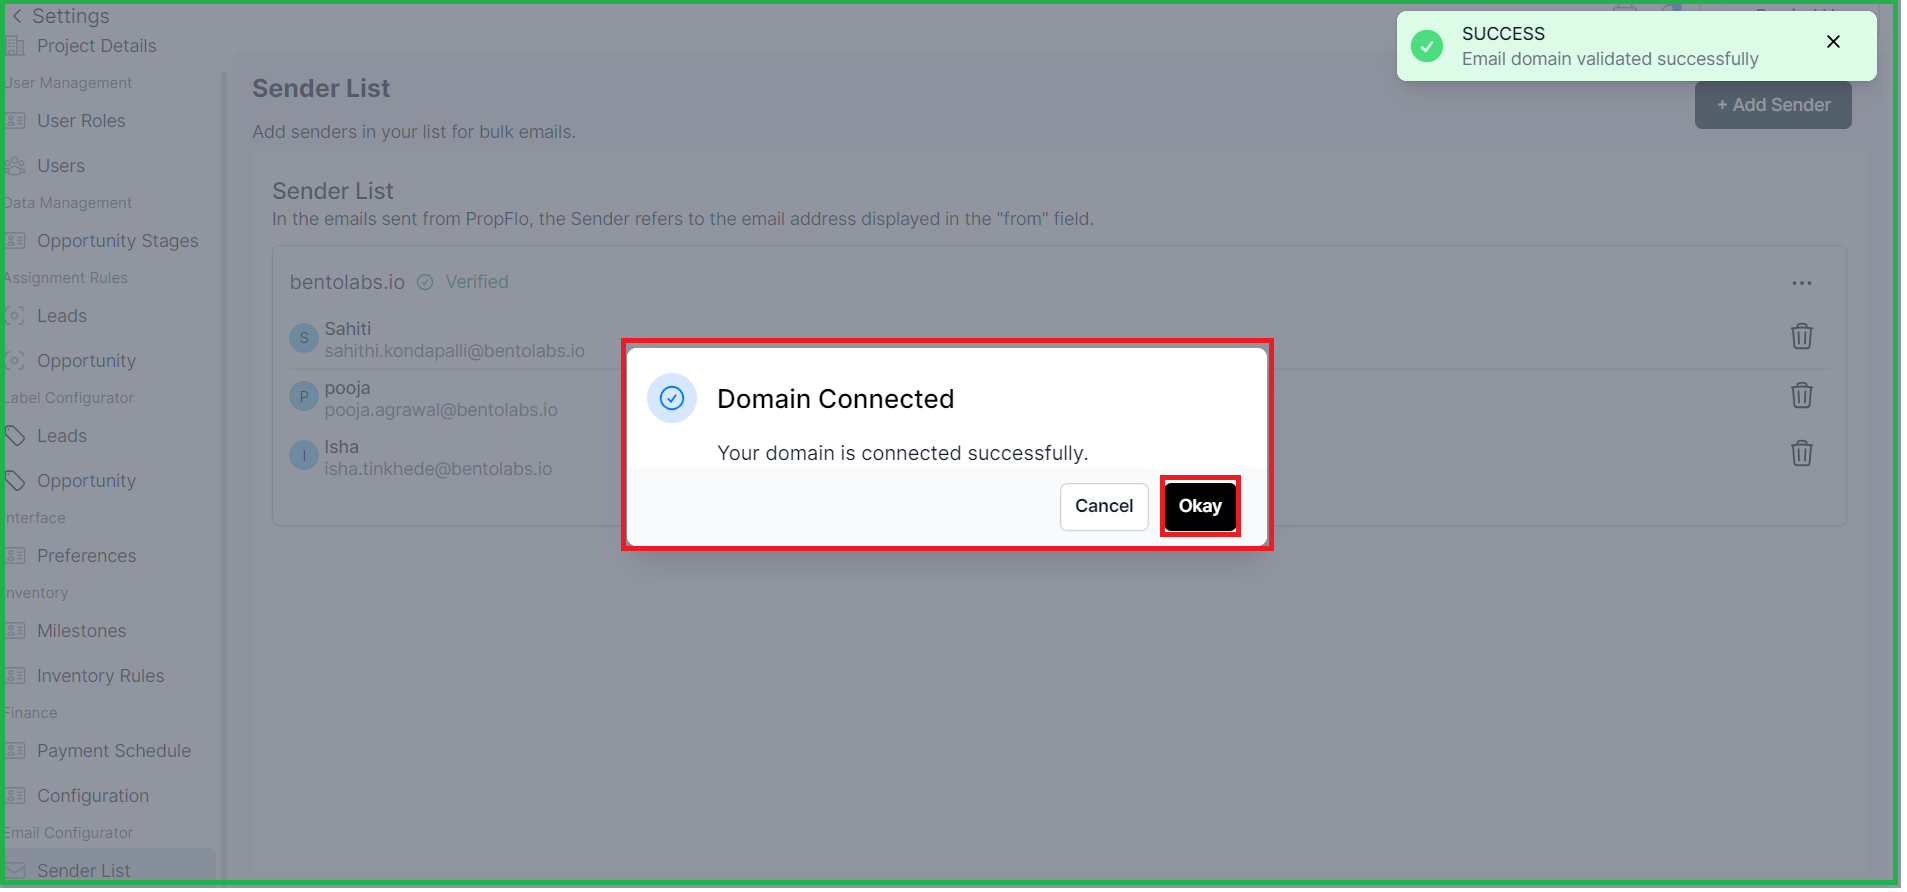


By following above steps, you'll be able to successfully authenticate your domain in Propflo, ensuring secure and trustworthy email communication.
-
Once a domain has been verified, the user can add the domain extension, and then see a list of all of the users who have created accounts with the domain extension.
1.1. Adding senders list:
After this, you will be able to add senders associated with your authenticated email domain. For example, after authenticating domainname.com, you will be able to add, from the settings page, the sender me@domainname.com.
With Propflo now you can send bulk emails to entire groups of lead and opportunity, with the option to personalize each message
- Go to the lead and choose to send a bulk email or select any particular lead to send an email.
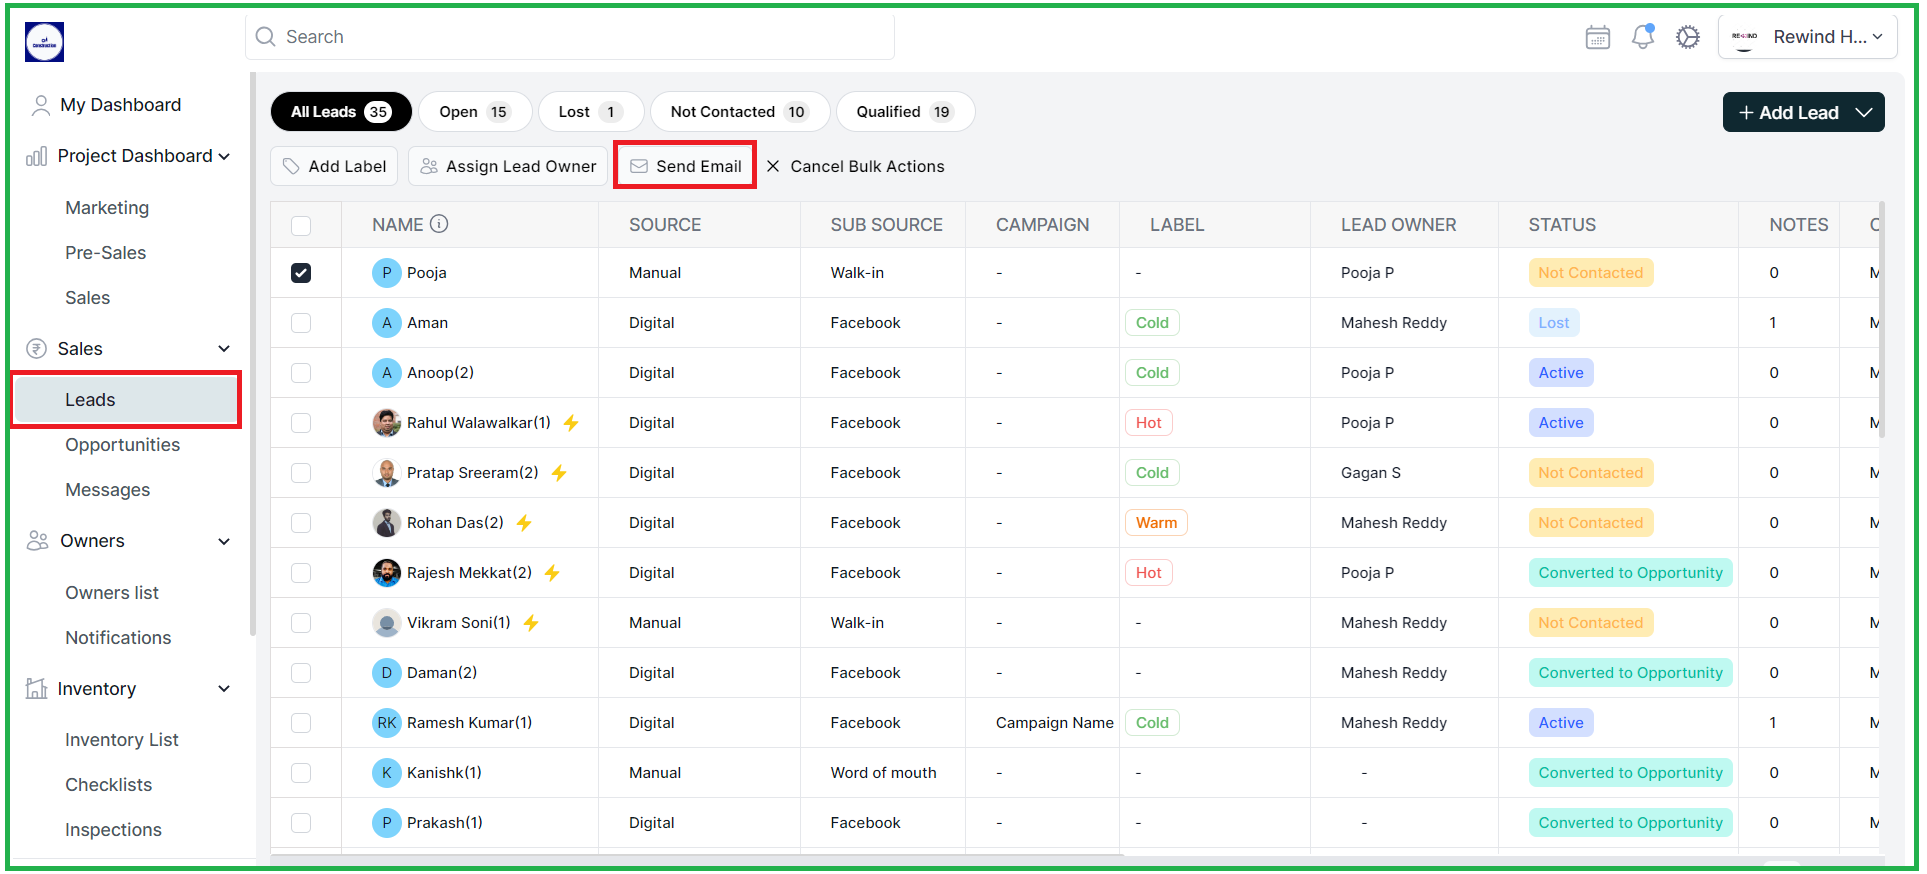
- The side bar will open and you can select the sender and add the Email Text here,
Pick the right sender in the "From" section.
-
Once your domain is authenticated, you can add multiple senders and then choose among the list of senders the right teammates to send your campaign from.
Adding a subject line, email text and Send


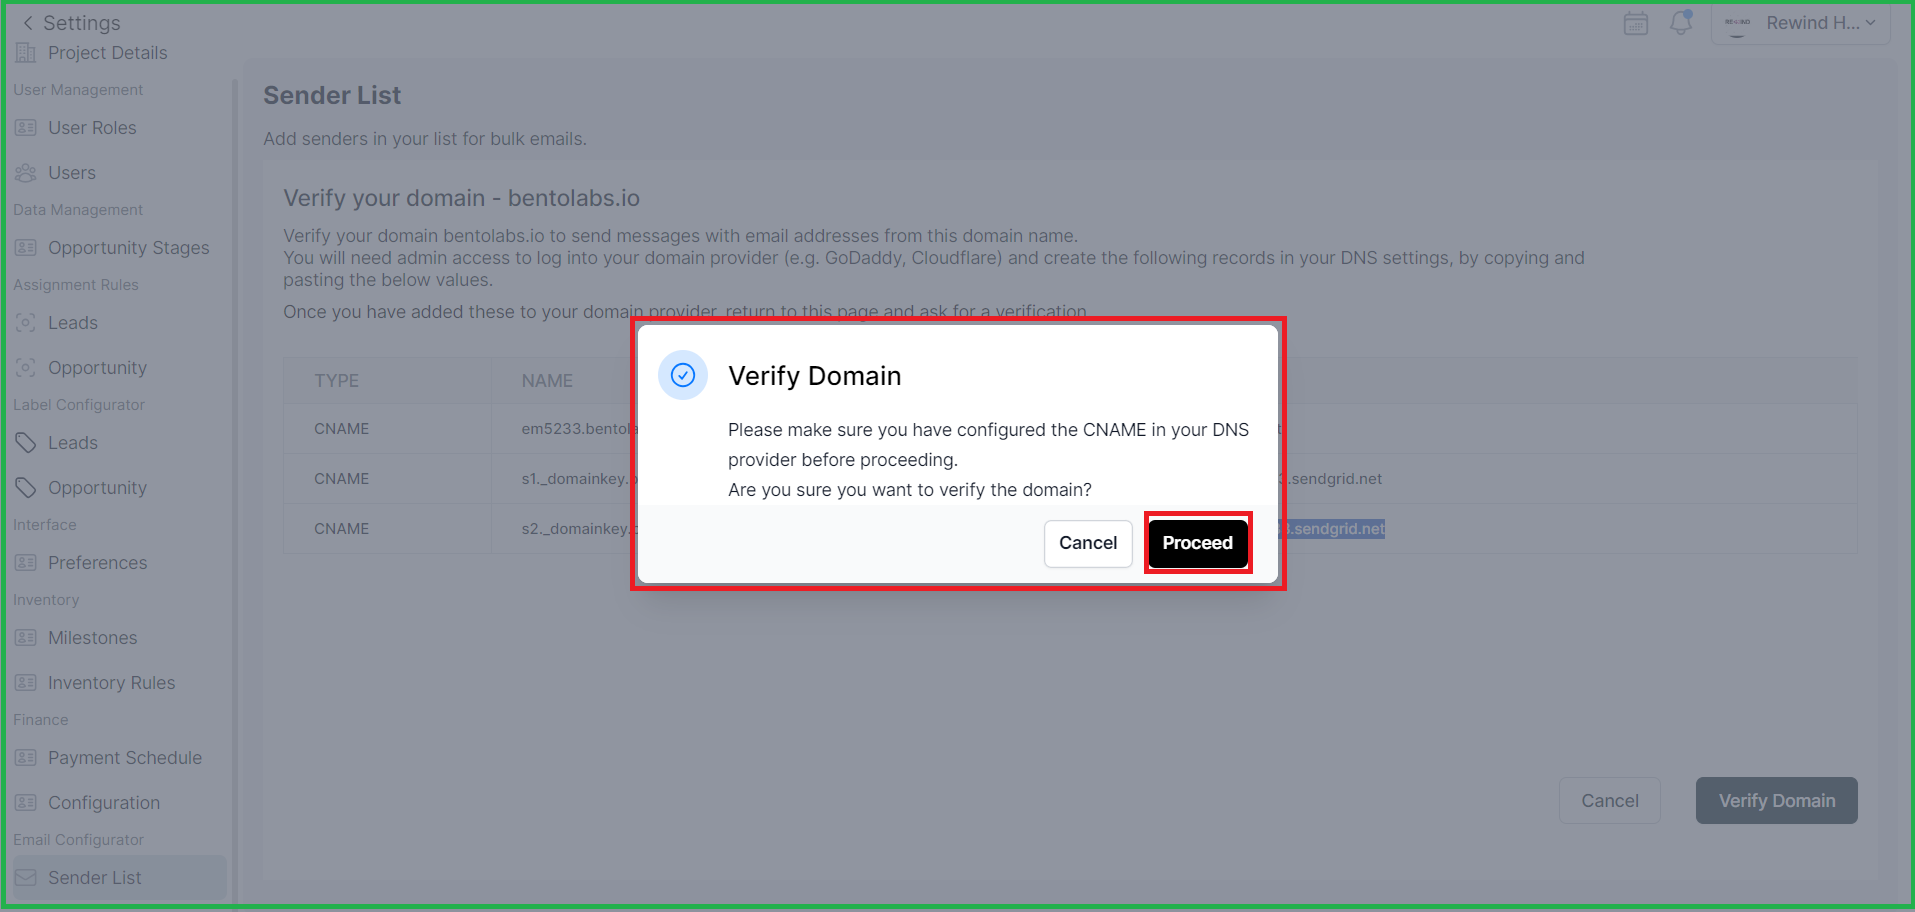
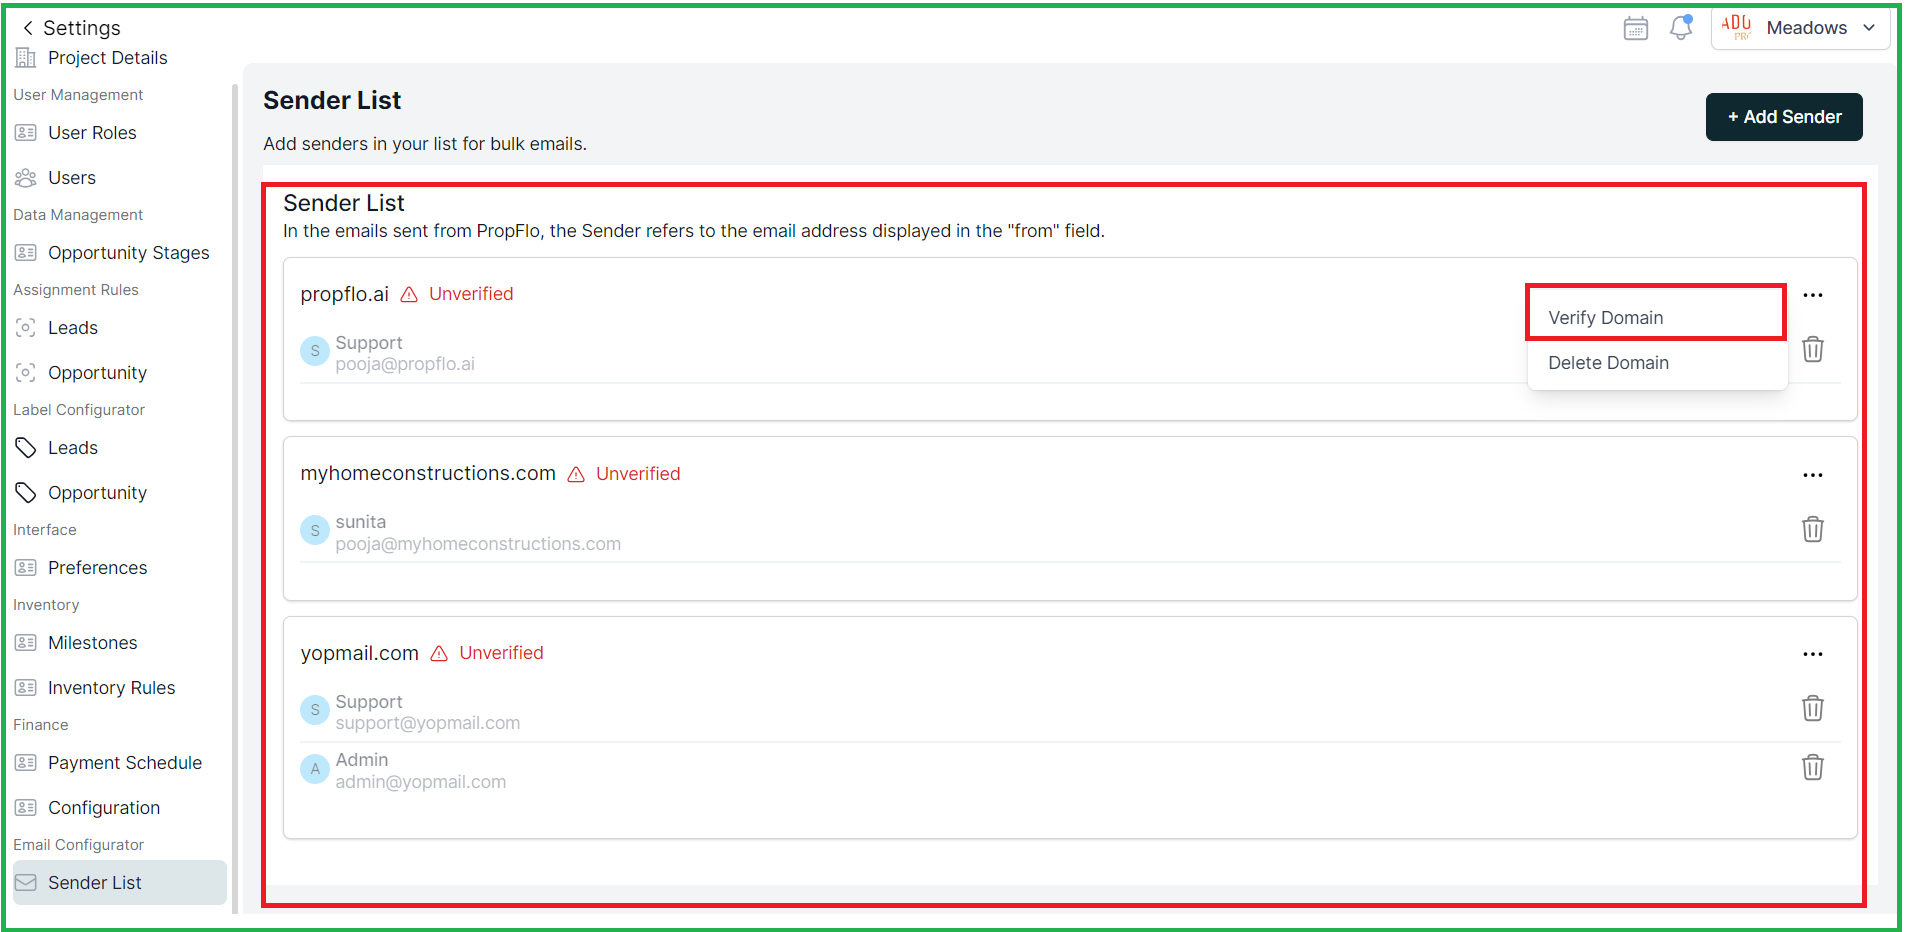
1.2. 2nd Scenario- Domain Unverified
- If the domain is unverified then you can come back to the sender list page and by clicking on the three dots select "Verify Domain" and the same process can be followed,
-
And after domain verification you will be able to send an email to the list of people you want.

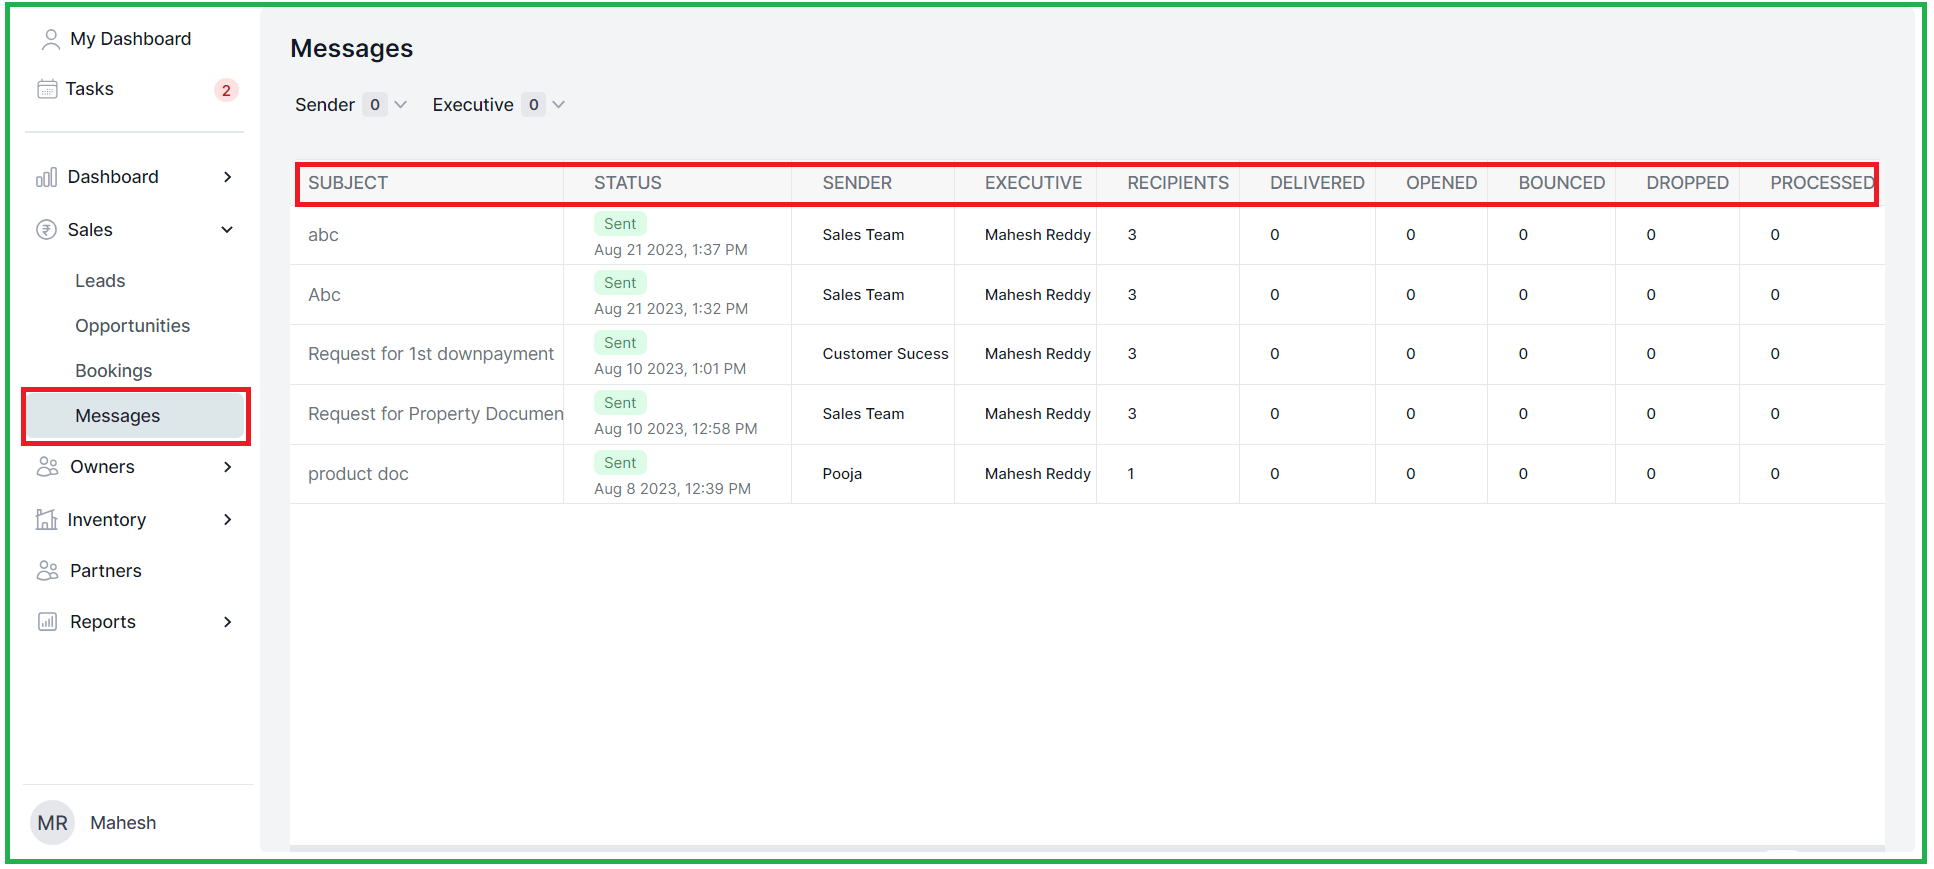
1.3. Messages overview-
We've introduced the "Messages" menu within the "Sales" module. This makes communication more convenient while managing leads and opportunities.
Get an overview of all your messages in Propflo i.e. emails.
- The table will show the details
- Subject
- Status
- Sender
- Executive
- Click on "Messages" to see the list of all the emails you send in Propflo, and the following:
- Subject: the subject line of your email
- Recipient(s): the group your email was sent to
- From: the email sender
- Status: Sent, Delivered, Opened, Bounced, Dropped, Processed
This is the screen for you to review all the messages which is shared.
2. Enhanced Kanban Features in the Opportunity
- You can now use filters to refine your view, perform bulk actions, and even export data in Kanban view also

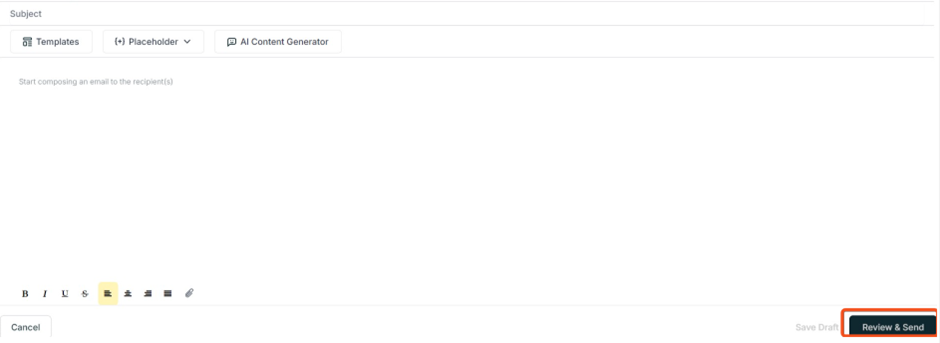
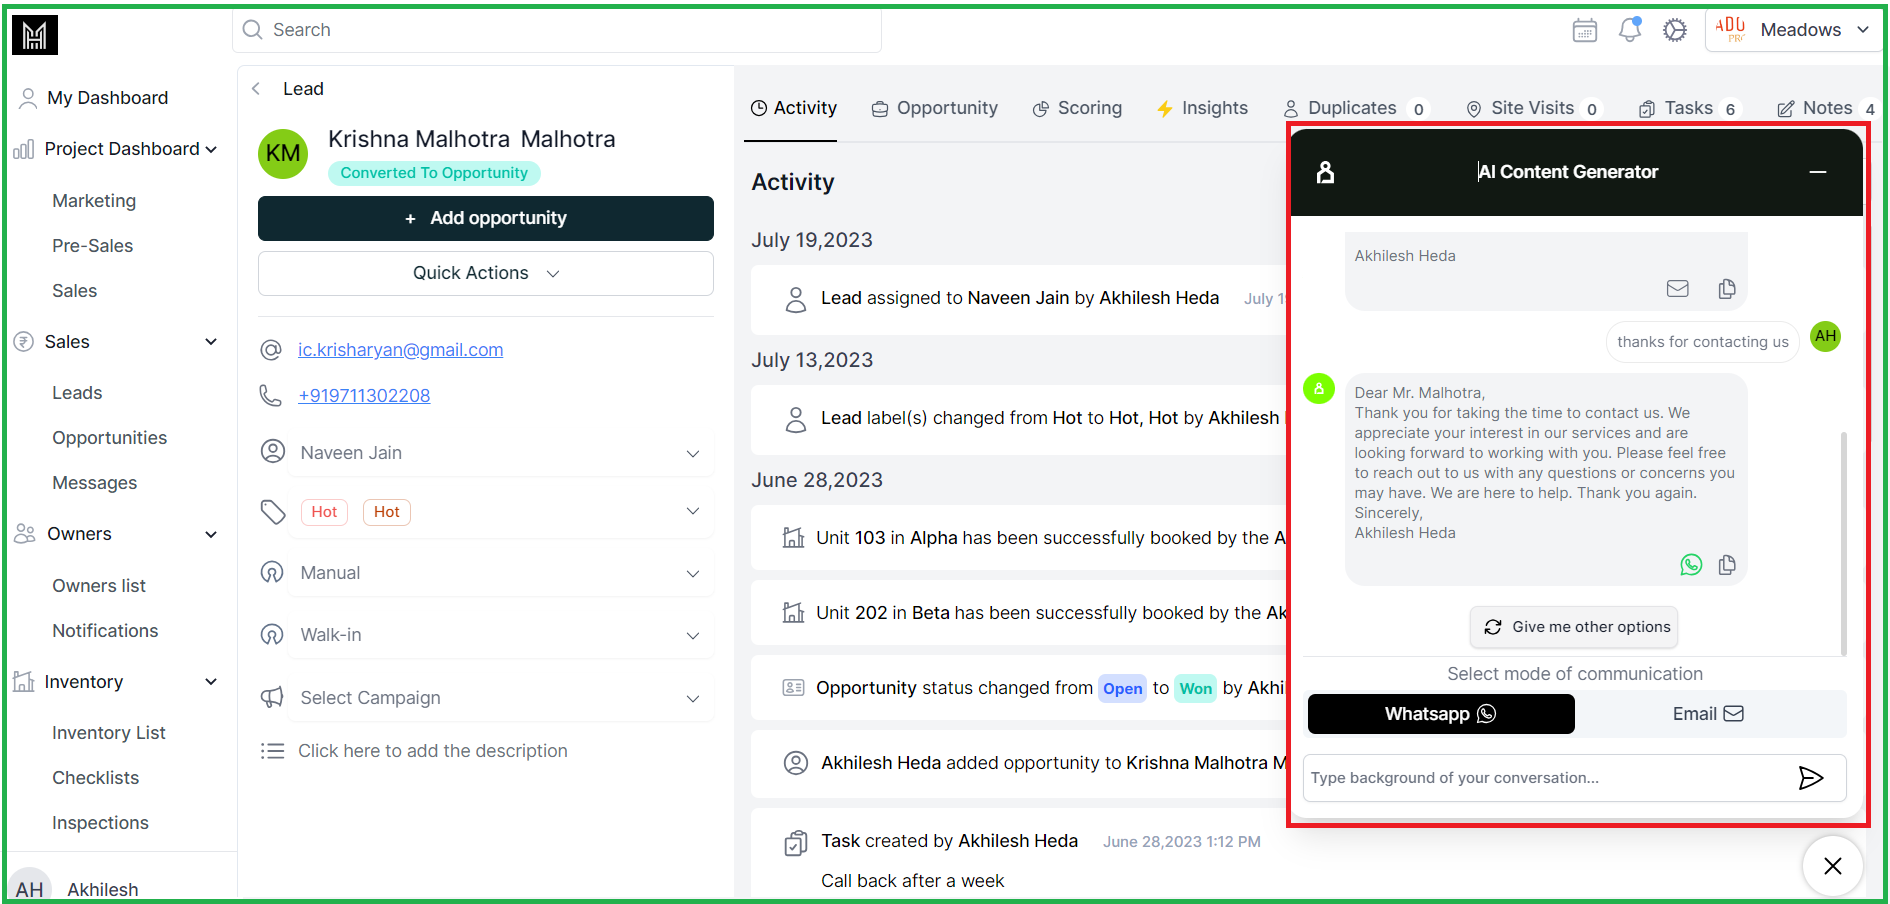
3. AI Content Generator Update: Chat Bot
Our AI-driven content generator has undergone a UI update, making it even more user-friendly and efficient.
- You can now find it at the bottom right corner of Lead and opportunity profile page,
- By clicking on this icon you will find the below shared view

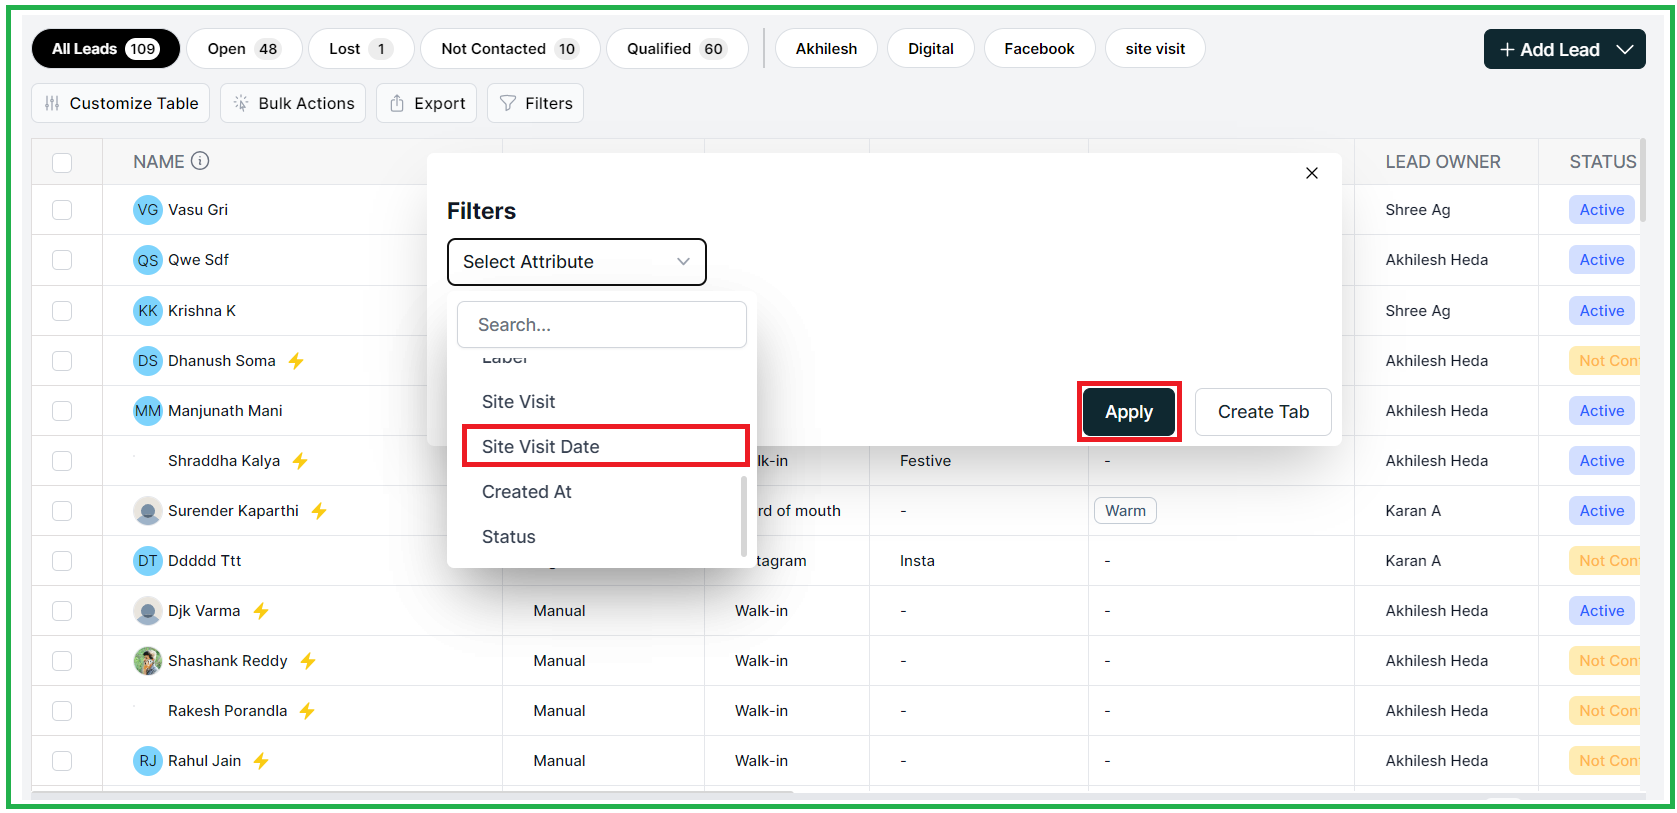
4. New Filter Option in lead/ opportunity list view
- A new "Site Visit Date" filter added to both leads and opportunities table.
- Now, when you hover over the Number displayed on any of the lead or opportunity in the list view and by clicking on to lead the duplicate list will be displayed.
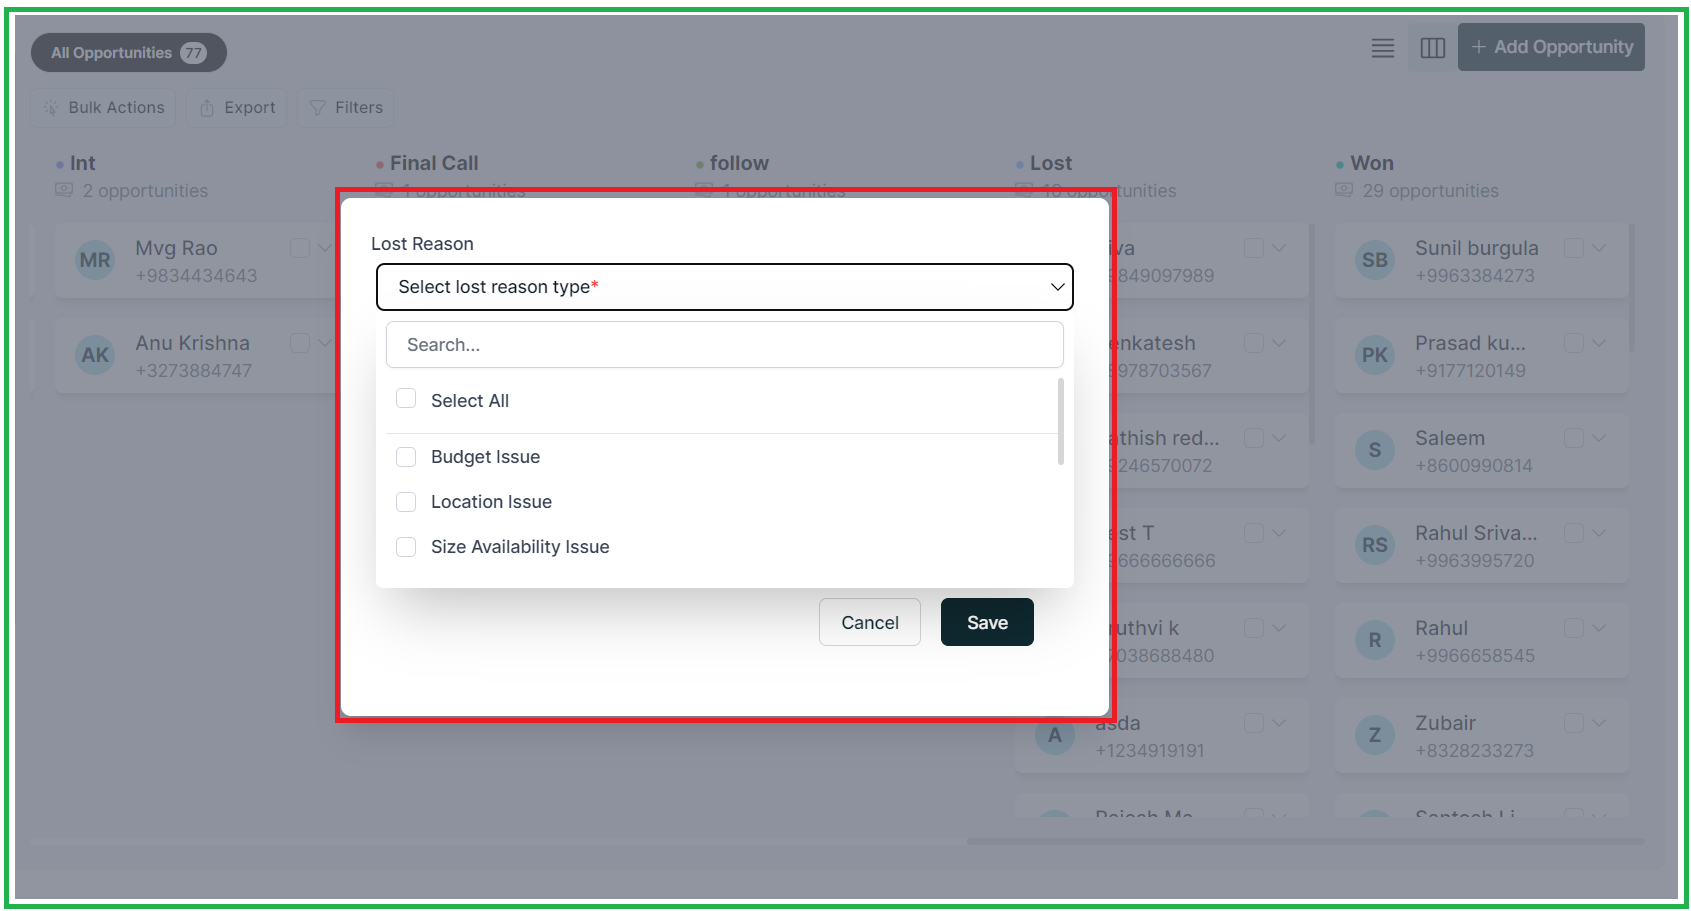
5. Lost Reason Selection:
- In the Kanban view now you can choose the appropriate "Lost Reason Type"
Date:19th JULY
Web Application
ENHANCEMENT
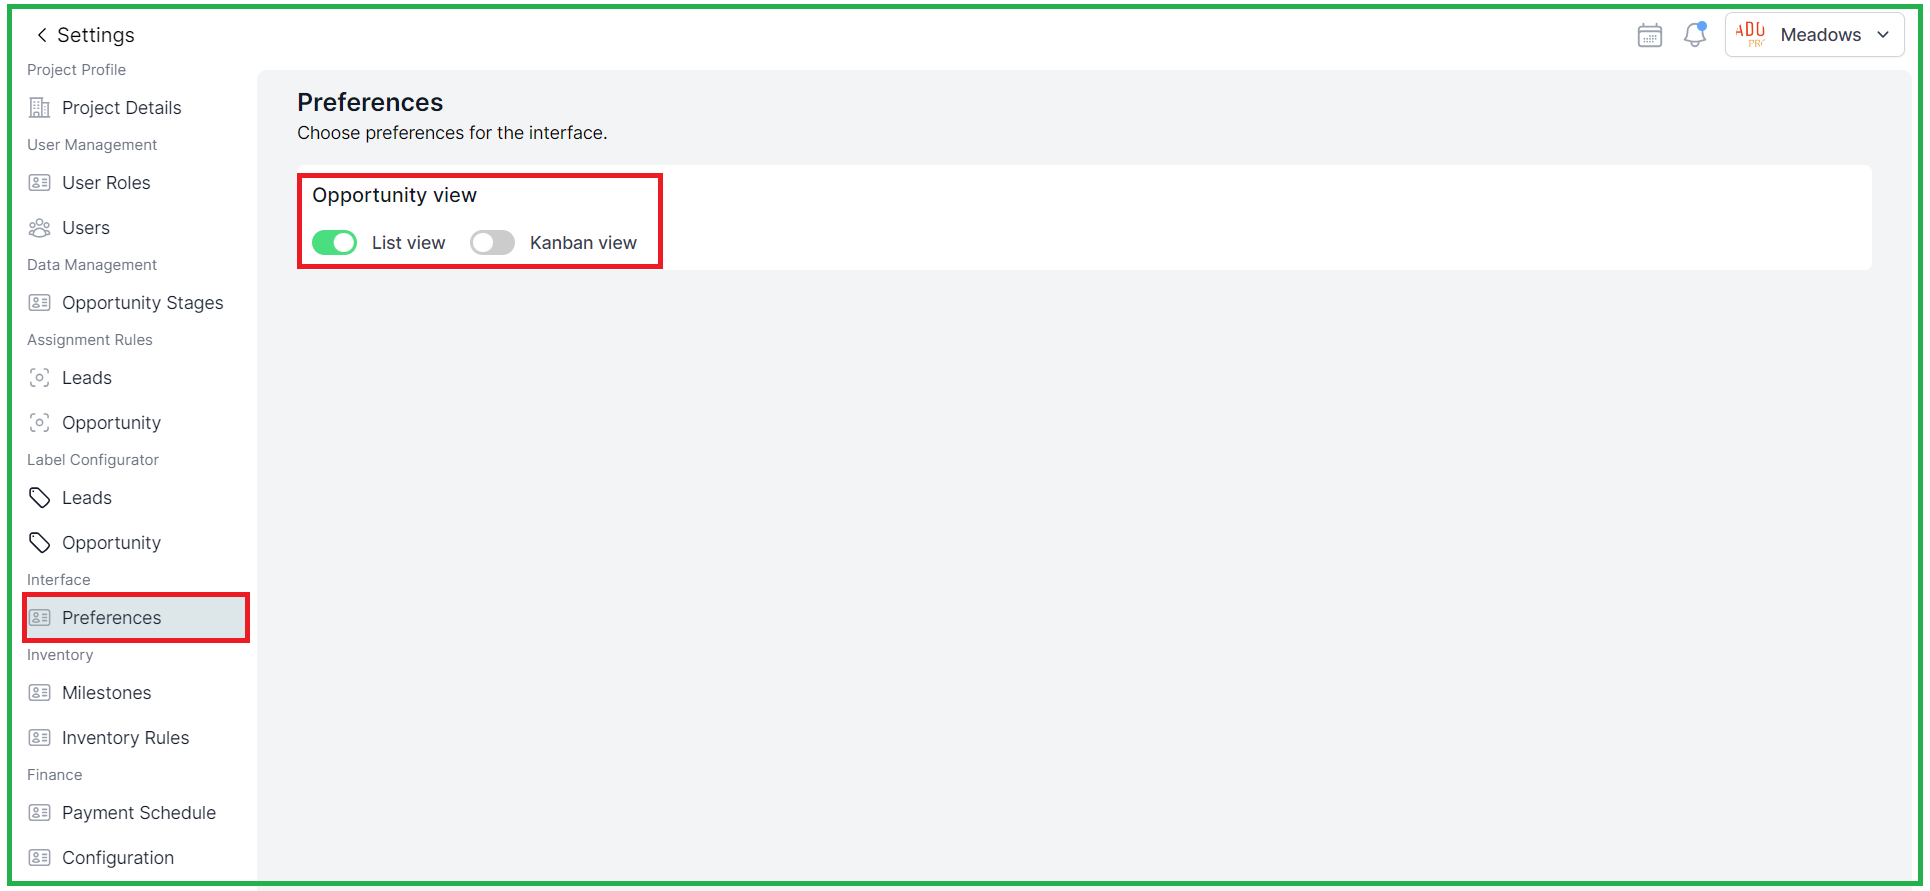
1."Preference" settings- Kanban or List view
- Click on the "Preference" in the side Navigation
- Choose your preferred view, either "Kanban" or "List View," from the available options and changes will be applied as default opportunity view.
- Now, whenever you access the opportunities section, it will display in the view you selected as the default.
2. Now you can scroll through and sort user records easily on the dashboard.

Date:14th JULY
MOBILE UPDATES [ Android & iOS]
Re-Designed
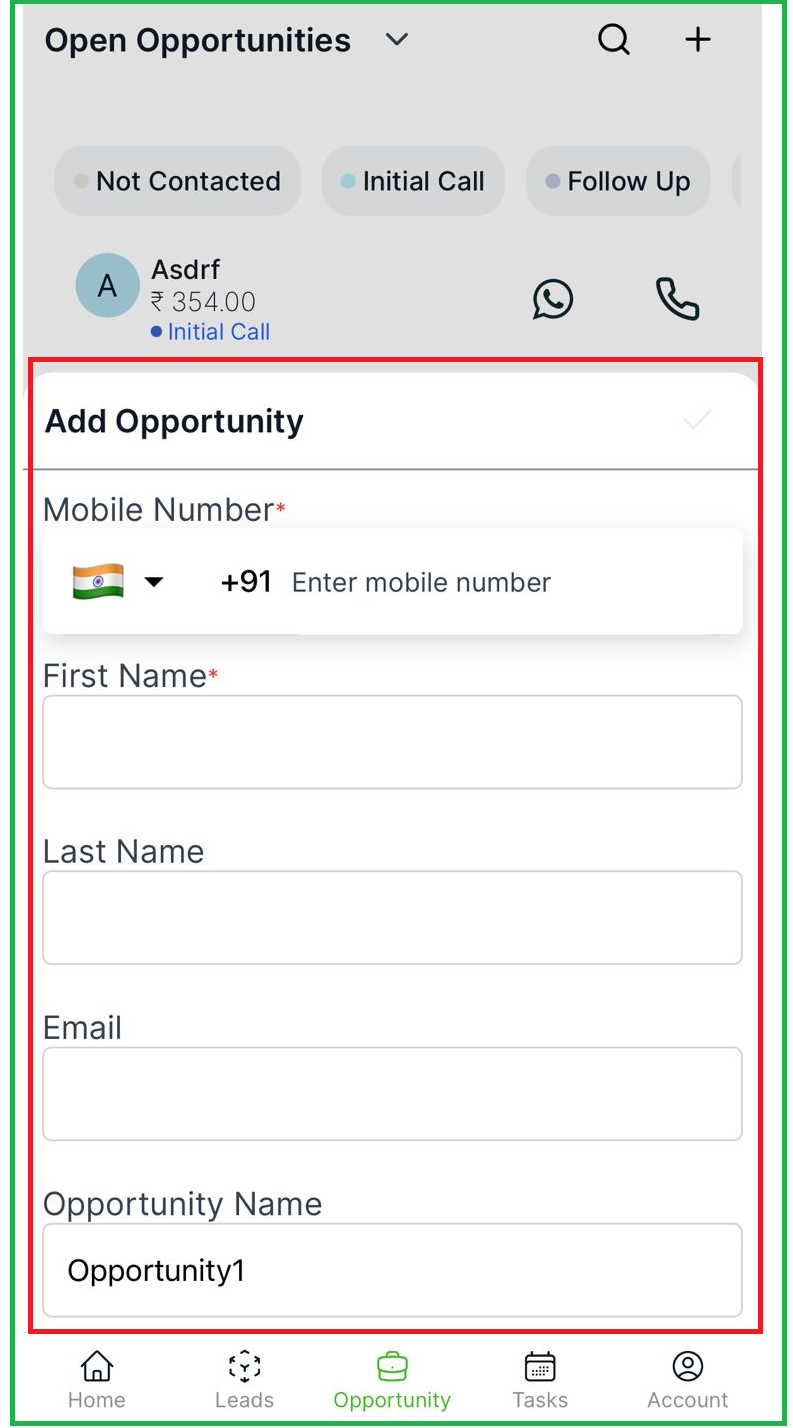
1. Add Opportunity:
- The user interface for "Add opportunity" feature has now been redesigned as bottom popup.
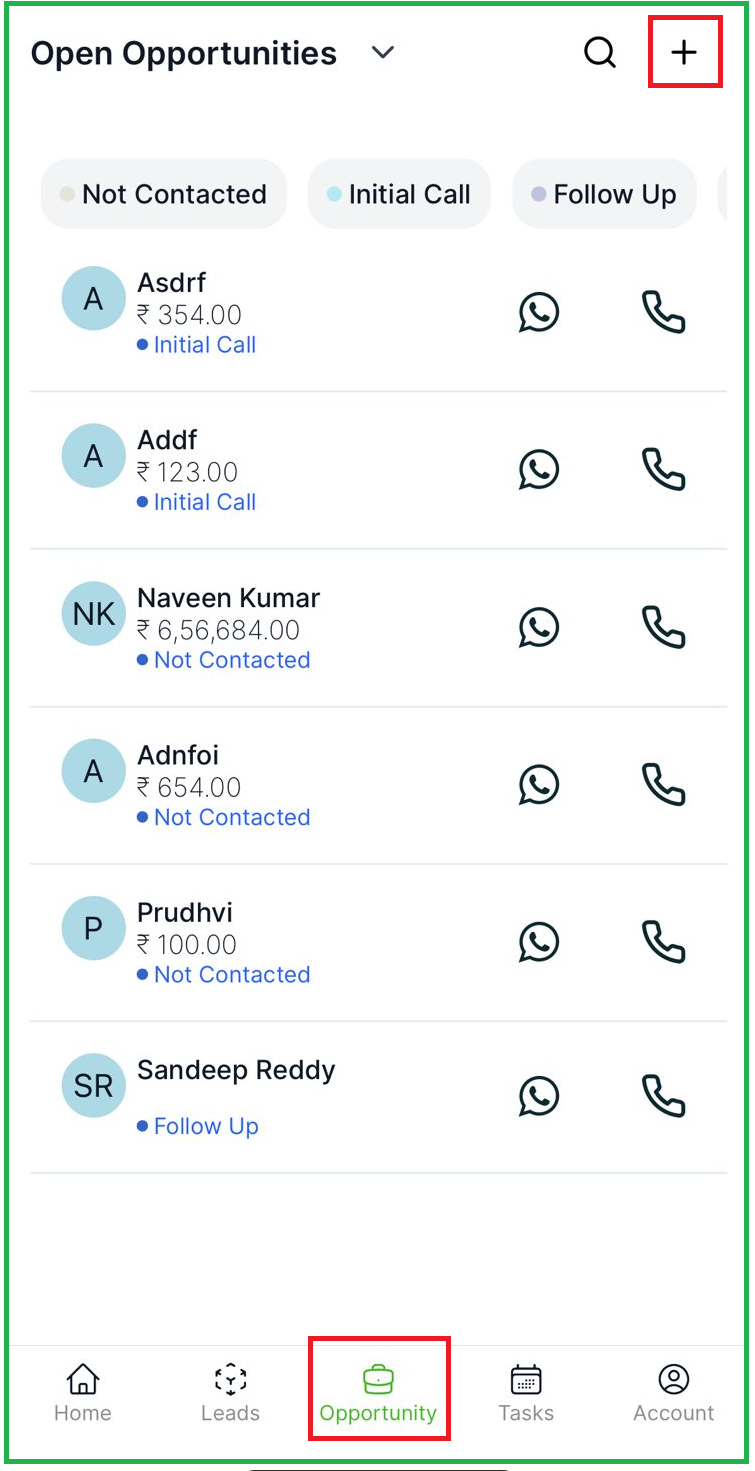
- It appears as a pop-up screen that slides up from the bottom when the user clicks on the "+" button to add an opportunity
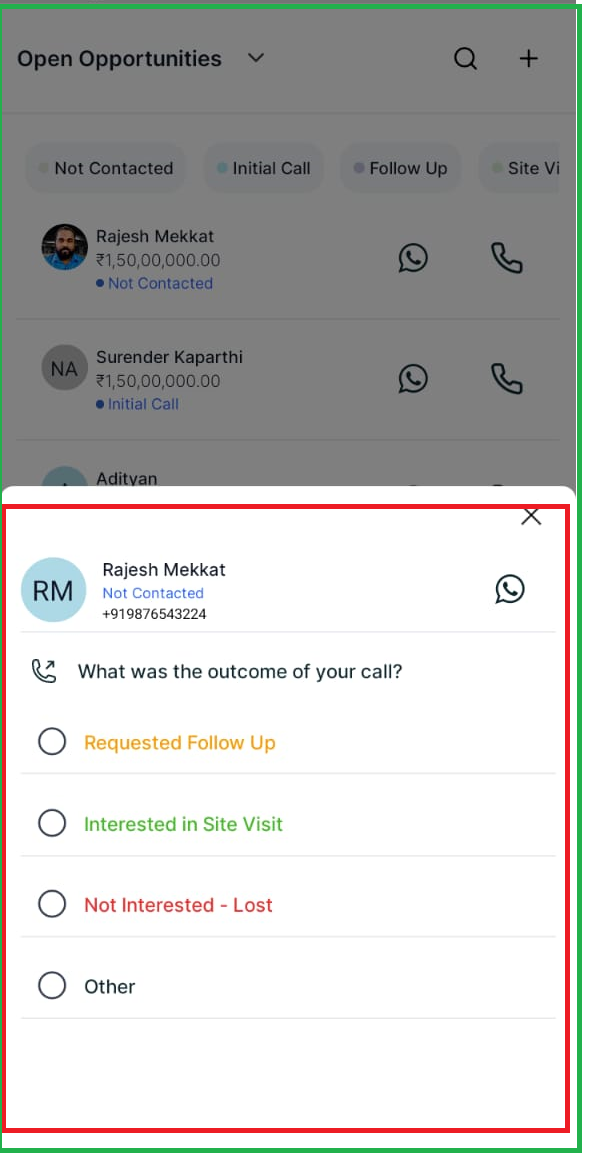
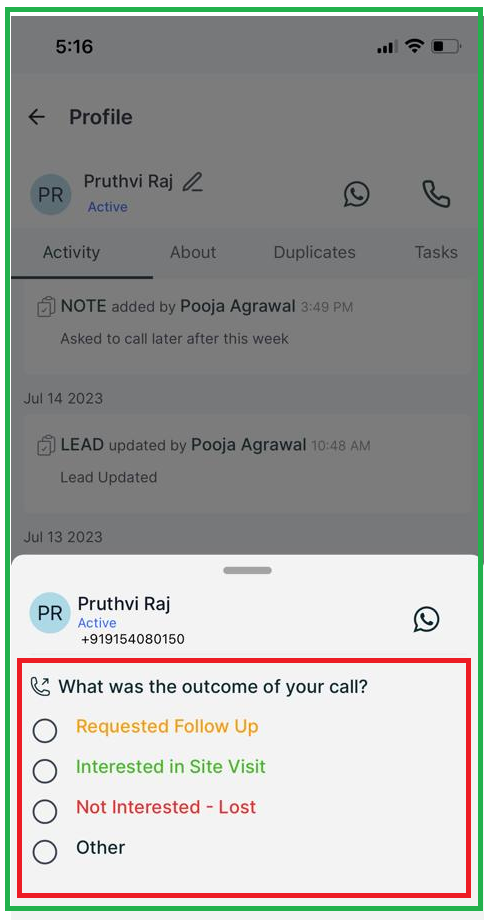
2. Call Flow:
- Once the call is completed, users will be asked about the outcome. Based on their response a form will be displayed.
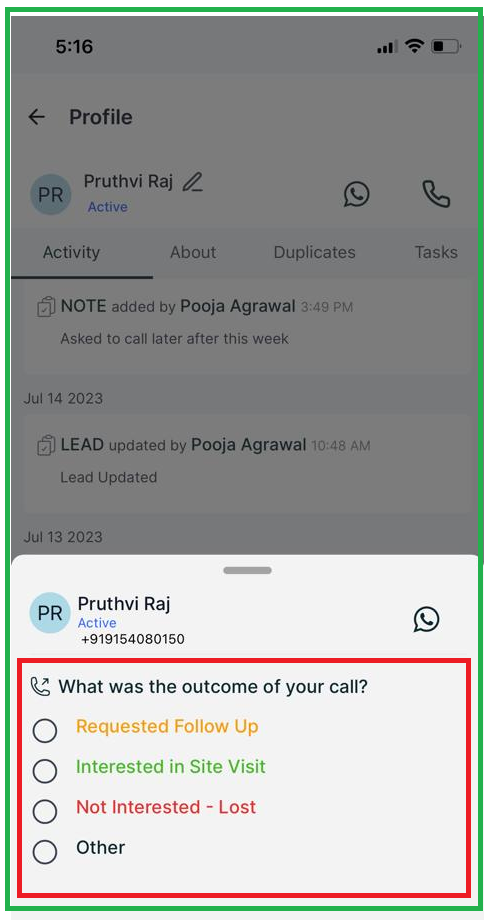
- Depending on the selected outcome, a corresponding form will be displayed with options like;
-Requested Follow Up,
-Interested in Site Visit,
-Not Interested
-Lost, or Other
This helps streamline the follow-up process by automatically creating tasks, notes, or site visits based on the selection.

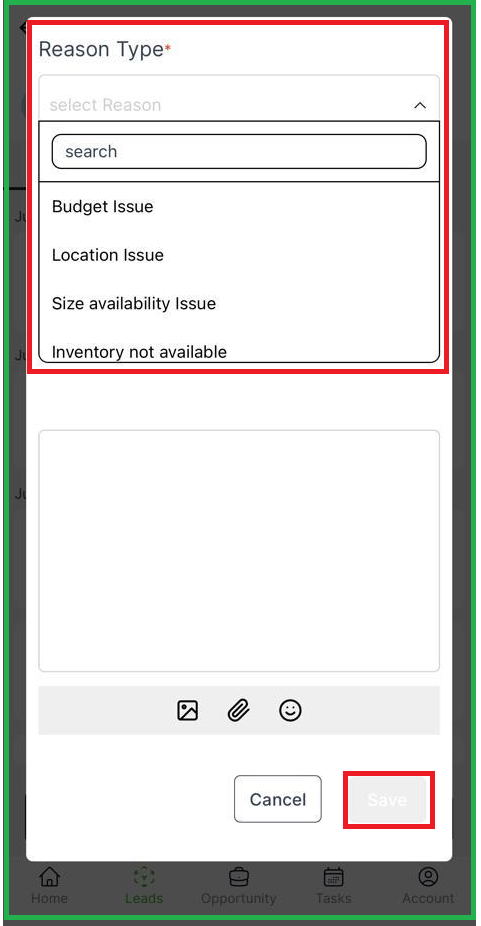
3. Opportunity Status Selection for Lost Opportunities:
- When changing the status of an opportunity to "Lost," users can now select a reason from a dropdown menu.
- Dropdown menu provides a list of options or reasons to choose from when marking an opportunity as lost

Date: 13th JULY
Web Application
ENHANCEMENT
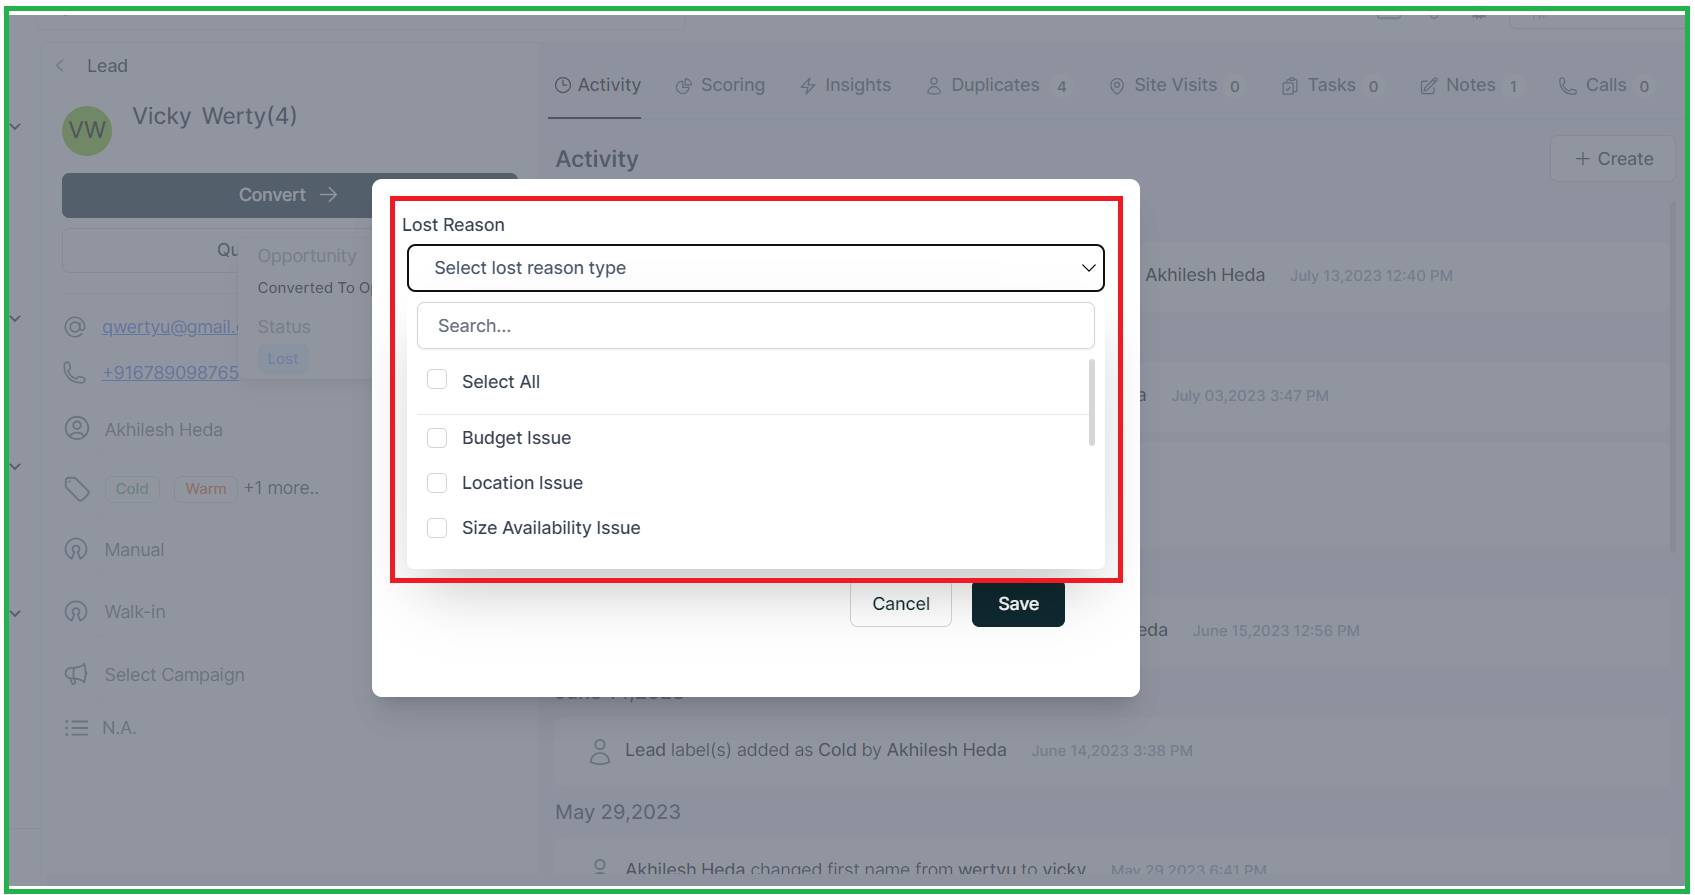
- The section where the user enters notes for changing the status to "Lost" will now include a dropdown menu.

- This dropdown menu will provide different options or "Lost reasons" for selecting why the status is being changed to "Lost."
Date: 6th JULY
Web Application
ENHANCEMENT
1.Project Dashboard- Driven by Access rights
Propflo provides a comprehensive overview of your projects. It displays key information and metrics, such as the status of each site visits, opportunities, and the best-performing executives. It helps you track the progress, performance, and success of your projects at a glance.
Including Marketing Dashboard, Sales Dashboard, and Presales Dashboard, to provide valuable insights and metrics.
1.1 Marketing Dashboard:
1.2. Pre- Sales Dashboard:
1.3. Sales Dashboard:
Introducing the Access Screen: From here you can understand how do you provide an access to the dashboards,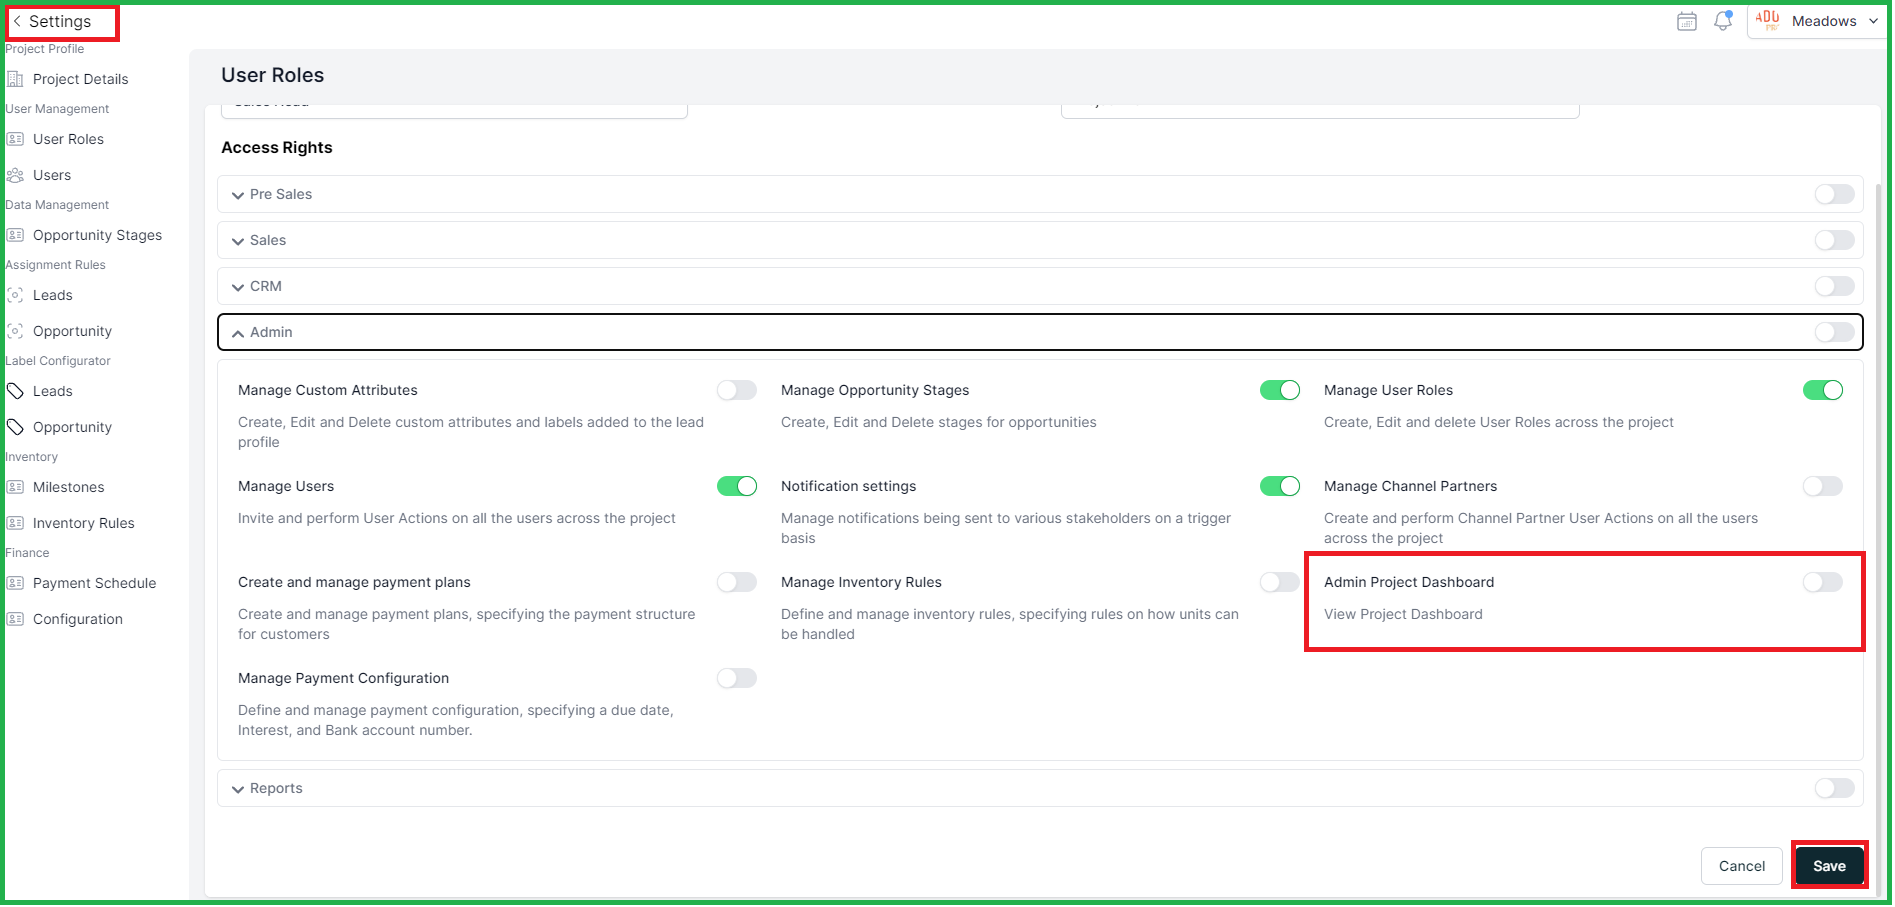
2. Reports:
2.1 Report Template-
The report builder helps you create and download personalized reports with the information you want, within a specified time period.
The report builder in Propflo allows you to create customized Report templates.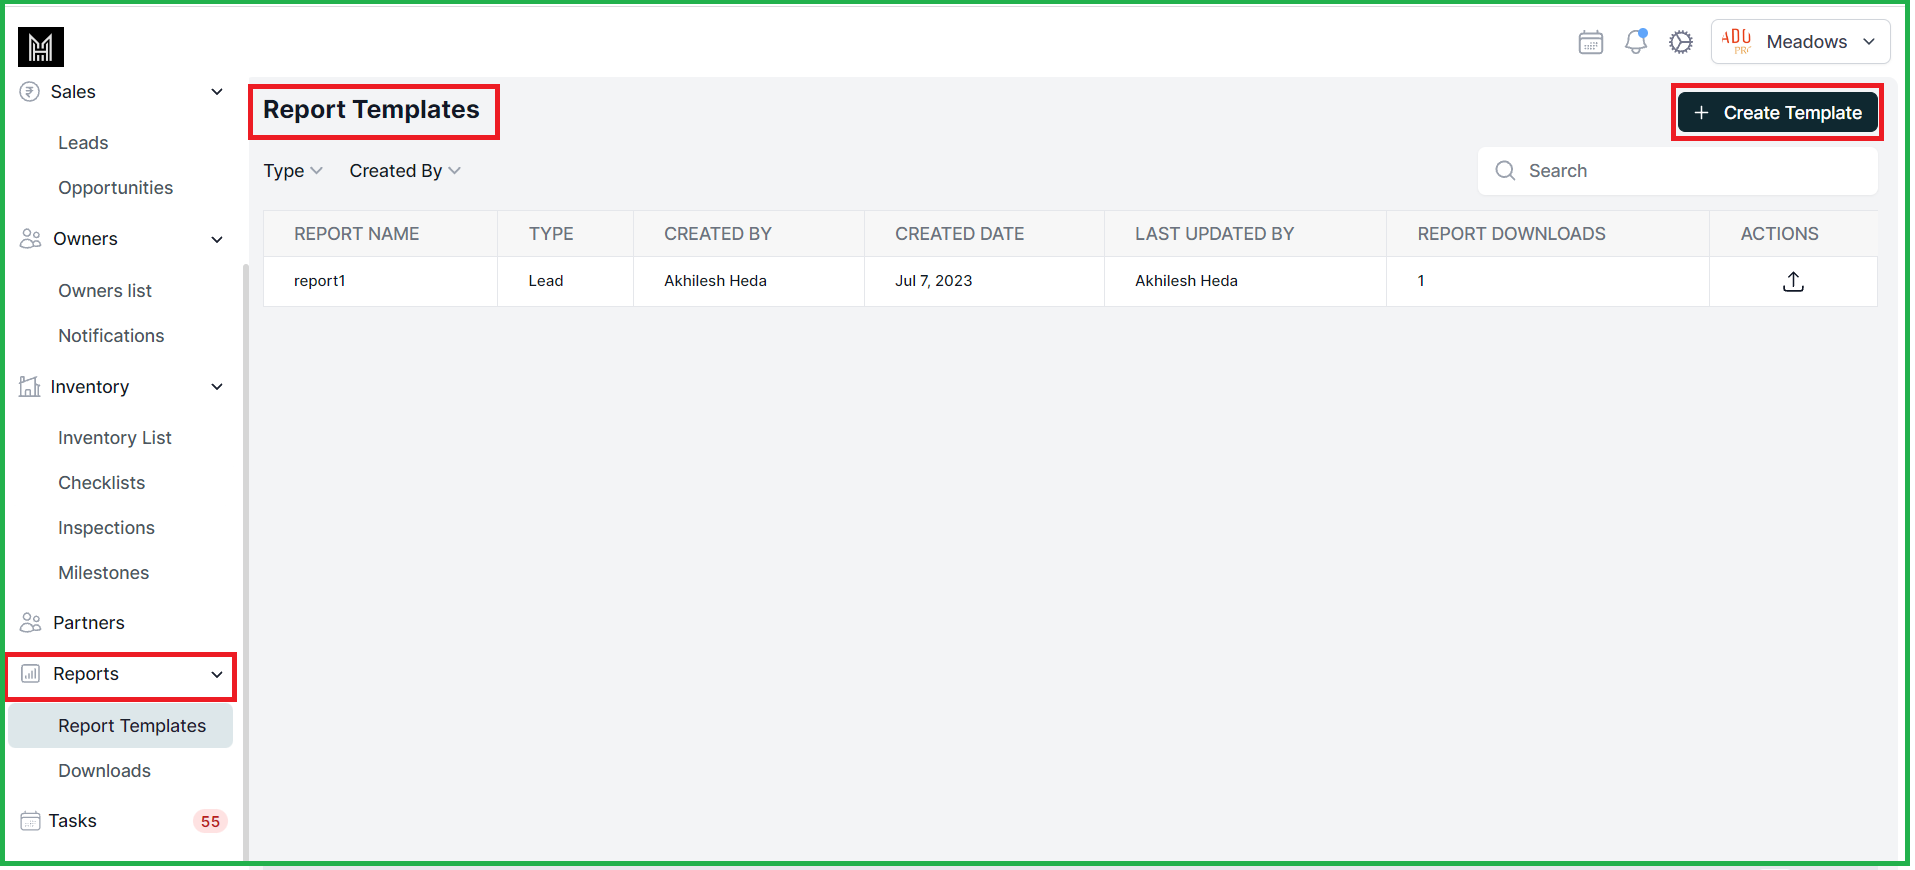
You can choose reports type here,
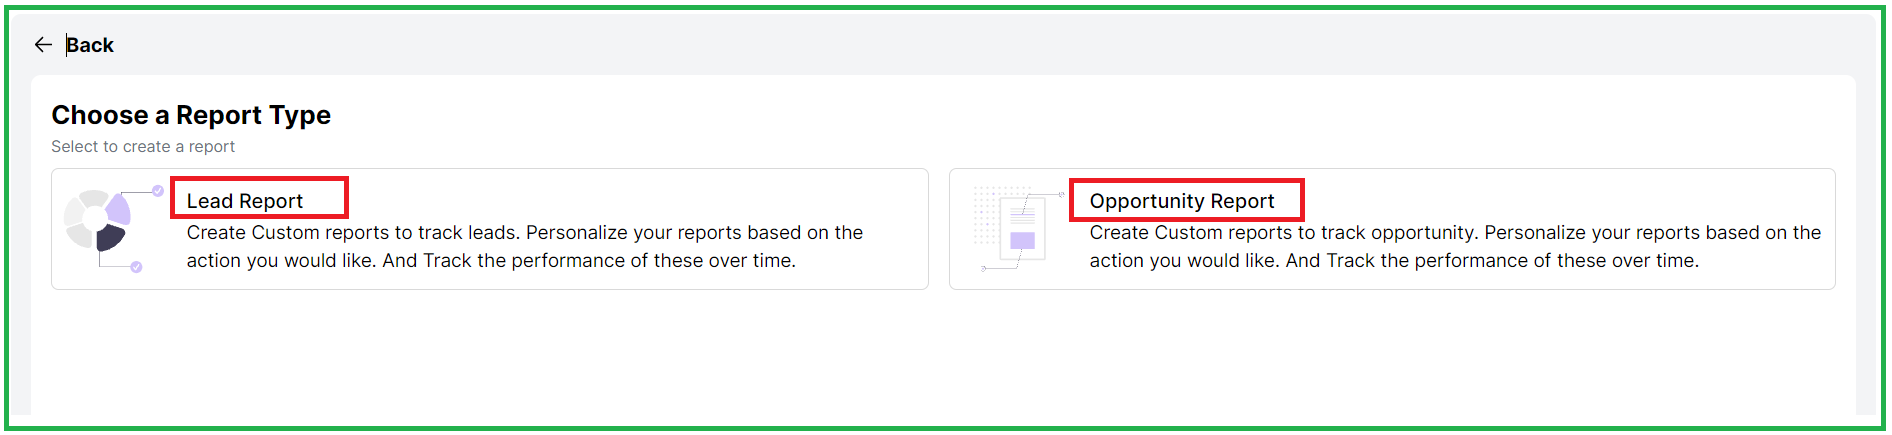
Select specific columns and apply custom filters to generate reports as per your needs.

Once the template is set up, you can populate it with data from a specific date range.
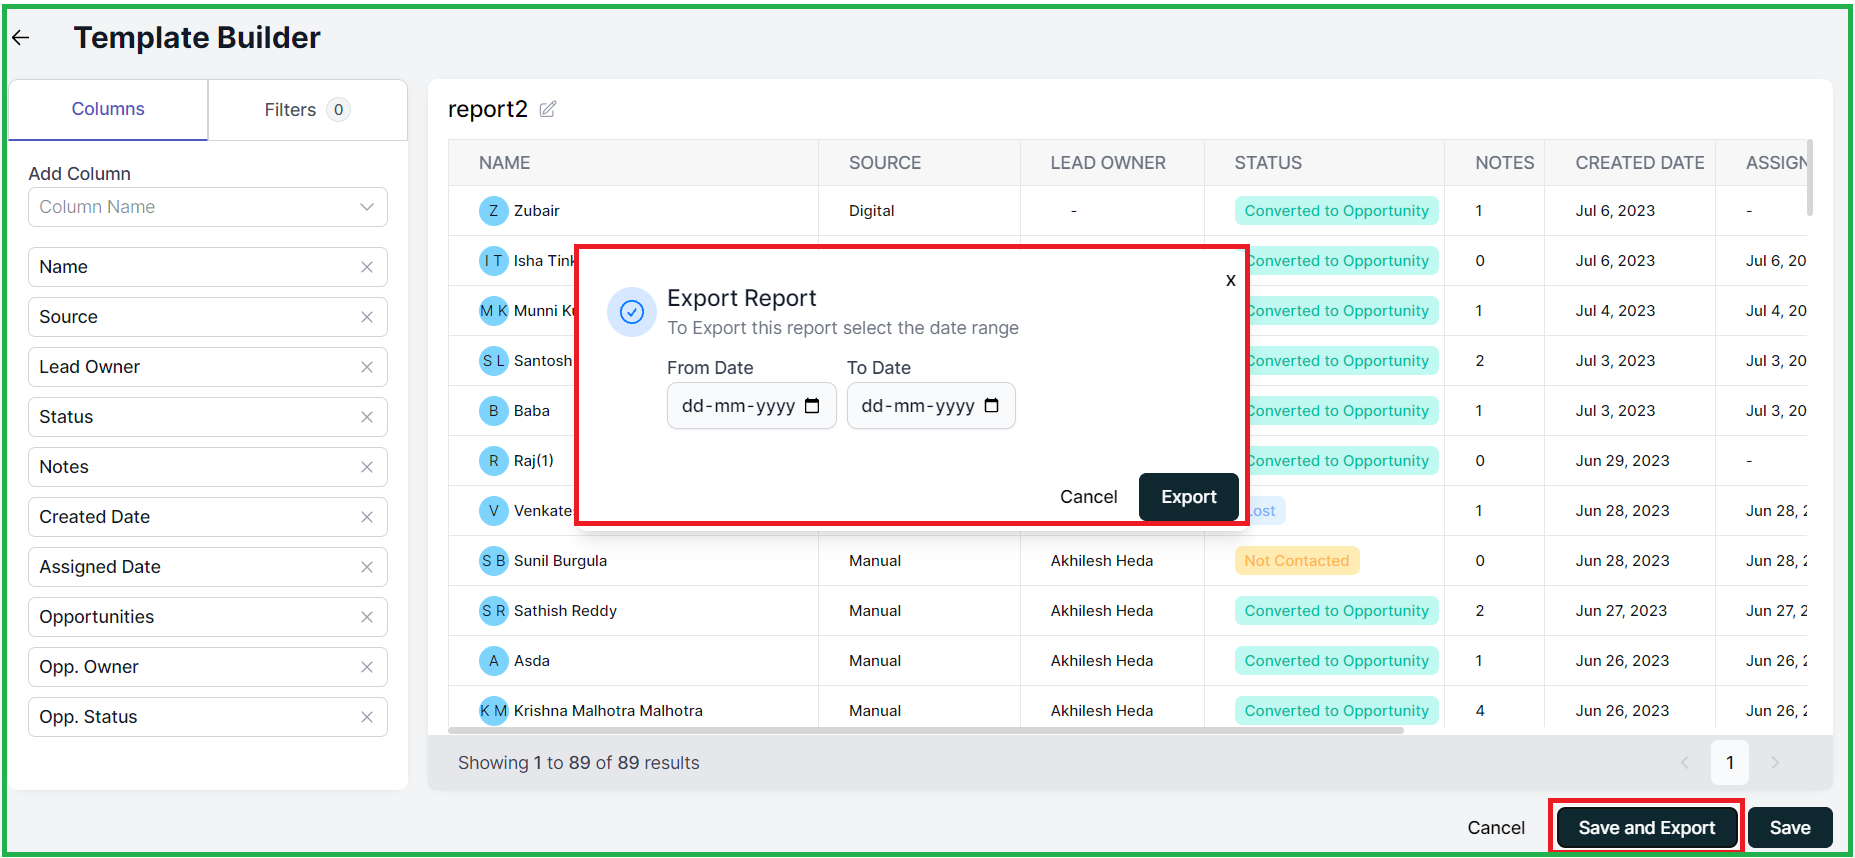
After clicking on save and export, the file will be send to the logged-in email from where you can easily download the report.
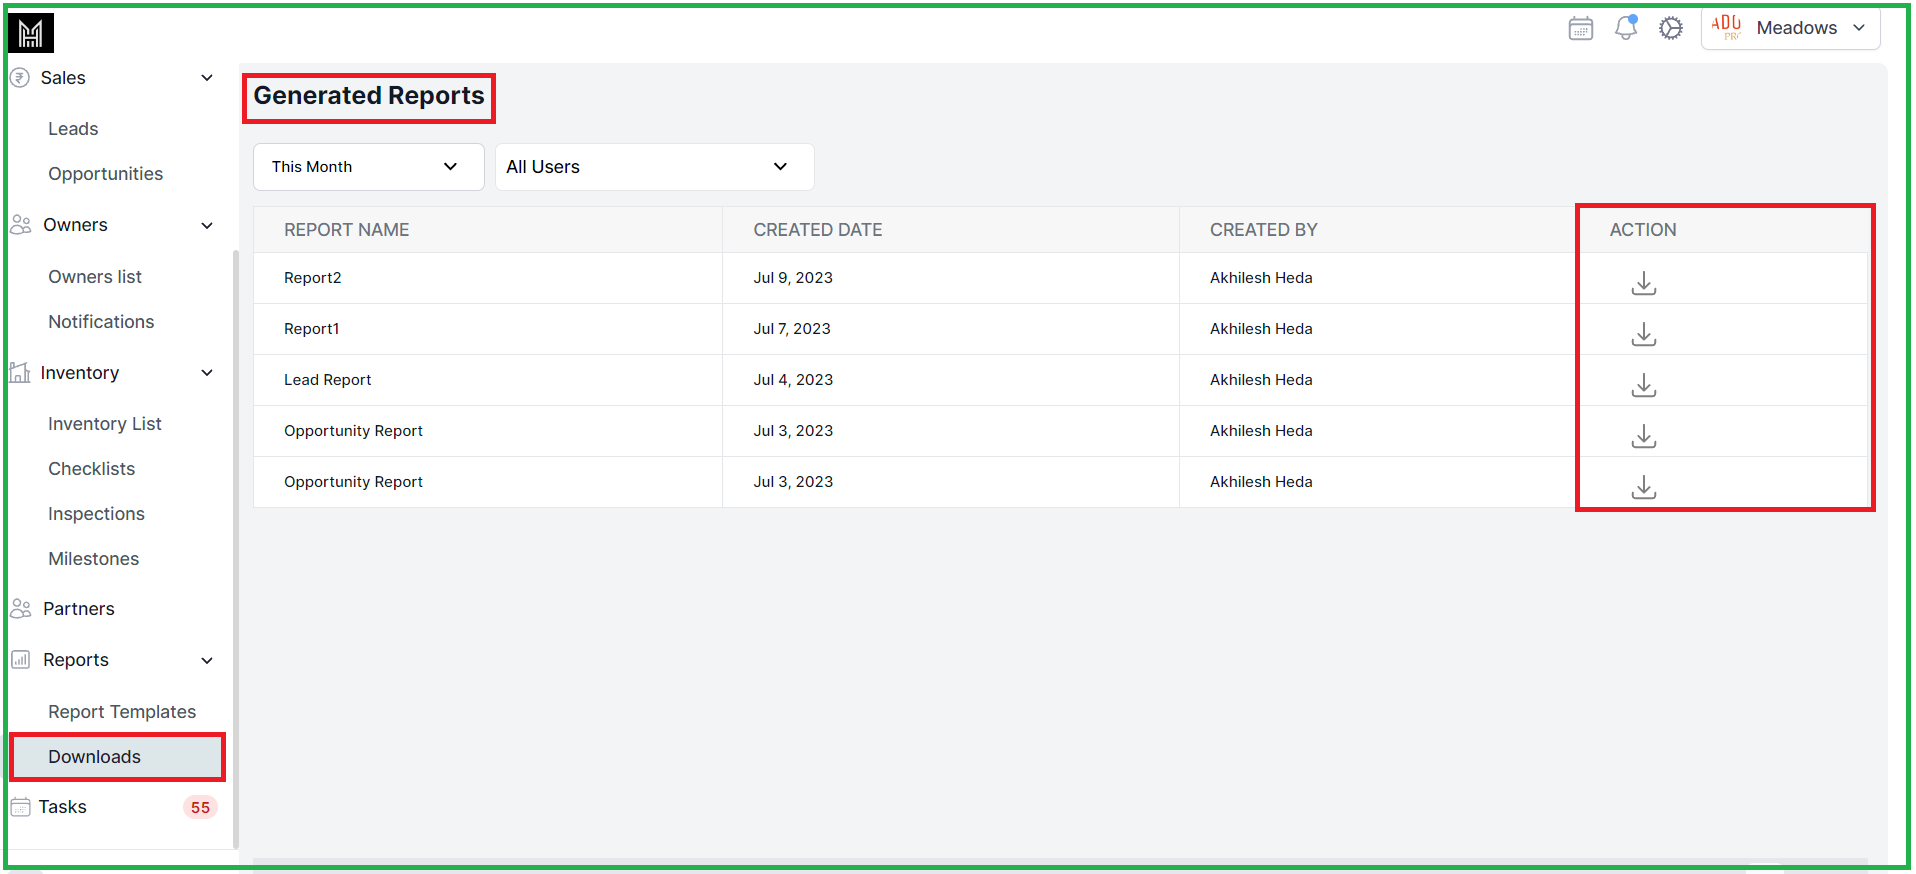
2.2 Downloads
The "Downloads" lets users view and manage all the reports they have downloaded.
Whether it's reports exported from the "Leads/Opportunities" section or reports downloaded from the "Reports Builder" section, this feature keeps you organized and easily accessible.
You can find the "Downloads" section in the sidebar,
3. Demand Note And Receipt Generation:
Demand Note and Receipt Generation: Set payment configurations, generate demand notes for completed milestones, create receipts for received payments, and access transaction details. Streamline your financial processes and stay organized with ease. Simplify payment management and gain transparency into your transactions.
You have a various step involved to complete the process,
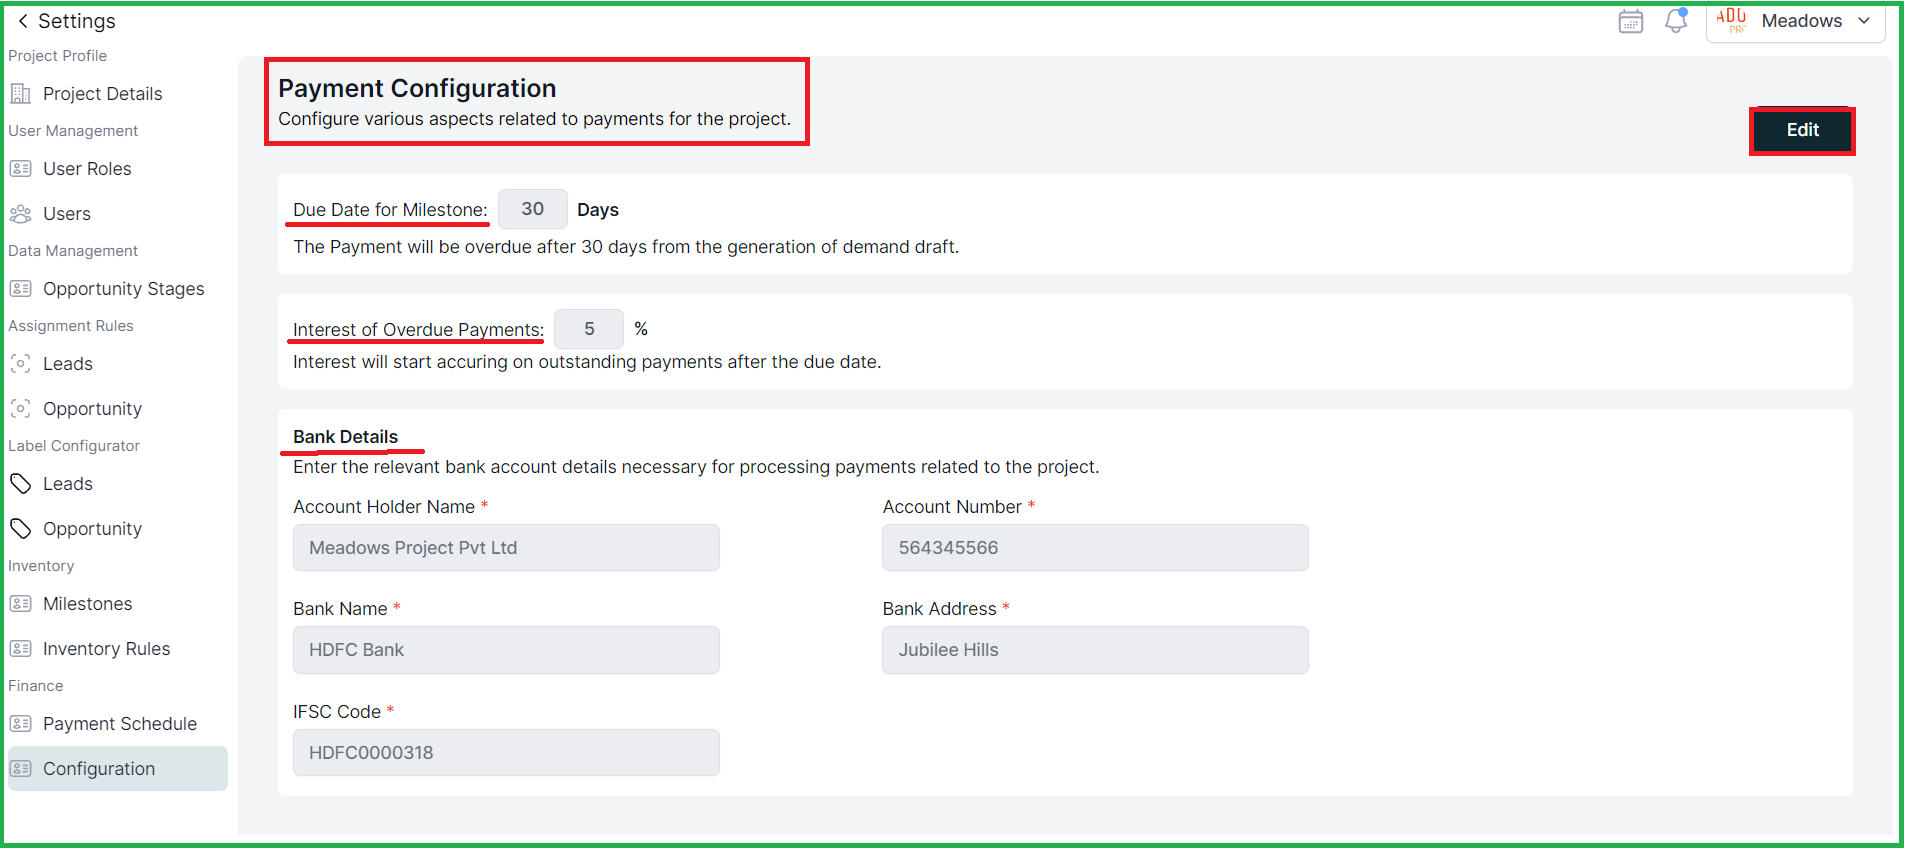
3.1 Payment Configuration
3.2 Milestone Creation
3.3 Demand Note Generation
3.4 Generation of Receipts
3.5 Payment Receipts
3.6 Transactions
3.1 Payment Configuration
In this section, you can configure payment settings based on your access rights. You can set milestone payment due dates, define interest for overdue payments, and provide bank details to attach it to demand notes.
3.2 Milestones Completion
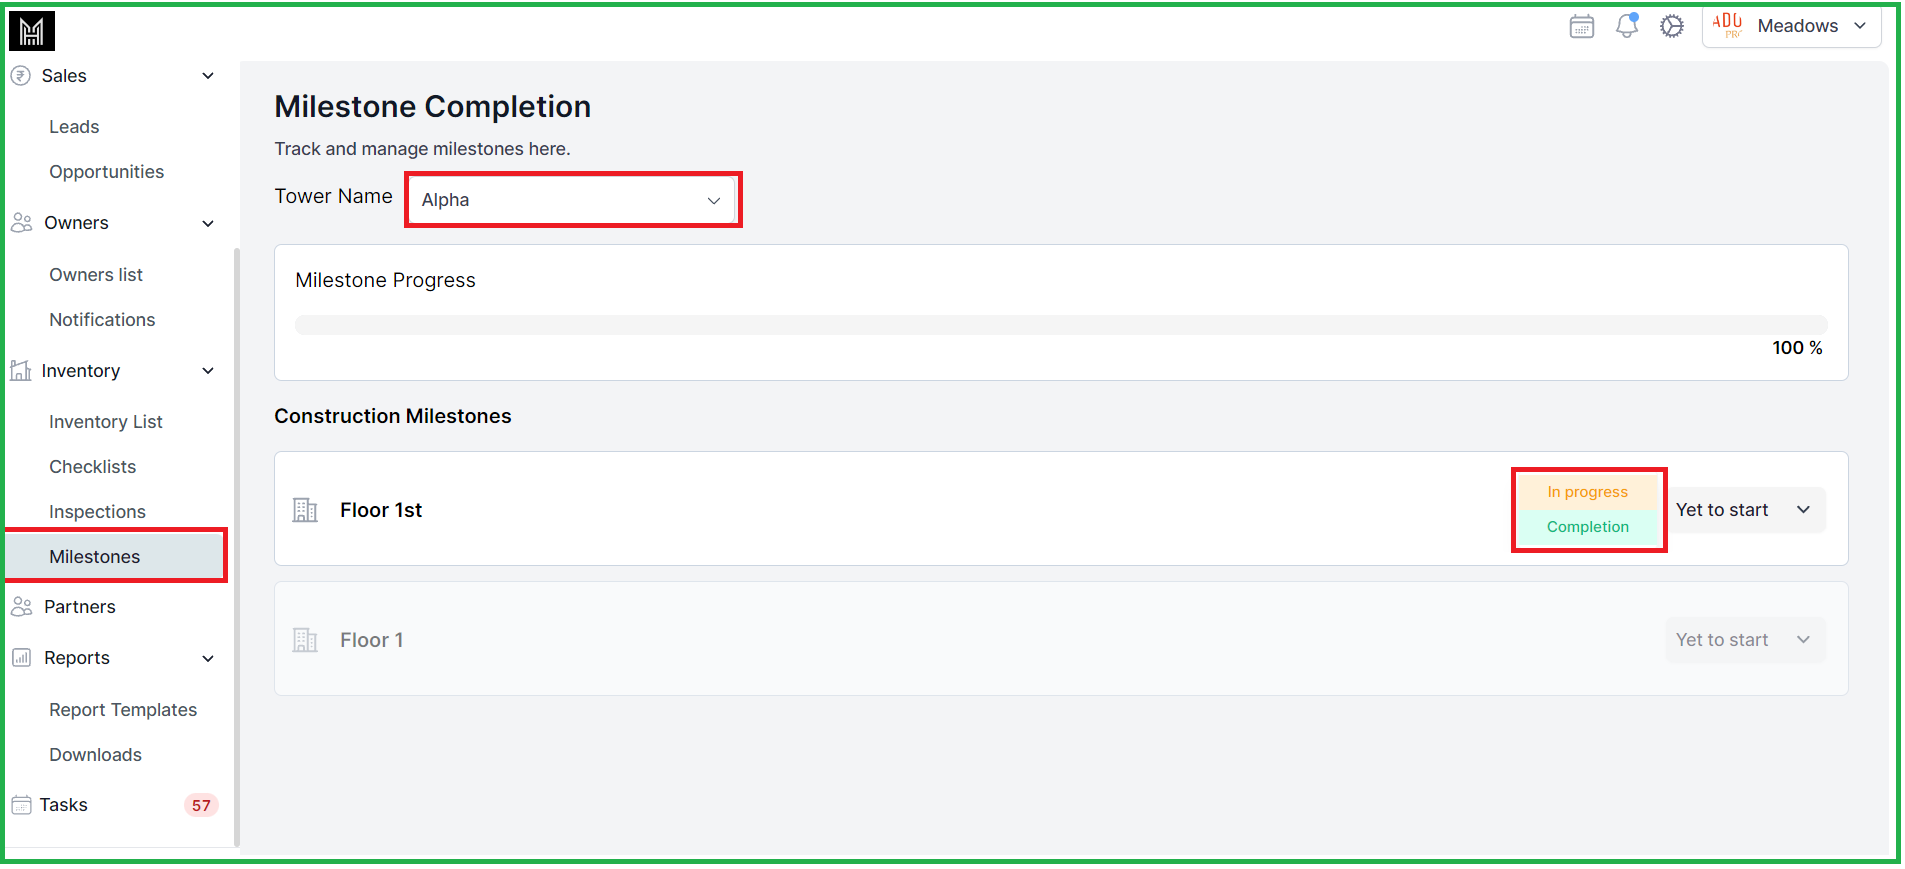
Here, you can view and update the current status of each tower's construction milestones. A progress bar with a percentage is displayed based on the milestone status, showing how much progress has been made.
Please find the steps below :
- Select the Tower for which you want to complete the milestone
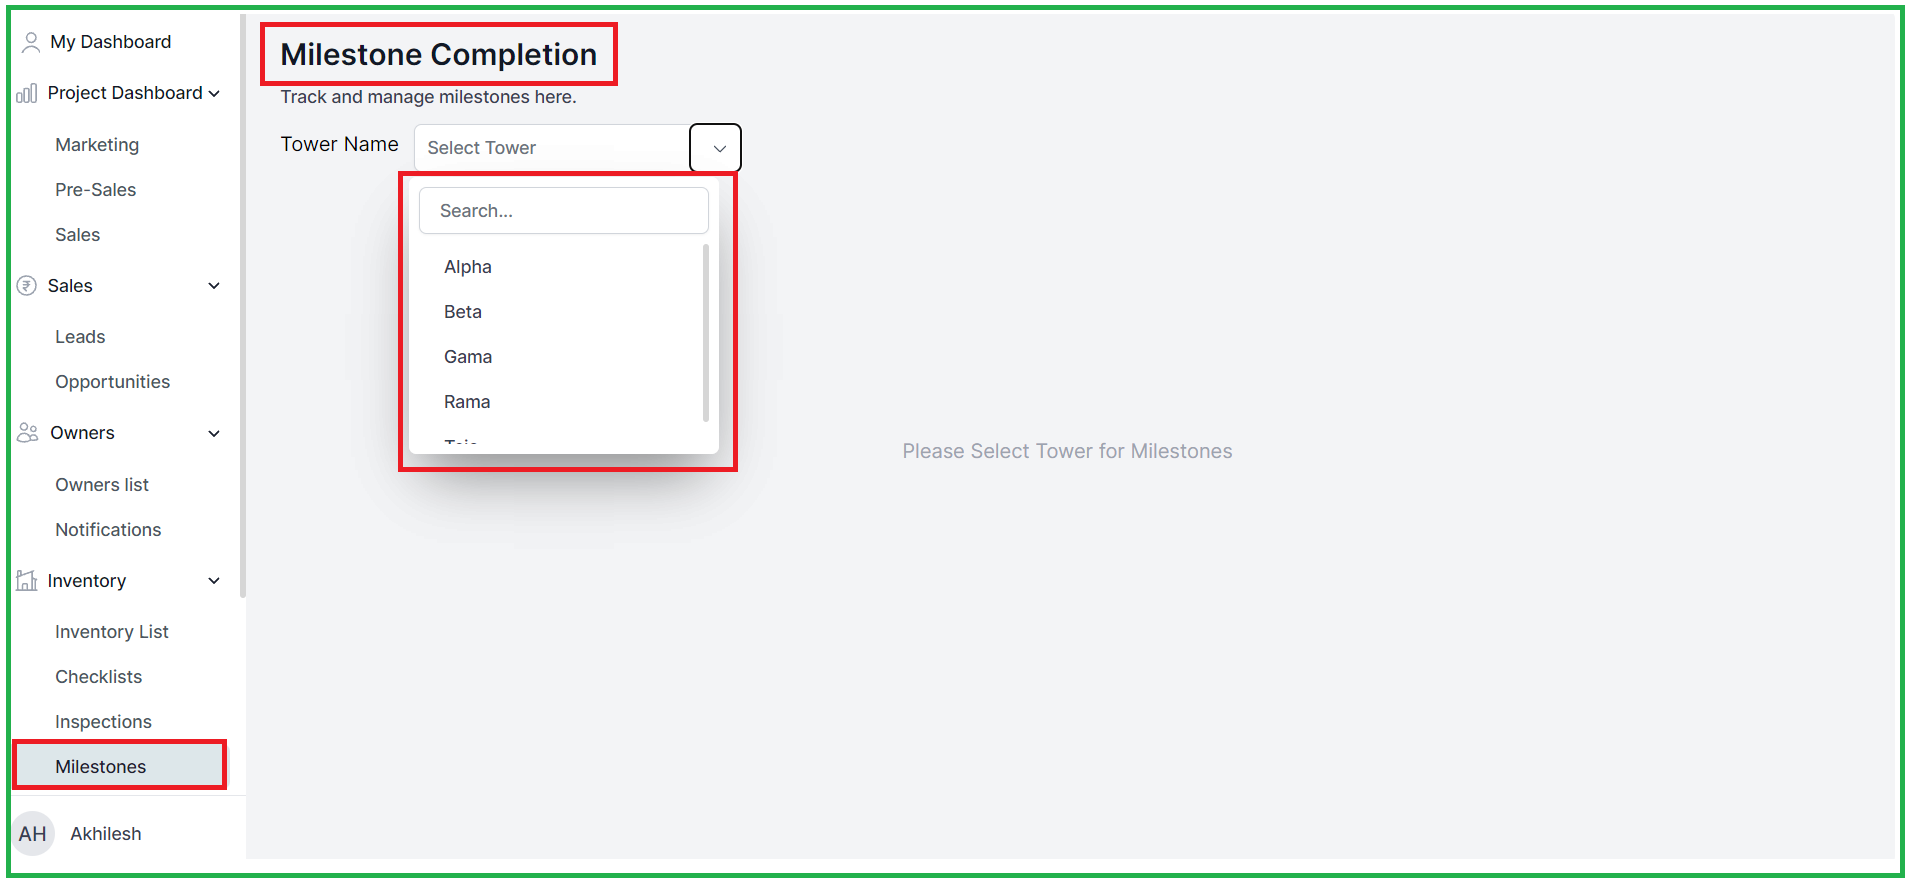
- Click on the Milestone status dropdown,
- Select the status In Progress or Completed

4. In the Side bar add Actual start date and End date upload Proof and add Remark if any
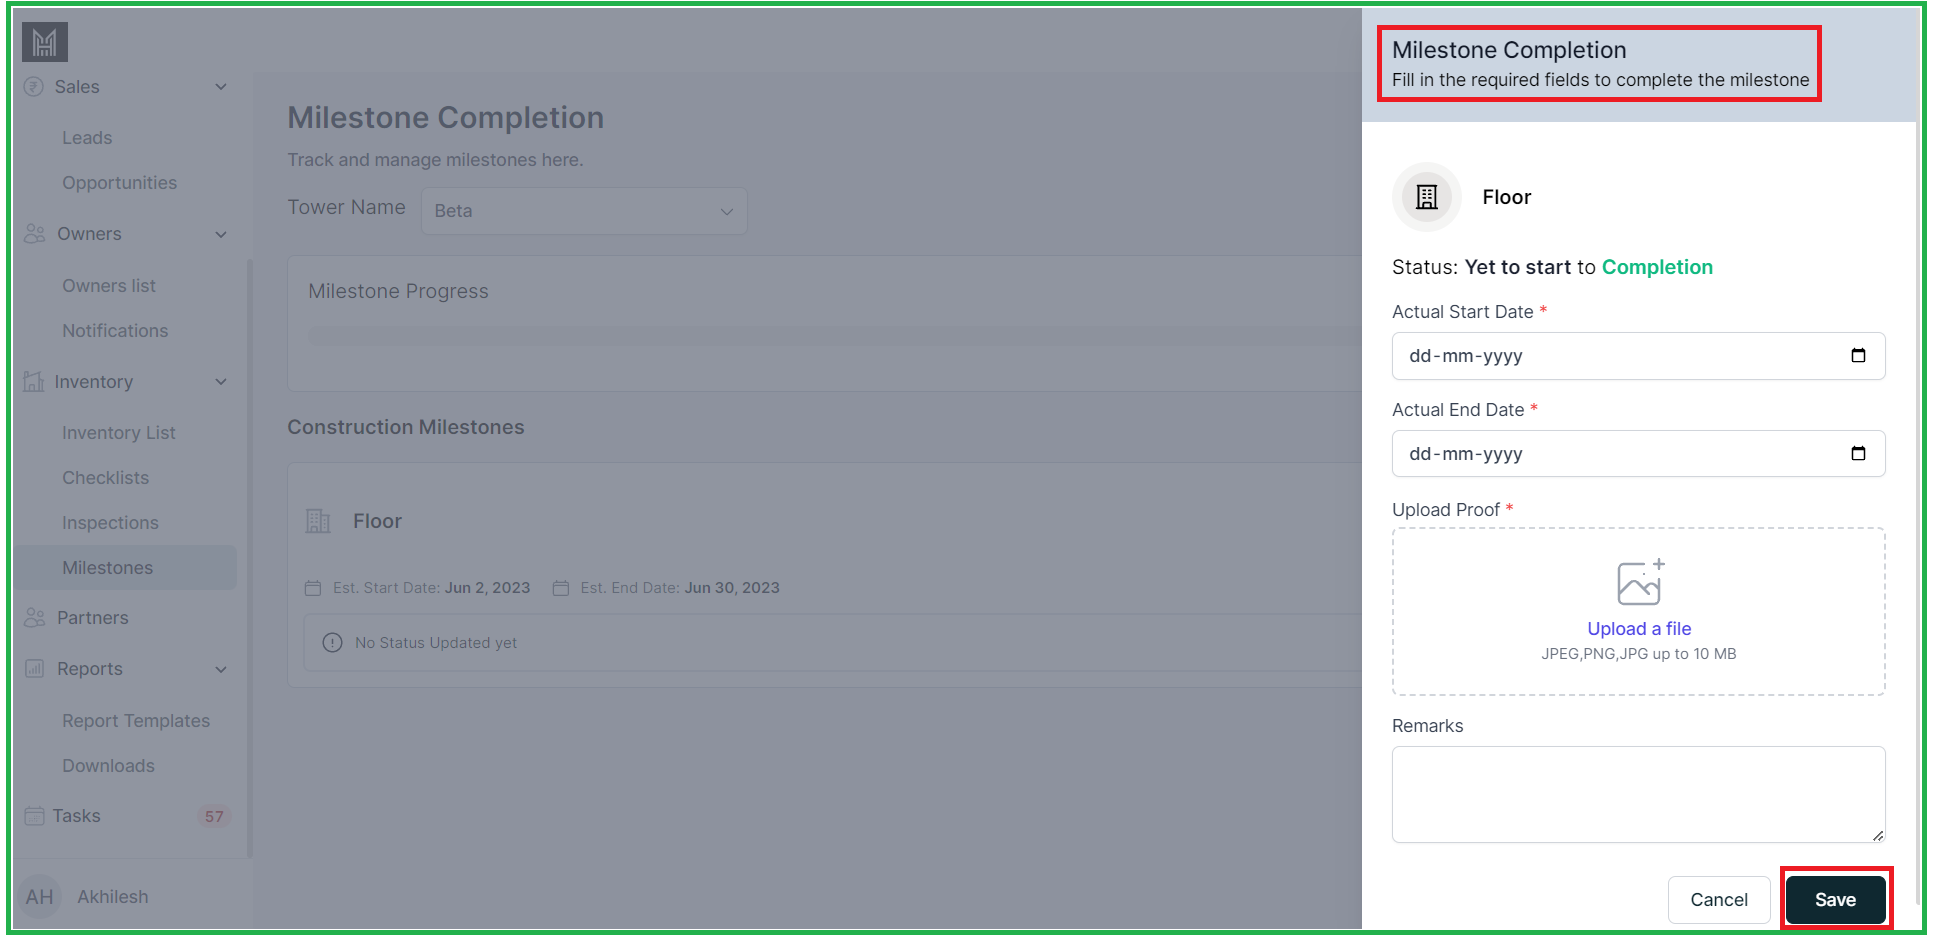
5. Once click on save you will get a confirmation Pop-up,

6. This is how we see once the milestone is completed
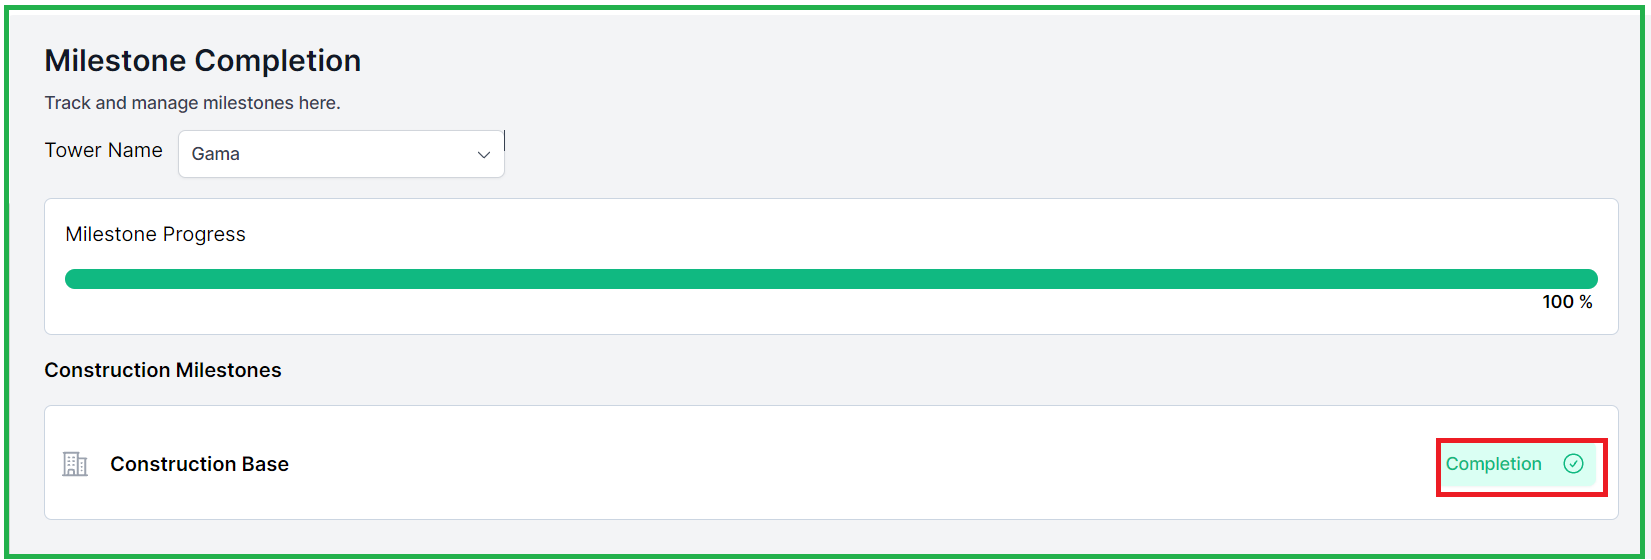
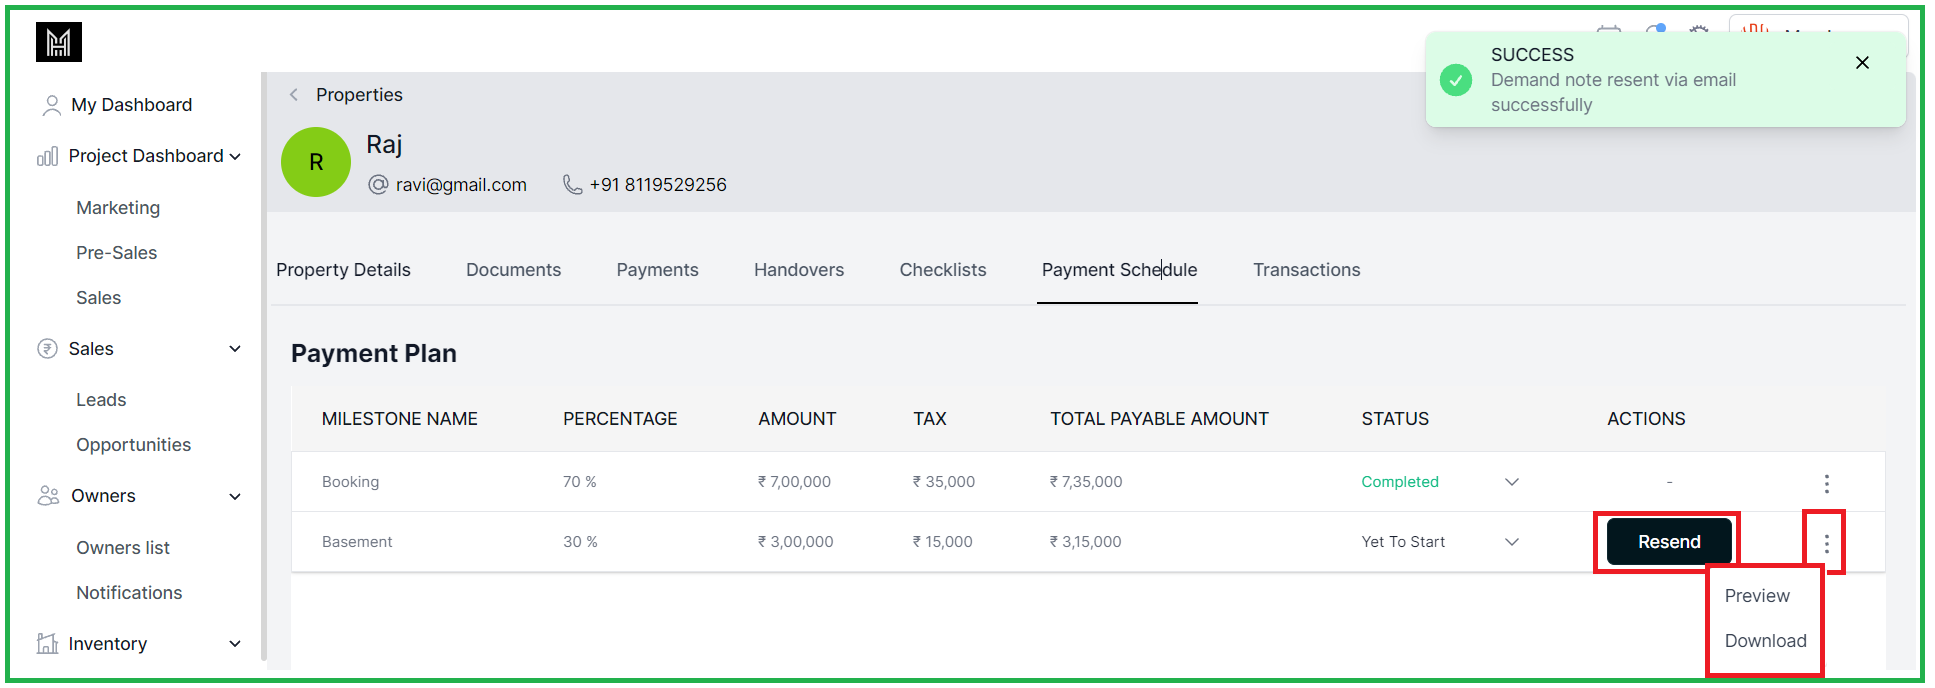
3.3 Demand Note Generation
You can go to the owners list under the owner and select the owner property for which you want to generate the demand note after the completed milestone,
Owner Properties-
- You can generate demand notes for customers to ask for the payment of that particular Milestone completion, demand notes are sent to customers to request payment for specific milestones.
- Select the Owner properties in the First step
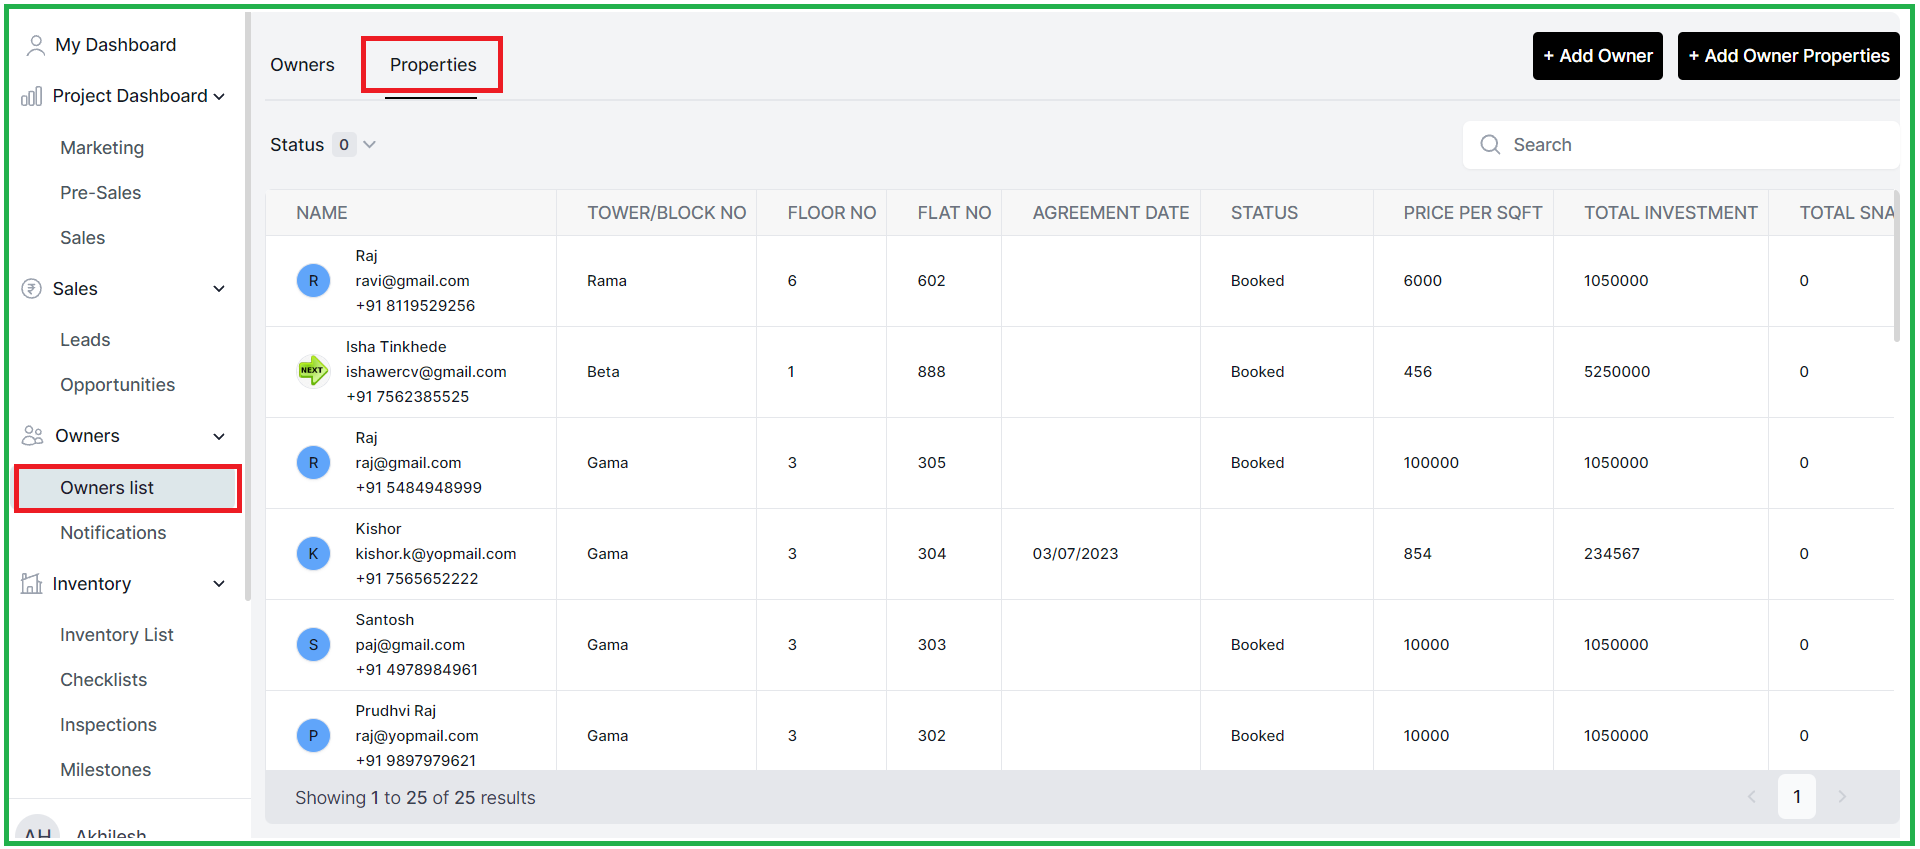
- Go to the Payments Schedule
- The Generate button is enabled once a milestone is completed.

- You can now click on Generate and send the demand note to the owners,
- You can also preview or download the demand note using the vertical ellipses (three dots).
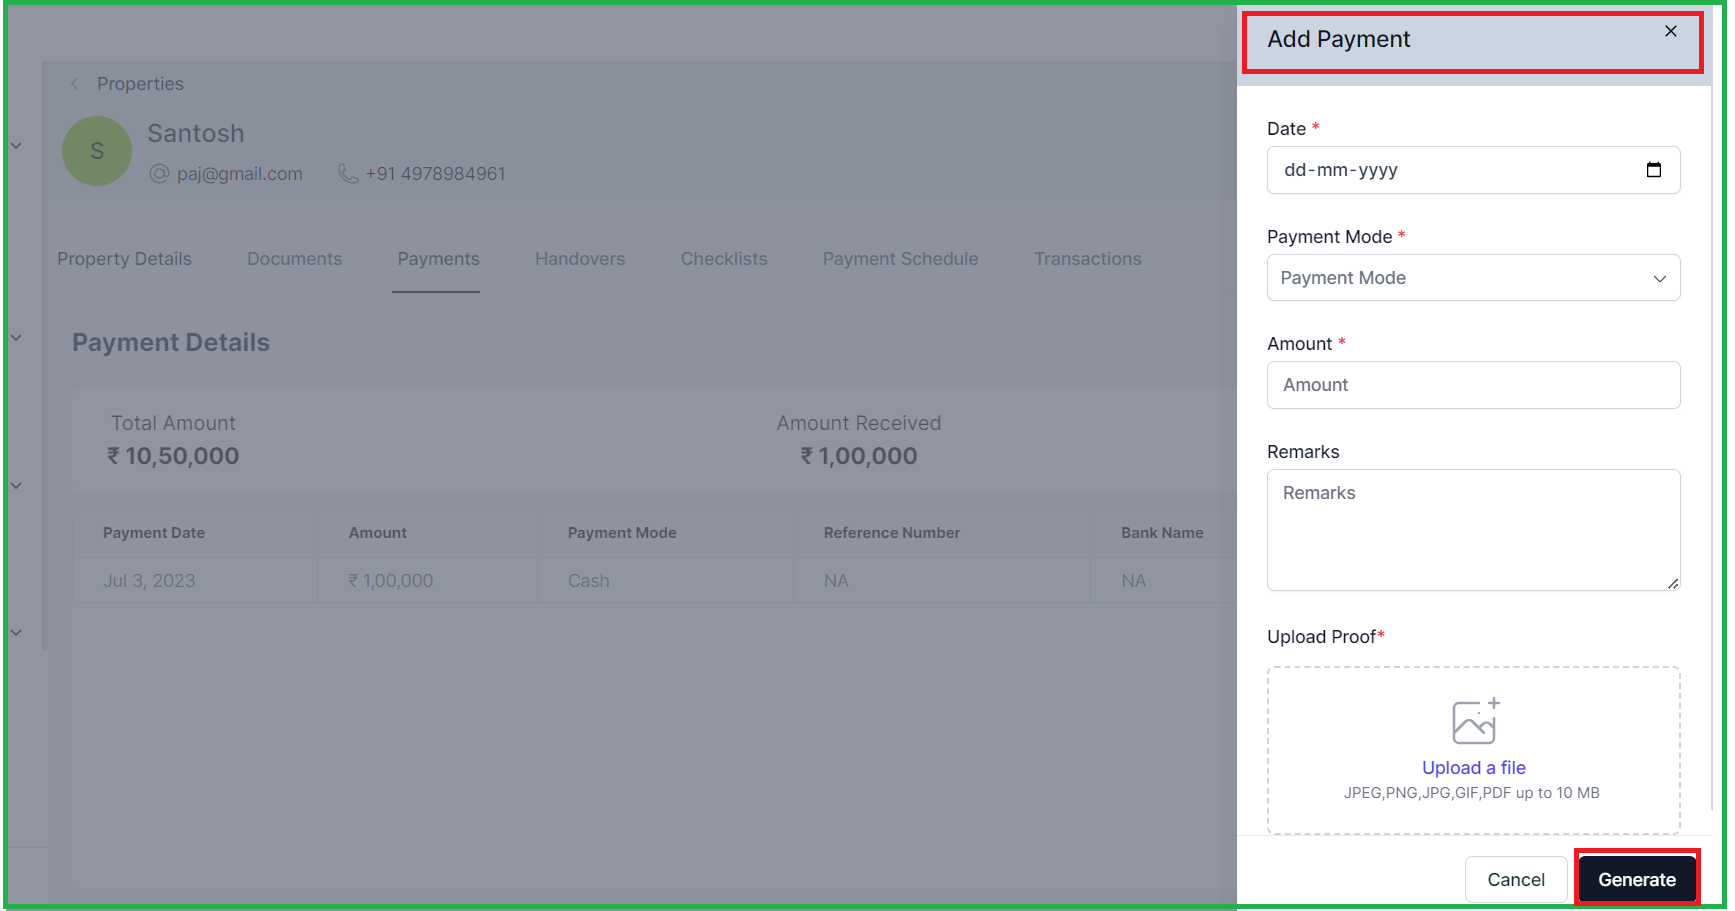
3.4 Generating the Receipts
Once the payments is done you can go to the Payments Tab and see the details of the payments happened, and add the payments details
- Go to the Payments tab and click on Add payments
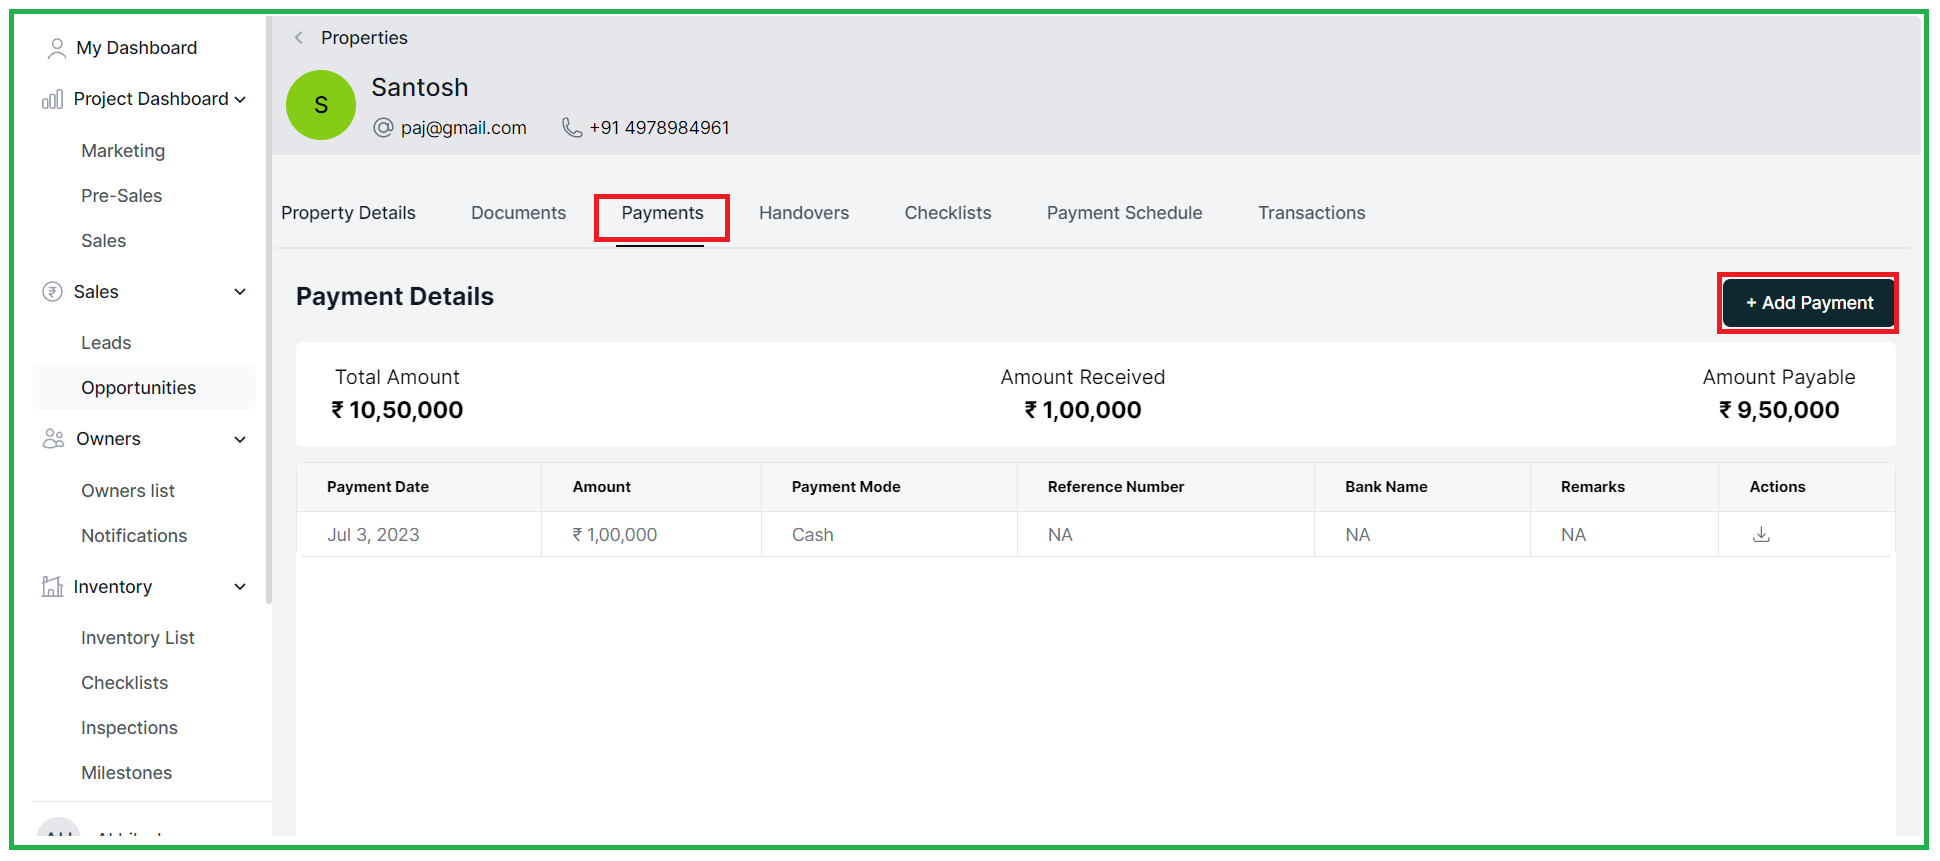
- In the side pop-up you can add the payment details, mode of payments along with the amount and Proof of the payment

3.5 Payment Receipts
In this tab, you can view and manage all the receipts generated for the payments you have received. Stay organized and keep a record of your financial transactions in one convenient location.
You can view the generated payment receipts for all the payments received.
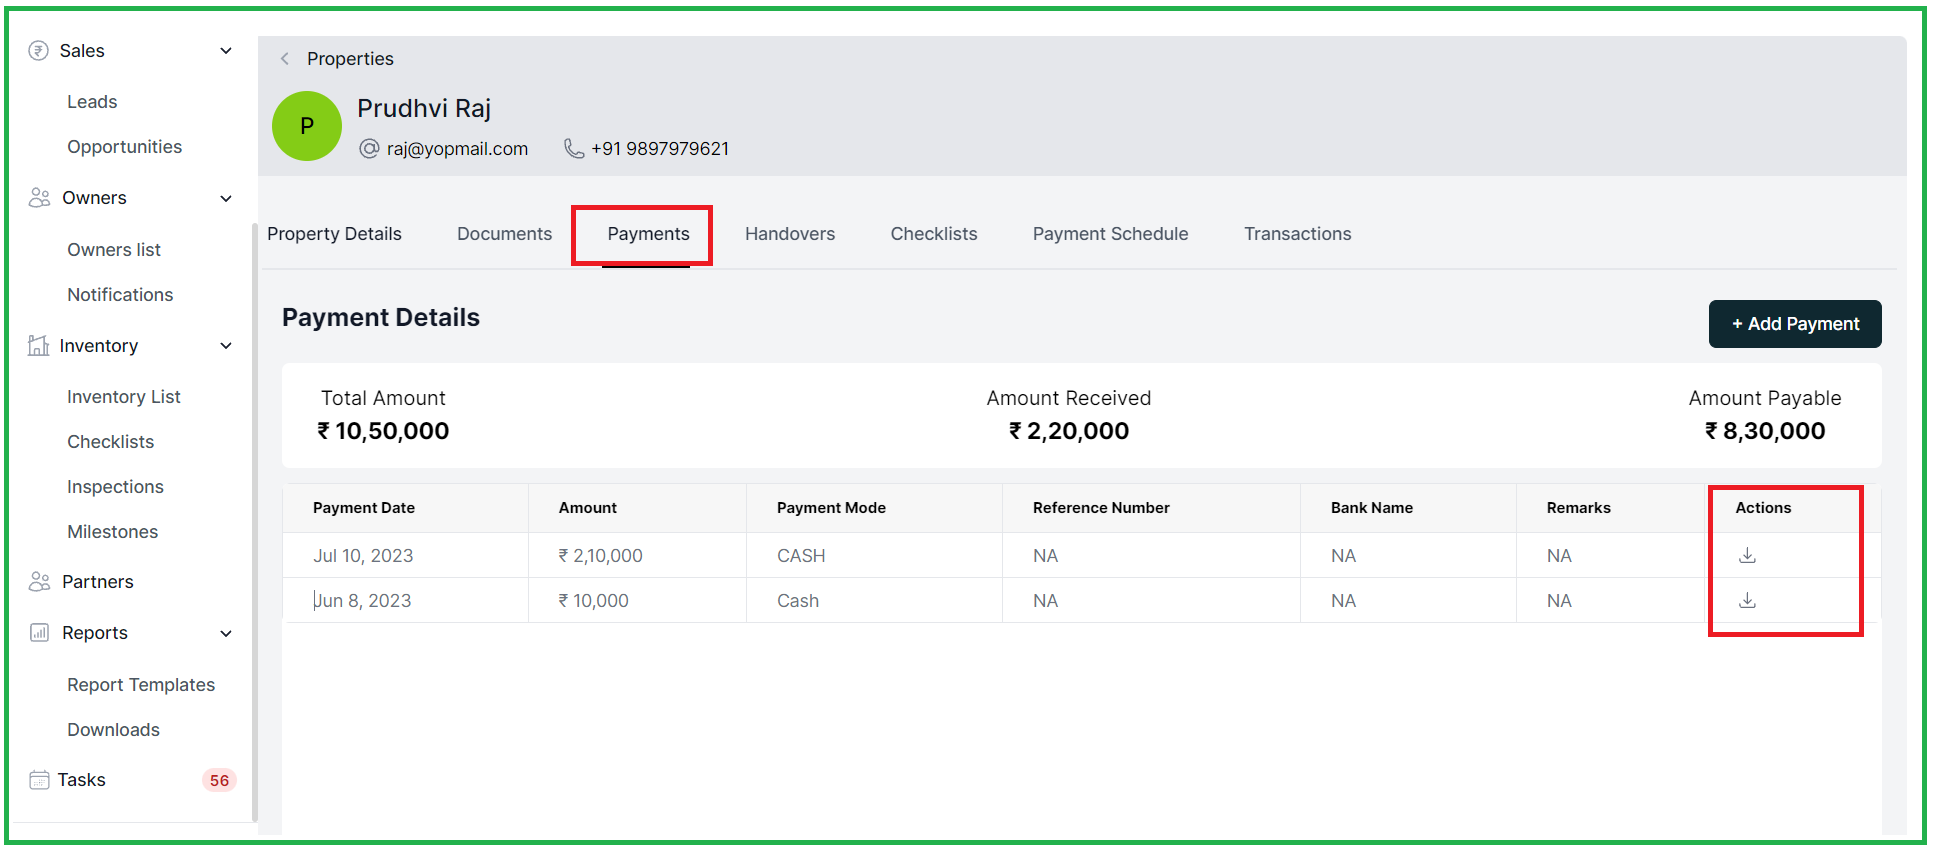
When a customer makes a payment, a formal payment acknowledgment receipt is generated by the system and sent to the customers via email. Customers can also view the receipt in the customer portal and in the payment tab of their owned properties.
Note that the receipt format may vary based on the payment mode (online, cheque, or cash).
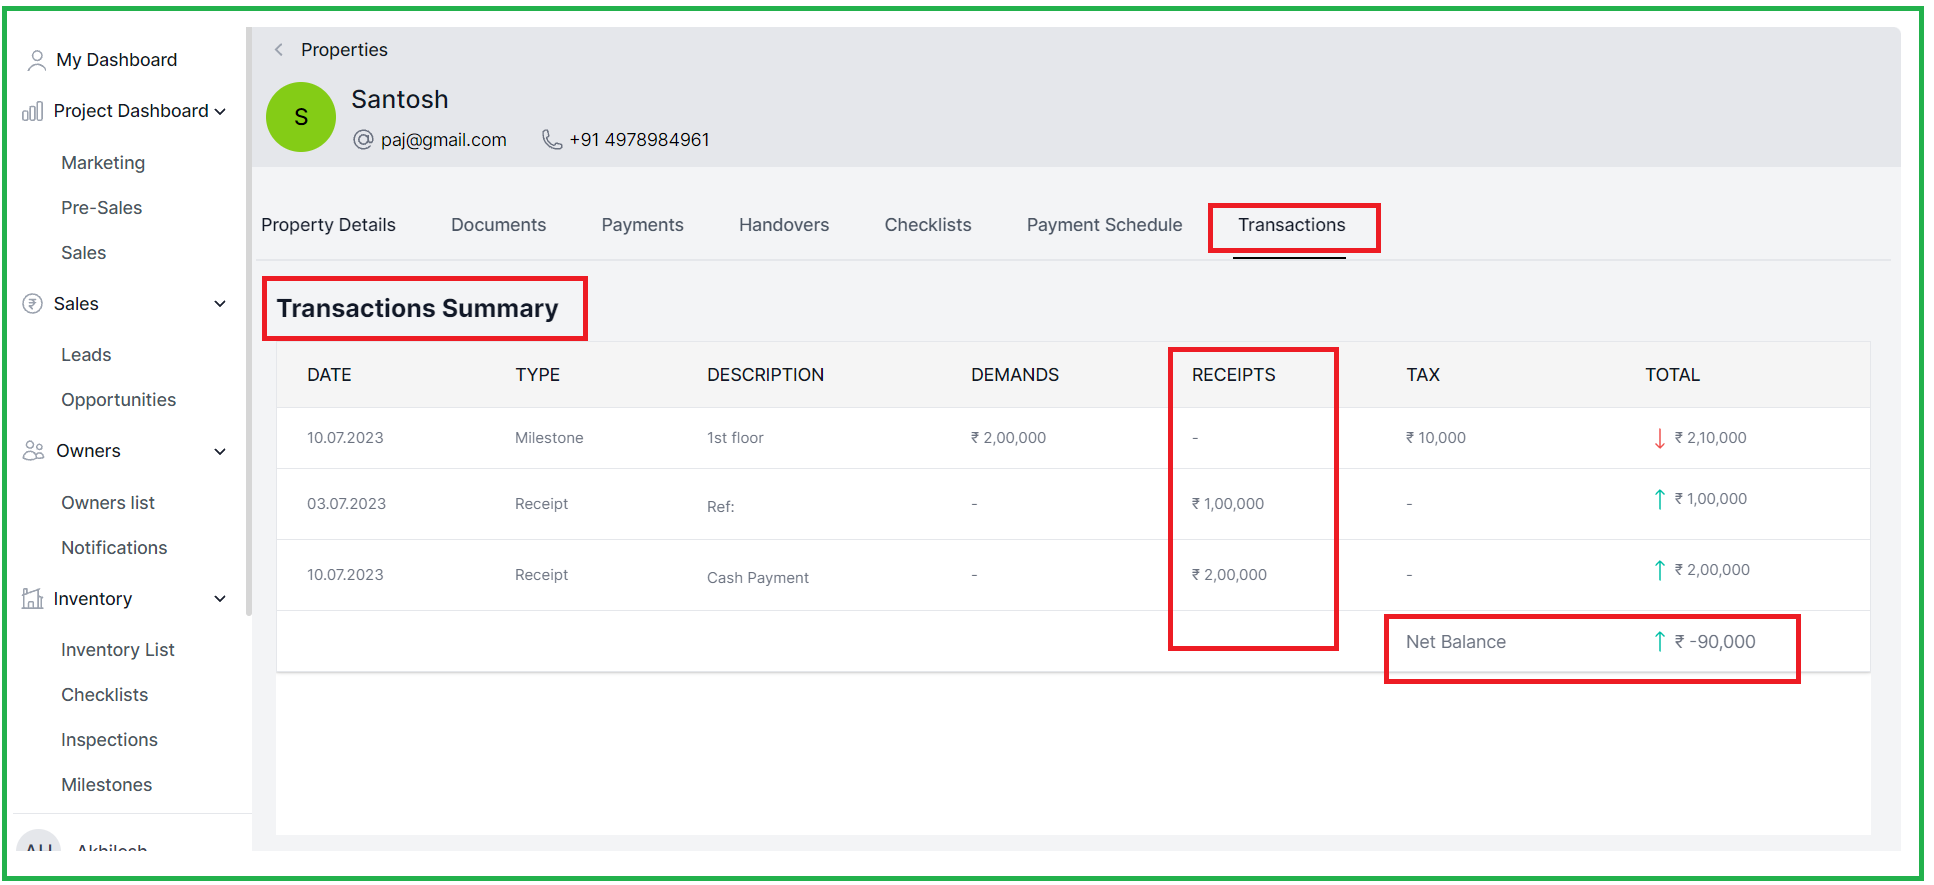
3.6 Transactions
The transactions section provides a summary of payments and demands generated. It shows the payments made by the customer and the demands raised by the CRM, reconciles both the payments and the demands, shows the remaining balance amount to be paid.
Date: 29th JUNE
Web Application
ENHANCEMENT
1. Lead List:
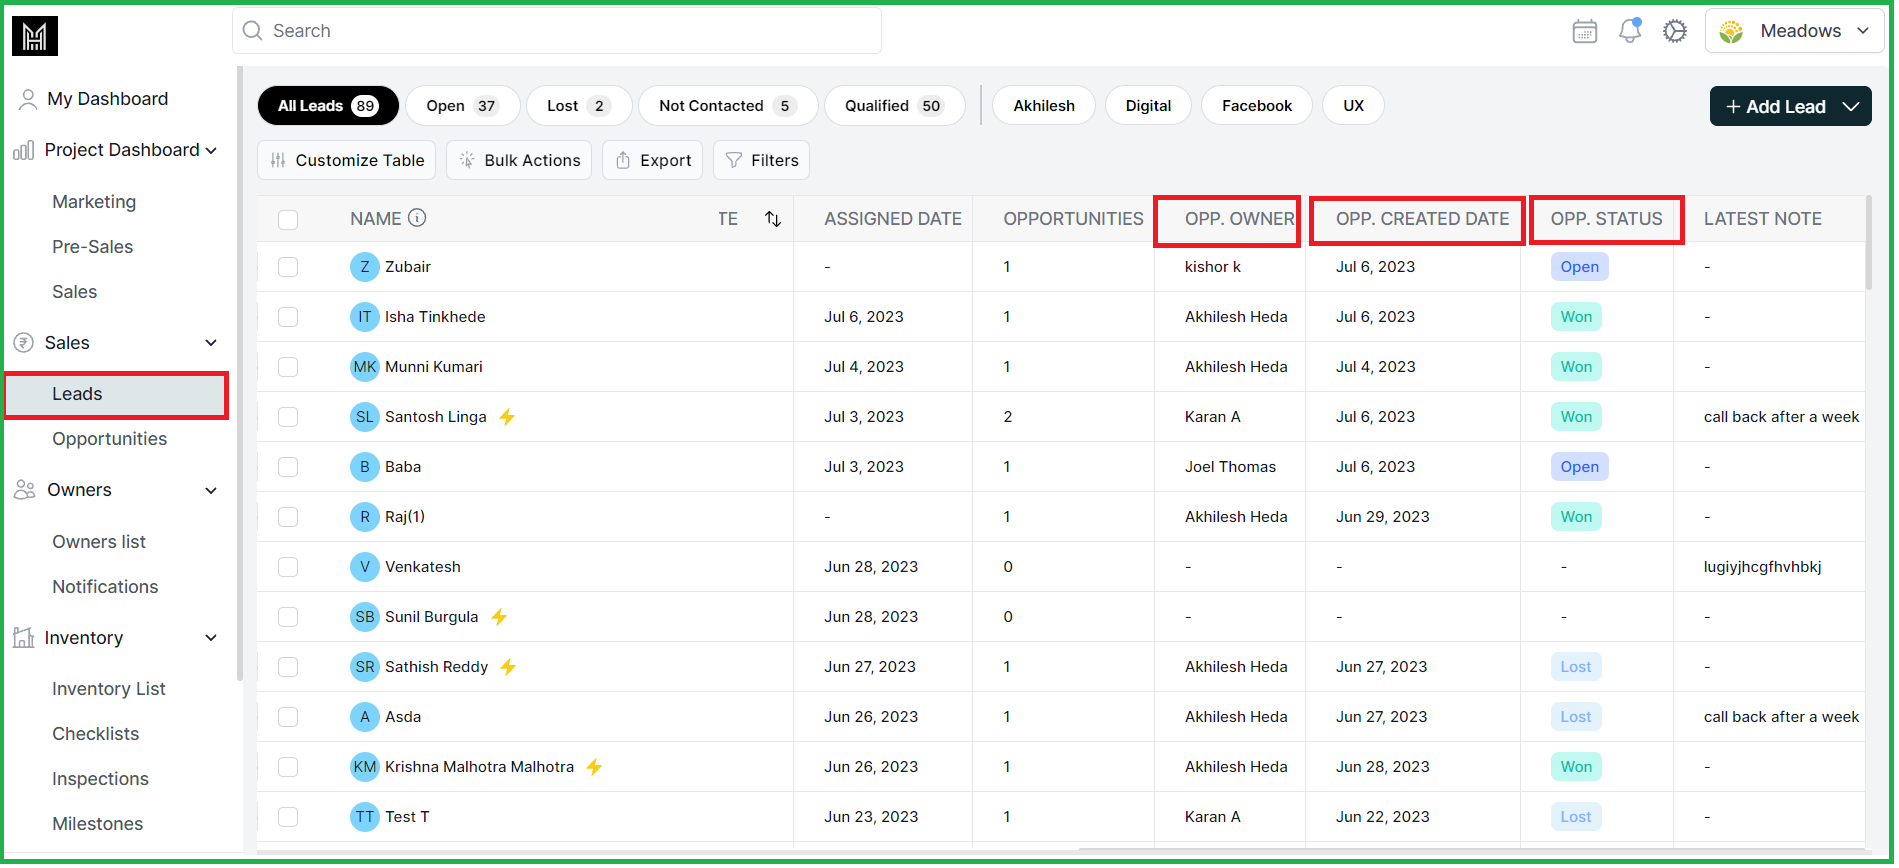
You can now see the latest opportunity created date, owner, and status right in the lead list.
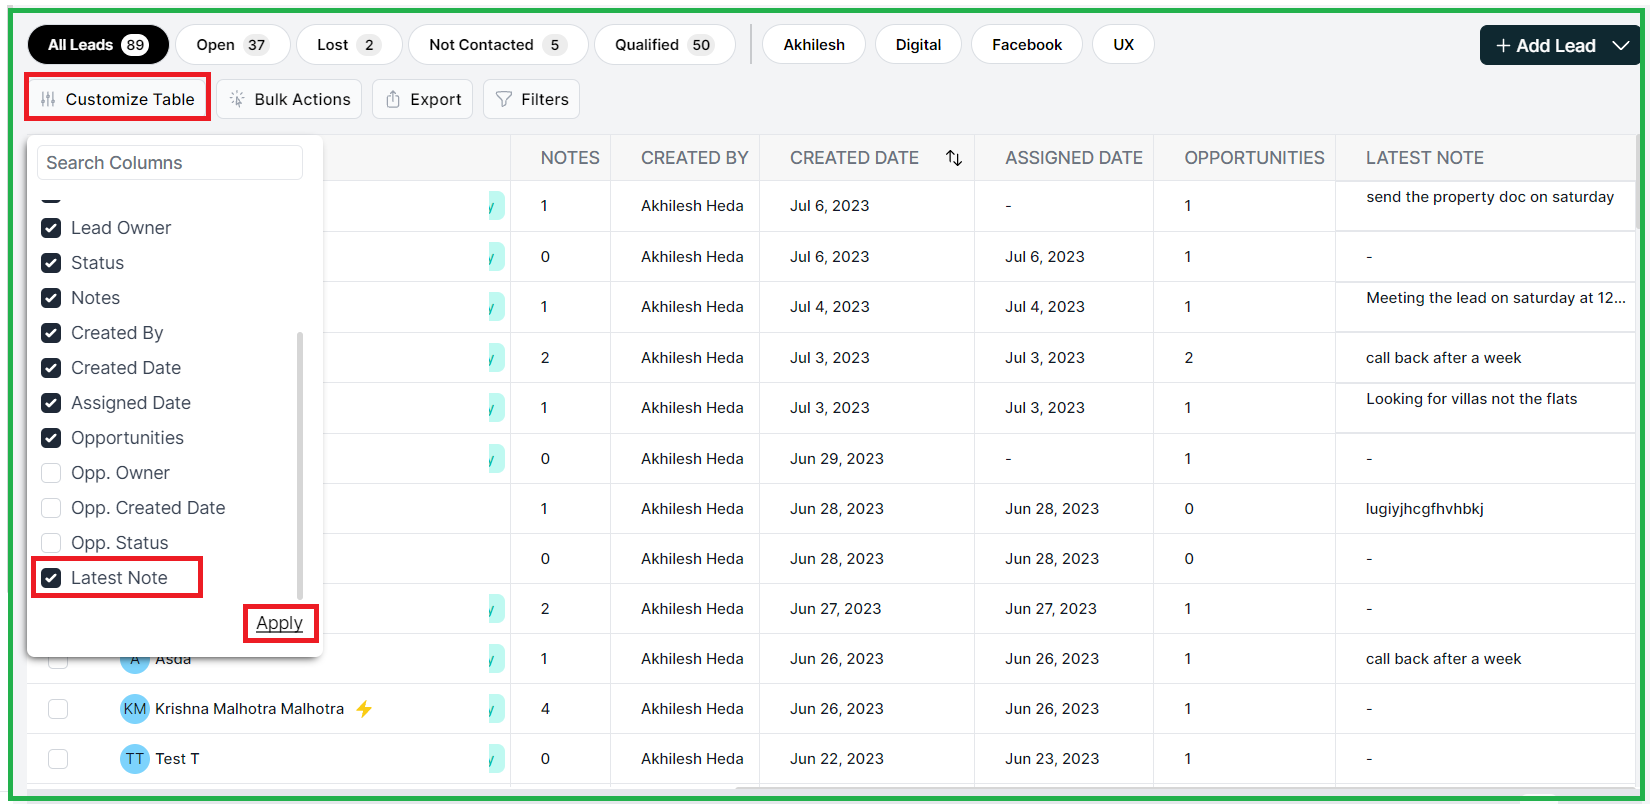
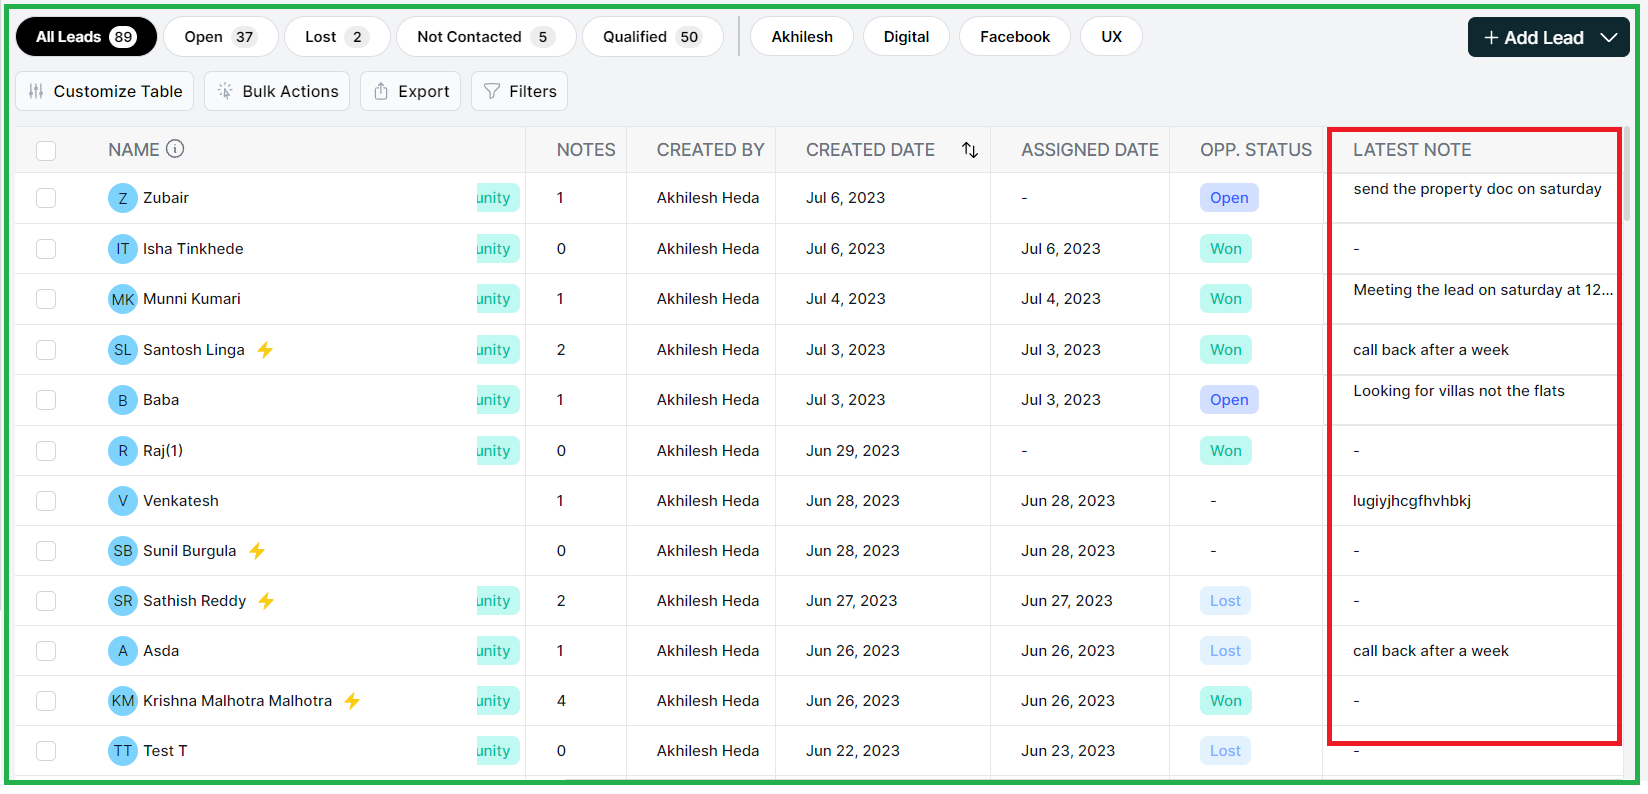
2. Latest Notes in List View:
You can view the latest notes right within the list view, so you can stay updated on important discussions and updates related to your leads.
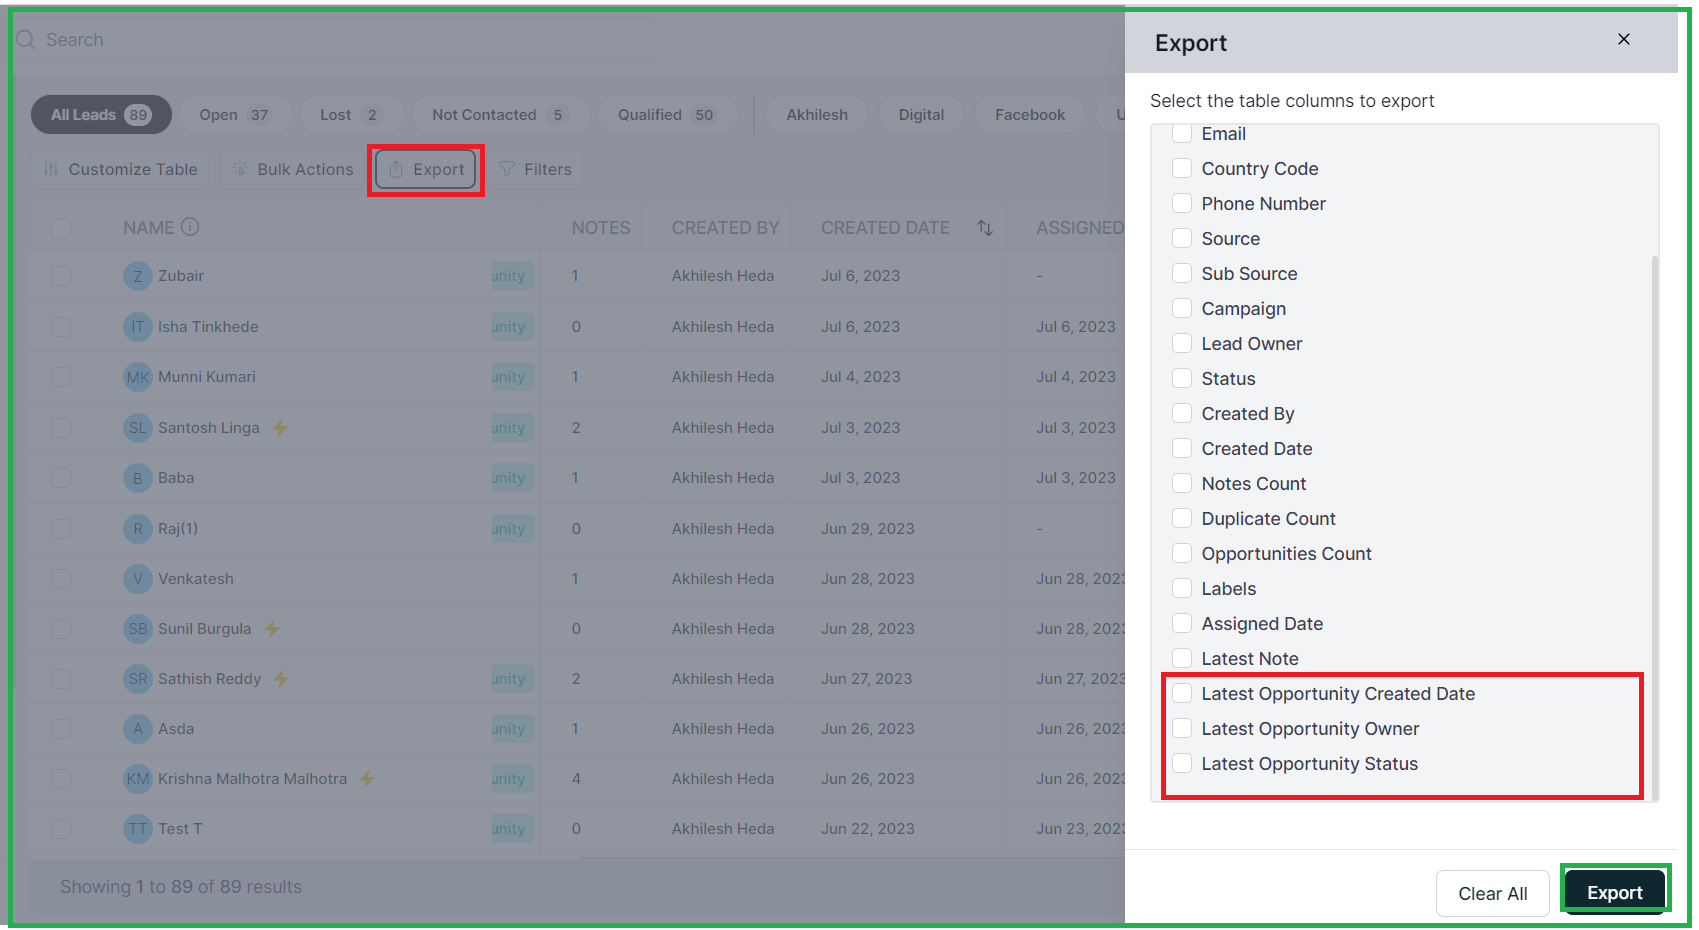
4. New Fields in Export Lead:
When exporting leads, we've added new fields such as Latest Opportunity Created Date, Latest Opportunity Owner, and Latest Opportunity Status. This provides more comprehensive information in your exported reports.
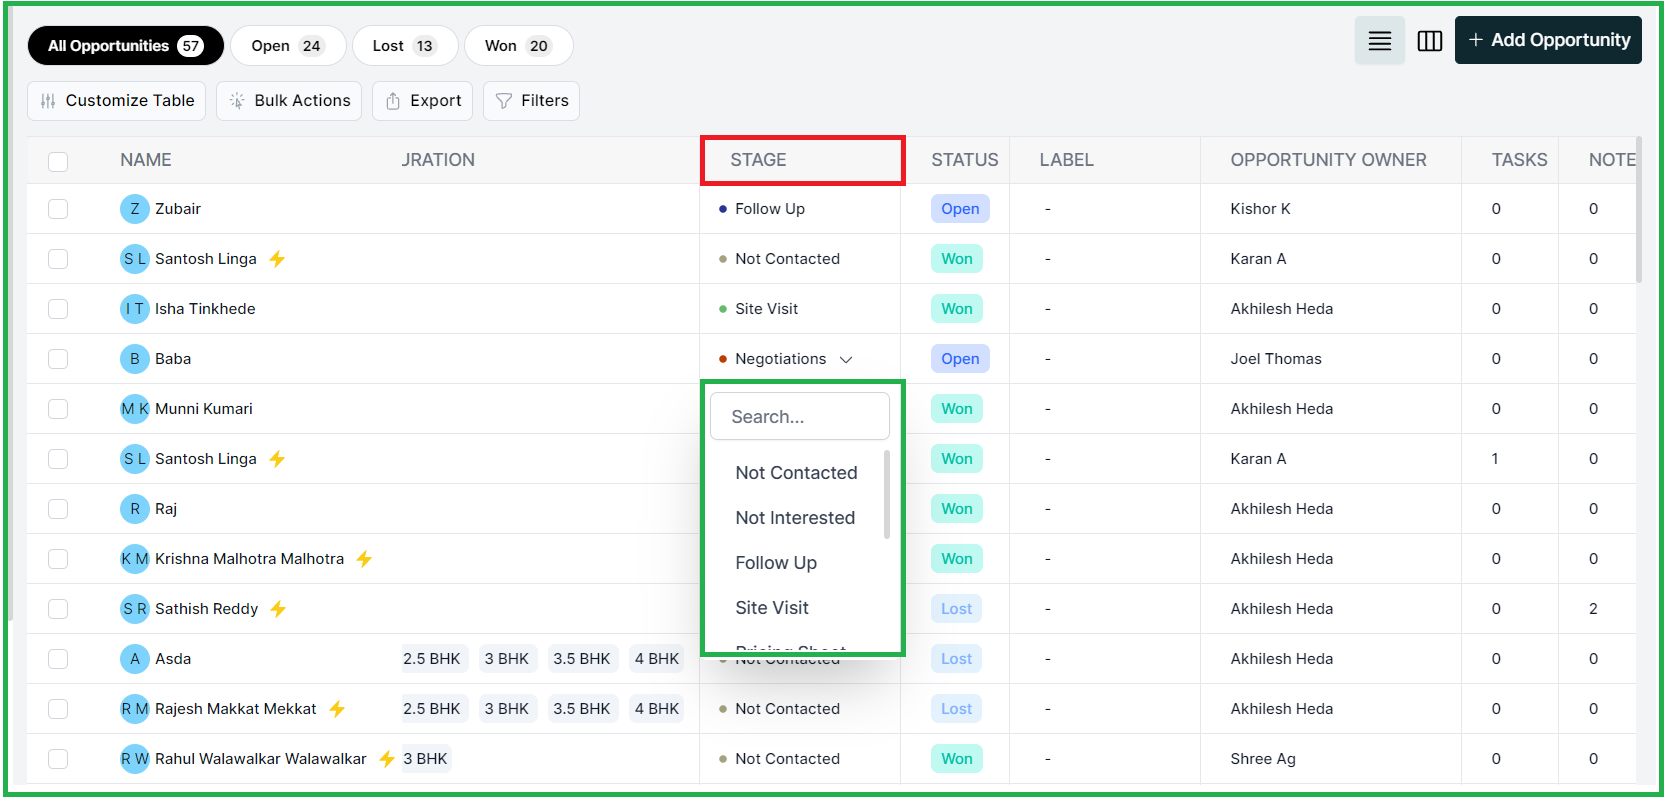
2. Opportunity Stage Change:
You have the flexibility to change the opportunity stage directly from the opportunity list. No need to navigate to different pages anymore.
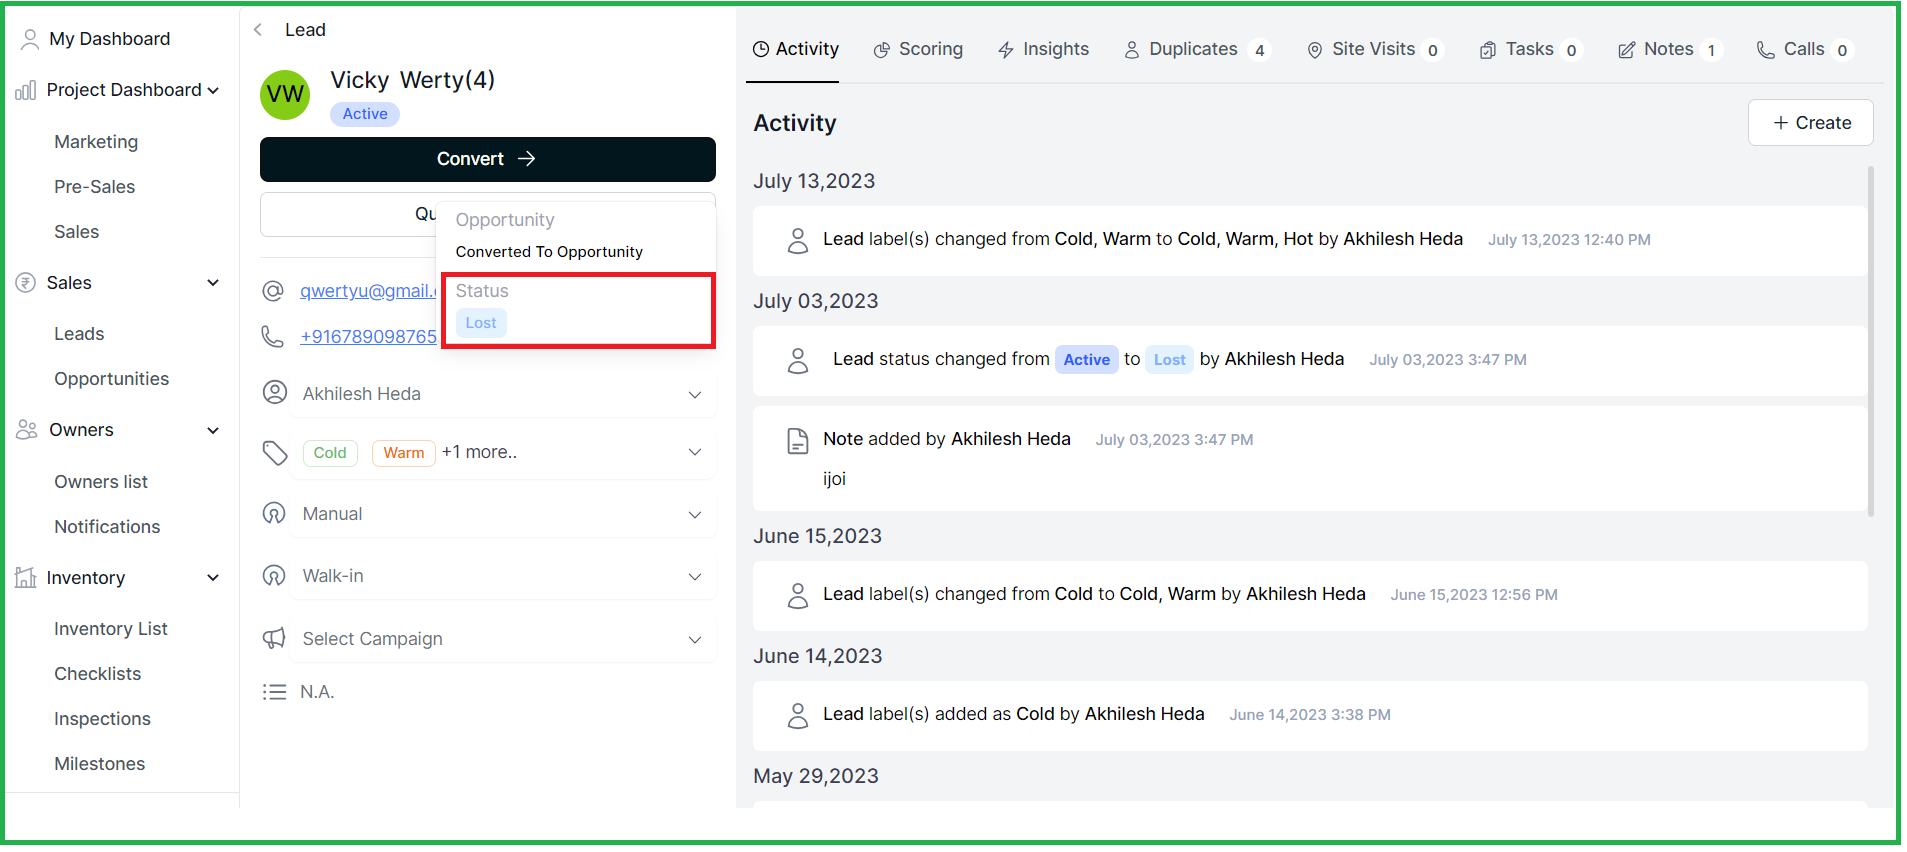
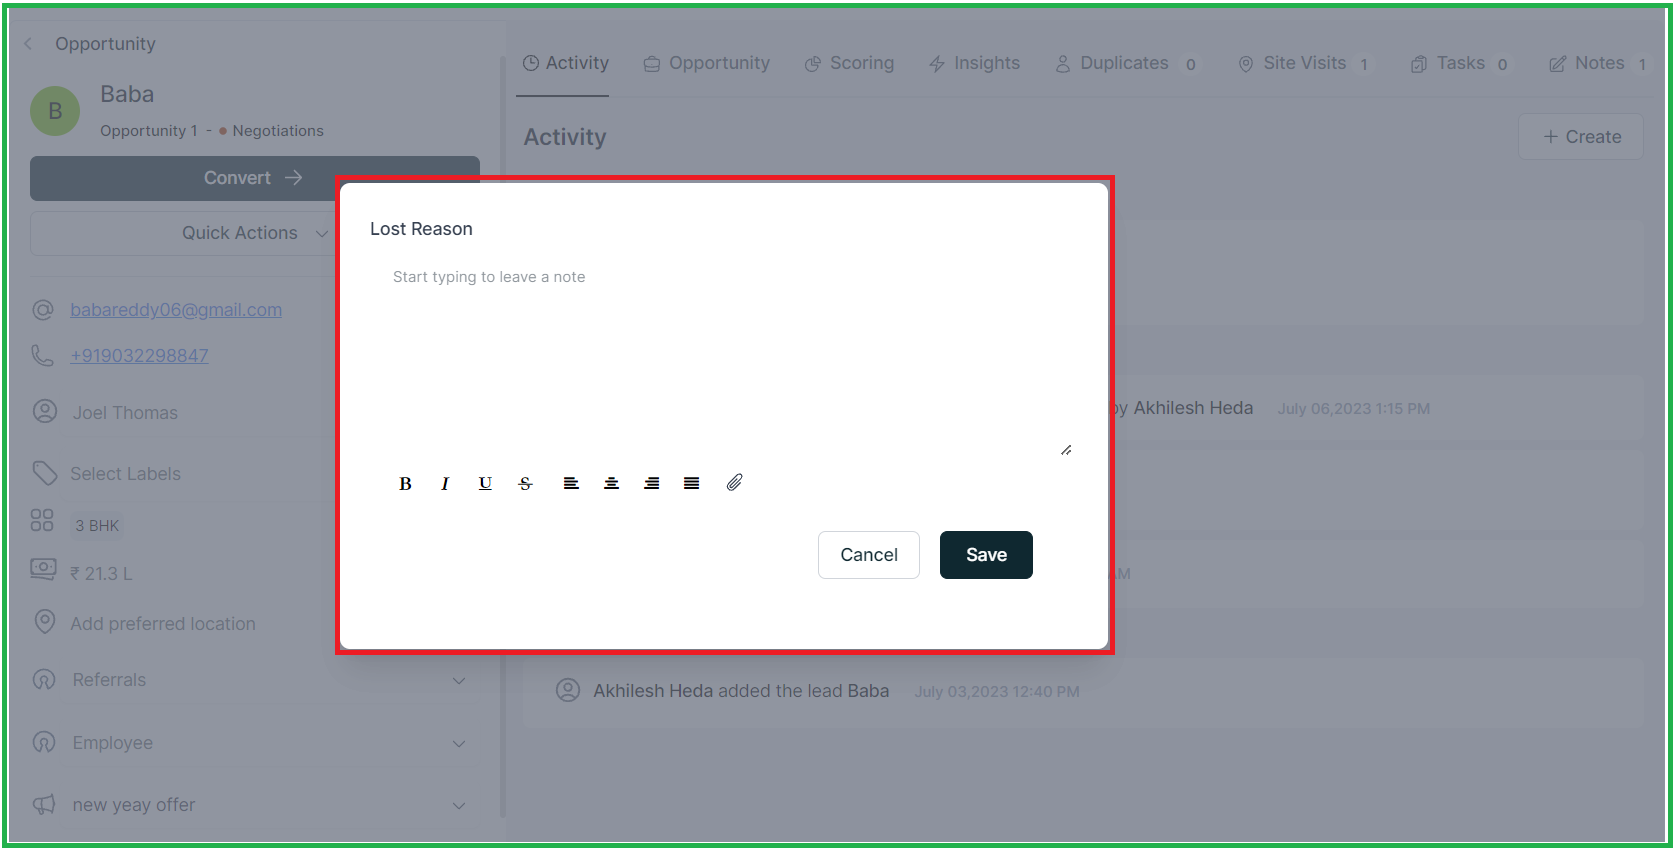
5. Opportunity Status Change Pop-up:
When you change an opportunity to "Lost," a pop-up will appear, allowing you to enter the reason for the status change.
MOBILE UPDATES [ Android & iOS]
1. Re-Designed
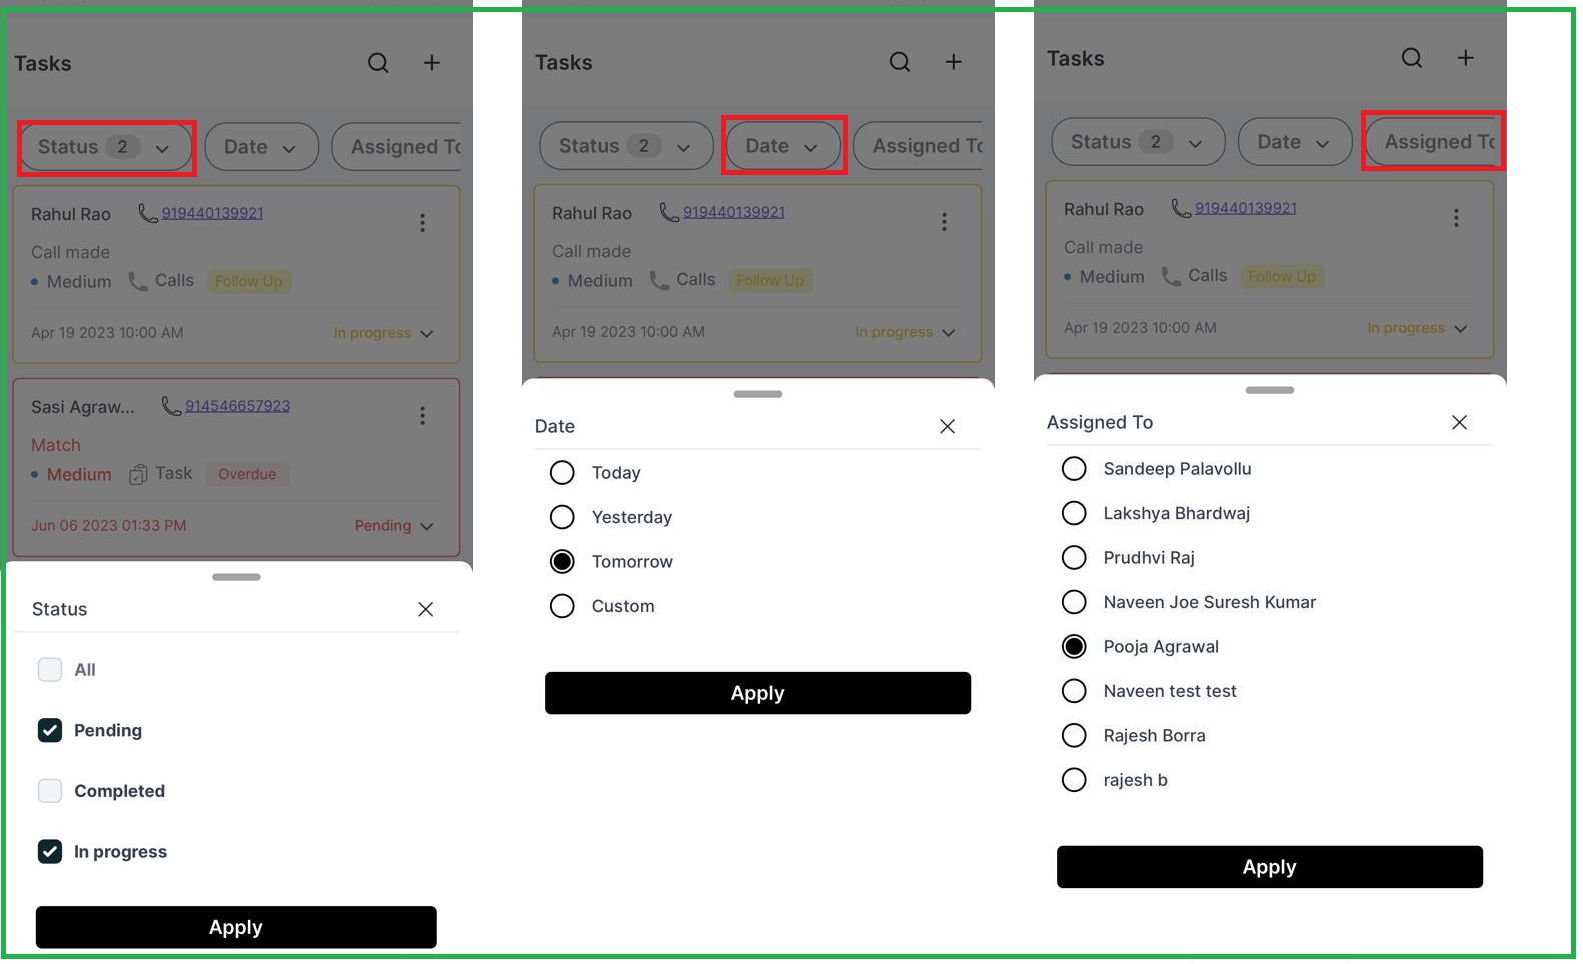
Changes to the task tab layout, global search in the tasks tab, task creation page design, and better navigation from leads/opportunities profiles to tasks.
Task Tab Changes: We made changes to the task tab layout, so now you can easily filter tasks by status, date, and assigned to.
- As per the "Assign opportunities to all” access right, an additional “Assigned To” drop-down is implemented while converting from lead to opportunity.
- Global search is implemented in the Tasks tab.
- The “create task” page design is changed.
Date: 22th JUNE
Web Application
ENHANCEMENT
1. Improved Sorting by Creation Date for Leads and Opportunities
You have the option to sort leads and opportunities based on their creation date,
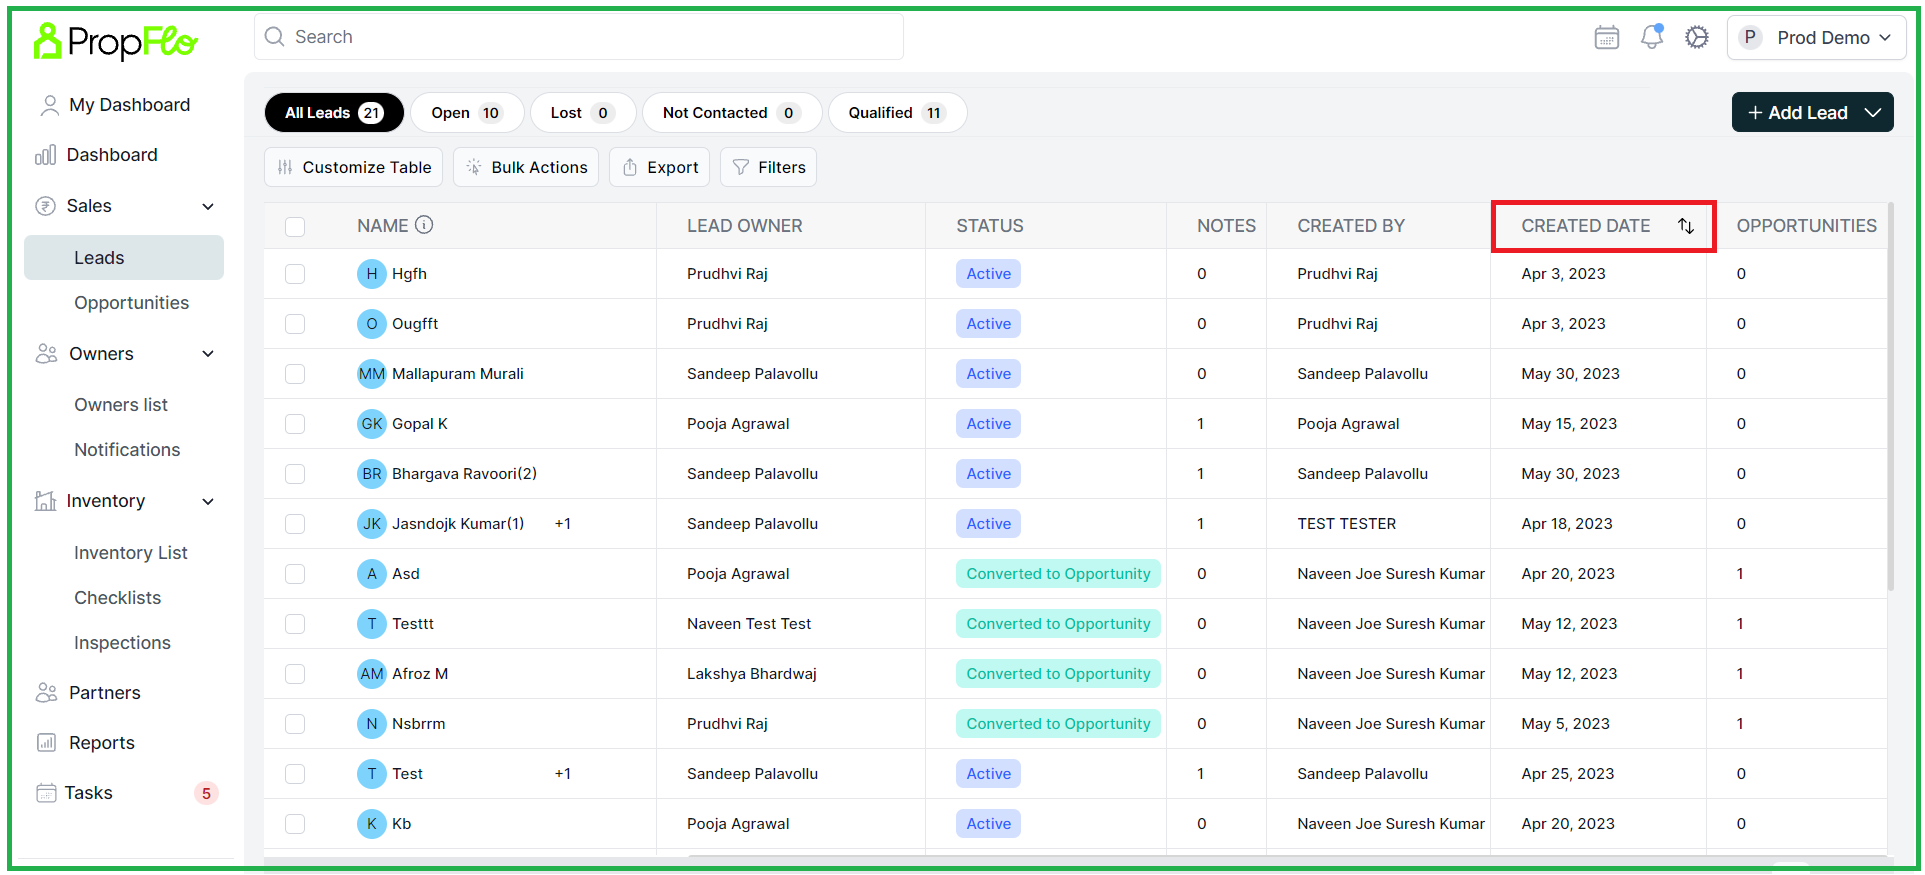
1.1- Sort by Most Recent: Click once to display the most recently added information first,
Sort by Oldest First: Click Again to display the oldest added information first

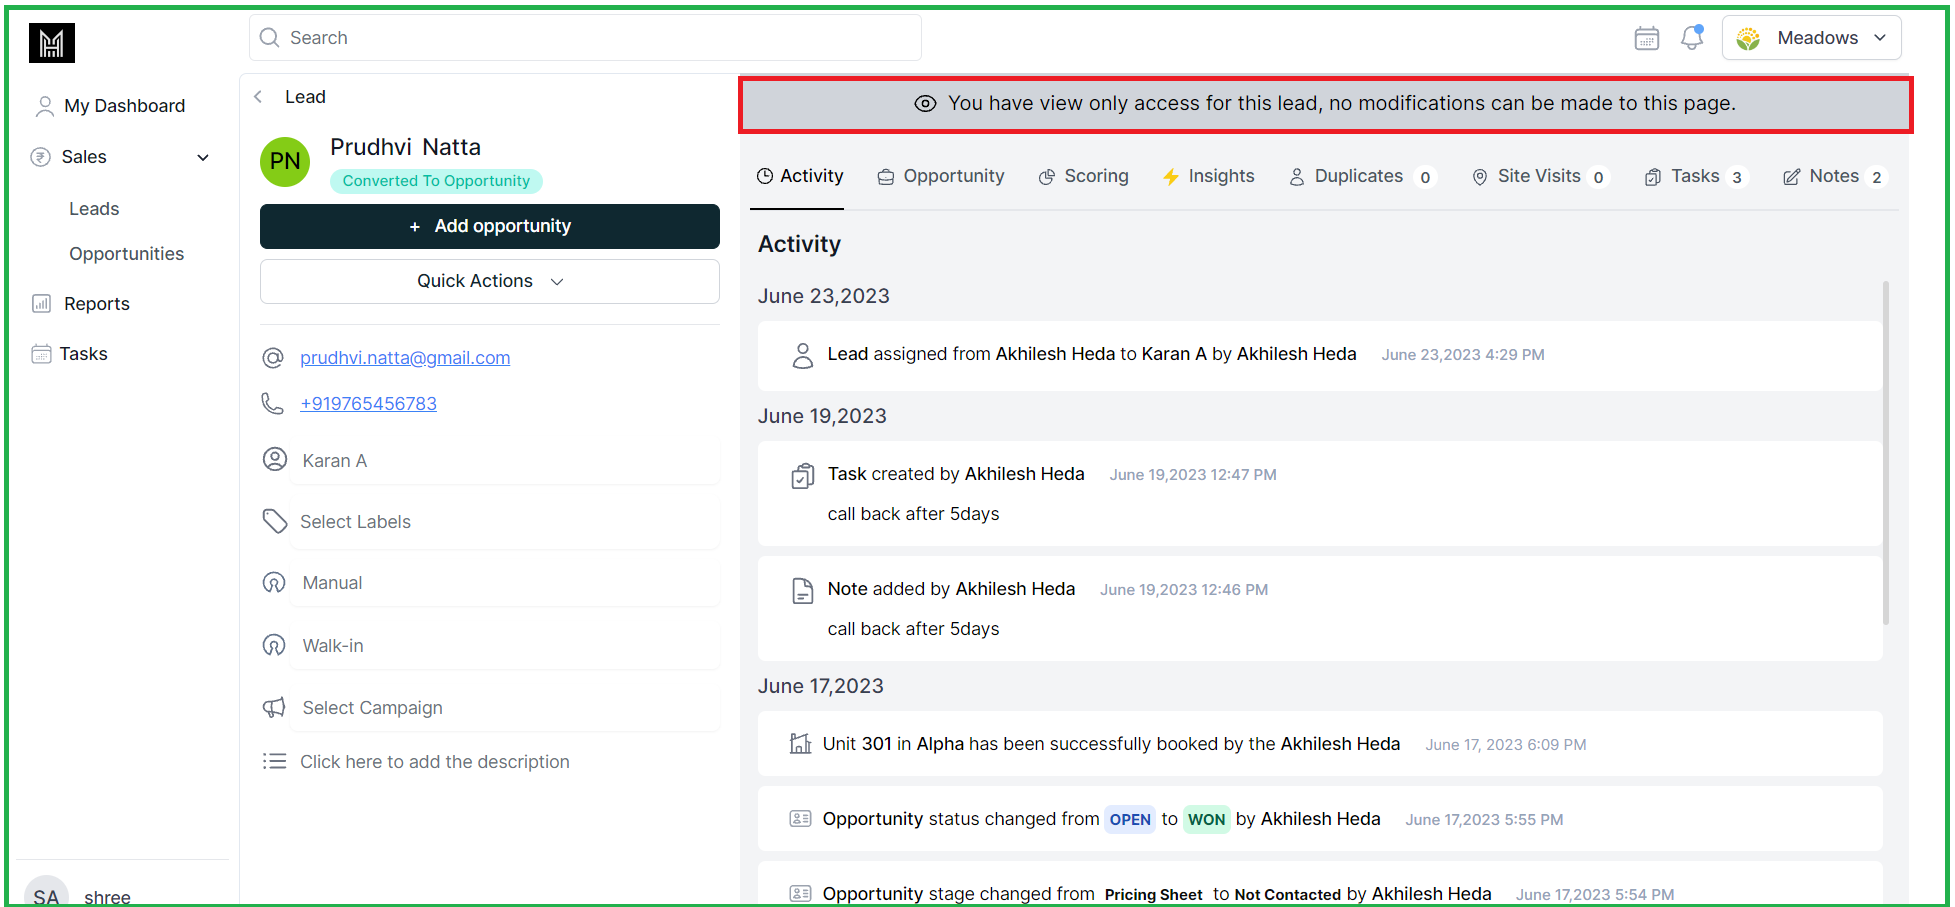
2.View Only Mode:
When performing a Global Search the Lead/Opportunity Profile Page can only be viewed if that particular lead or opportunities is not assigned to the logged in user, and is not editable.
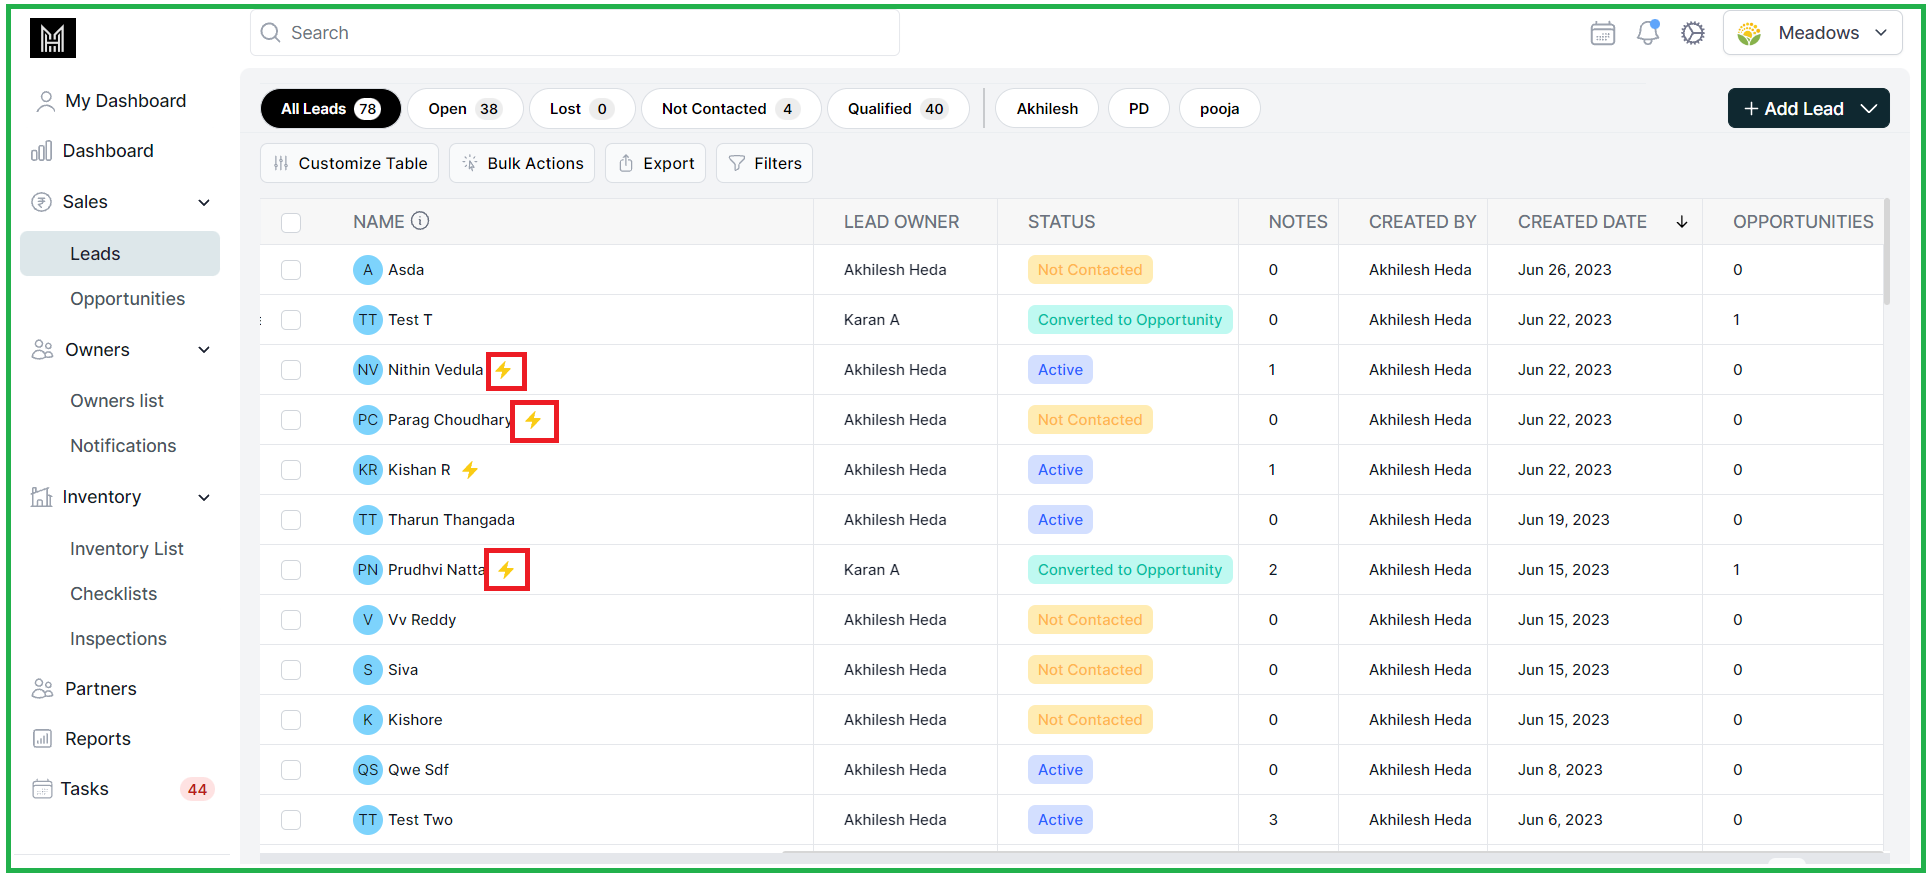
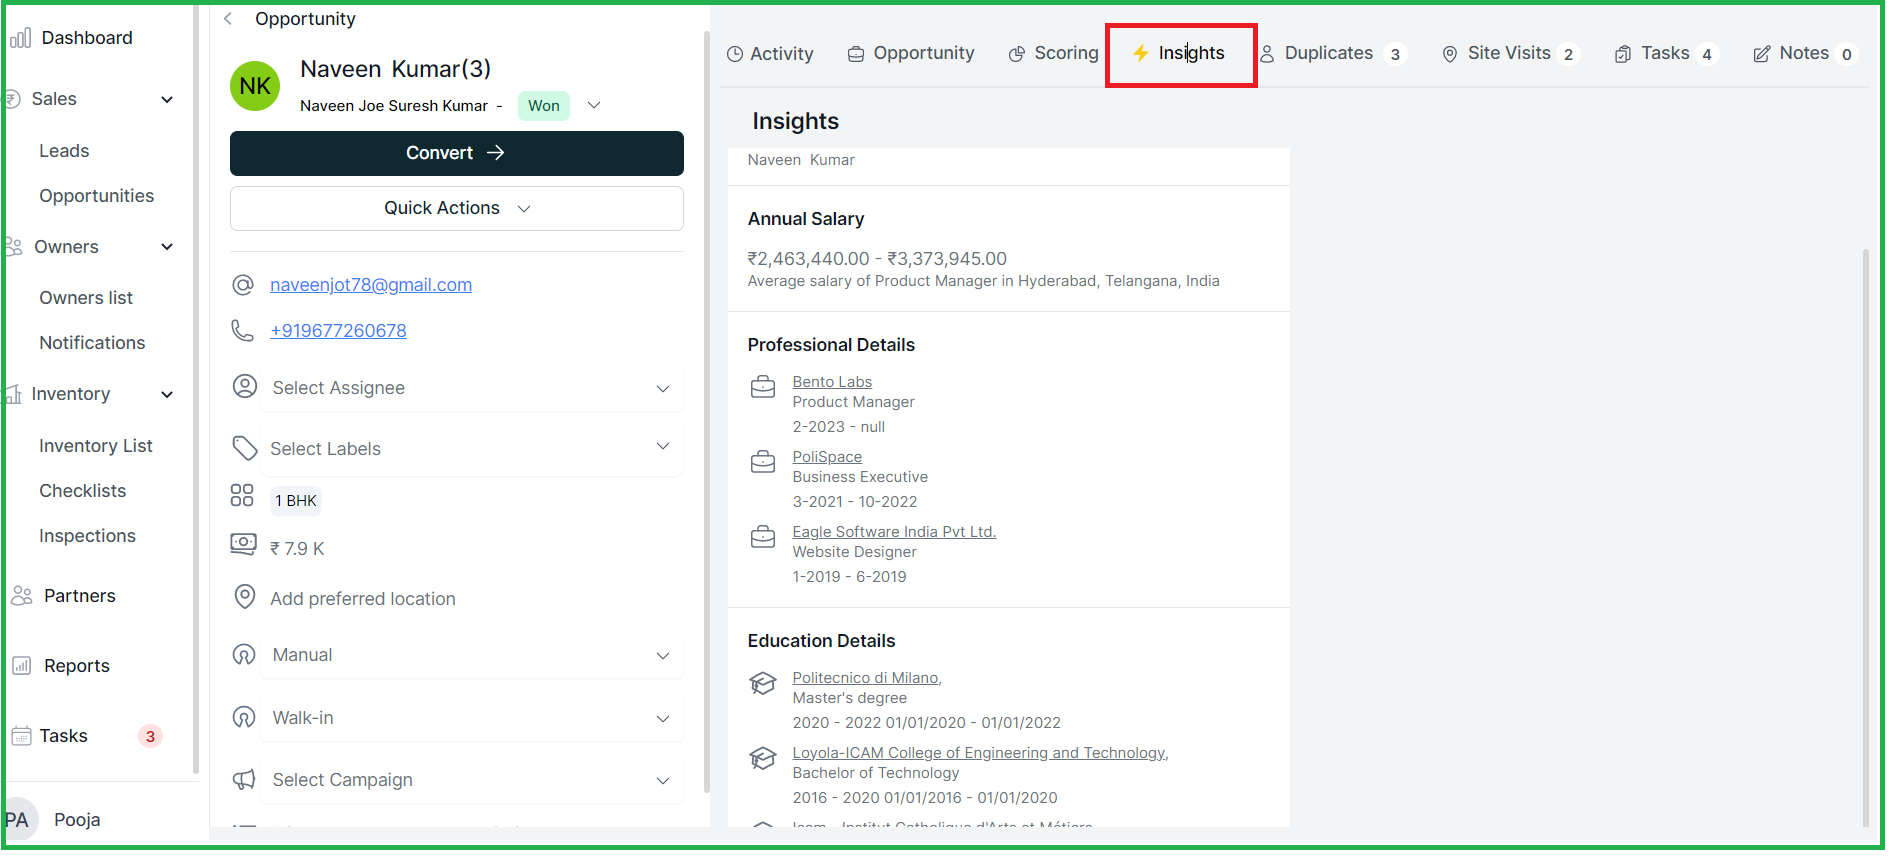
3. Insights Indicator:
An "spark" indicator is now displayed next to leads/opportunities when data is fetched for insights.
4. My Dashboard:
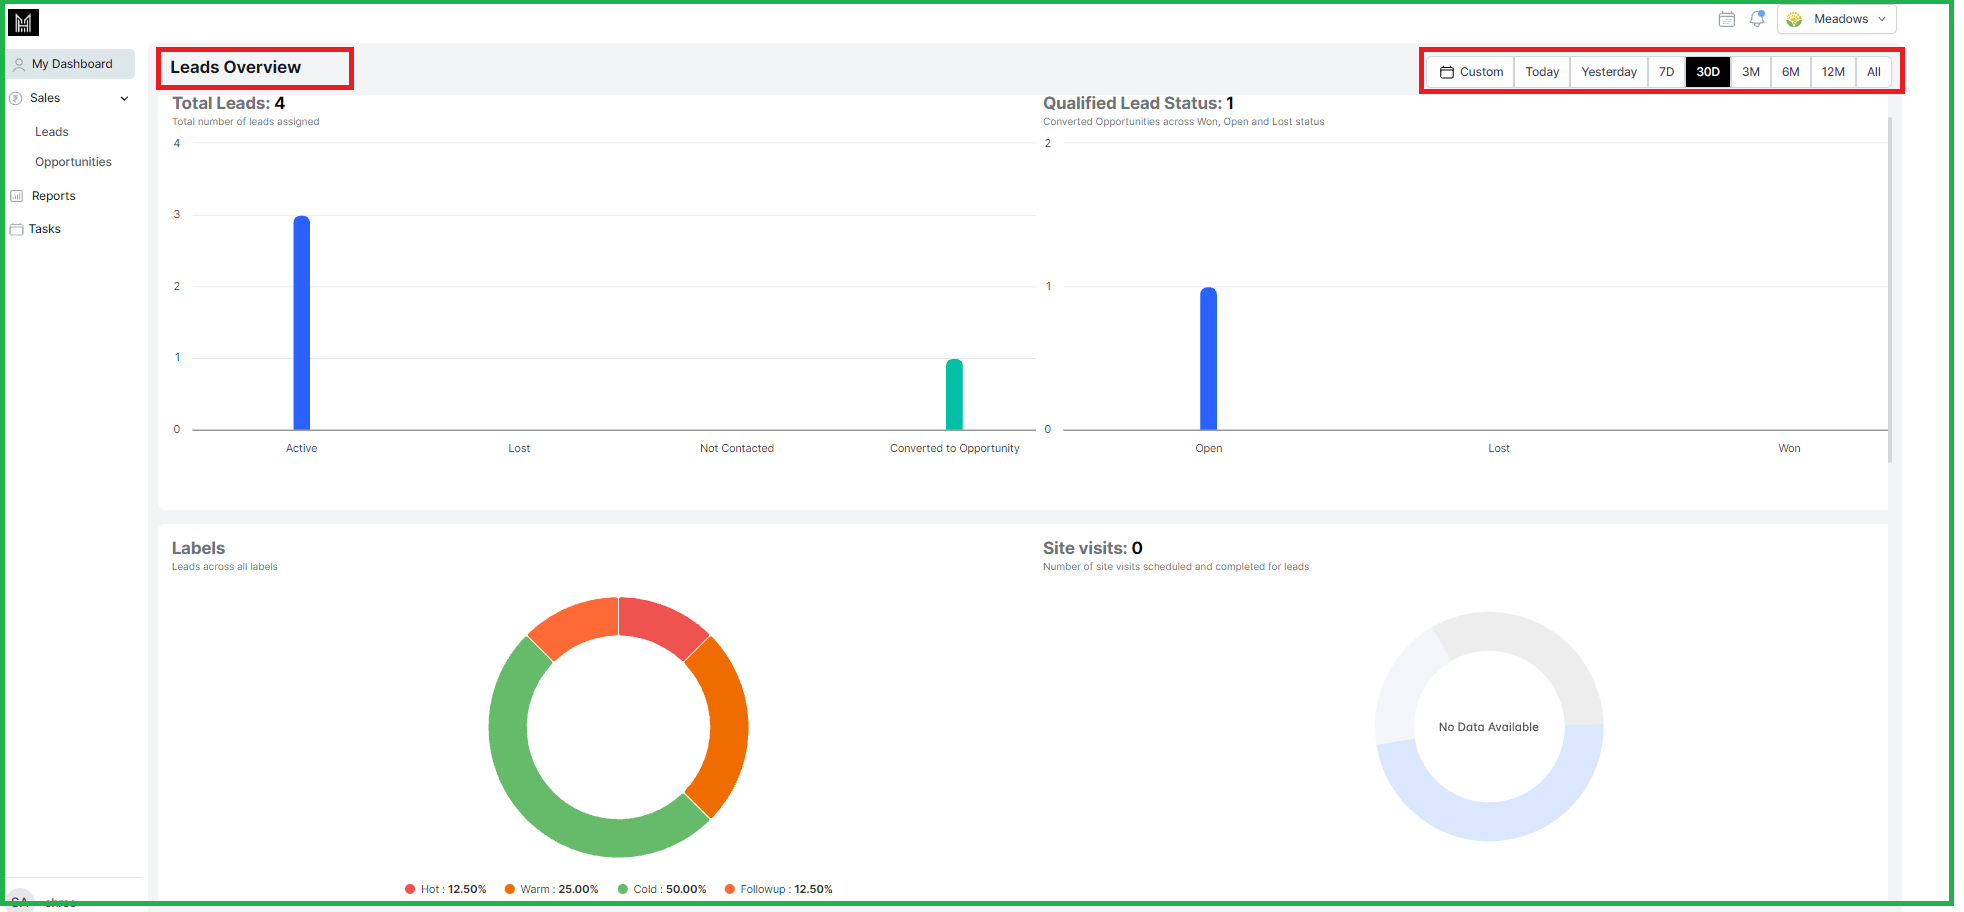
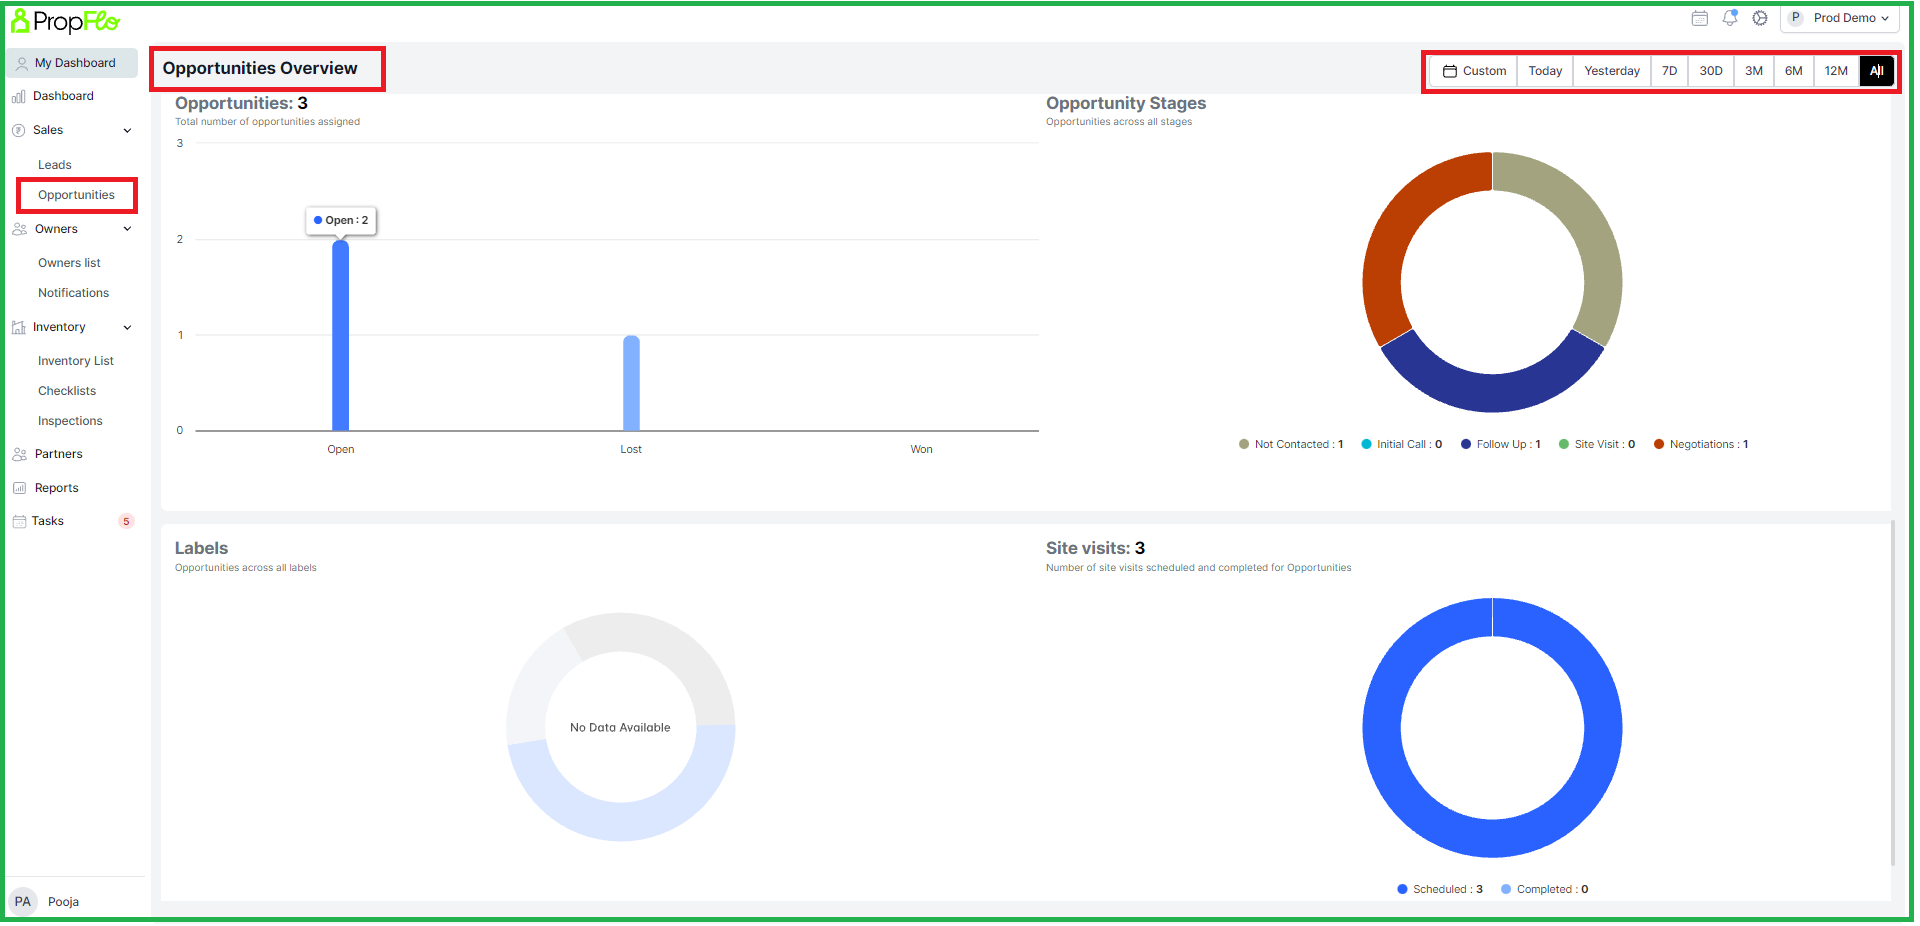
We have implemented My Dashboard that provides an overview of important metrics for both leads and opportunities.
4.1 Leads Overview: You can now see the total number of leads and their qualified status, Labels and site visits are also included.
4.2 Opportunities Overview: You can track the number of opportunities, their stages, labels, and site visits.
Date: 16th JUNE
Web Application
NEW FEATURES
1. Direct Booking - Driven by Access rights
Users have the option to perform a direct booking from the Won Opportunity page.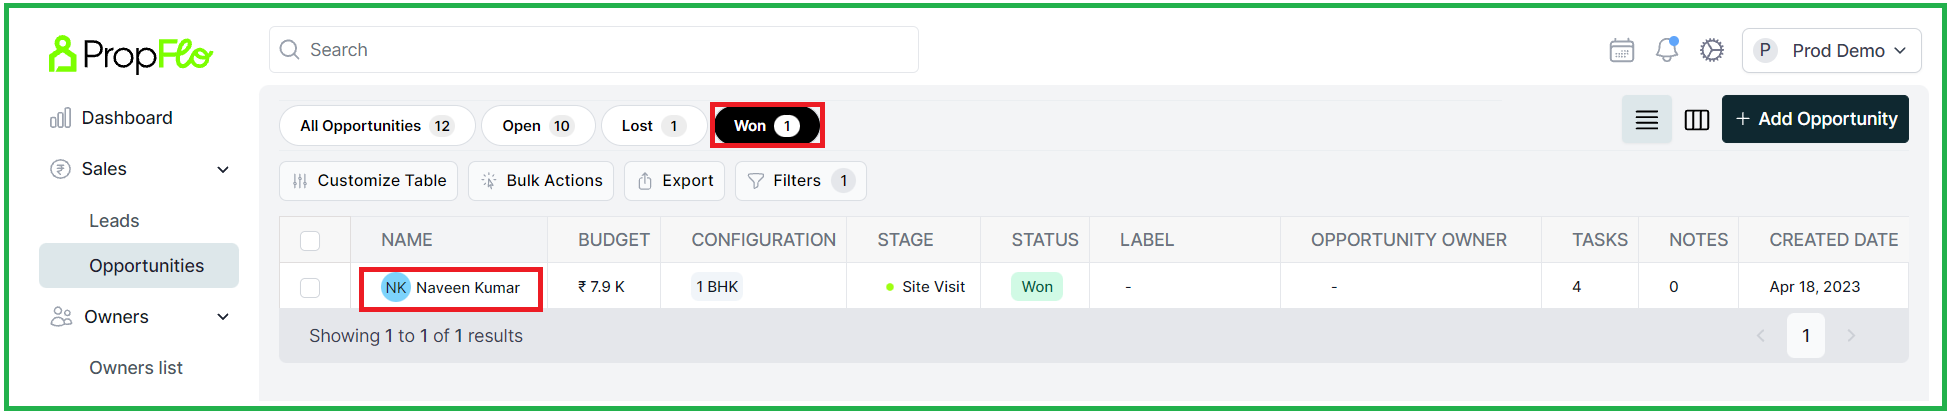

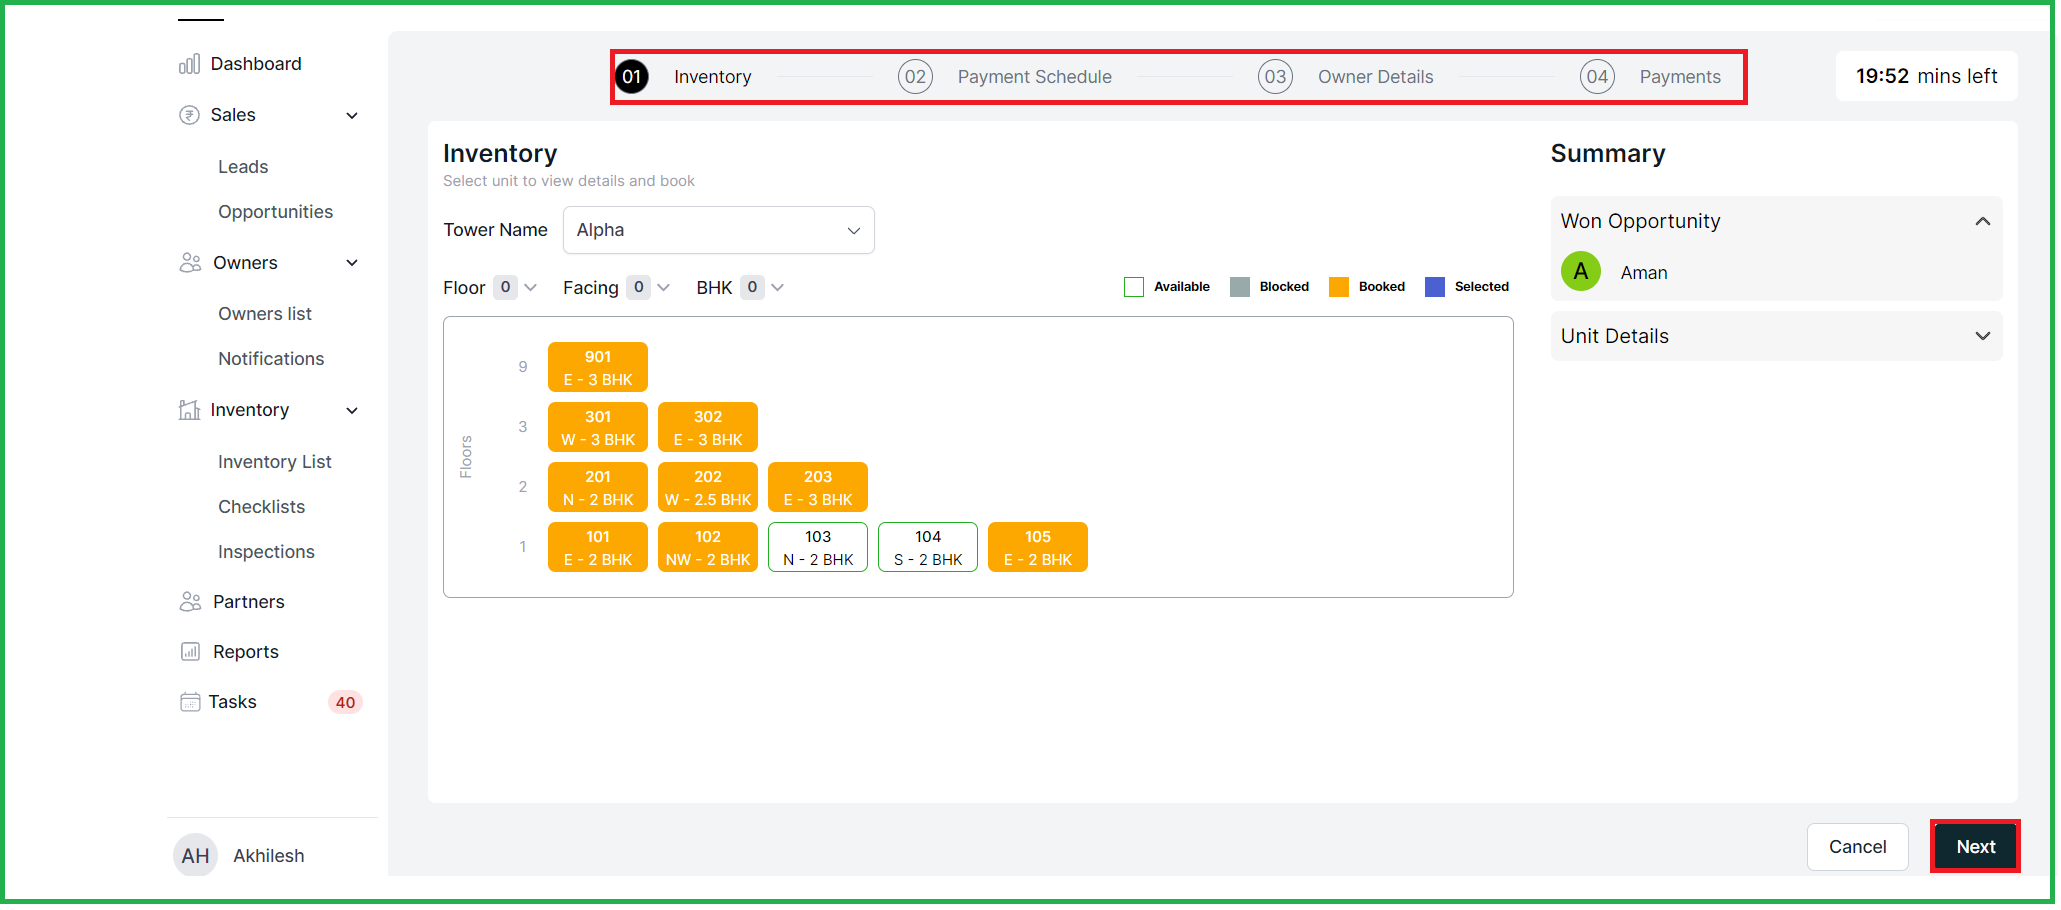
1.1 Click "Book" and select an Inventory unit which you want to book and then click "Next"
1.2 Go to the "Payment Schedule" and choose a payment plan and click "Next". Payment Schedule templates and Milestones related to payment schedule can be created in settings. Refer to point 2.1 for more details.

1.3 User can modify the "Milestone percentage" and "Next". Payment Schedule templates and Milestones related to payment schedule can be created in settings. Refer to point 2.1 for more details.
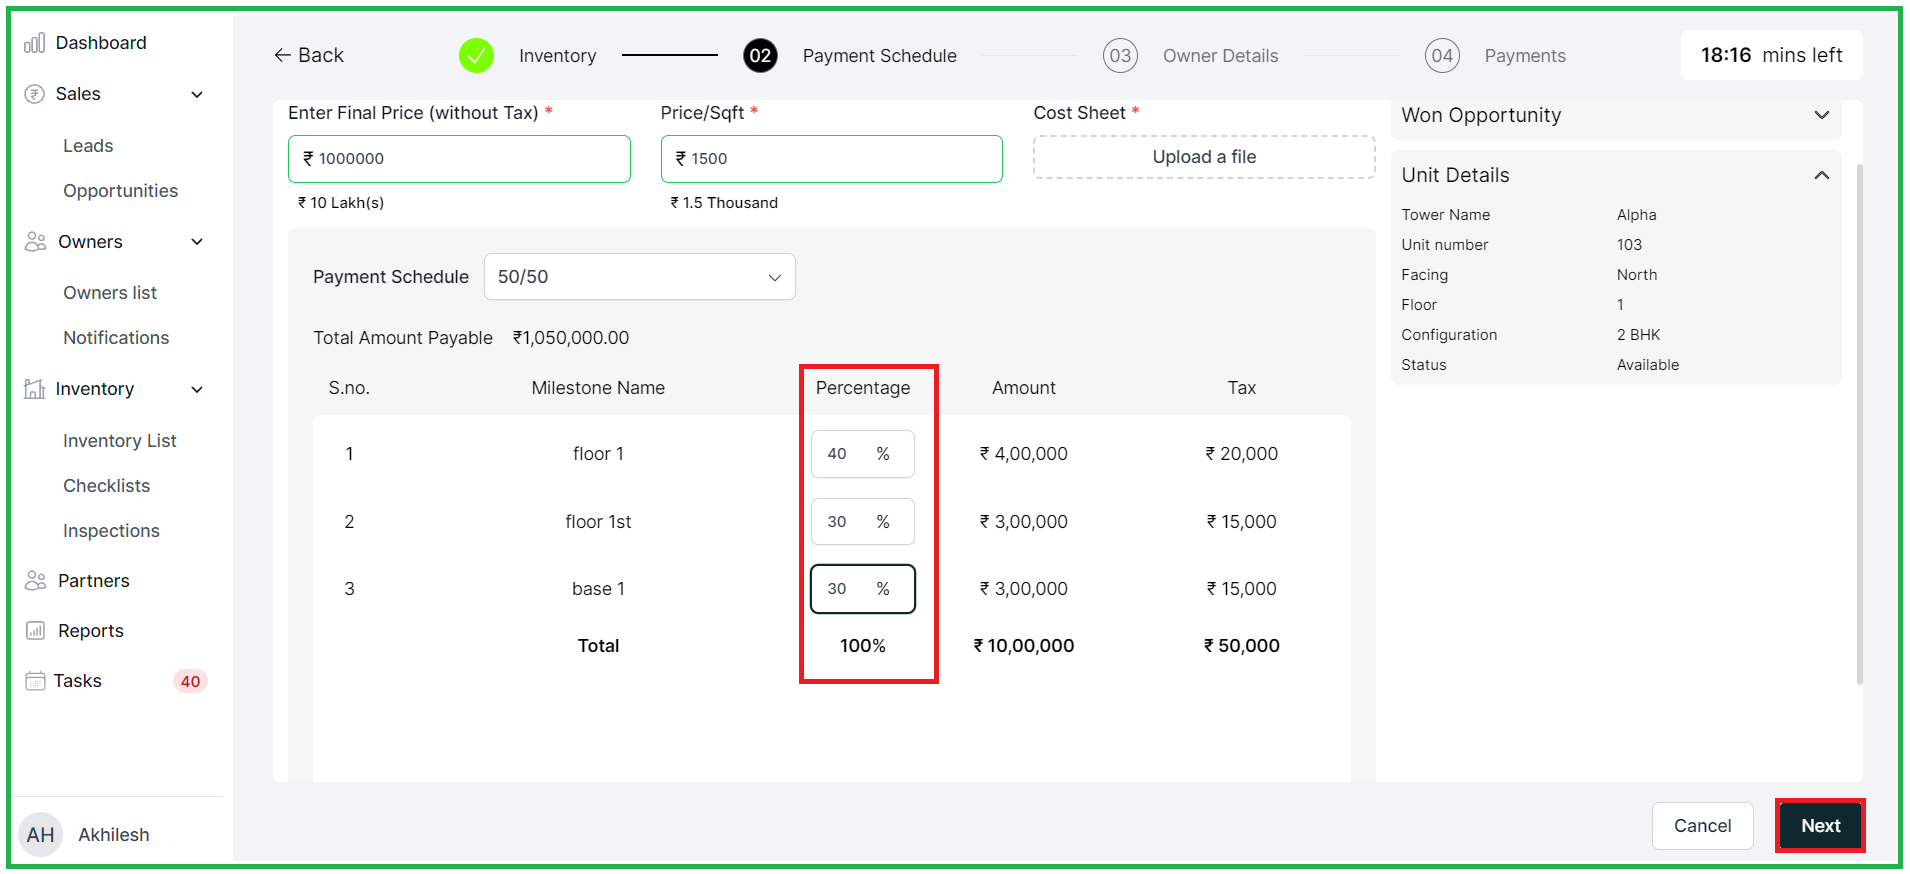
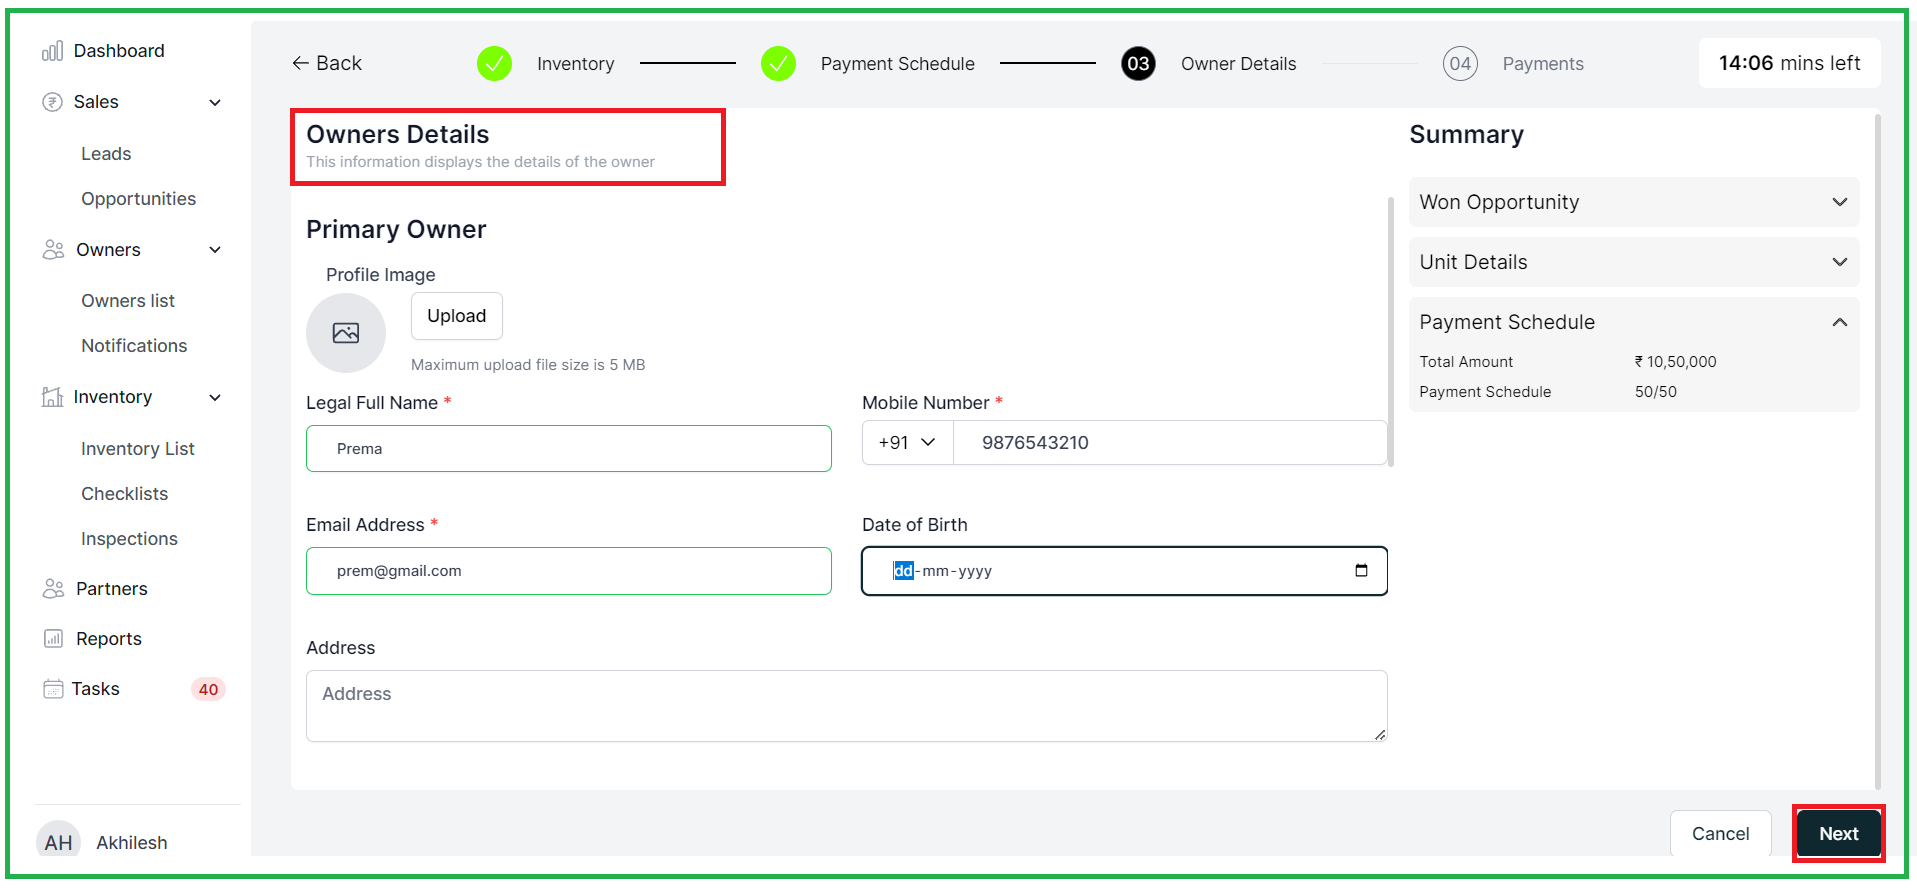
1.4 Provide details for "Primary and Secondary owners" and click on "Next"
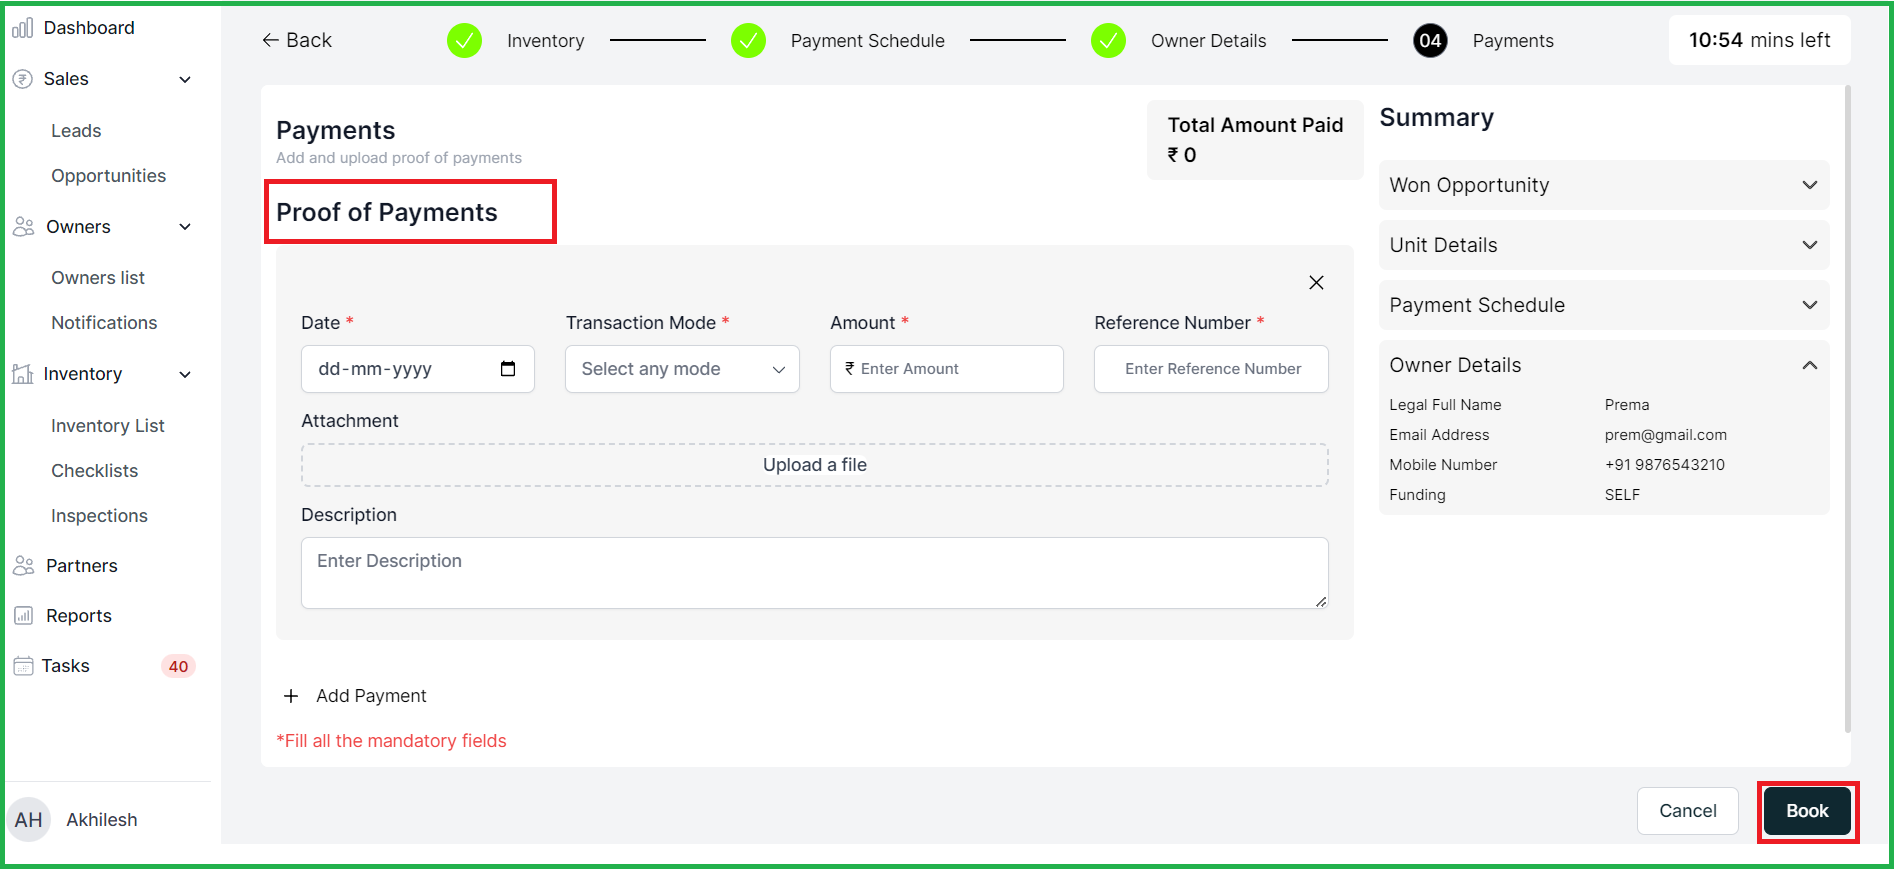
1.5 Submit "Proof of Payment with payment details" and click on "Book"
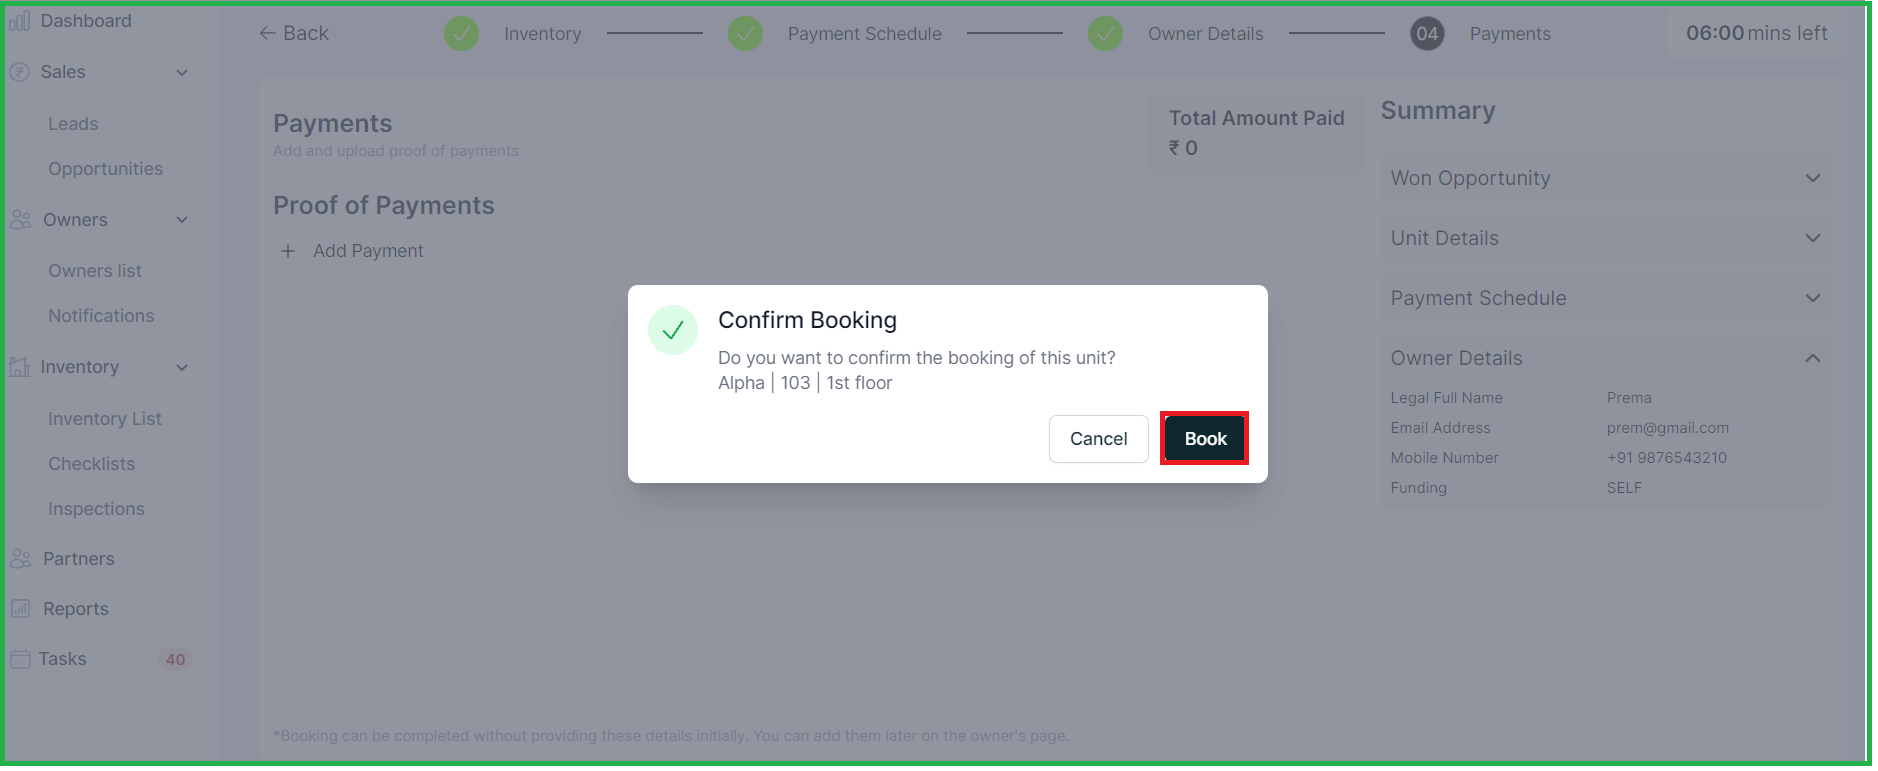
1.6 "Confirm" the booking after entering all the required information
2. Milestone and payment schedule setting screen templates:
To proceed with the milestone creation and payment schedule, you will need to make some customizations in the settings. These settings include configuring the milestones and defining the payment schedule.
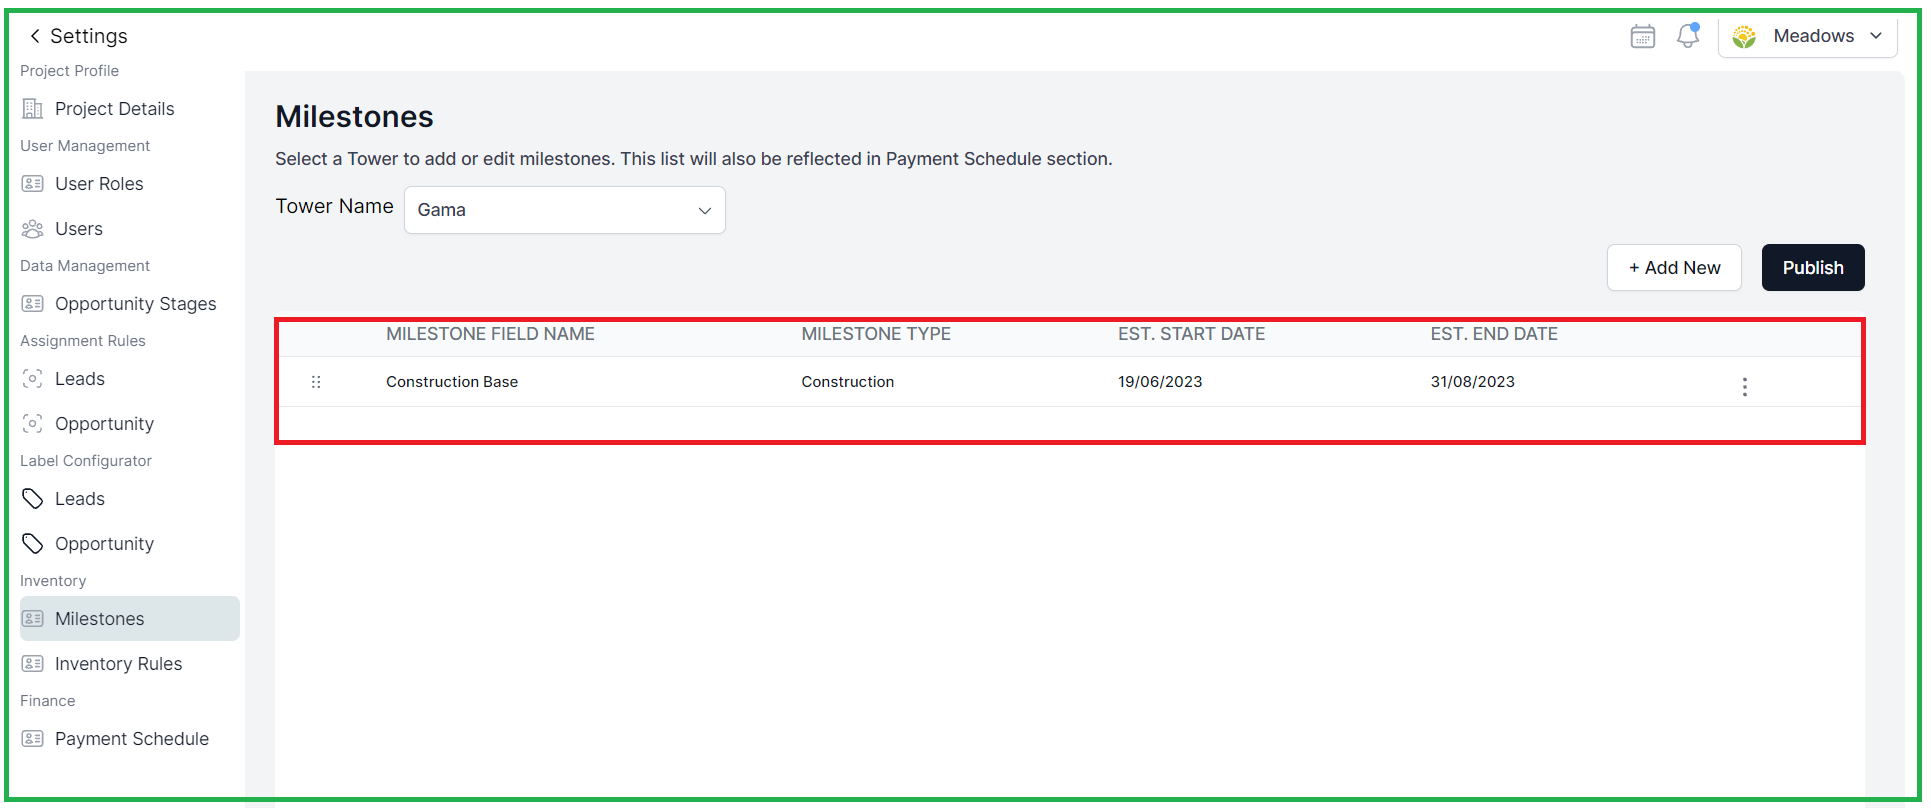
Users can create, edit, delete, and publish milestones at the tower level.
Milestone can not be edited once it is Published
2.1 Milestone Creation
To proceed with booking, it is necessary to set up a milestone. You can easily set up a milestone by accessing the "Milestone" tab in the settings. This step is essential in order to continue with the booking process.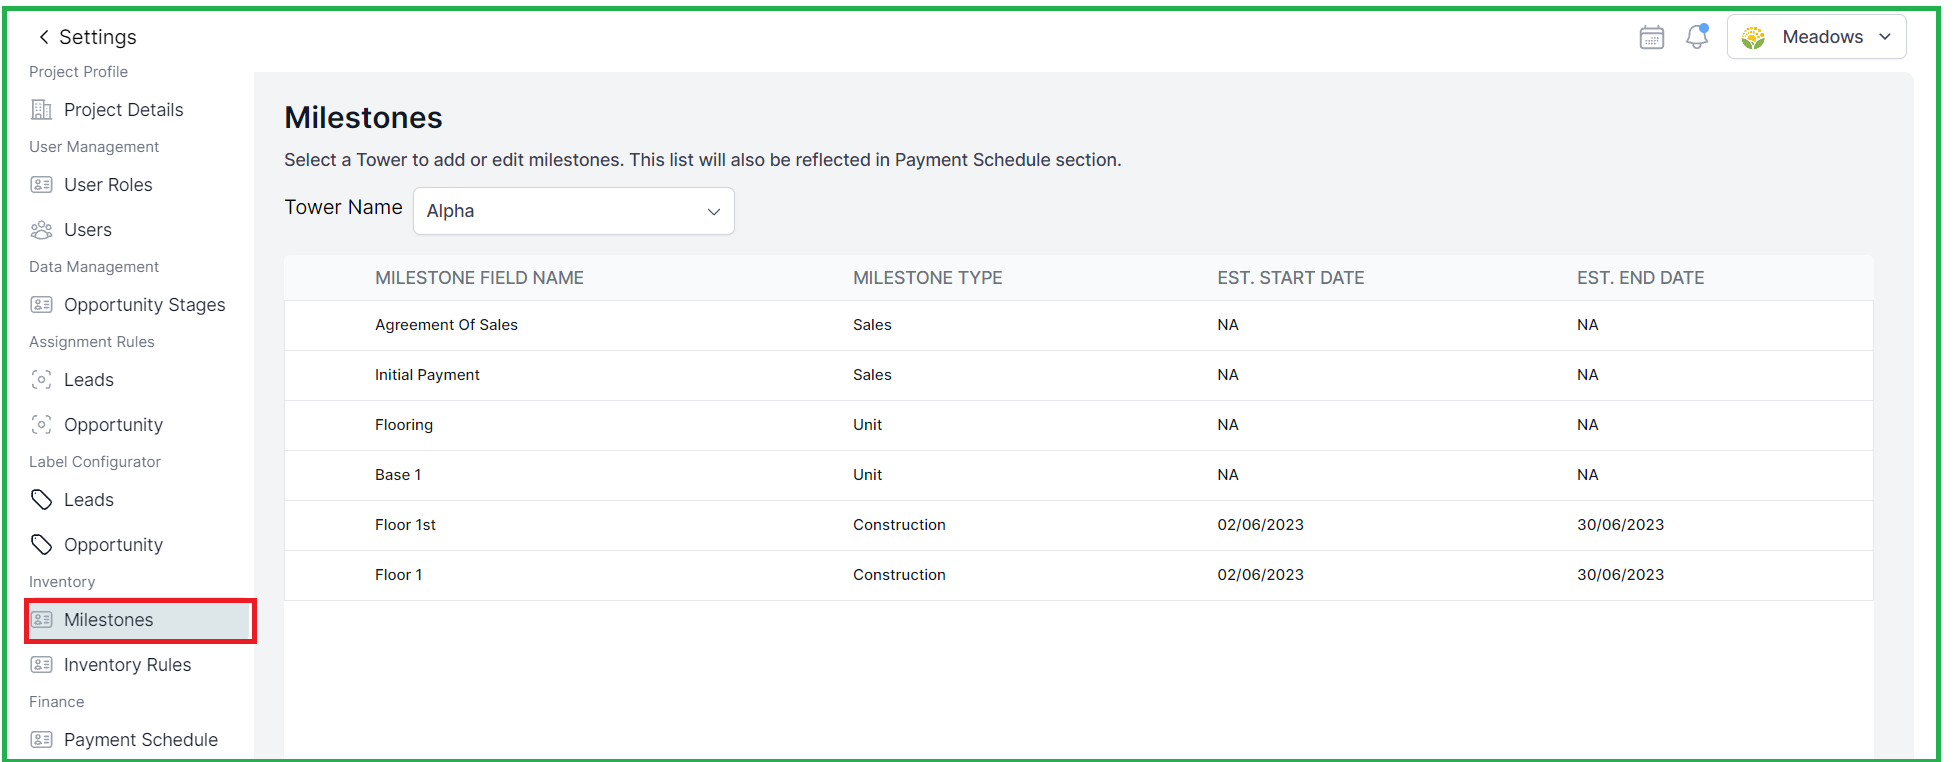
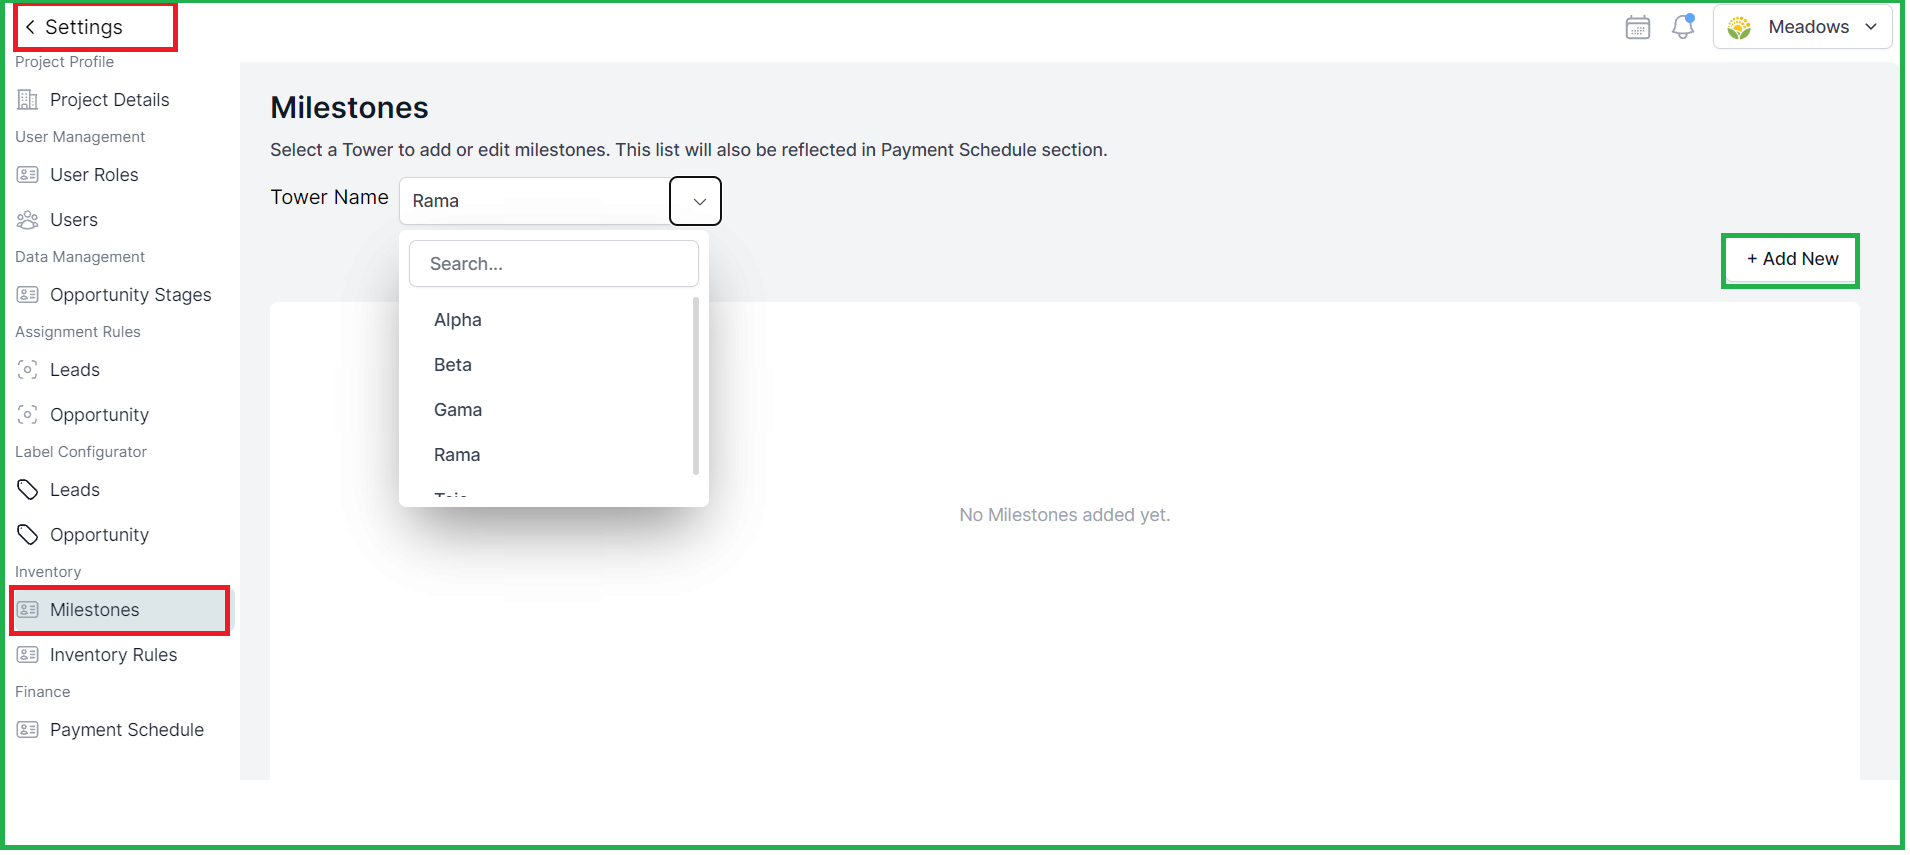
2.1.1 Selecting Tower
Here you can select the Tower Name for which you want to set up the Milestone,
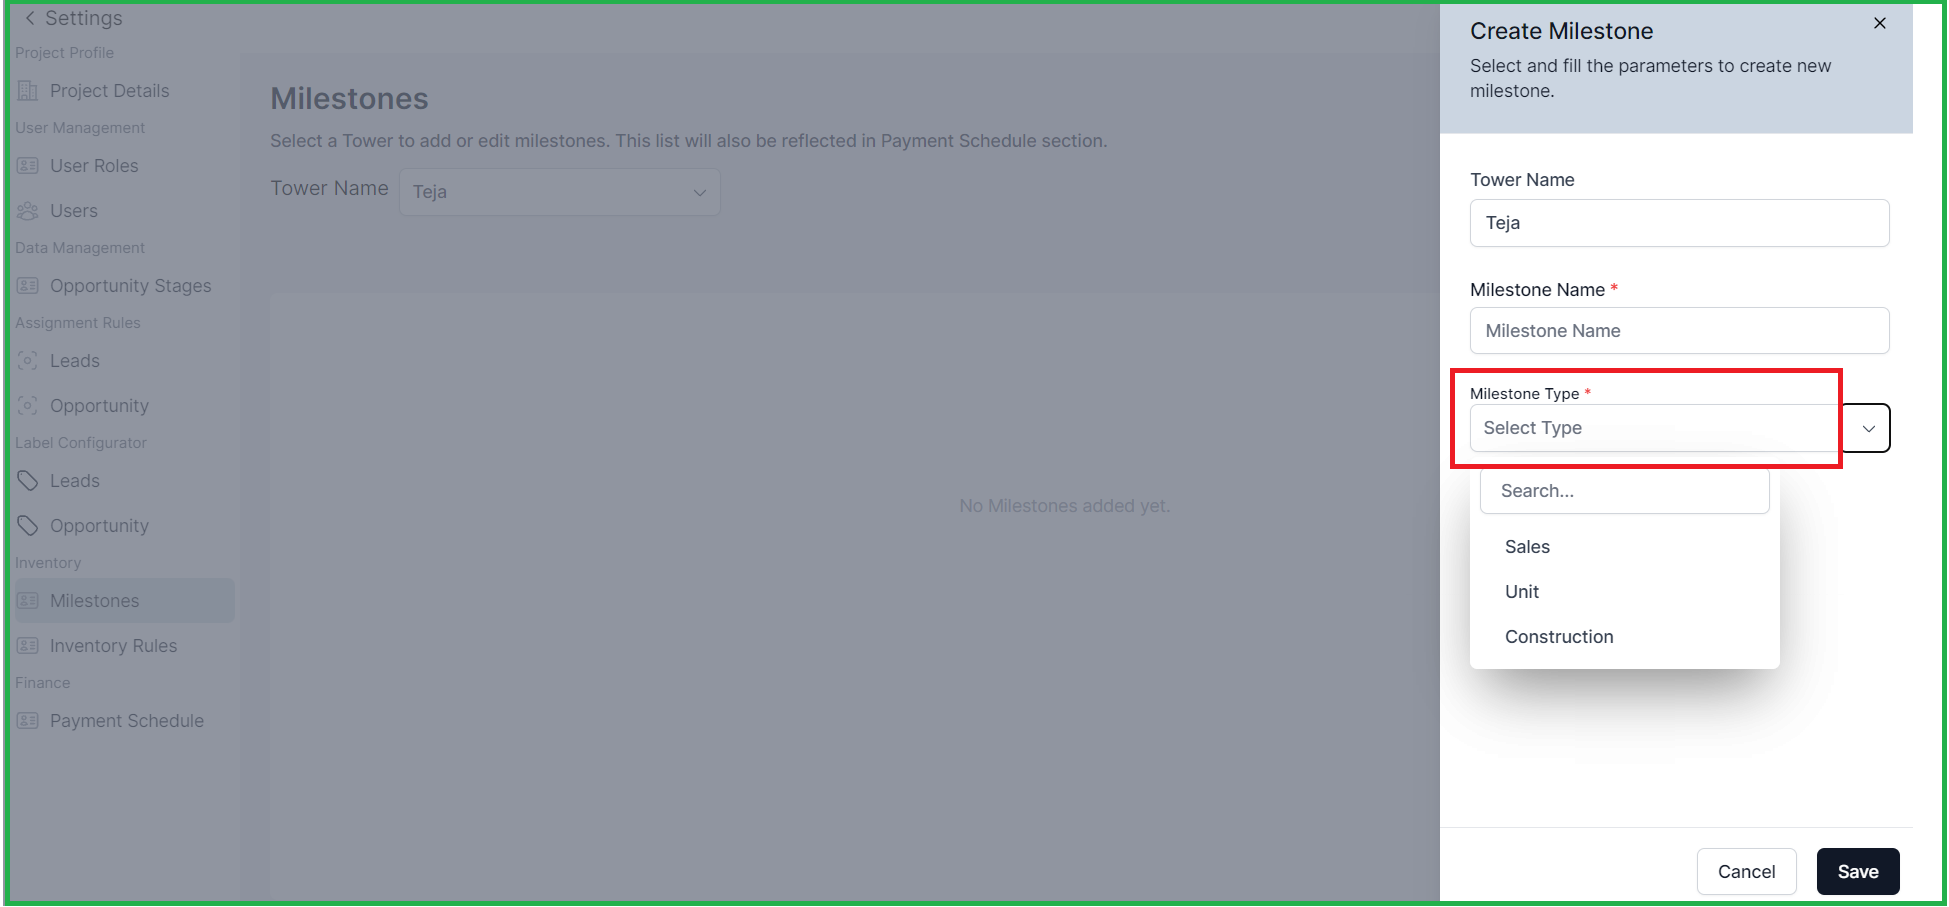
2.1.2 Side popup
From this Side popup you can create a Milestone Name and Type
2.1.3 Created Milestone
Screen to see how the created milestone is seen
2.2 Payment schedule
To set the payment schedule, you can access the "Settings" option and configure it accordingly. By clicking on the "Settings" option, you will be able to define the payment schedule for your booking.
Payment Plans can only be created after a milestone is published
2.2.1. Click on the Create Payment Plan
2.2.2. Side popup
Left popup will open and here you can create a payment plan,
- Set payment schedule name> Tower Name for which you are creating that Payment schedule and select the milestones and click on Next to save that payment schedule.
3. Blocking and Unblocking- Driven by Access Rights
When an opportunity is won, temporarily block or unblock units can be done
3.1 Blocking Unit:
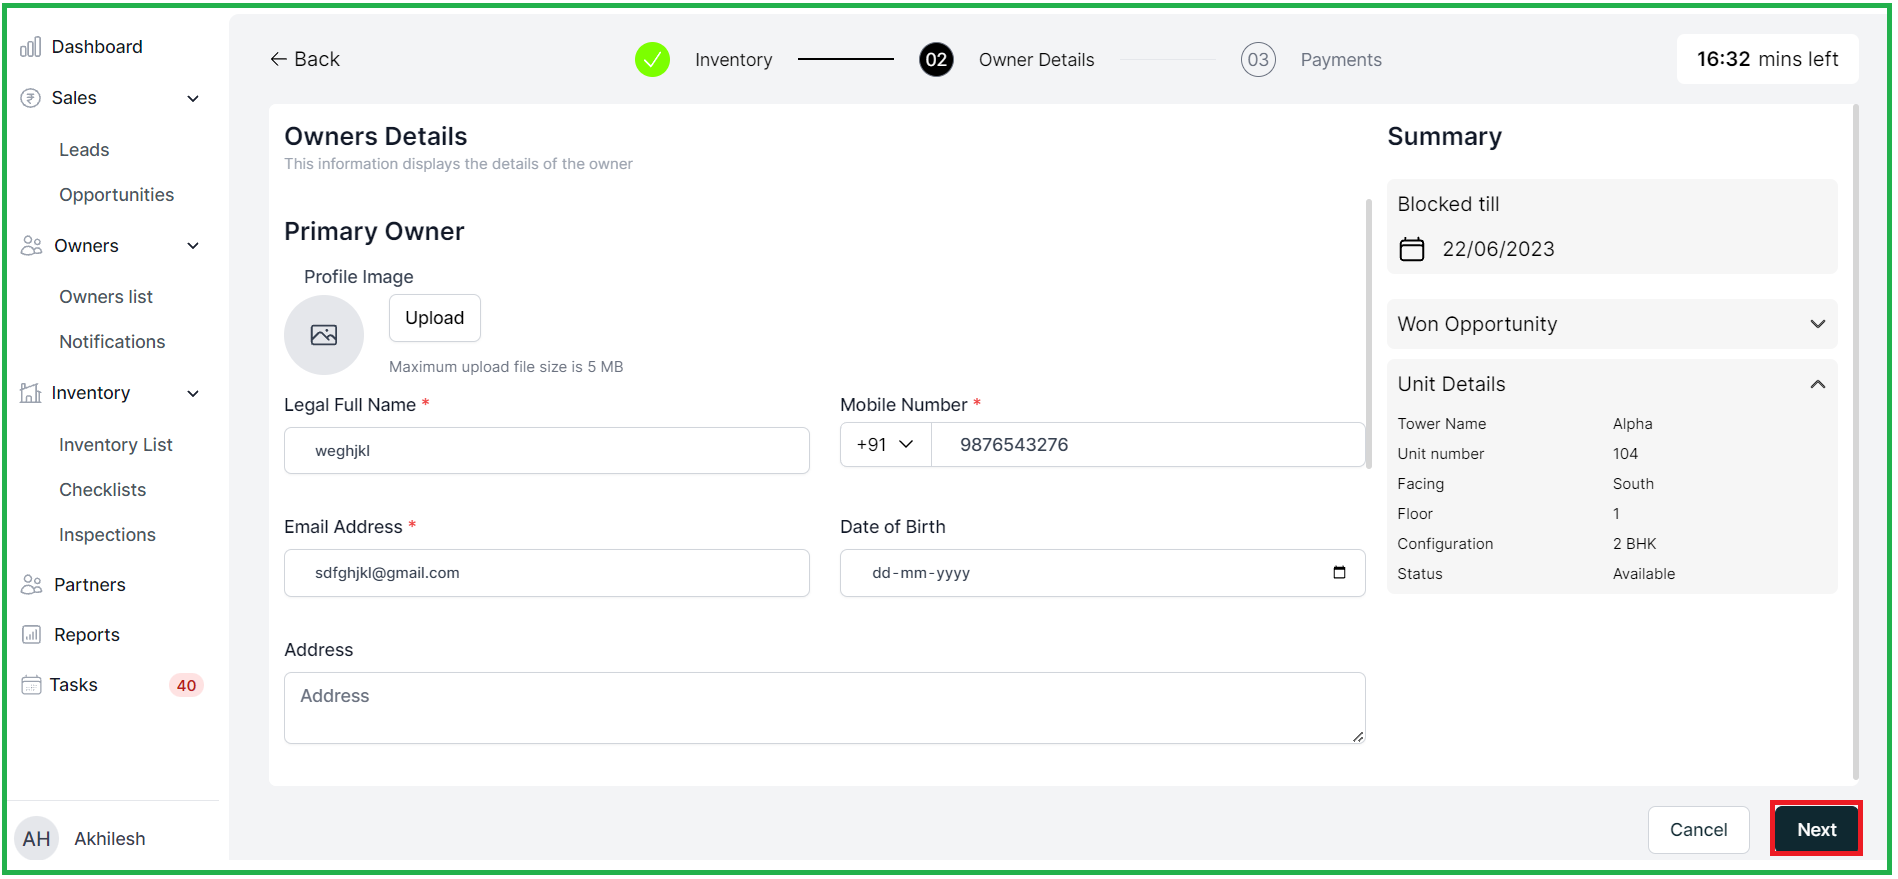
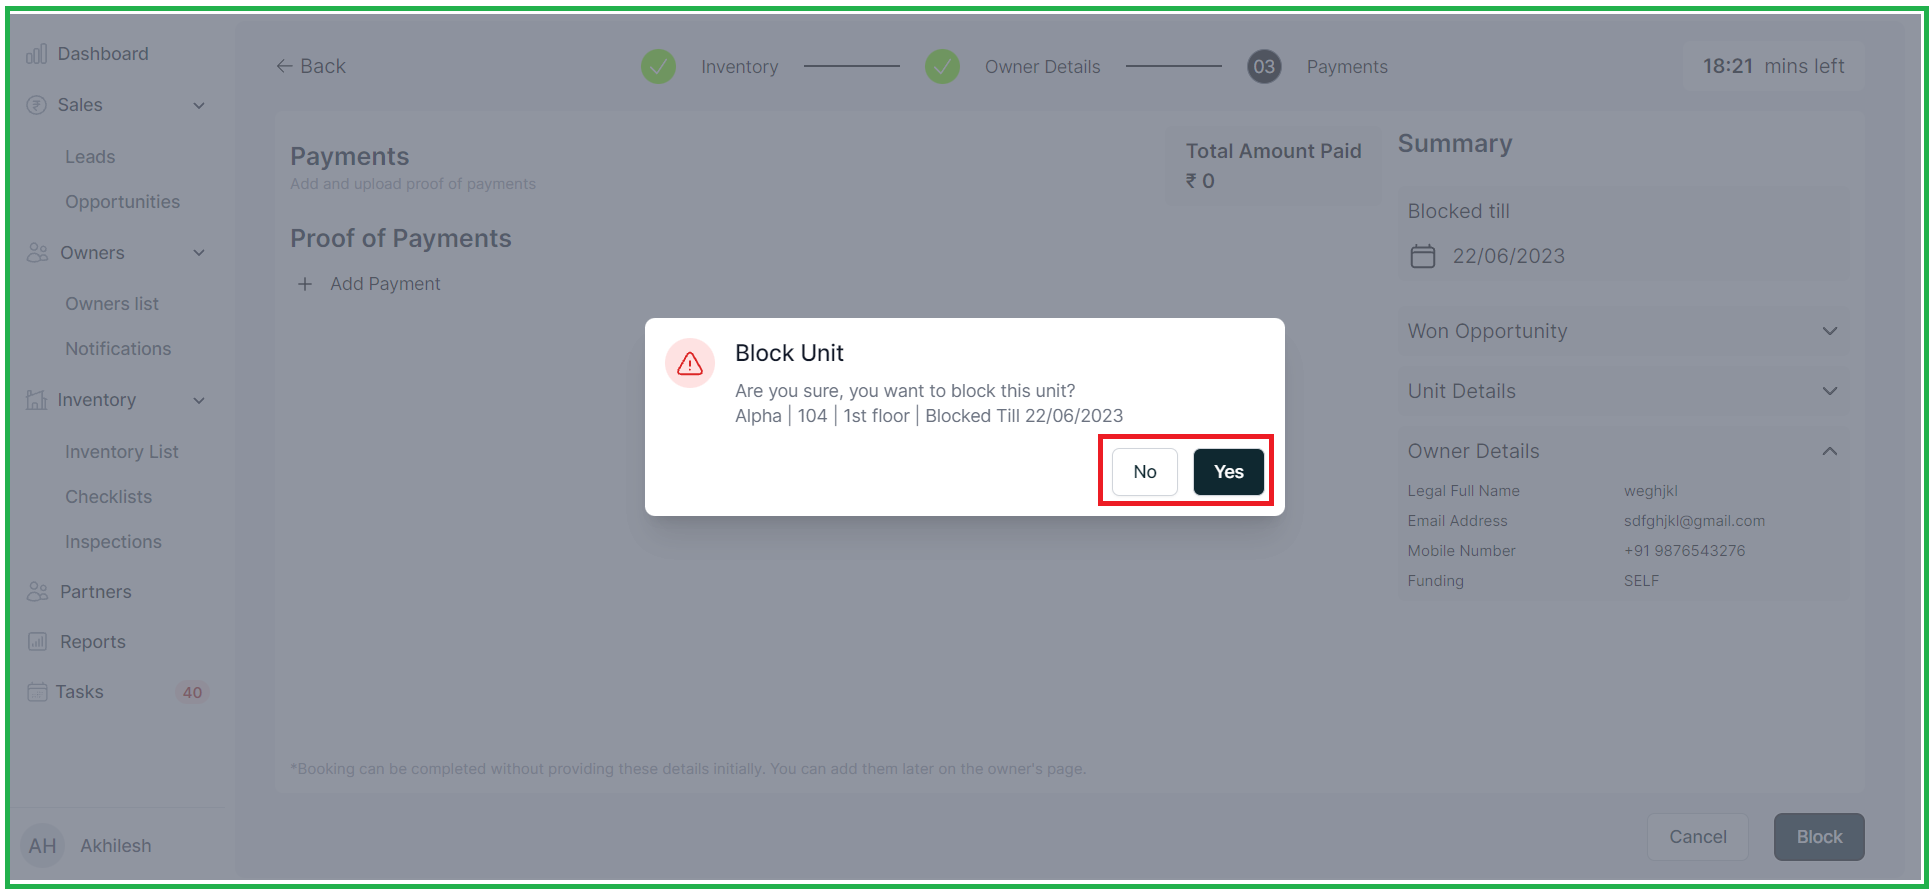
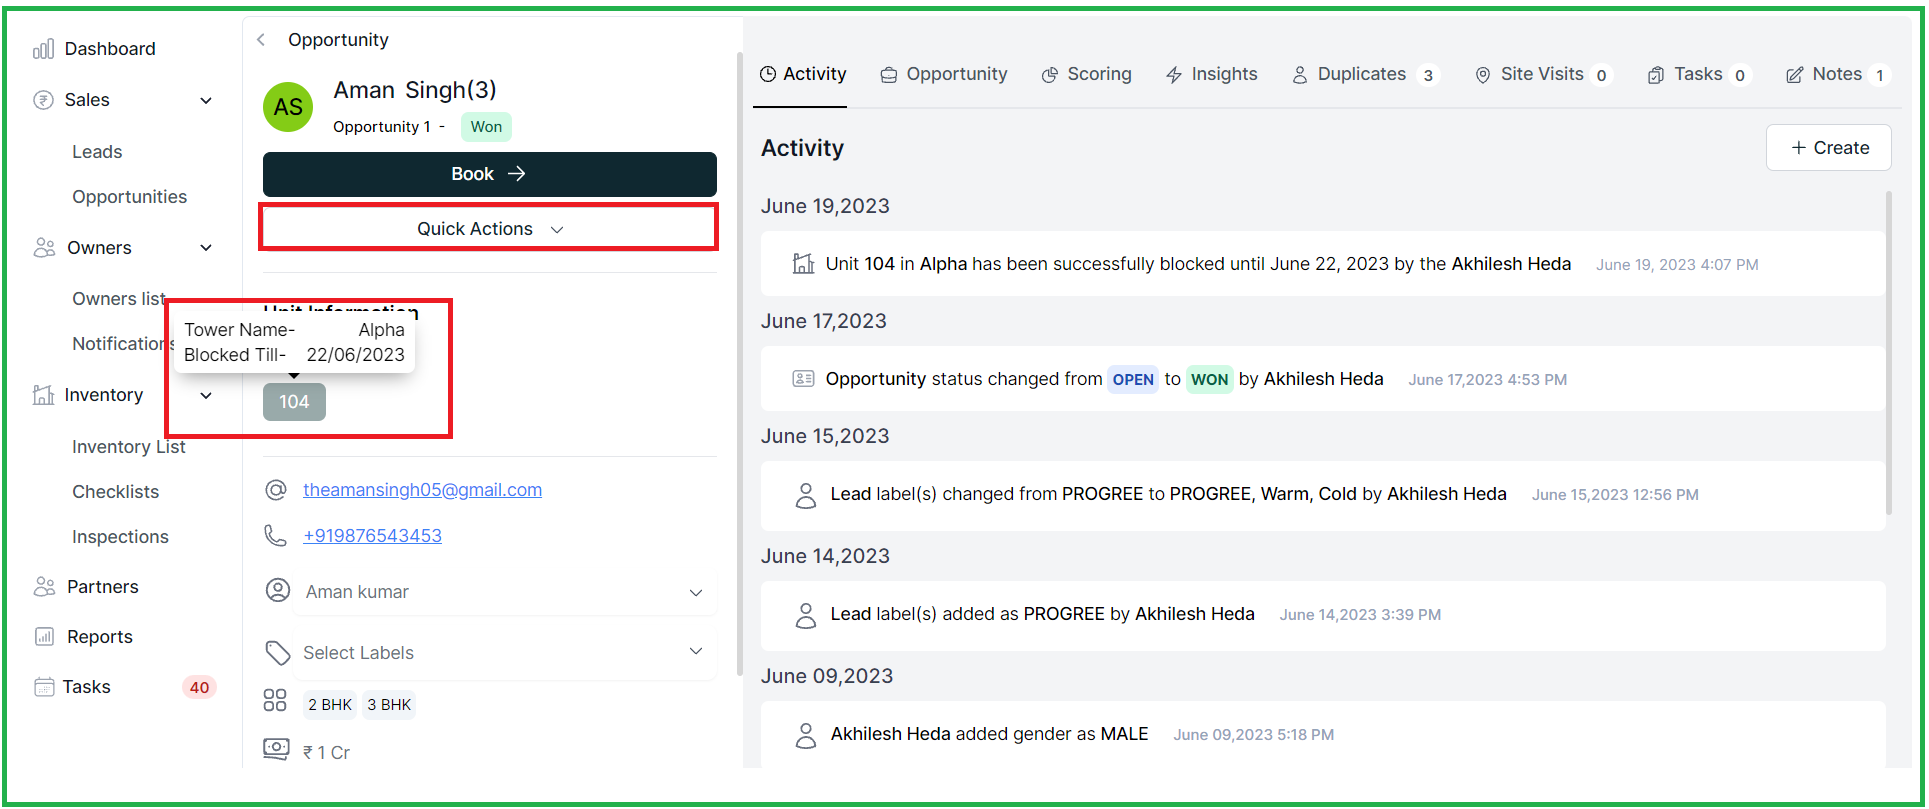
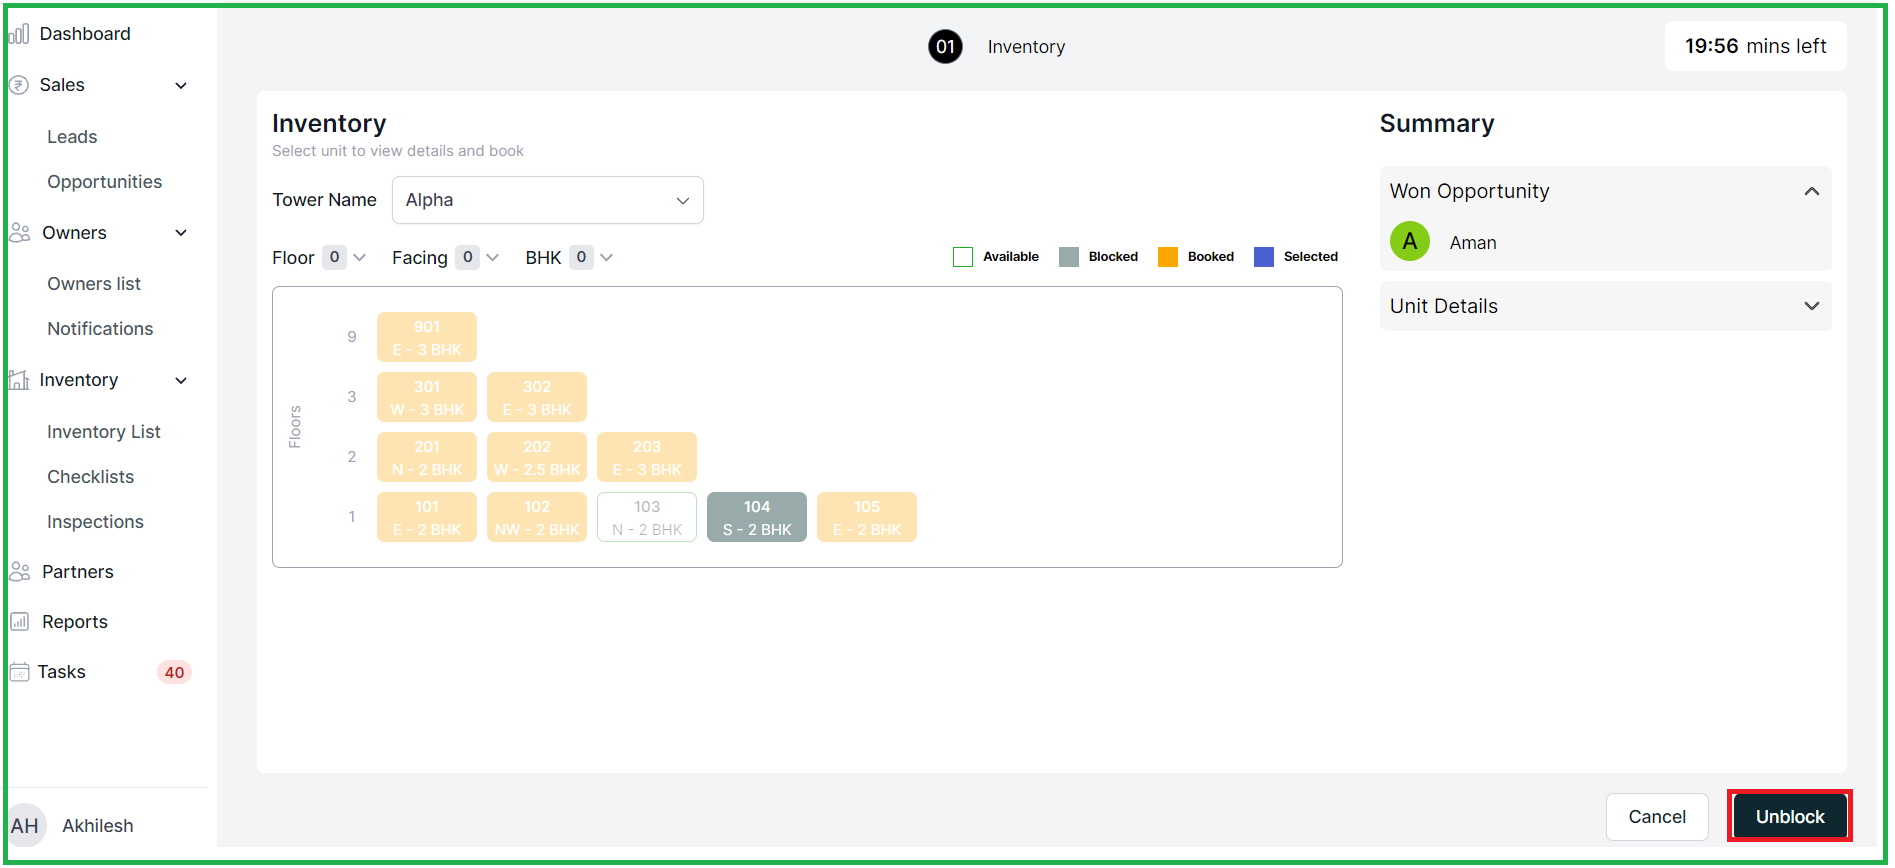
By clicking "Temporary Block Unit" from the Quick action tab on the Opportunity, selecting a unit entering optional payment details, confirming the blocking, the customer is added to the owner list, the unit status changes to "blocked," and the opportunity profile is updated accordingly.
3.1.1 Units available for blocking and selected unit is in the blue color. Inventory Rule setting templates can be created in settings. Refer to point 1.2.3 for more details
3.1.2 Owner details Updating under this
3.1.3 Confirmation Popup for Blocking the Unit.
3.1.4 Blocked Unit is Greyed out, and will show under the Opportunity profile.
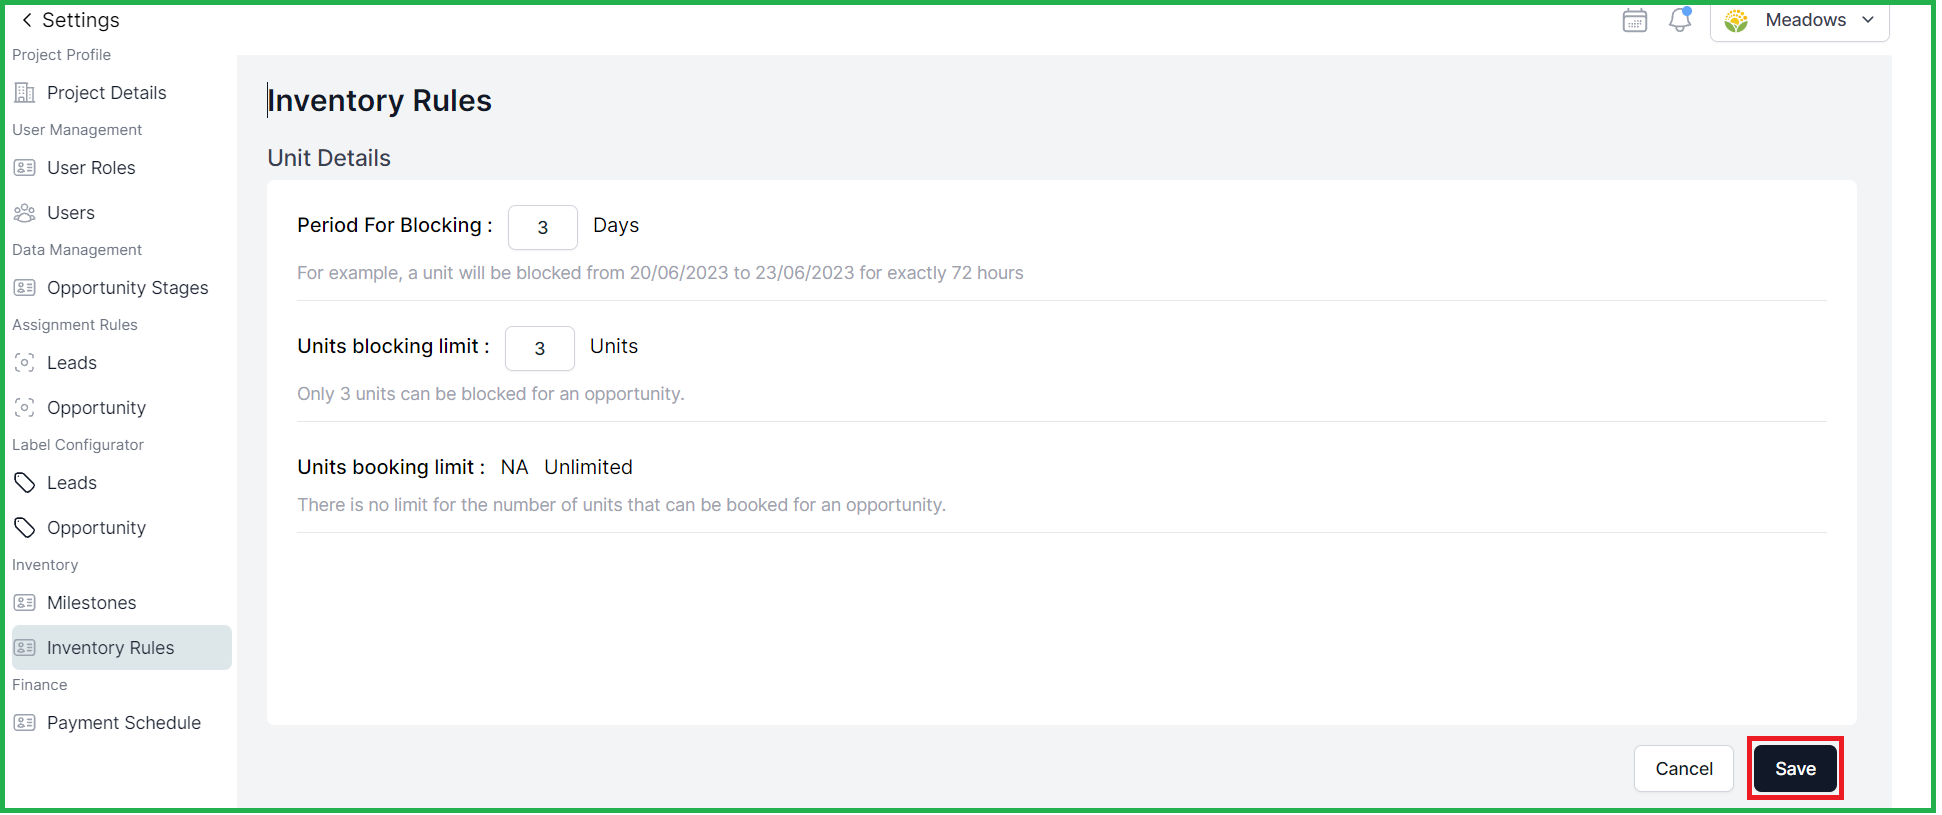
3.2. Inventory Rule Settings Screen templates:
3.2.1 Admin can set rules for inventory, such as the period for blocking units, blocking and booking limits.
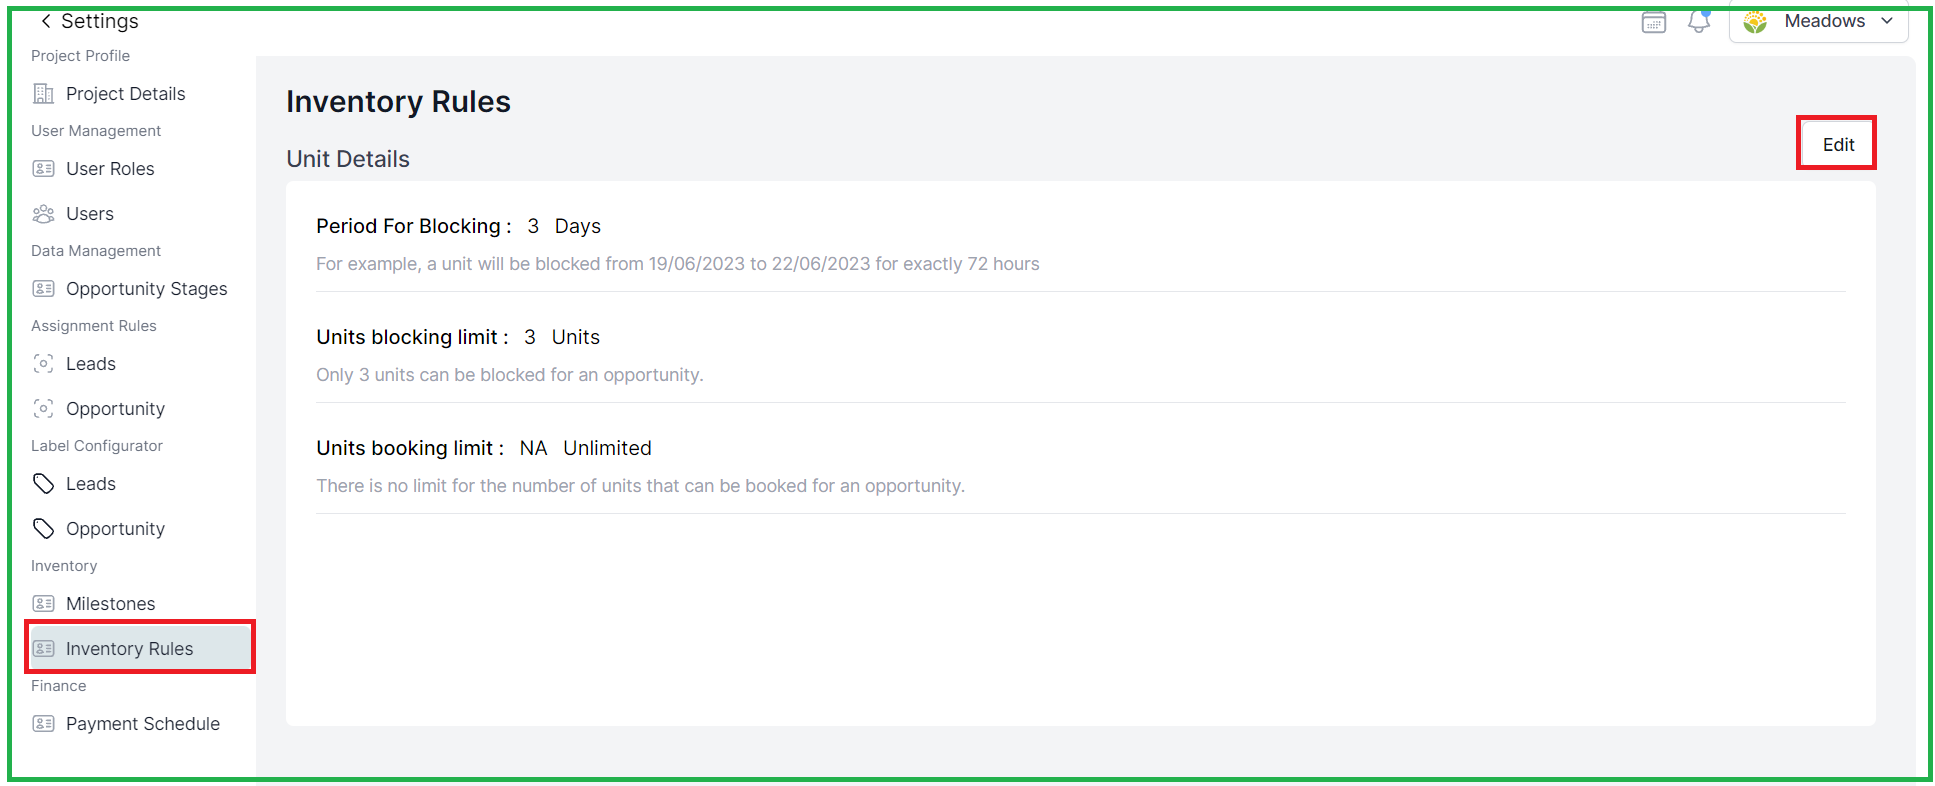
3.2.2 You have an option to edit this and set Your own Rule and Next
3.3 Unblocking:
Units can be manually unblocked by selecting the "Unblock Unit" option in the opportunity profile's "Quick Actions" section. The system can also automatically unblock units based on the specified time period in the settings.
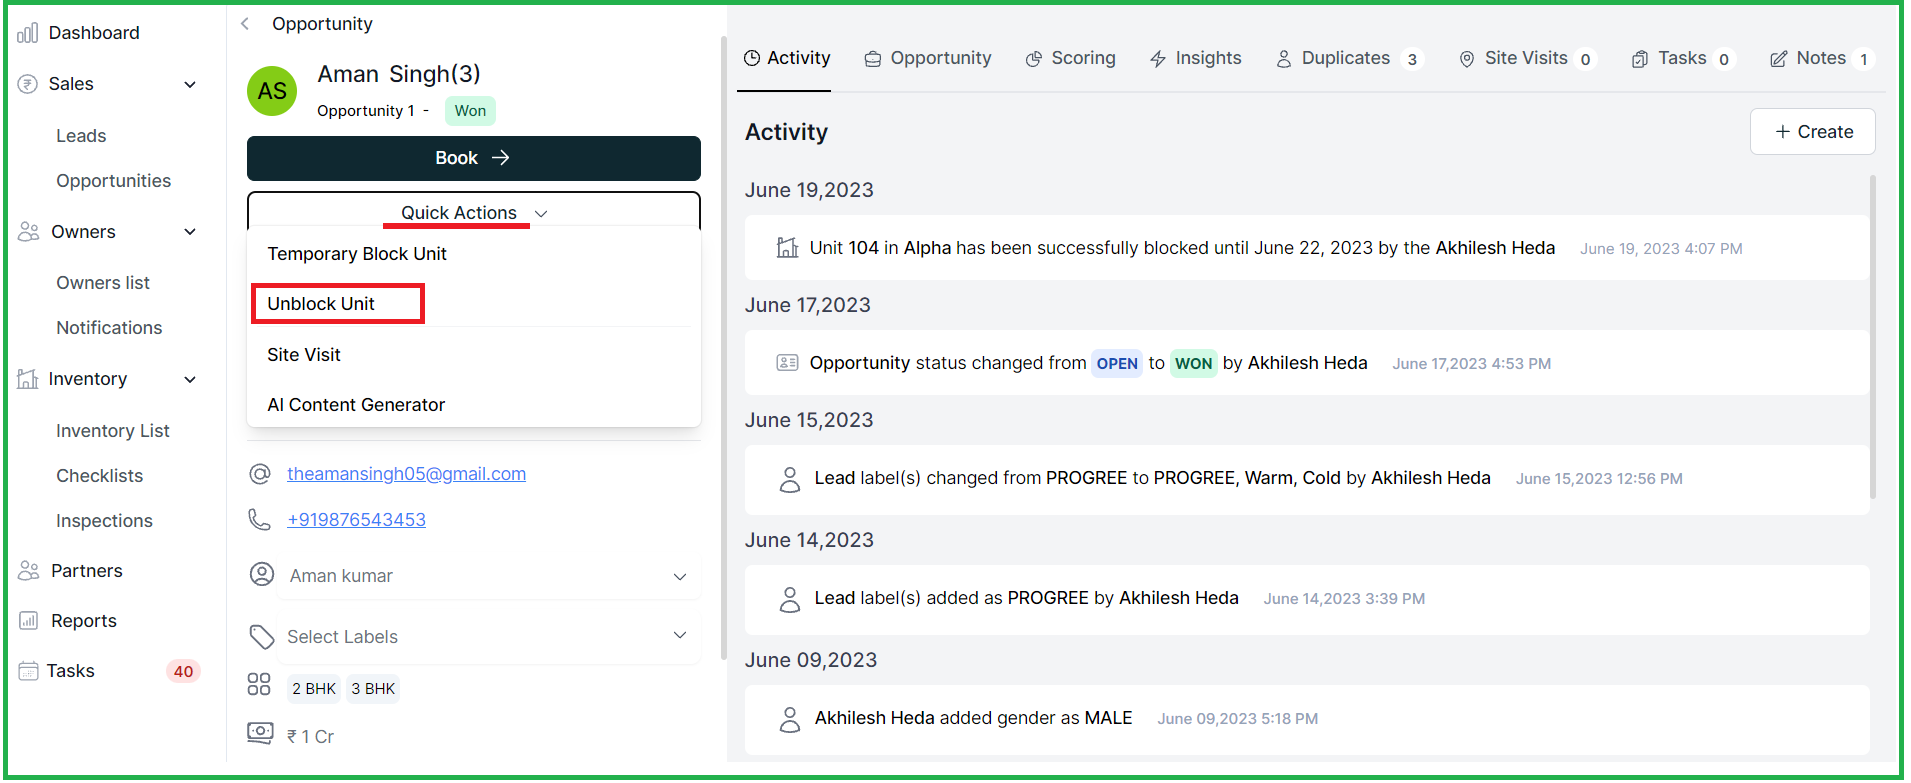
3.3.1 User can click on Unblock unit directly and Click on "Next"
If a unit is unblocked manually or by the system, the inventory status becomes available, and the status in the owner property list changes to "blocking canceled."
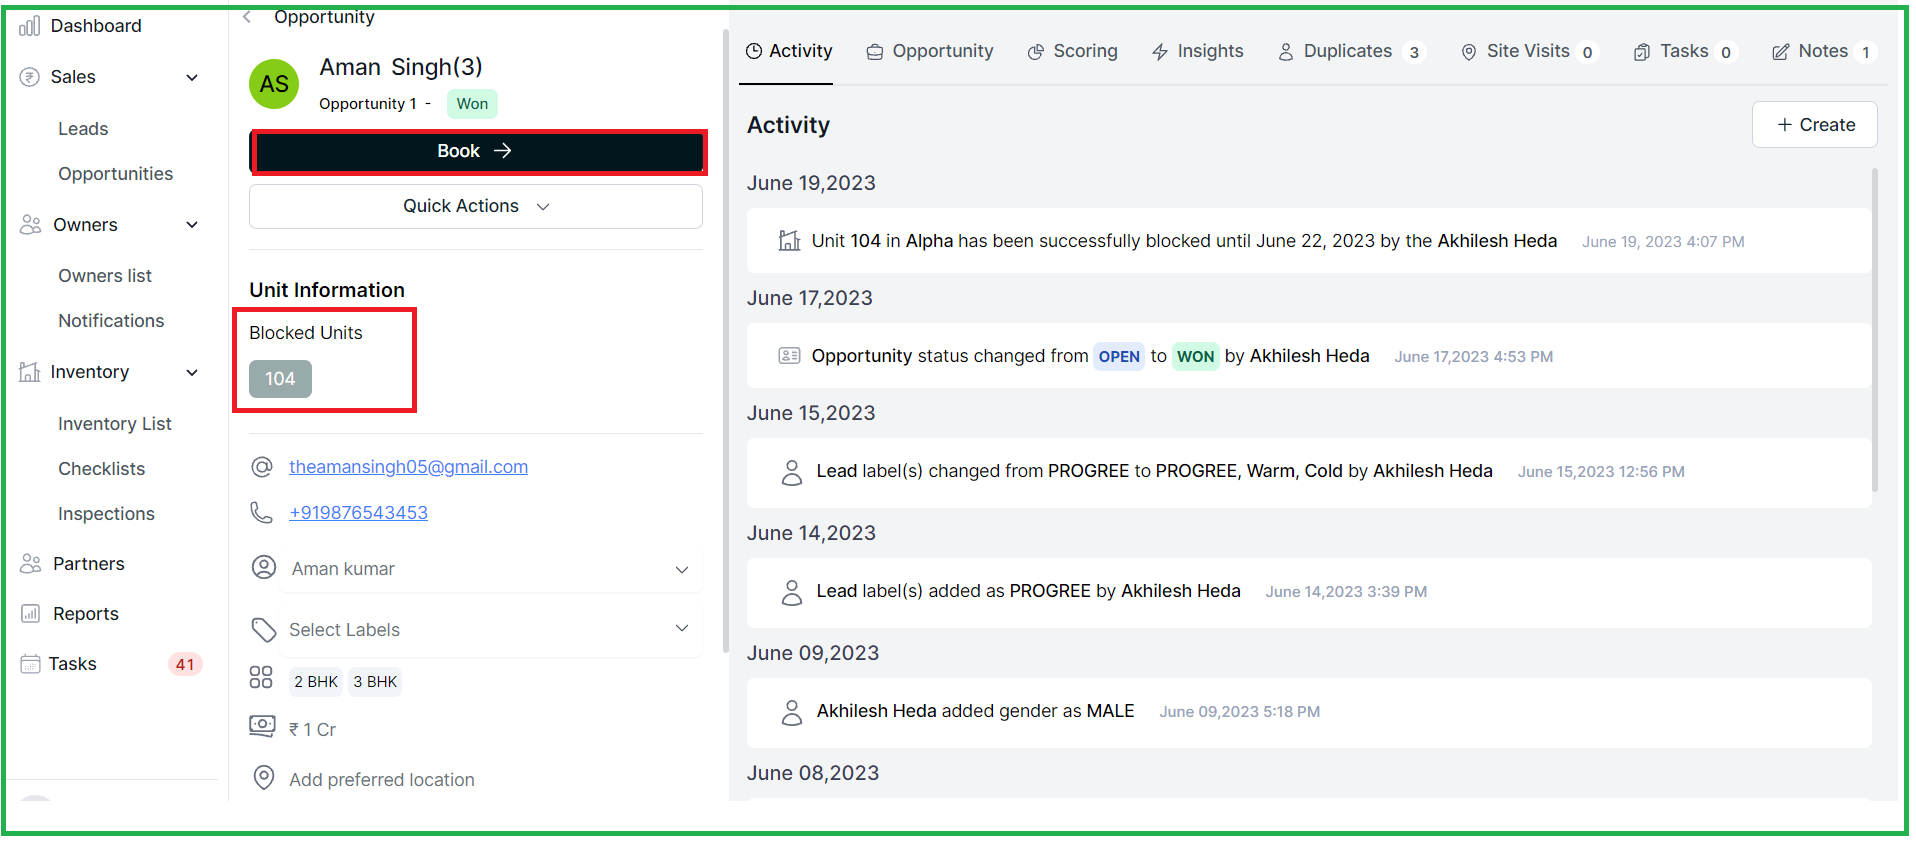
4. Booking a Blocked Unit-
By clicking on the "Book" button, users can select a blocked unit from the inventory and proceed with the booking process. Once booked, the status of the previously blocked unit changes to "booked" in the opportunity profile.
4.1 Go to Opportunity profile below you will see the blocked units details
4.2 Clicking on the Book you will able to see the blocked unit greyed, click on the greyed unit it will turn blue and you can continue with the booking process.
4.3 Profile details will be Auto filled then click on "Next"
4.4 You can confirm the booking a blocked unit here,
ENHANCEMENTS
- In the owner portal, owners can log in using their email and password or mobile number and OTP.
- Owners can view various sections such as Overview, Booking Form, Owner Property Details, Property Documents, Updates, My Documents, Payments, and Handovers.
- Activities are created in the opportunity profile when inventory is blocked, booked, or unblocked.
- At the entity level, there is a dashboard, property list, and owners list (including owner and owner property details
Date: 14th JUNE
Web Application
NEW FEATURES
1. Re-Designed Leads and Opportunities Pages
The landing leads and opportunities pages have been redesigned completely to make them more user friendly.
1.1 Easy to access filter tabs and view metrics - Users can quickly switch between various tabs and add a new view. Additionally, users can view the metrics to get quick insights.
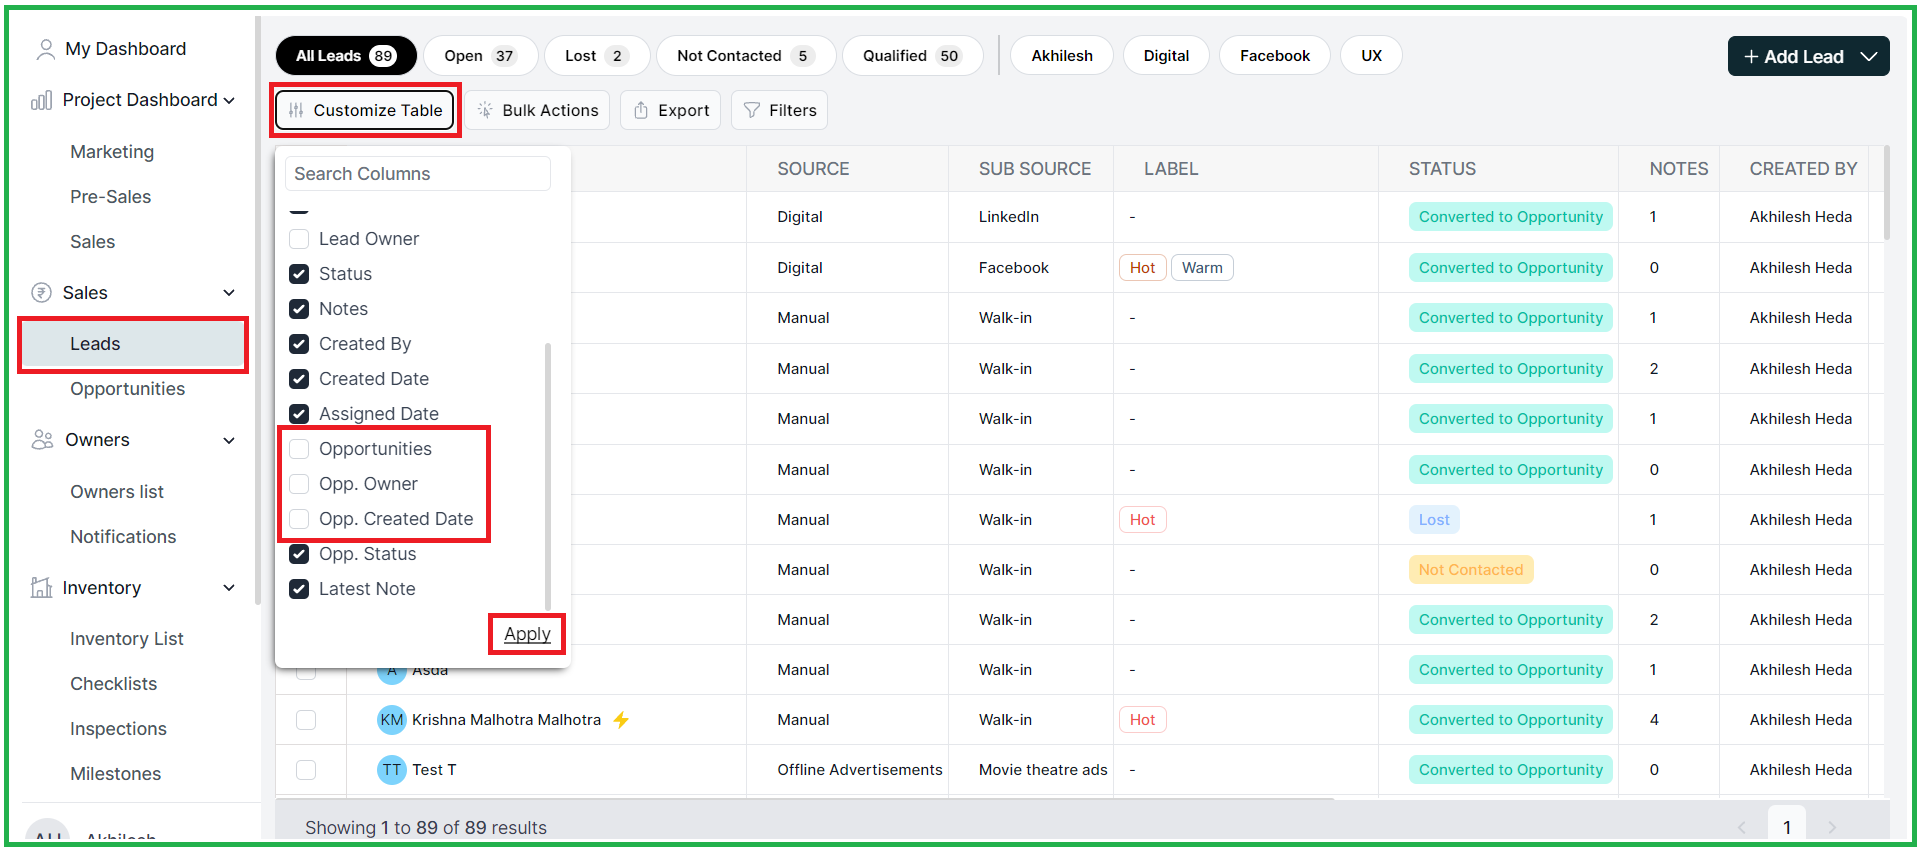
1.2 Customize Columns - Users can choose columns that they want to view.
1.3 Making edits directly from the table -
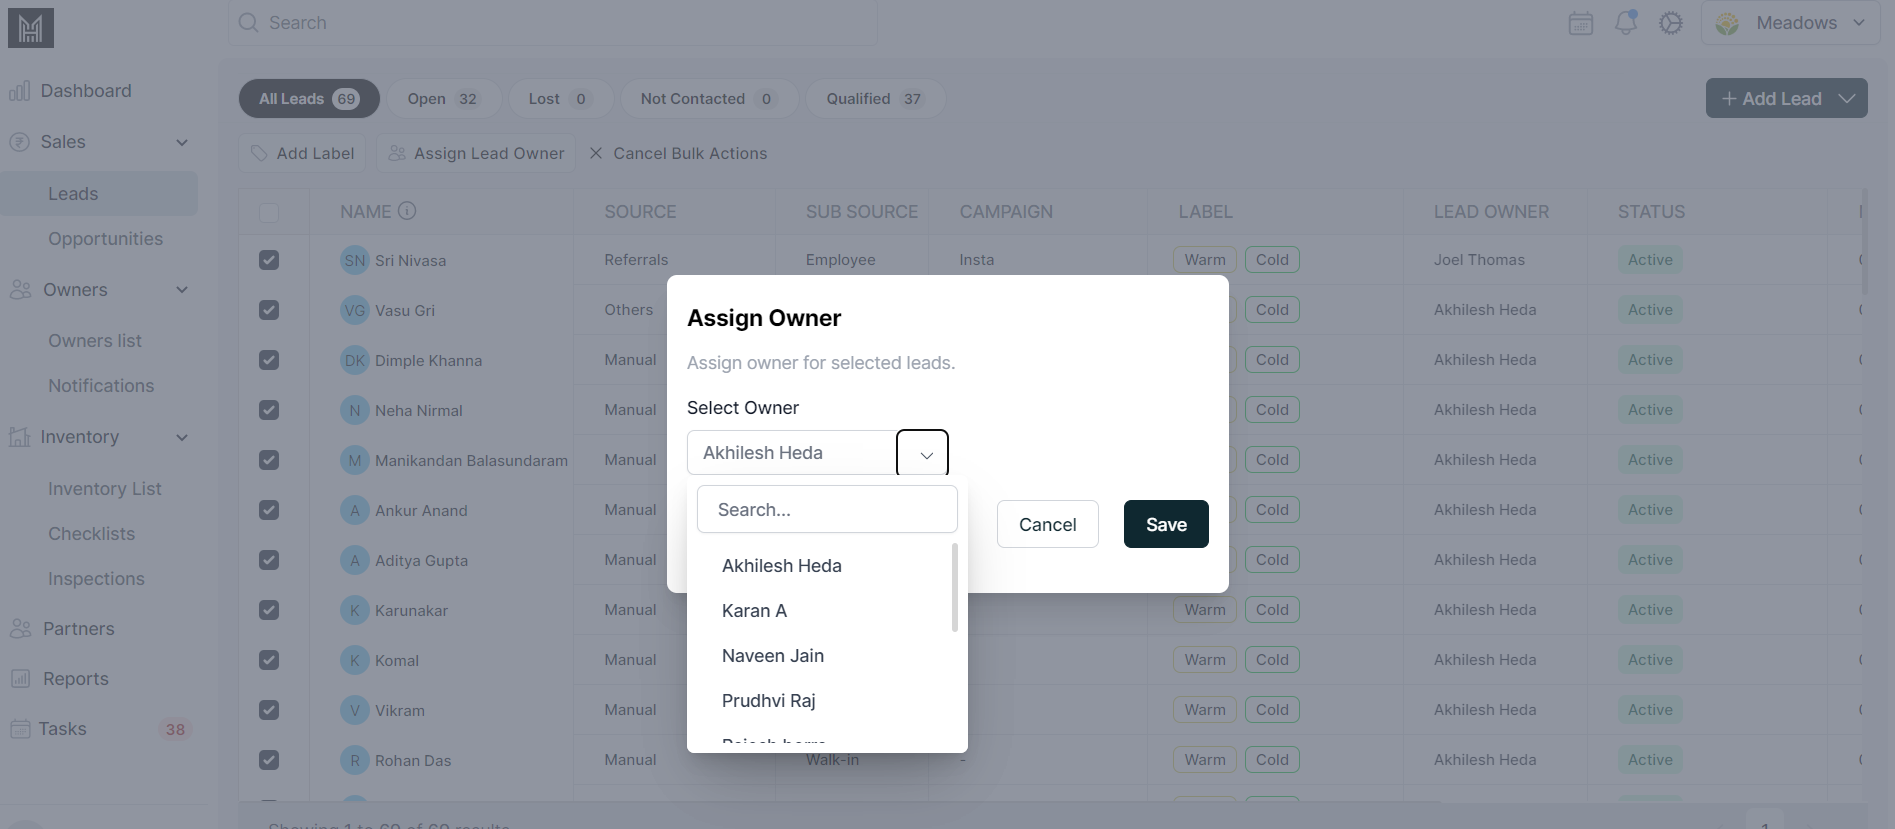
- Users can reassign lead ownership by selecting a different owner from the drop down in the "Lead Owner" or "Opportunity Owner" column.
- Hovering over the "Label" column displays all labels associated with an individual item. Users can also add labels from the table.

1.4 Lead/Opportunity Bulk Actions:
Users can bulk select leads or opportunities and perform actions such as adding labels and assigning owners.
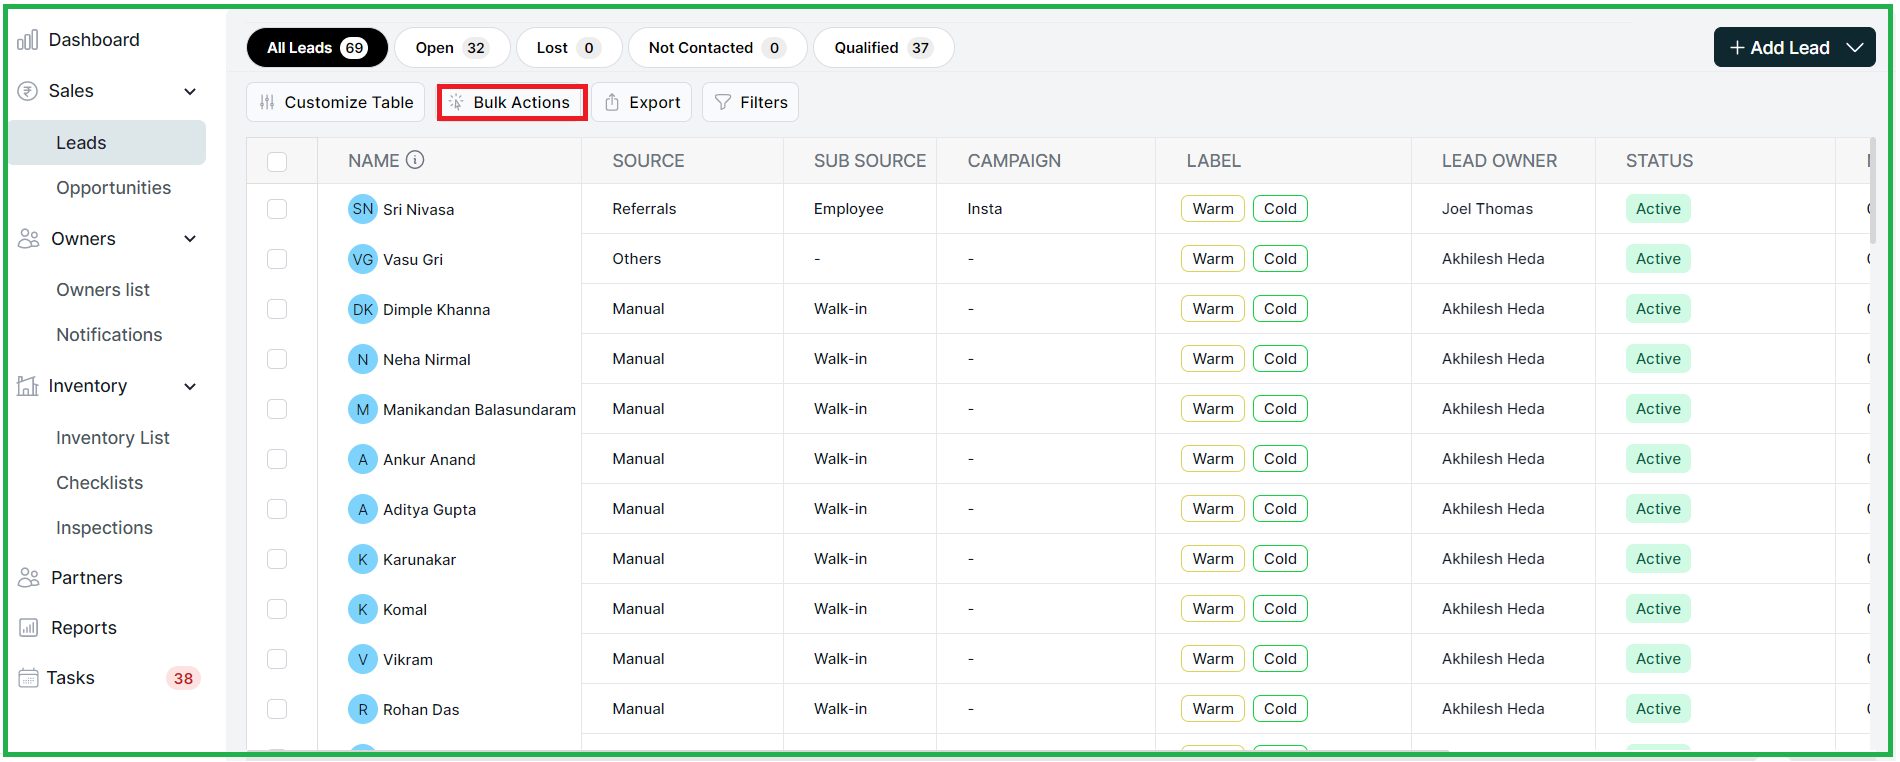
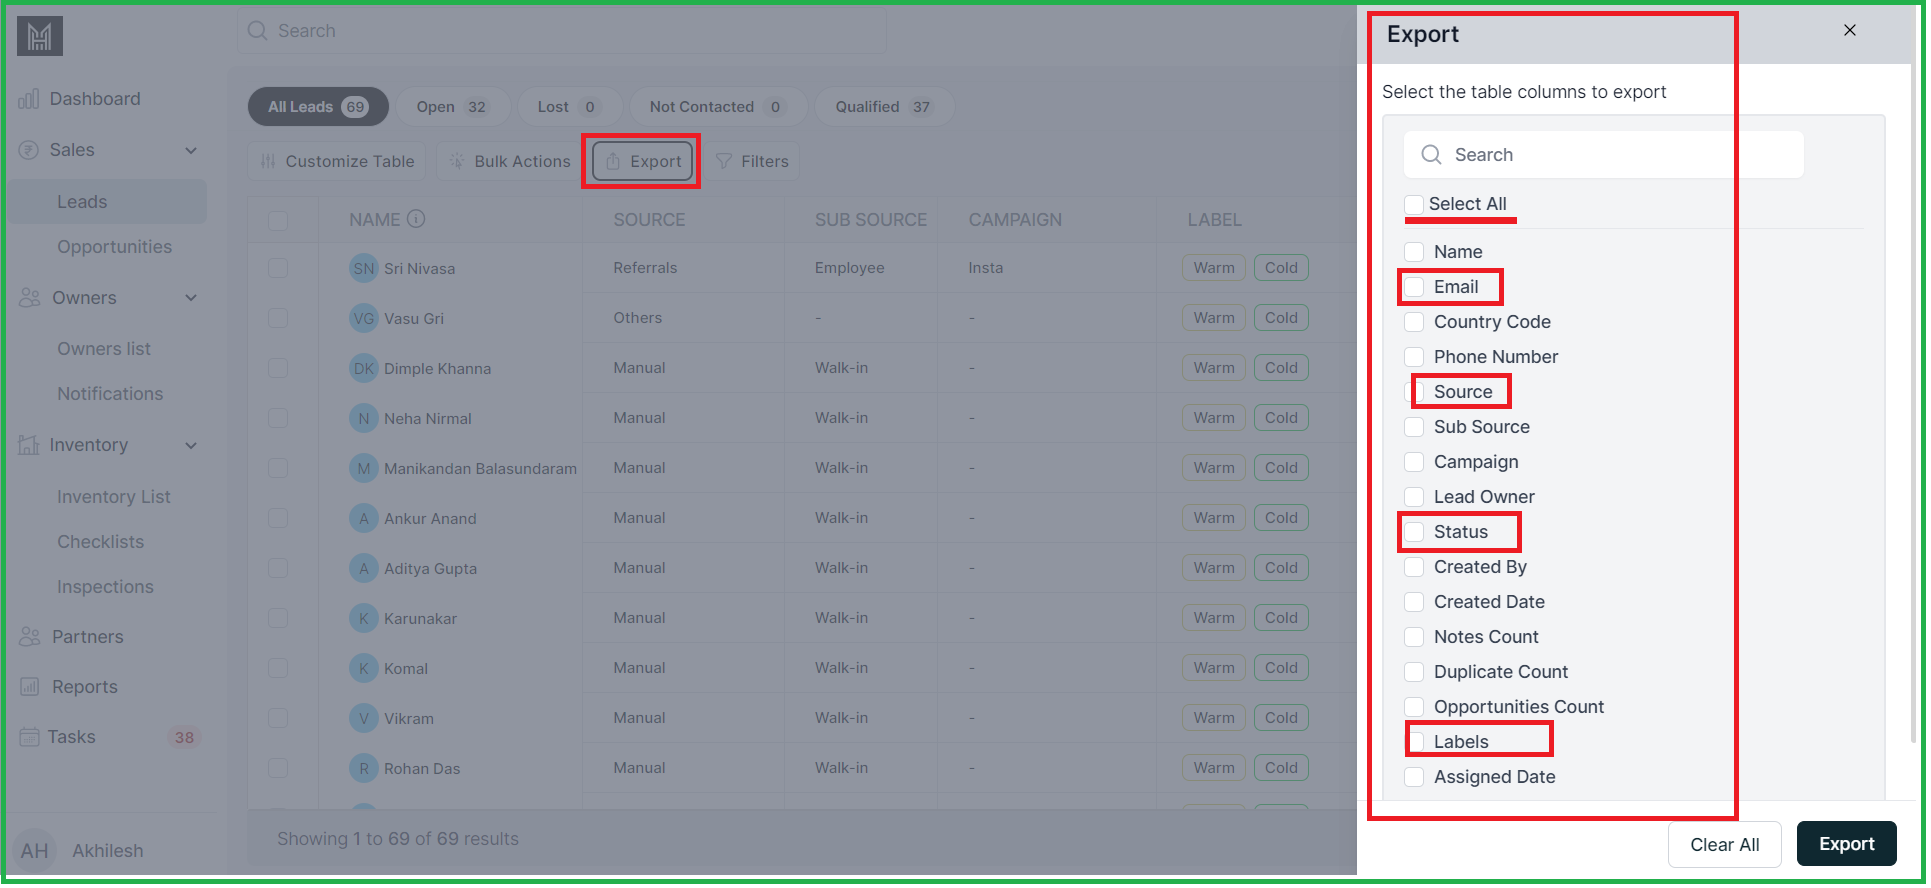
1.5 Lead/Opportunity Export:
Users can now export data from leads or opportunities into a CSV file and select the required fields to include in the exported sheet.
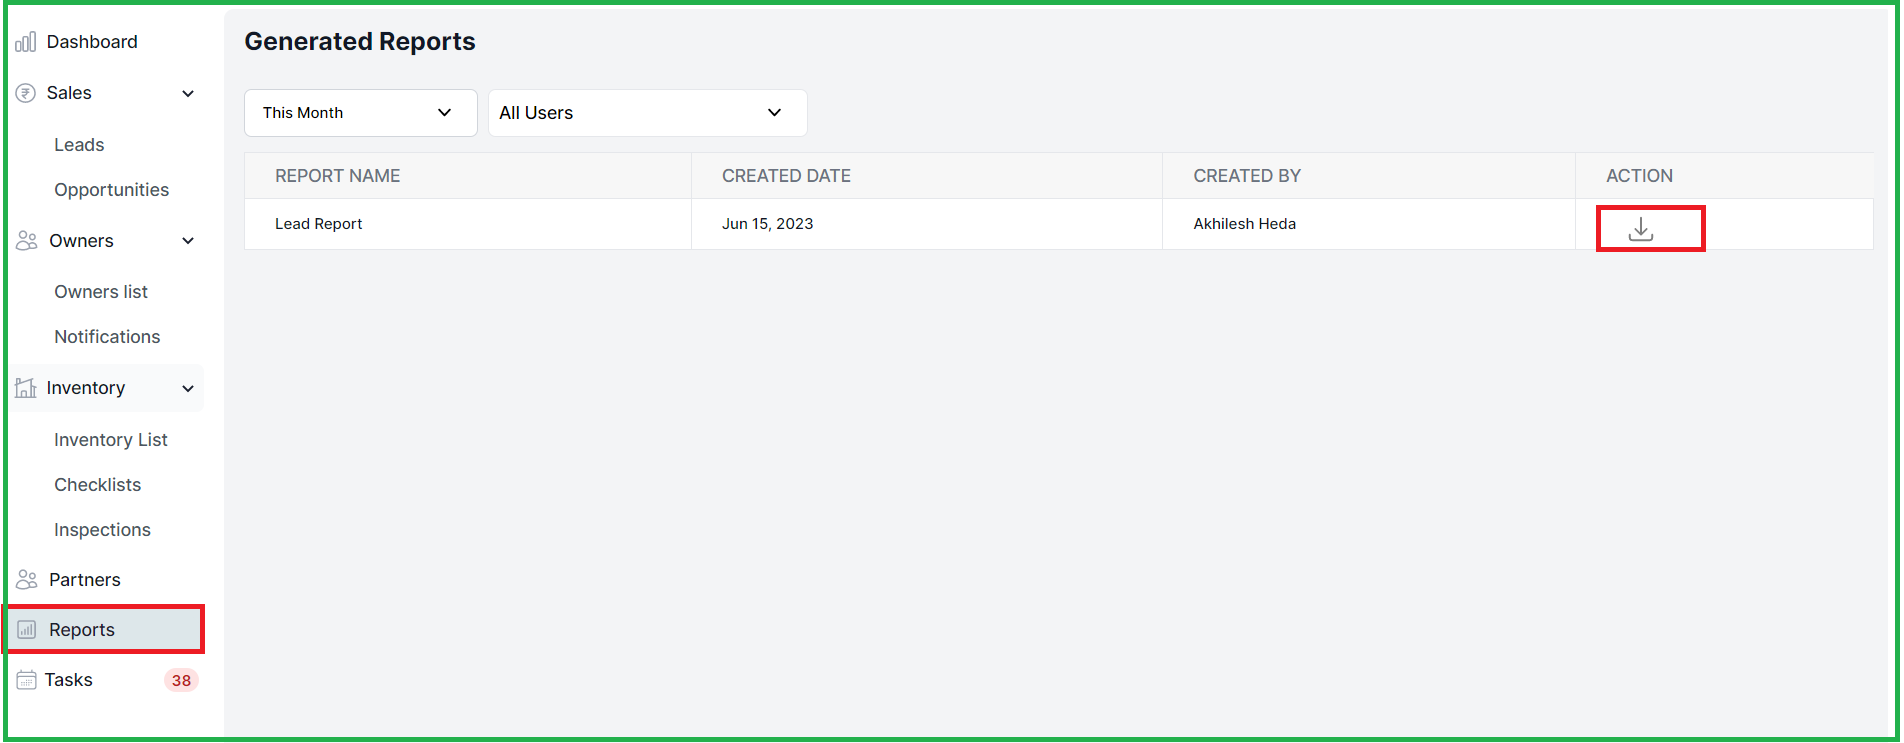
2. Reports Tab
Users can view and download generated reports that include information like report type, creation date, creator, and actions. Reports can be categorized as either Leads or Opportunities reports.
ENHANCEMENTS
1. New Access Rights
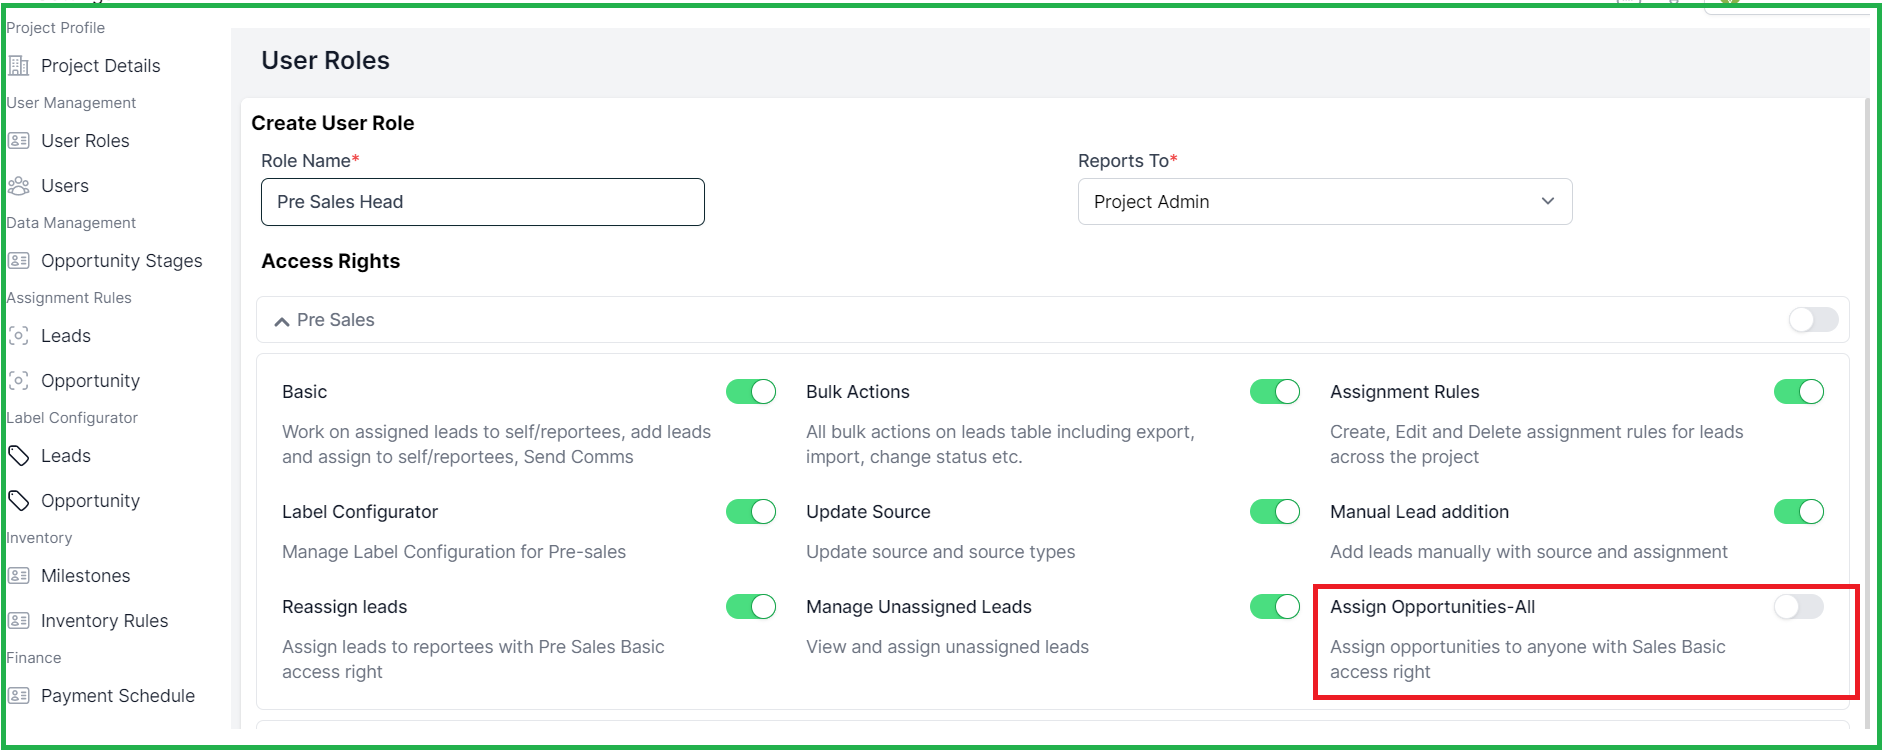
1.1 Pre-Sales access right called "Assign Opportunities - All" - This access right gives the pre-sales user access to assigning the lead being converted to opportunity to any member in the team. Earlier, the system only allowed opportunities to be assigned to reportees.
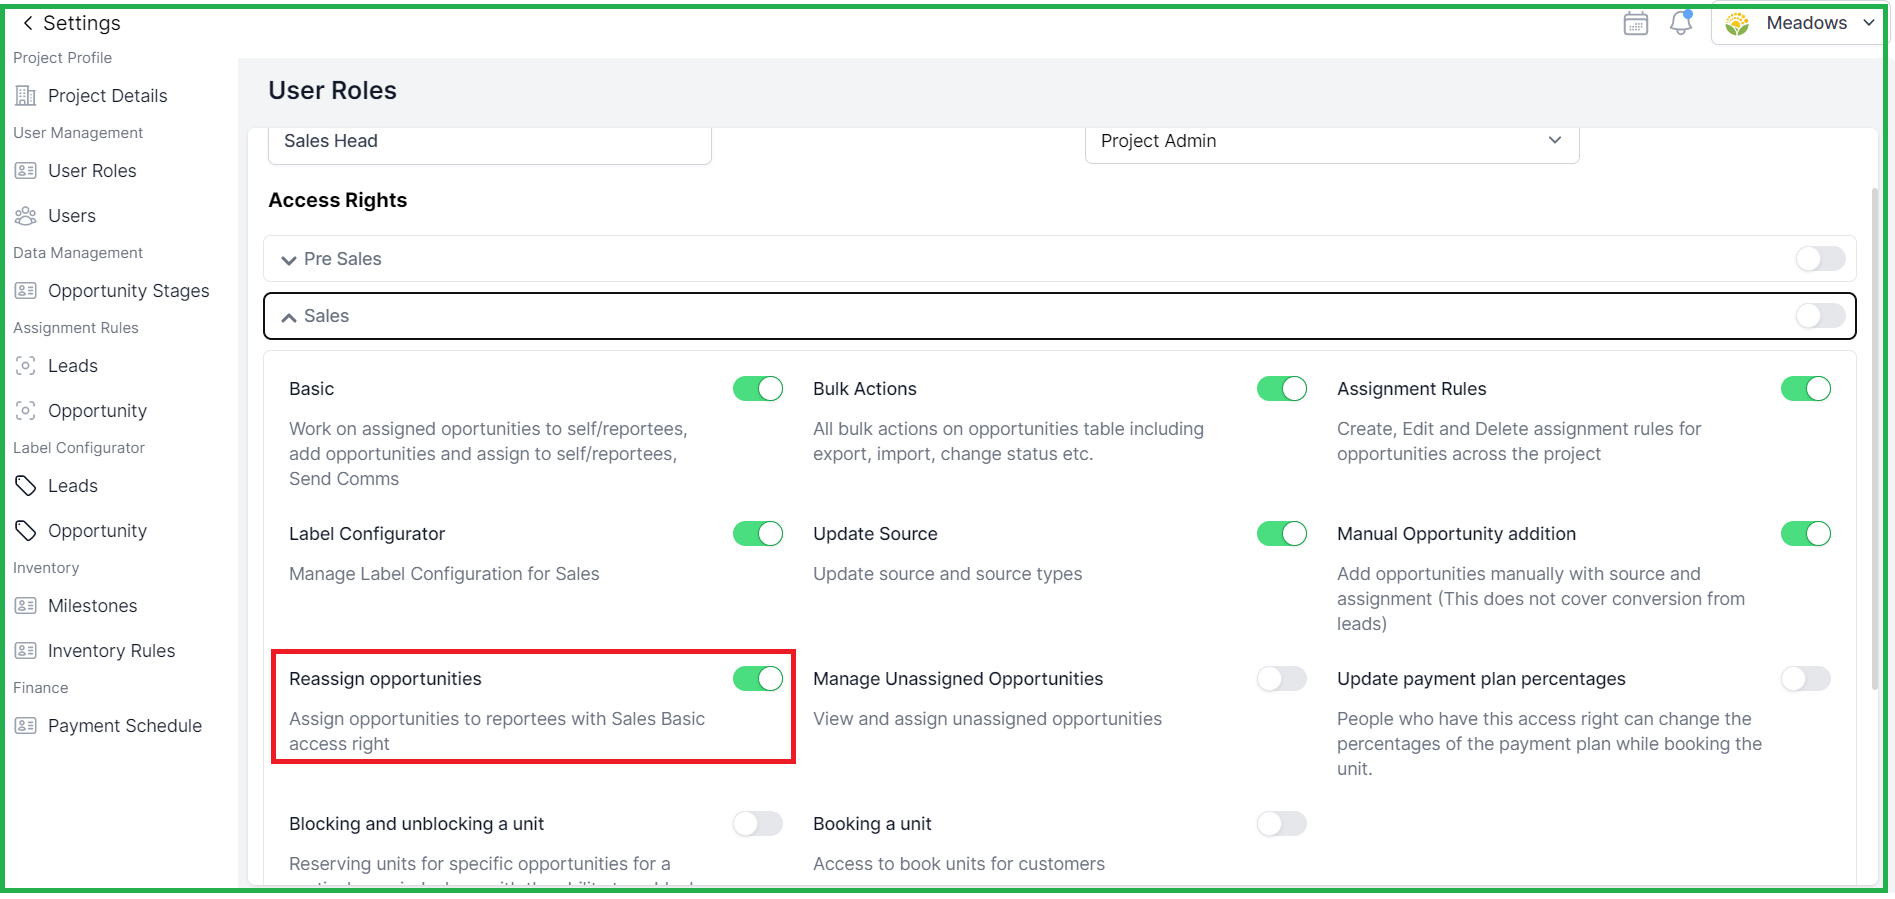
1.2 Sales access right named "Reassign Opportunities - This access right gives the user access to assigning the opportunity to any member in the team. Earlier, the system only allowed opportunities to be assigned to reportees.
2. Manual fetching of Insight
Now, users will have to manually fetch insight data for a lead. This was done to reduce junk pulls and make the fetching process faster.
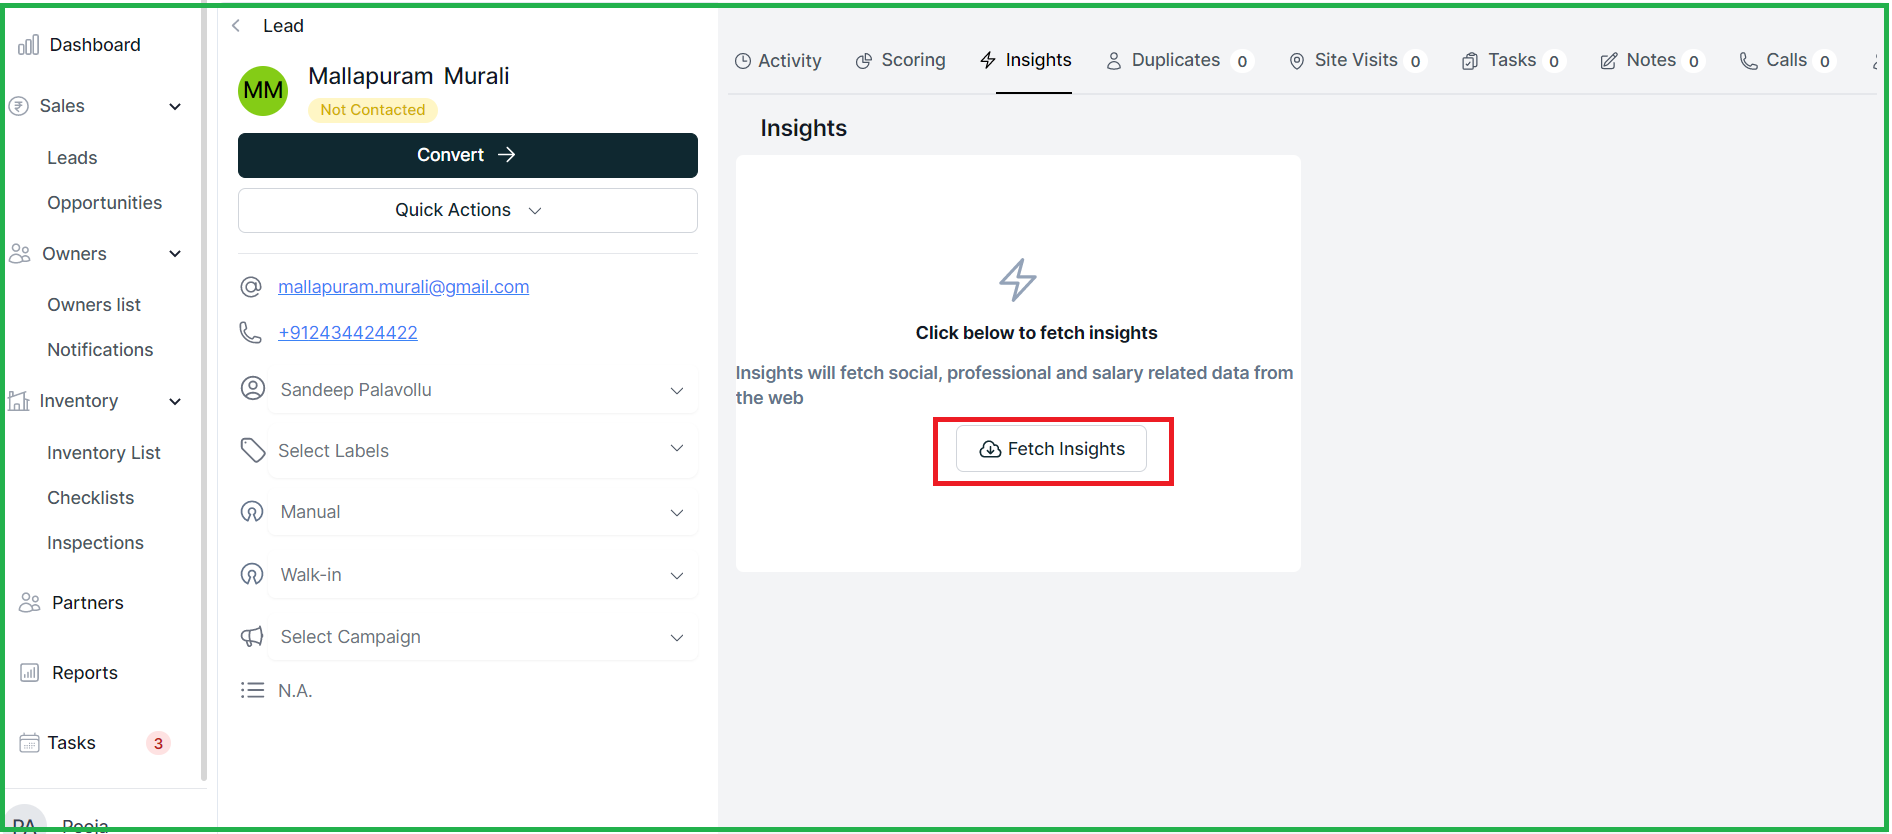
Once the details are fetched, the spark lights up.
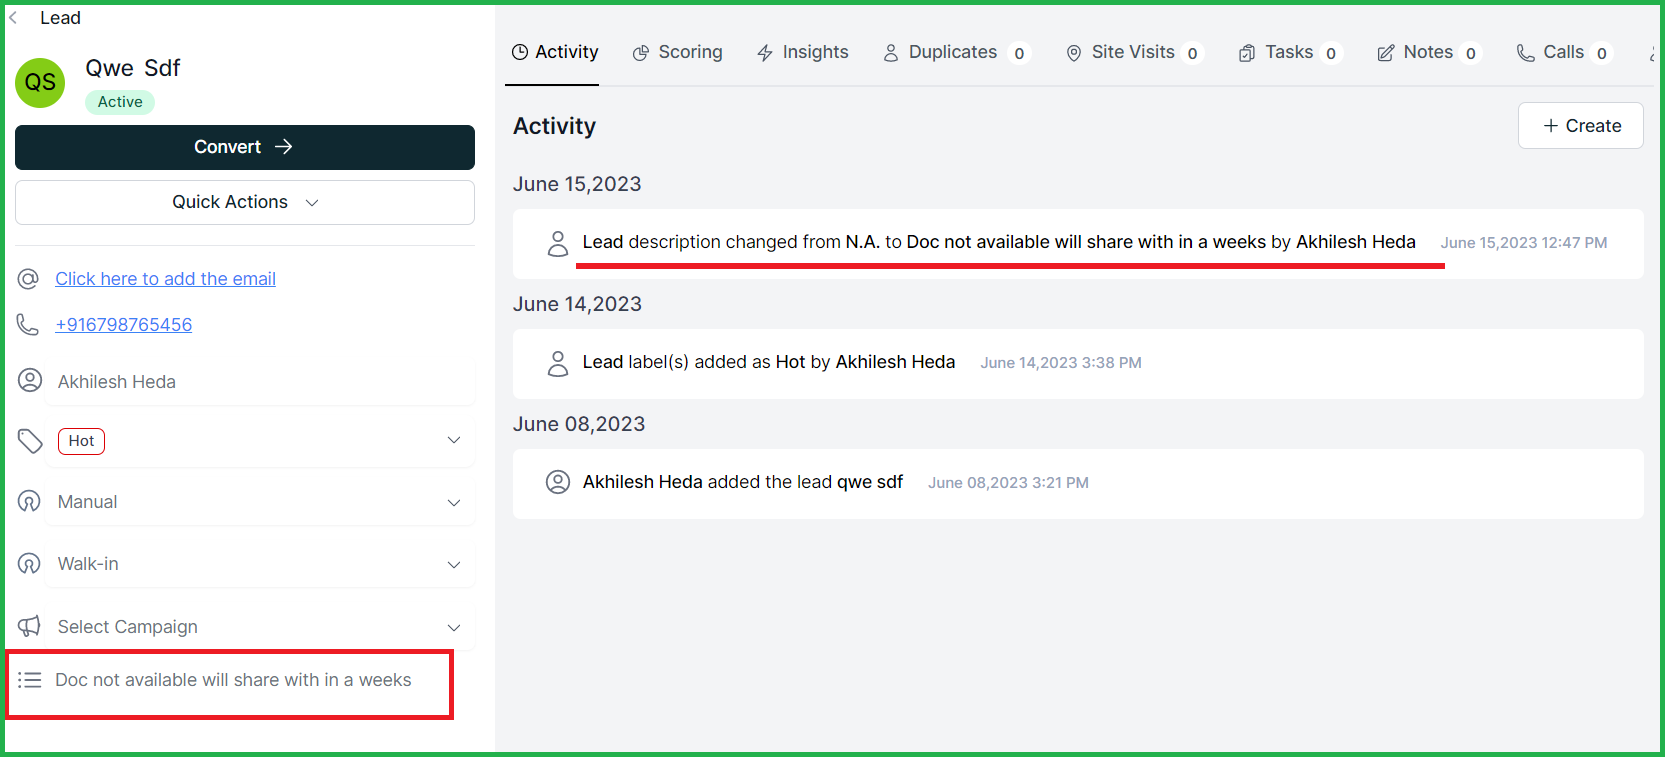
3. Description and Remark fields are added as notes
When you add a lead and include a description or when you convert a lead to opportunity and include a remarks, they are displayed as a note.
BUG FIXES
-
Fixed an issue where an error was shown when inviting users with email IDs starting with a capital letter.
- Notifications are sent as toaster messages for tasks or site visits scheduled within the next 15 minute
-
Fixed an issue where the last name of a lead couldn't be removed.
-
Bulk importing leads now provides a CSV file specifying reasons for failed imports.
-
"Manage Unassigned Opportunity" access right allows viewing of unassigned opportunities.
-
The "Created By" column for system-generated leads shows the sub-source instead of "NA". For Channel Partners, it displays the channel partner's name.
-
Opportunities count is displayed in the lead list view.
Date: 6th JUNE
Web Application
ENHANCEMENTS
-
Issue related to Global search on the lead which doesn't have first name and last name is fixed
- Scenario: When a Global search with a mobile number is done after the lead profile data is updated, the result shows "no data".
- Condition: Search performed after Lead Profile data is updated except for the mobile number
Date: 2nd JUNE
Web Application
NEW FEATURES
1.Lead/ Opportunity converting:
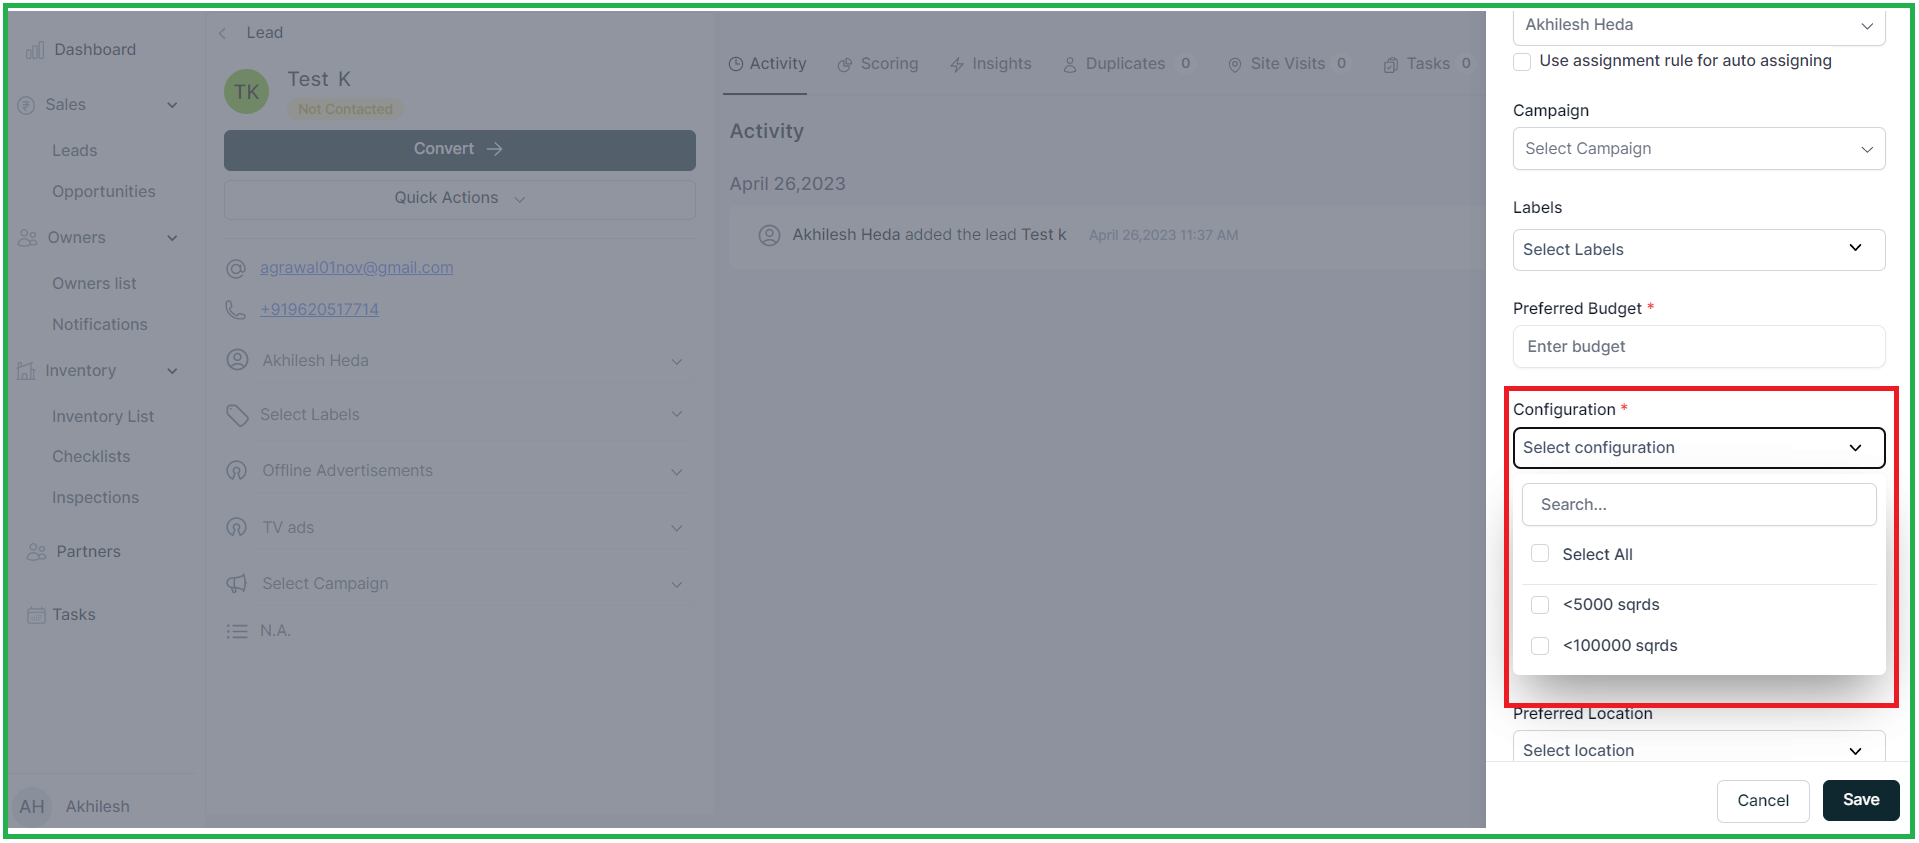
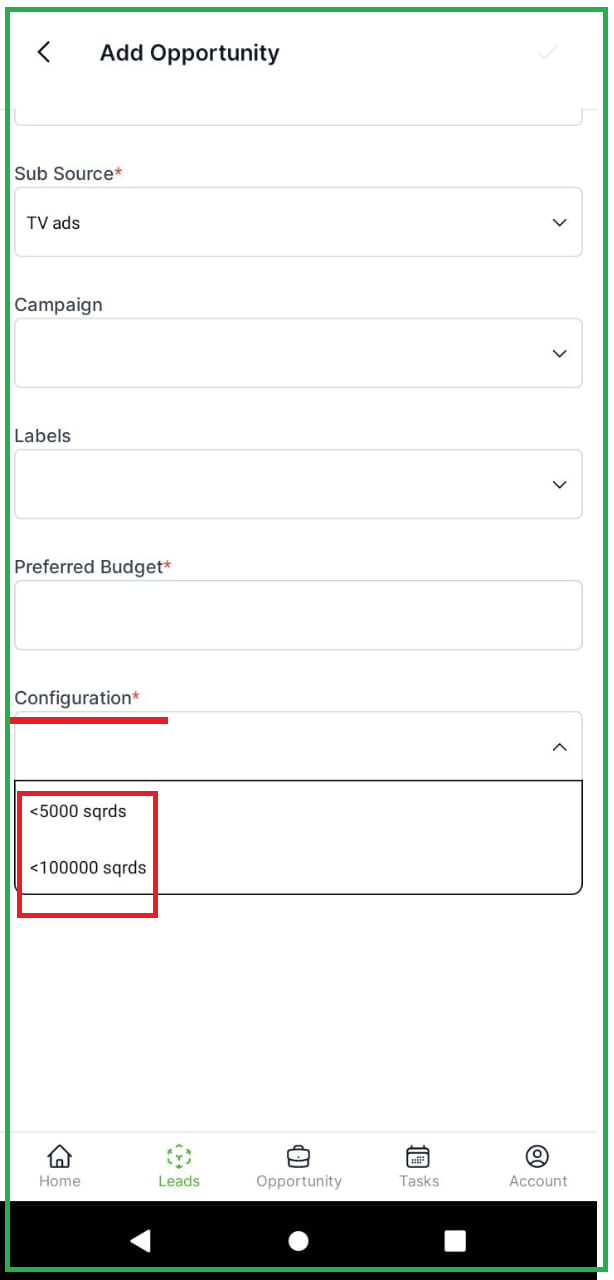
When adding or converting a plot to an opportunity, the configuration dropdown now displays the input values as square yards (sqrds), making it easier for users to select and understand the unit of measurement.
2. Task Updates
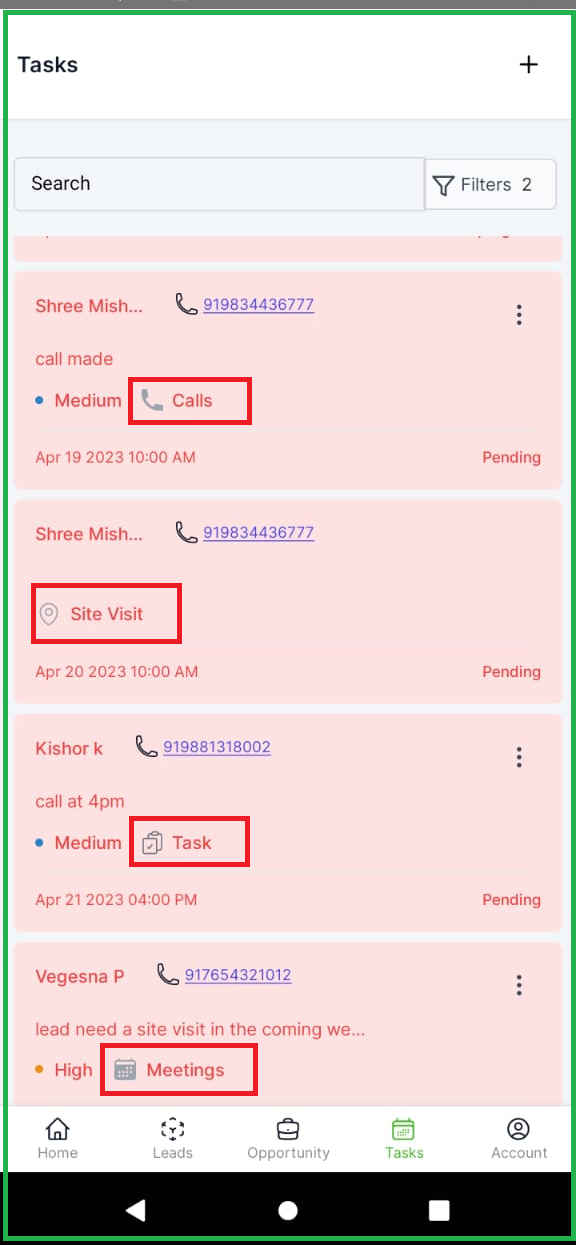
2.1 Icons specific to each task type have been implemented, improving visual representation and aiding in quick identification of task types.
2.2 A tick mark has been added to indicate completed tasks, allowing users to easily identify and track completed tasks
2.3 In the Tasks section, the "All" option is made as default in the filter.

ENHANCEMENTS
- When the existing lead enquires again, the toaster message will display with the message "Lead already exists and assigned to <Lead Owner Name>
- When you update the site visit the toaster message will now reflect the updates made to the site visit
MOBILE UPDATES [ Android & iOS]
- The redirection issue from home page cards to lists (Open leads and Open Opportunities) has been resolved, ensuring seamless navigation and access to the respective lists.
- The global search functionality now works with both first names and last names, providing users with more comprehensive search results and improved usability.
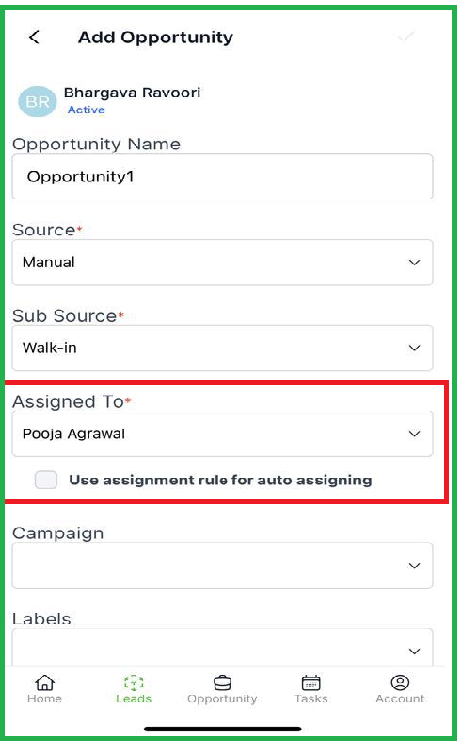
- When converting a lead to an opportunity, the "Assigned to" field is now automatically populated with the person converting the lead or follows the assignment rules if defined.
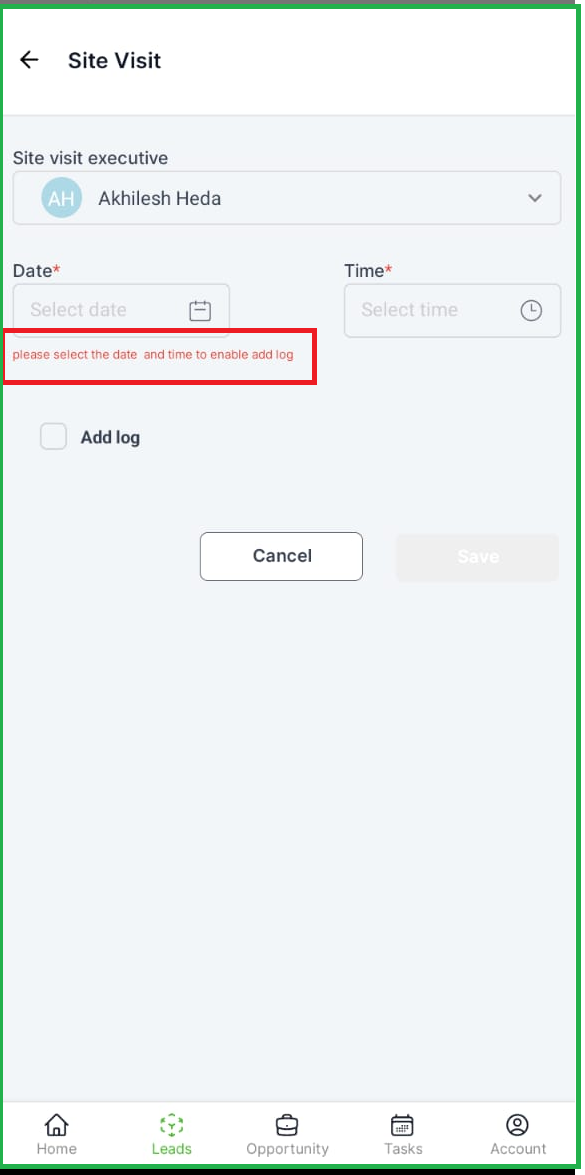
- In the Site Visit section, a validation message now appears when attempting to add logs without entering dates and times, reminding users to select the required information for successful log addition.
- Android & iOS App
Icons specific to each task type have been implemented, improving visual representation and aiding in quick identification of task types
- Android & iOS App
When adding or converting a plot to an opportunity, the configuration dropdown now displays the input values as square yards (sqrds), making it easier for users to select and understand the unit of measurement.
Date: 30th MAY
NEW FEATURES
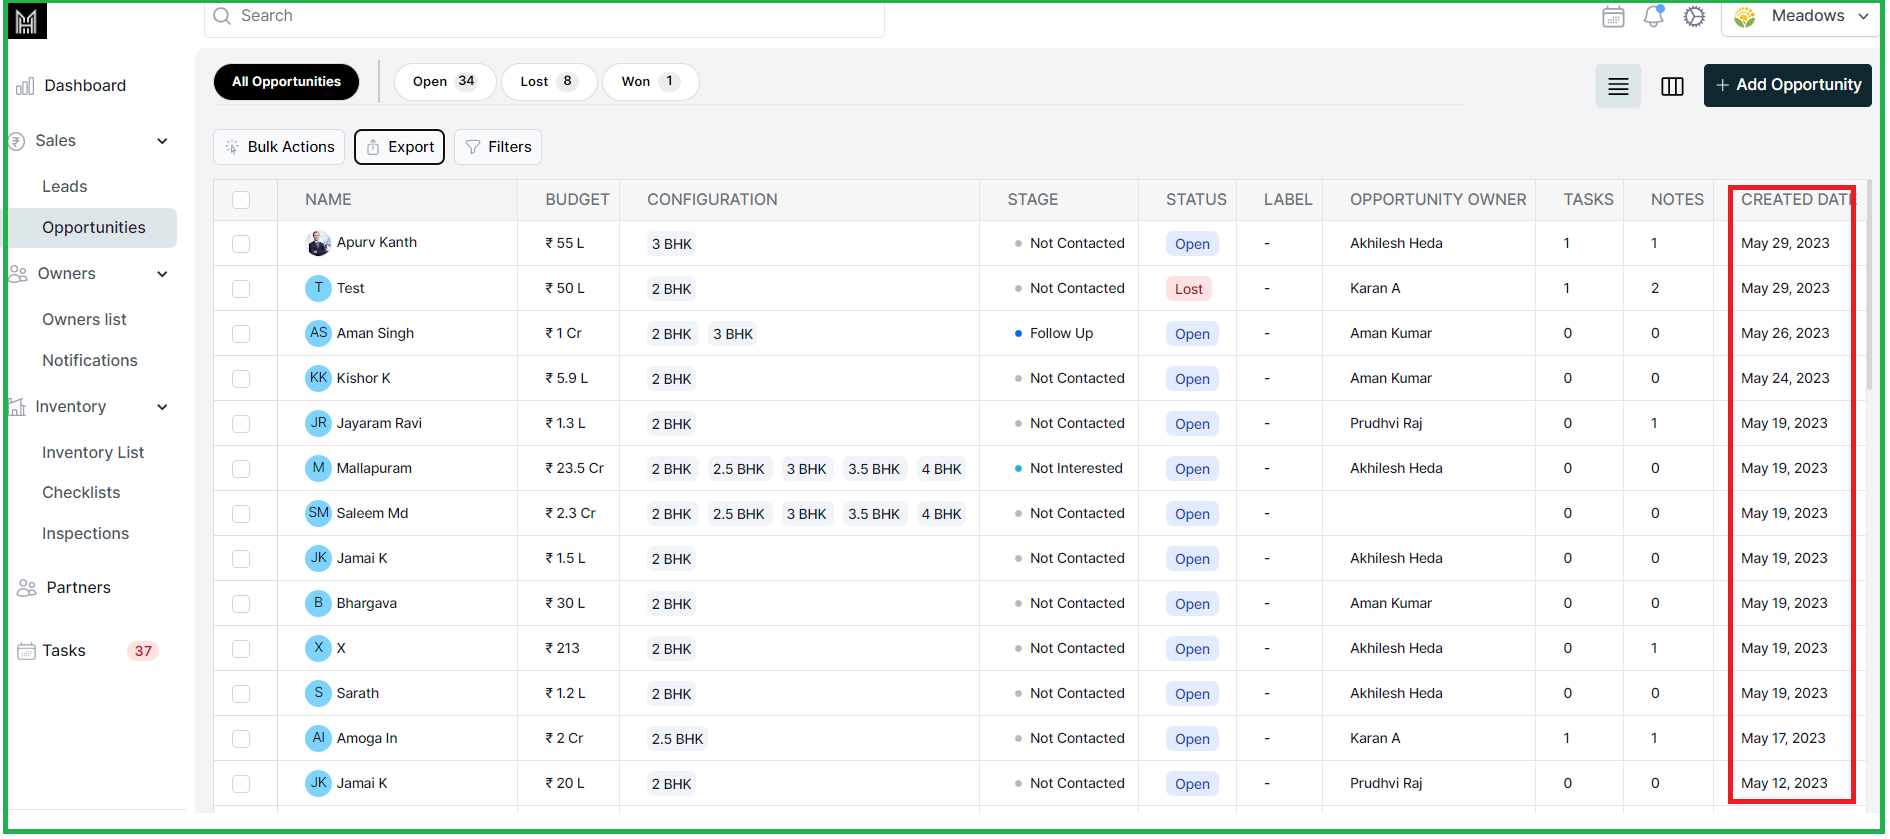
- The "Created Date" column is added in the exported excel from the Opportunity side
Date: 26th MAY
Web Application
NEW FEATURE
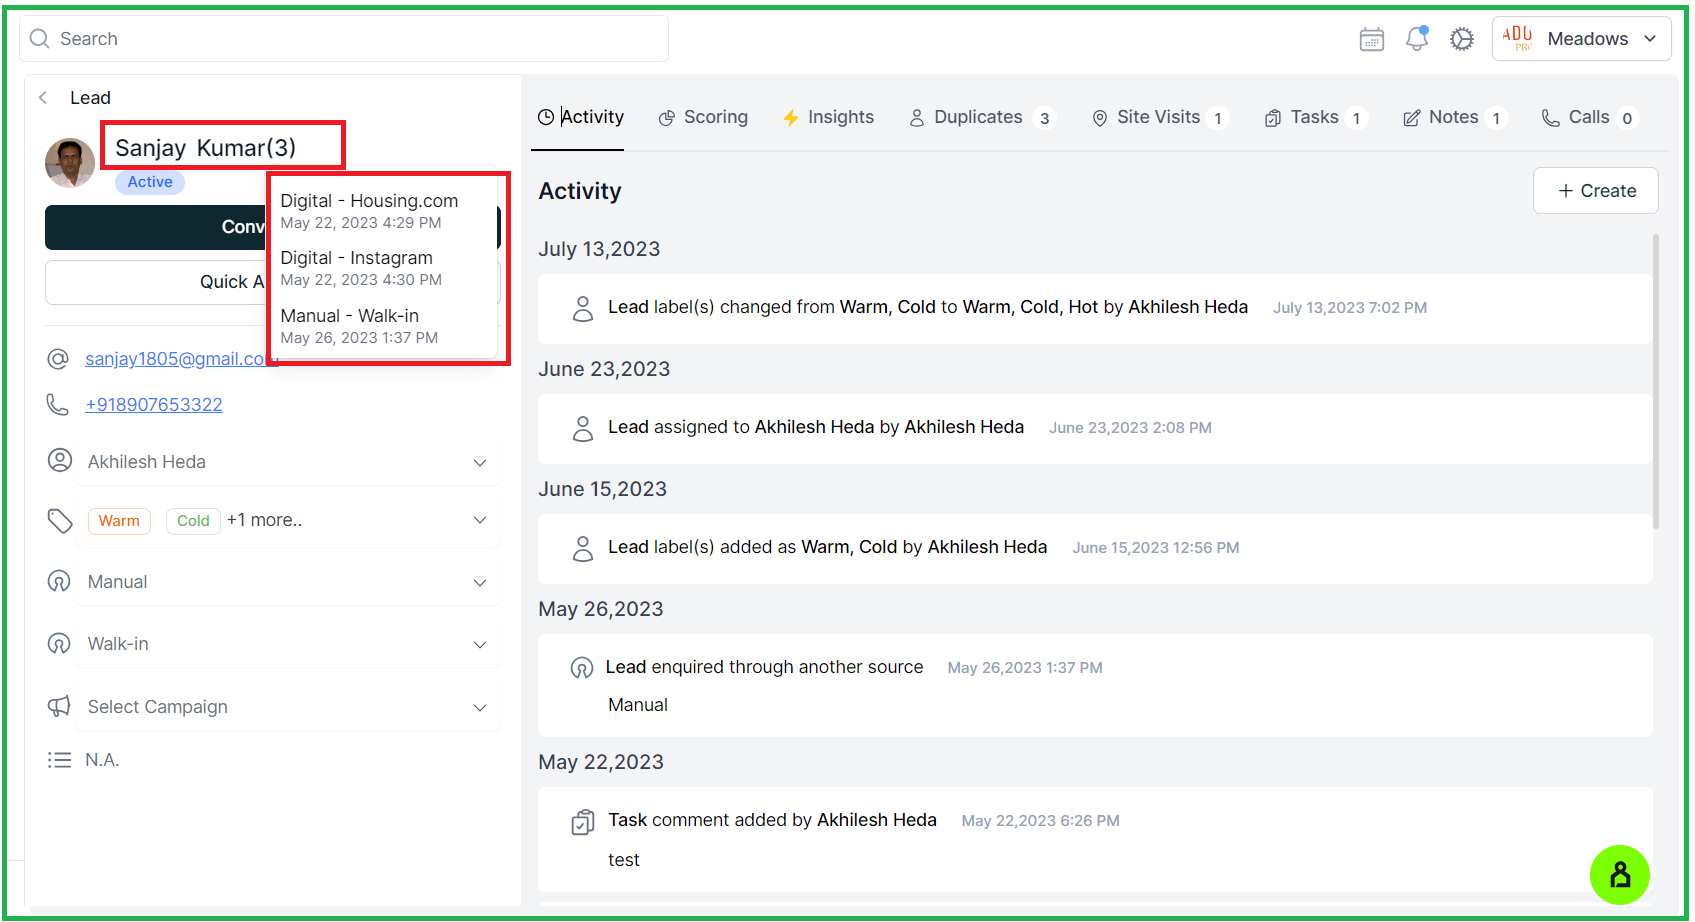
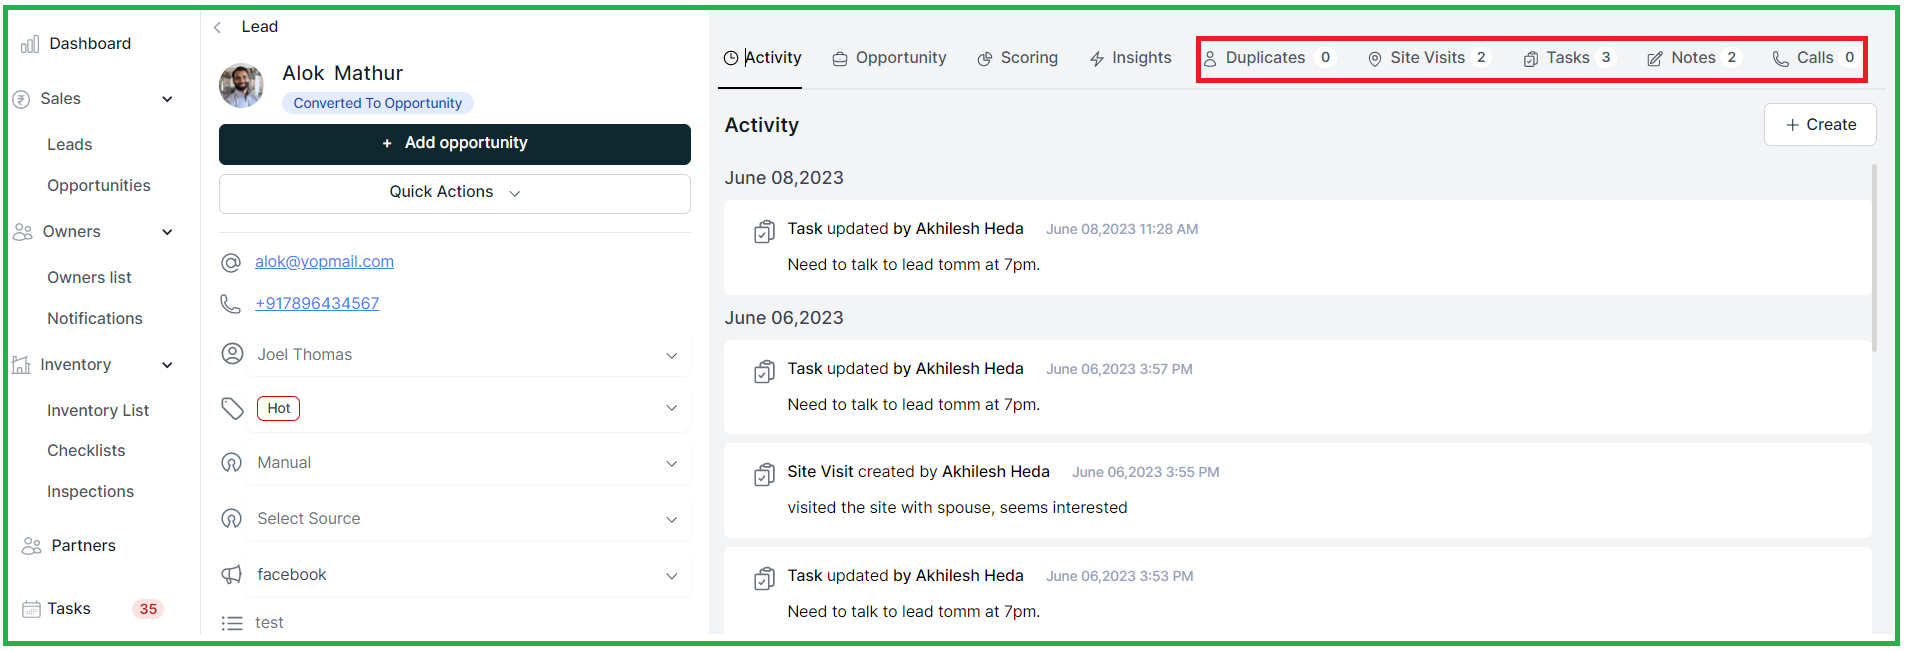
1. Enhanced Lead/Opportunity profile tabs: The lead and opportunity profile tabs now show counts or icons for tasks, site visits, notes, calls, and documents, where applicable.
Overall, these enhancements make it easier for you to see the status and activity associated with each lead/opportunity. You can quickly check the number of tasks, site visits, notes, calls, and documents, which helps you stay organized and informed about the progress and details of your leads/opportunities.
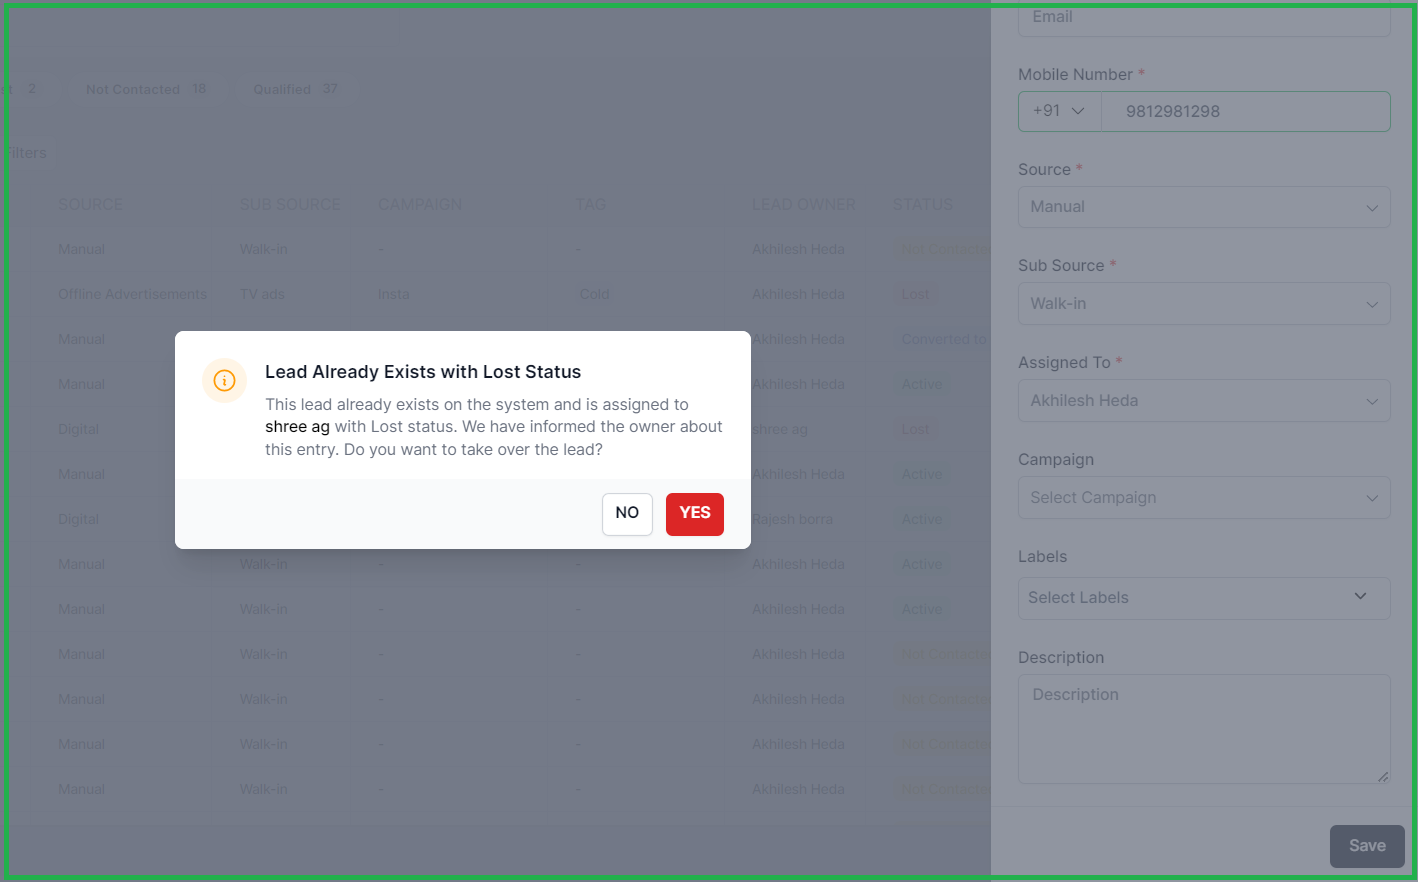
2. Alert for "Lost" leads: If a new lead is created and it is already marked as "Lost," an alert is triggered to assign ownership to the lead.
If we create a new lead, and it's already marked as "Lost" in our system, we will automatically notify you. This alert serves as a reminder to assign ownership to the lead and take appropriate action. It ensures that no lost leads are overlooked and allows you to promptly handle them according to your lead management process.
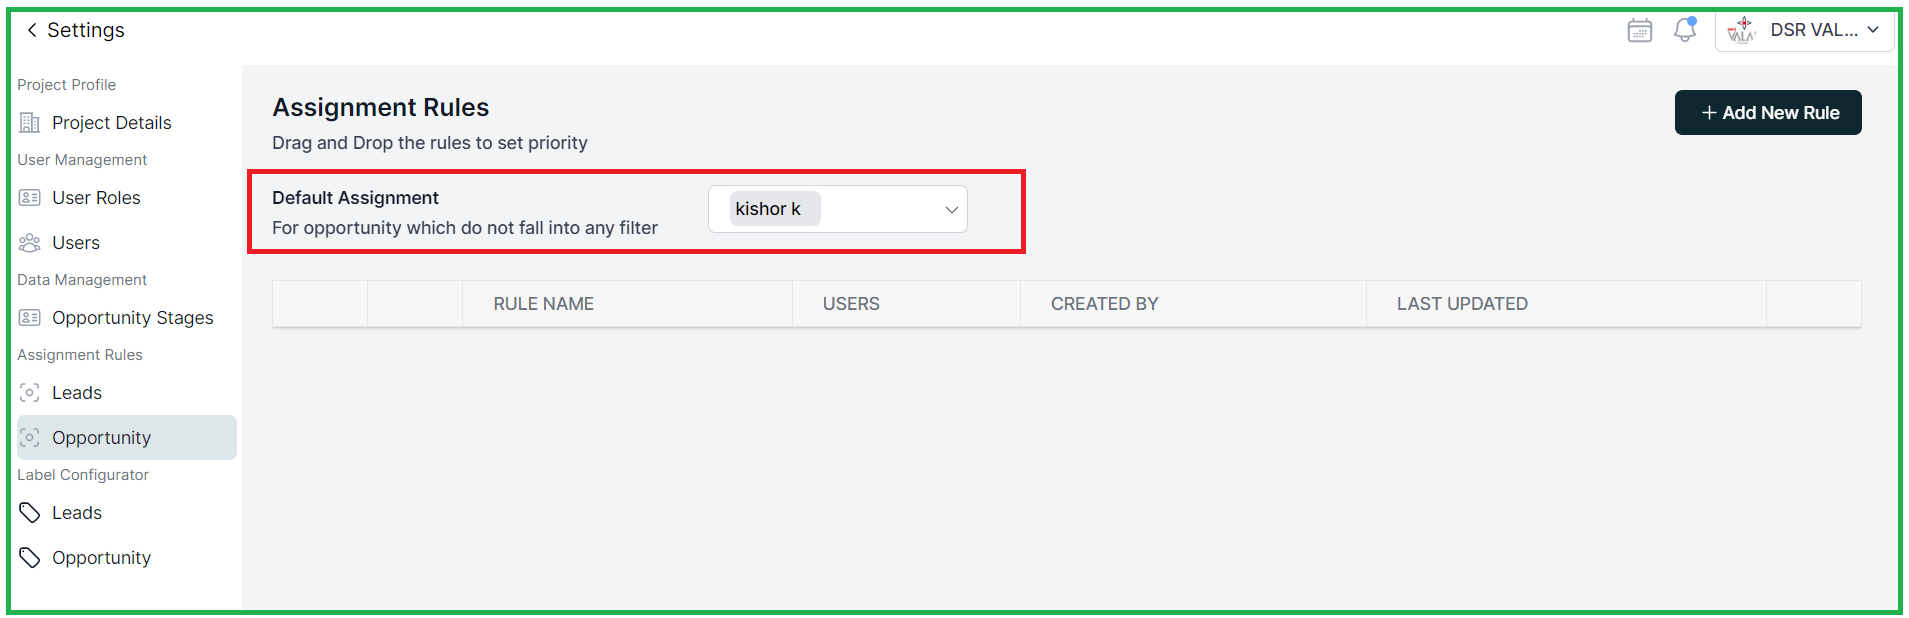
3. Default assignment Rule and Users list: The default assignment rule is now included along with the Users list.
With the recent update, we have made the default assignment rule if their is no rule set in the system you will be able to see the default assignment rule alongside the list of users
3.1 If their is no assignment rule set then the in the opportunities default assignment is done to the sales head.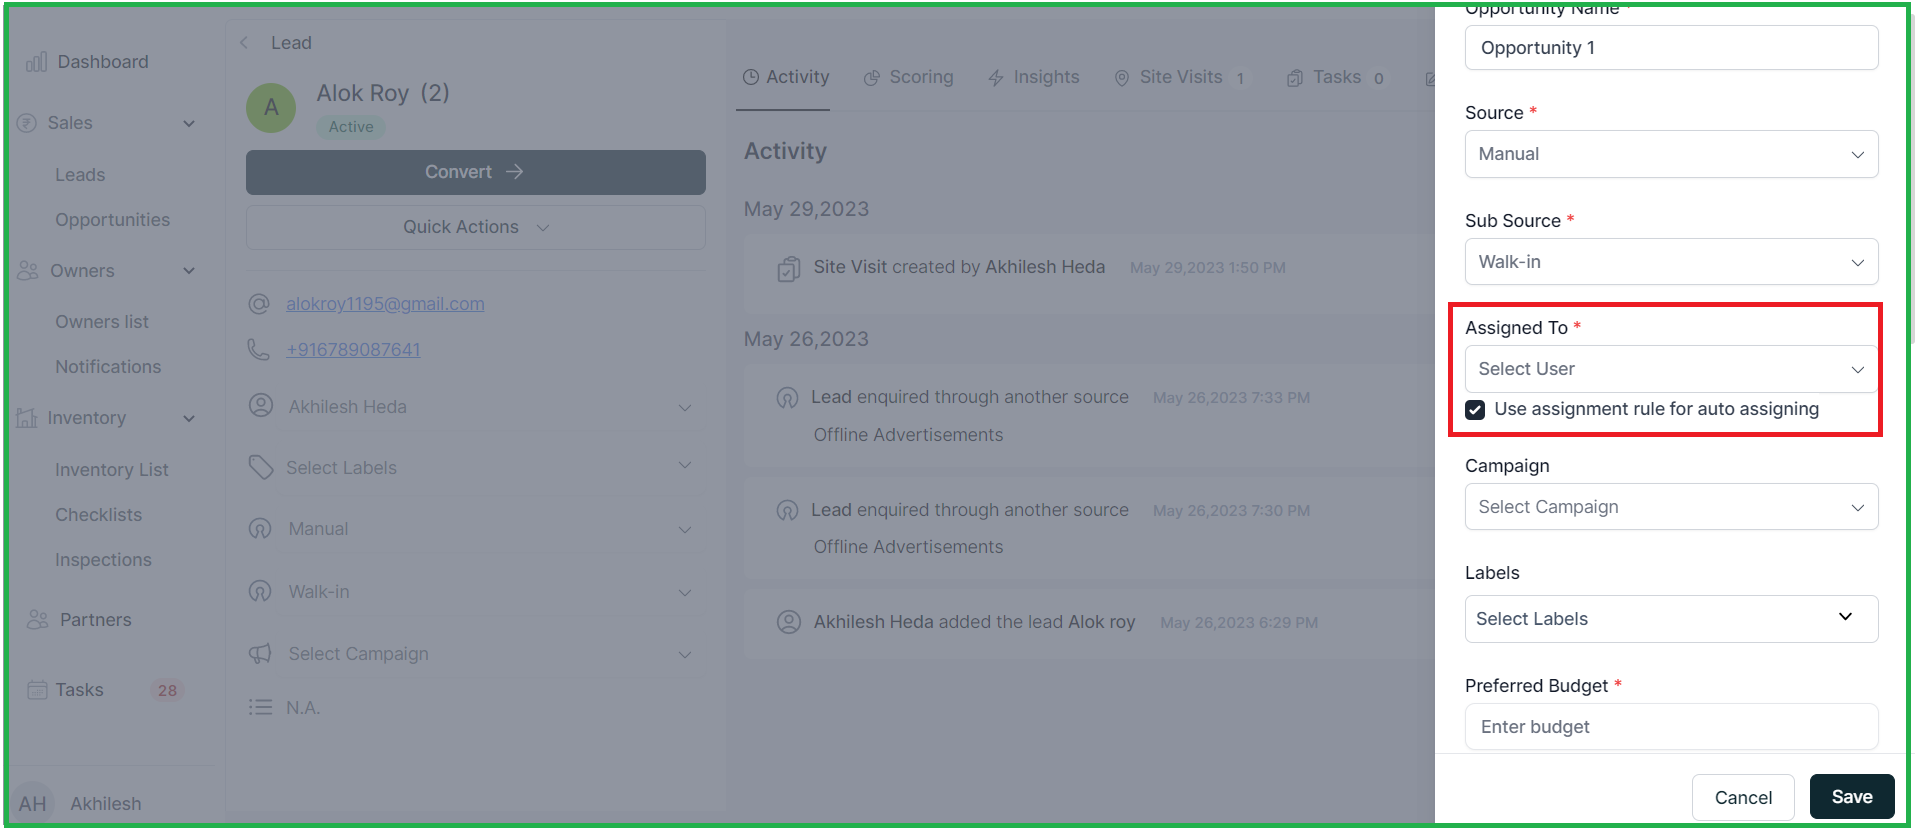
4. In the opportunities table a new column called "OPPORTUNITY OWNER" has been added. This column displays the name of the person who is responsible for managing or owning that particular opportunity.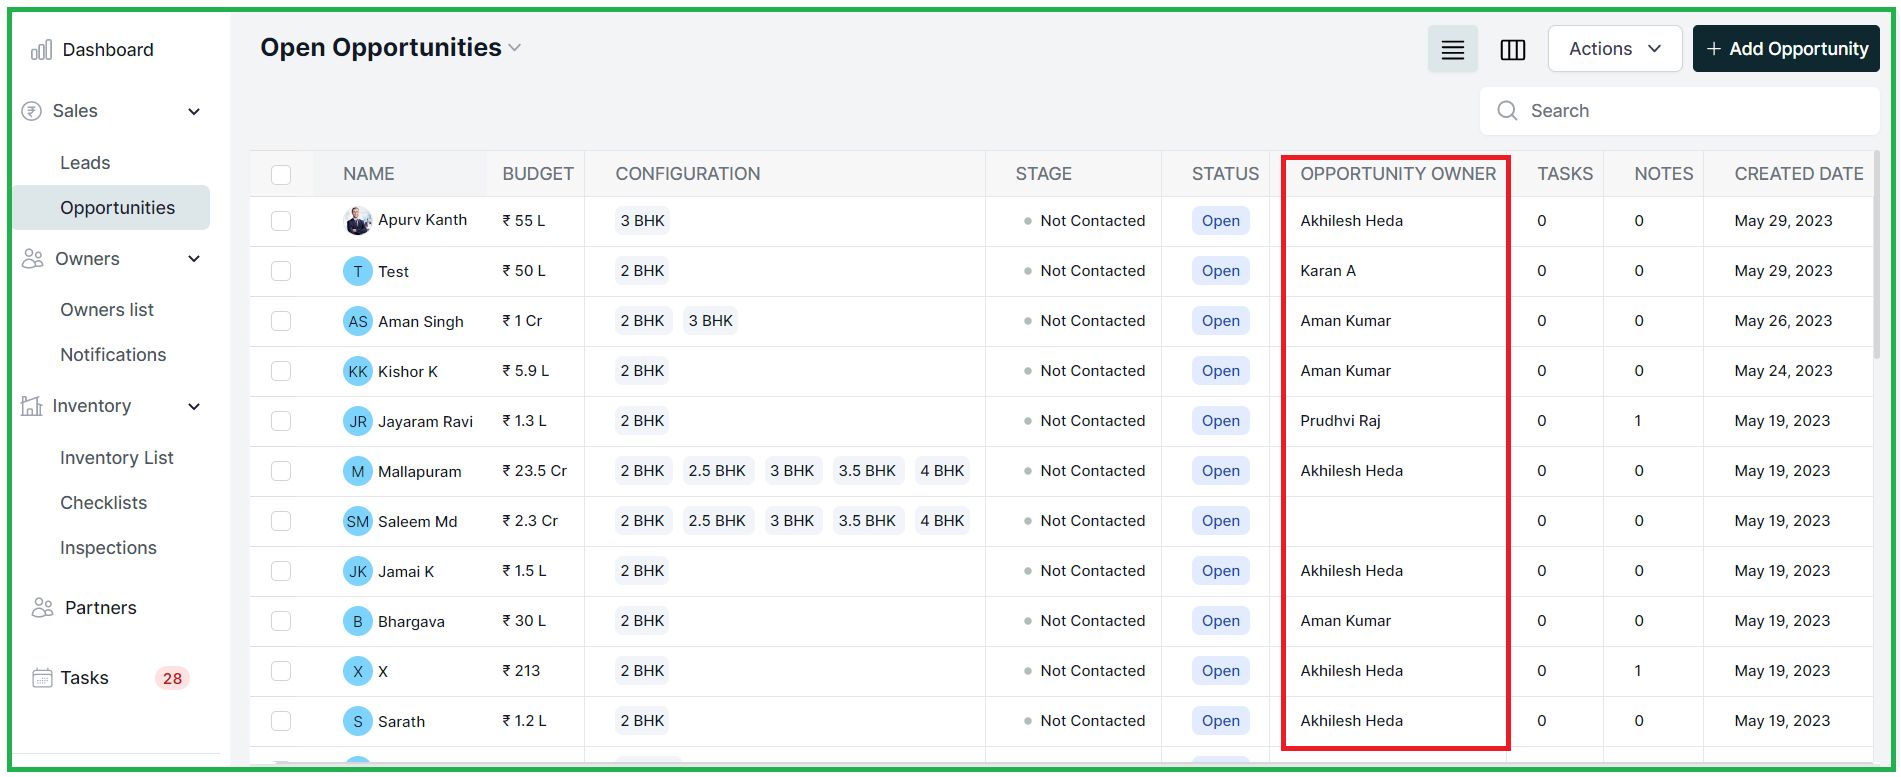
ENHANCEMENTS
- In the leads list, clicking the back arrow from a lead's profile page, the leads list will remember previous position and scroll back to it.
- You now have the option to apply filters based on the status of leads or opportunities. This allows you to easily sort and view specific types of leads or opportunities based on their current status.
- You can now filter leads or opportunities based on whether a site visit is required or not. This helps you quickly identify and manage leads or opportunities that involve site visits.
- When the bulk export at the opportunity is done, the exported Excel will have mobile number & email sections.
- Both the Lead and Opportunity levels now include a duplicate tab, offering users a convenient way to manage and track duplicate entries, just as in previous releases.
Date: 23rd MAY
Mobile Updates
iOS App:
- The "All" checkbox in the Task section has been fixed and now functions correctly.
- Alignment on the home page has been improved and looks more organized.
- Filters in the Task section have been enhanced. By default, the filters for Pending and In-Progress tasks are now selected for easier task management.
- You can now conveniently record the reason for losing a lead in the notes section.
Android:
- The lead counts now accurately reflect the actual lead records, and the counts for not contacted and tasks on the home page are now correct.
- Dates are correctly displayed for completed tasks and overdue tasks, providing better task tracking.
- Unnecessary options for blocked tasks and in-progress tasks have been removed from the filters, streamlining the filtering process.
- The search functionality in the leads and opportunities sections has been improved, allowing for more efficient searching.
- Creating site visits with past dates has been fixed, ensuring that only valid and future dates can be selected.
- Alignment issues throughout the app have been addressed and resolved, resulting in a more visually pleasing and user-friendly interface.